The dynamically developing Haex LLC since 1998 has launched into production ...
|
|
One of the most difficult stages of repair is rightfully considered to be filled with screed. Really... |
Hidden wiring allows you to aesthetically place a network of wires along the area of \u200b\u200bthe room .... |
Hot roof. Device, nodes and strengthening of a hip roof
The most important element of the house, which affects the entire building, is the roof. Its design is selected, given the weather conditions in your area and materials, which are used in construction. And, of course, the appearance of the roof is of great importance. Among all the designs, the fellar roof deserves most of all.
Content:
Features and design of the hip roof
The hip roof is especially popular, since it has high strength characteristics, durability and original appearance. It is also worth noting its extraordinary configuration. The hip roof will be a great choice when arranging a living attic floor, as it allows us to simplify the procedure for creating attic windows.
In addition, the hip roof has a streamlined shape. And thanks to this, it is not so much subjected to destruction from wind loads, like other structures. The roof horse, in turn, is not undermined by gusts of wind. And this property should be paid attention to if you live in southern areas with strong winds.
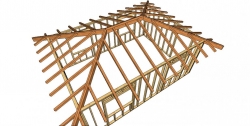
The hollow roof is represented by four slopes. They are tilted from all sides of the building. Two slopes are lateral, like the classic roof design. Two more, additional, are located between the two previous ones. In the hollow roof, unlike the tent variety, there is more than one peak, but two. They are interconnected by a skate.
Vertical pediments are of the form of inclined triangular slopes. They are called valves. It turns out that two slopes in such a design take the form of a trapezoid - on the long sides. And along the end of the triangular shape.

The design of the hip roof consists of such nodal elements:
- Skate beam. It is this element that is the top of the roof and its main carrier axis. All faces are also connected in this place. Most often, when erecting a hip roof, the center of the skate coincides with the center of the entire roofing.
- Corner rafters. Raising legs of a bit type are basic power elements and connect the ridge beam and buildings of the building. To cut them, boards are used, the thickness of which is equal to the thickness of the ridge. The rafter leg is attached to the skate at one end, and the second - goes beyond the boundaries of the house. You will need four pieces, depending on the project.
- Short rafters. They can be different in length, but come out at one angle. When determining their number, the area of \u200b\u200bthe roof is taken into account. Short rafters are connected by one end with corner rafter legs. And to others they rest on the Mauerlat or corner of the building, they are not attached to the ridge.
- Private frame. The central intermediate rafters are installed at the ends of the ridge beam and are displayed on the supporting walls of the building. Their number is six, on each side three.
- Intermediate frame. Intermediate rafters begin on the skate, and the second side rests on Mauerlat. They are not installed on the rollers.
Varieties of holly roofs
Before the installation of a holly roof, you should figure out what they are. If the design with a roller breaks above the level of lateral slopes, then the roof is called Dutch. Also, sometimes you can find the name Danish roof. This design is more difficult to build than a classic holm. However, old houses with a similar roof for decades, and sometimes much longer, are without changes.
There are still tent hip roofs, the slopes of which take the same shape. There are simply no lateral slopes. The rollers form the same angle. The tent roofs are equipped exclusively for square houses.

You can also find various unusual broken variations of the hip roof. The design consists of slopes that have a different size and diverge at different angles. Complex broken hip roofs are rarely found, but the species have the most spectacular.
DIY
The device of the hip roof should begin with the design of this design. If you correctly develop a scheme, then it will be able to assemble it yourself without involving additional workers.
The angle of inclination of the roof
The optimal angle of inclination of the roof should be determined depending on climatic conditions in the region:
- The slope in the chicken area should be as less as possible. So you can protect yourself from large loads on the external walls.
- Roof tilt for regions where heavy snowfalls occur should be increased. So from the roof it will quickly go snow.
- In the area where dry and hot weather prevails, the slope should be made minimally possible. To forget about overheating forever, choose this indicator at 2-5.

The angle of inclination is also recommended to choose, depending on the roof material:
- When using set material in pieces, for example, slate, create a roof at a minimum angle - 22.
- For a hollow roof from rolled material, the angle of inclination will depend on the number of layers. If you plan to lay two layers, then the angle should be up to 15. If you lay 3 layers, then make an angle from 2 to 5.
- When installing a roof from corrugated board, build a roof under a minimum slope, provided that it is airtight joints from 12.
- If you decide to lay a metal tile, make a minimum slope of 14.
- For soft tiles, limit yourself to a slope of the hip roof at 11.
- When covering the roof by ondulin, the angle reaches 6.
- If you have chosen a membrane roof, then remember that it is suitable for roofs that have any slope.
In addition, the slope of the holm roof is recommended to be proportionally increased if the total area and the amount of materials that are used during operation increased. Therefore, if you are interested in savings, it is worth considering this moment when designing a hollow roof.
The area of \u200b\u200bthe dwarf roof
Please note that some factors are not included in the calculation of the hip roof:
- the dimensions of the chimney;
- the dimensions of the attic windows;
- fakes;
- not related to the roofing of overhang and parapet;
- the length of the slope,
- elements of bars that protrude above the roofing;
- clouding.
The area of \u200b\u200bthe roof is determined in square meters. To conduct such calculations, you can use a special calculator that is easy to find on the network. With its help, the area of \u200b\u200bthe roof and the number of building materials is determined.
To calculate the hip roof, you will have to recall the knowledge gained in geometry lessons. Since the hollow roof has two vertices, its total area consists of the sum of the areas of two side planes (trapezoid) and the area of \u200b\u200btwo values \u200b\u200b(triangles):
- The area of \u200b\u200bthe roller can be determined by the formula of an ordinary isosceles triangle: S \u003d 0.5*A*H, where the base is the base of the rod, H the height of the hip plane.
- The area of \u200b\u200bthe lateral plane is determined by the trapezoid formula: S \u003d h*(a + b)/2, where a length, b base, H height. The area of \u200b\u200bthe trapezoid will be divided into the area of \u200b\u200bone rectangle and two triangles.
- At the same time, it is recommended to calculate the area along the length of the cornices, and not at the edges of the house. If you plan to lay a metal tile or roofing in rolls, then reduce the length of the slope by 700 millimeters.
- The area of \u200b\u200bthe carpet can much exceed the roof itself. This is due to the fact that the materials are laid with overlap. There are also many additional elements and adjacency on the roof. Therefore, to calculate the amount of roofing material, add 10%to the roof area. If you plan to build a complex roof, then - 15-20%.
Calculation of the rafter system
The calculation of the rafter system of the holly roof is very important work. The rafters must withstand the roofing material, the loads created by the wind and snow. Therefore, when calculating, take into account the weight of the materials used to create roofing and finishes, the weight of the rafter system and climatic conditions in your region.
For this work, prepare a measured rail and apply all the marking designations on it. So you get rid of inaccuracies in measurements. To make a rail, use a plywood that has a width of 5 centimeters. Also prepare the table, which indicates the ratio of length and placement of rafter legs to achieve high accuracy during measurements.

Calculations are carried out in the following sequence:
- The length of the rafter leg is equal to the work of the corresponding coefficient.
- Mark the axis from the end of the building. Do the upper strapping.
- Calculate half the skate width. So you find out the location of the first element of the rafter system.
- Attach the end of the rail to the marked line. Another - place along the side of the side wall. Here there will be a place for an intermediate rafter leg.
- To find out the length of the rafters, set one end of the beam on the roof overhang, and the second - place on the outer corner of the carrier wall.
- Where to place the next central rafter, calculate like that. Transfer the measured rail to the edge of the side wall, leave the notes of the future rafter system on it.
- Similar actions need to be carried out at three corners, which remained. So the placement of the skate and ends of the intermediate rafter legs is calculated.

To calculate the angle of tilt of a four -sided rolled roof, do manipulations in the following sequence:
- Measure the horizontal projection of the intermediate rafter leg using the measured rail.
- In the table, find the right angle of the roof. Perform the work of these indicators.
- Measure the length of the rafters from the place where the support is attached to the skate.
- Similarly, determine the length of the overhang. Make a product of the corresponding coefficient for a horizontal projection.
Now let's talk about the same part. Calculation of the rafter leg, do this:
- Measure its length from the corner of the residential building.
- The projection can be obtained if you make squares of the projections of the ordinary frame.
- Multiply the result is recovering. This will be the length of the corner rafter leg.
Installation of rafters for rafters
First of all, install supports to support the skate tanks:
- The lower supports differ, depending on the material used for the construction of the house. In gang or chopped houses, these functions perform the upper crowbar crowns. In the buildings that are built using frame technology, the support of the frame is the support of the frame. In brick houses, liking rafter legs rest on Mauerlat.
- Mauerlat is needed to distribute the load on the external walls. For its manufacture, take a beam of wood, which has a cross section of 100x100 mm. This element can be laid closer to the inner edge of the wall or in the center.
- So that the roof does not tear off the wind, attach it with a wire twisted. Take a step of 1000 mm at the same time.
- So that you can freely inspect Mauerlat and rafters, withstand certain distances. From the attic overlap to Mauerlat should be at least 400 mm.
- The upper support for the system of coil and diagonal rafter legs of the beam, the cross section of which is equal to the cross -section of the diagonal rafters.
- There are no brick pediments in the design of the holly roof that has a gable roof. Therefore, set the racks under the ridge beam, which have a section of 100x100 mm. They are placed in steps 3-4 m, as shown in the photo of the holly roof.
- Roll the rack on the lying. Put it on the inner load -bearing wall or floor slab. In the first case, a board is used for the manufacture of a head, which has a cross section of 50x150 mm. In the second situation, a beam that has a section of 150x150 mm. Under the lying, put the roll waterproofing without fail.

Installation of the rafter system
When installing a system of clock and diagonal rafter legs of a hip roof, follow the instructions:
- Contact rafters are attached to the inner angles of the walls, and the diagonal - to external. The length of the former is larger than ordinary rafters, since they are entrusted to one and a half times a large load.
- The shortened rafters of the slopes will be based on rafter legs of a bit. They are called Narodnaya. It is customary to make them paired from two ordinary legs.
- Under the rafters of the diagonal type, supports are installed - one or two. For their manufacture, use racks from a beam. The struts are placed at an acute angle of 45.
- Intermediate rafter legs rest on top of the ridge beam, and from below - on Mauerlat. When installing them, follow a step of 1.0-1.2 m. The cross-section of such legs must be selected, depending on the beam’s scheme- one- or two-span, the steps of the rafters created by the weight of the roof and the snow load. Remember that intermediate rafter legs should not be too long.
- Fix each second rafter to the carrier wall with twists. Make them from 2 wires, which have a diameter of 4 mm. Combine the intermediate frame with the Mauerlat. Use a reverse bracket for this.
- Corner rafter legs are known under the name Penetrons. They are also often called midnight, as they have a shortened length. On the one hand, the people who rely on Mauerlat, from the second on the diagonal leg. For uniform distribution of the load from the corner legs to the clock people, they are attached to the diagonal in different places, according to the scheme of the roller roof.
- For symmetrical placement of all rafter legs, make marks on the skate beam and Mauerlat. The most important point in the manufacture of the rafter system of the hip roof is a competent connection of all elements in places where central and diagonal rafters intersect. Do for this on the bars of the cuts that have a double bevel.

Roof strengthening and crate
In order for the design of the hip roof to be durable and reliable, it is not enough to make a strong rafter system. It is also necessary to strengthen it:
- To strengthen in the corners, a bar is placed in the corners, which is thrown between the shoulders of the Mauerlat and forms the angle. These racks are intended for propagation of diagonal rafter legs. If the sprenigel is located far from the corner, then it is recommended to attach the farm to it.
- Install the racks that are connected by a timber on the floor. It acts as a real support for rafters and provides uniform distribution of load on the building. Such racks perform the functions of the shelves.
- If the diagonal rafters have a very long length, then you should use dual beams instead of one beam, as shown in the video about the hip roof.
- To create a crate, it is recommended to use wooden boards. Also for this purpose, bars with a section of 40 to 40 or 50 by 50 mm are suitable.
- Pre -treat the wood with a protective composition, then - dry thoroughly. It is better not to take raw boards for work, as they are able to cause roofing deformation.
- The crate is placed perpendicular to the rafter legs. The rafters must be placed with a continuous layer. You can also install them with a step of 10-15 cm. The method of arranging the skin depends on the type of roofing material. Say, for a soft roof, the crate is allowed only continuous.

A roofing pie
After installing the crate on the hollow roof, you can do the arrangement of a roof pie:
- To begin with, lay a layer of waterproofing material to prevent water from falling under the roofing of water. Also, waterproofing will help to avoid condensation formation. Fix it to the rafters using a construction stapler. Strengthen the counterparty from above, not forgetting about the clearance between the roofing and waterproofing material to create ventilation.
- The placement of vapor barrier and thermal insulation material will depend on the purpose of the attic. Determine how warm or cold it will be. In the situation with a cold attic, insulate the floor, because the heat of heat from living space is minimal. In the case of a warm attic, insulate and roof. Lay the insulation between the rafters. Then coordinate the reverse surface of the hip roof with a construction cardboard. As a result, you will receive a ceiling for the attic.
- A vapor barrier is often laid under the insulation. It is located. Therefore, you should count on a large consumption of material.
- When choosing a roofing material, take into account its appearance, strength characteristics, reliability and durability. Also pay attention to weather conditions in the region and the angle of inclination of your roof.
- The holly roof is a classic design, so clay tiles will look great, which is not amenable to deformations and does not burn out.
- Take a closer look at other tiled materials of bitumen and metal tiles. They have a budget value, differ in simple installation, are characterized by high indicators of resistance to various kinds of damage and sound insulation.
- It is allowed to use sheet variants of roofing material made of metal profile. To achieve the most original type of hip roof, think about copper coating. This is an expensive material that increases the price of a hip roof. However, its value is more than justified by environmental purity and great endurance.
- Then take care of skates and cornice overhangs, finishing chimney pipes in those places where they pass through the roof, the device of mhargers and auditory windows. Pay special attention to the installation of snow retention elements, the drainage system and fences of the roof.

Thus, holly roofs are very popular. Especially if you decide to build a small country house or cottage. Take a closer look at the hut roof when erecting an office structure of a representative nature. In addition, such a design will be ideal for the construction of original architecture with elevations, ledges and turrets. And the hip roof is perfect when installing the attic floor.
![]()
StrPort construction portal 2011-2018. Articles about repair, construction, building materials.
Copying information from the site is possible only with permission of the editorial office Or indicating a direct link to the source. Legal justification