Entering almost every garden house, you can see a copy of the city apartment ...
|
|
The external beauty of the ceiling coating is only its visible part. For comfortable ... |
Installing screw piles allows you to build a massive and strong foundation for ... |
Installation of hidden wiring

Hidden wiring allows you to aesthetically place a network of wires along the area of \u200b\u200bthe room. At the same time, switches and sockets minimally protrude beyond the level of the walls. Such wiring is stationary and planned at the overhaul stage. This article will tell you how to make hidden wiring correctly
Table of contents:
- Hidden wiring device
- Requirements for hidden wiring in the house
- Scheme of hidden wiring
- Materials and equipment for hidden wiring
- Hidden wiring with your own hands
- Wiring hidden wiring in a wooden house
- Hidden wiring tips
Hidden wiring device
There are two opinions on the expense of which wiring is considered hidden. Some experts say that one that is not visible is hidden. It is laid in a strob or mounted under the skin. Others argue that cables placed in tubes and channels must be attributed to hidden wiring.

Consider the first, classic version in which all experts are similar. That is, the placement of wires in the thickness of building structures. Namely, in partitions, floors, floors, voids of walls and a suspended ceiling.
The installation of hidden wiring must be proceeded during repair work. In the ideal version - before applying the finish layer of putty.
Typically, wires are placed in a specially made stroke. These furrows are made by stroobores and a grinder. With domestic repair and a small amount of work, a punch or a scarlet with a hammer is used.
The wiring should have a second shell or placed in protective pipes or a box.
Requirements for hidden wiring in the house
The most important requirement for hidden wiring is fire safety. Its laying in wooden and flammable structures requires special caution. Therefore, the wires are placed in steel or polyvinyl chloride pipes.

It is necessary that the elements of the cable system are easily replaced. This rule is rarely observed. And manipulations for replacing and adding wiring are forced to destroy the coating of the structure.
The wiring is carried out vertically and horizontal relative to one of the walls. This will save materials and means, simplify the process of work. And with future repair work, the search network will simplify.
Before installation, it is necessary to draw up a plan for the cable system. It will not be superfluous to indicate the location of all electric boxes. The scheme of hidden wiring is carried out and preserved for the future. In its changes in the process, appropriate adjustments to the plan are made.
The electrical safety of hidden wiring is important. Experts advise using cables for three cores. And connect the yellow-green ground wire in the future, if this is not provided initially.
It is also necessary to take care of the device of protective shutdown.
Scheme of hidden wiring
Installation of hidden wiring is performed in a certain sequence.

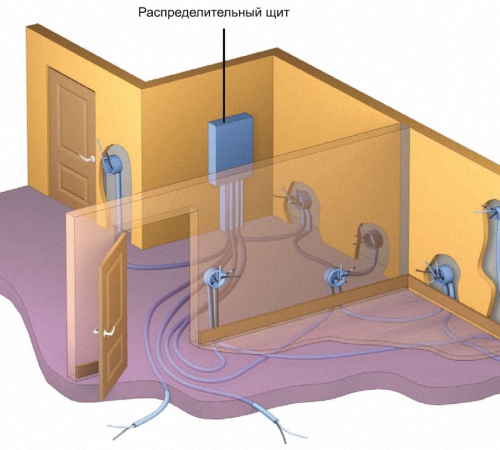
Initially, the type of branching of the network is determined: boxed or loop.
The first, involves the laying of one cable along the area of \u200b\u200bthe entire apartment. From it, each room is allotted on the wire. Such branching is carried out in a decaying box.
A European -type trail shield involves the conduct of two wires. One is for sockets, the second for lamps. They leave the distribution shield to each room. Which contains a switch for each cable of hidden wiring.
After determine the location of the lamps and the branch boxes for the hidden wiring switches.
It is necessary to think through the ways of wires. They are placed 15 cm below the ceiling or 10 cm from the beam or cornice. The distance to the door and window connectors should be at least 10 cm. The tracks are laid to sockets at their level. Perpendicular to the floor, climbing to places for lamps and sockets are performed.
It is recommended to exclude the intersection of wires. Remember, the stroke of the load -bearing walls is prohibited. Therefore, in such places, mounting in a thick layer of plaster is used.
The drawn diagram on paper is transferred to the surface of the design.

Materials and equipment for hidden wiring
When installing hidden wiring in the house, it is optimal to use a cable with a section of 2.5 mm for VVG sockets. It is based on copper veins with double protection. And for eyeliner for PBGPP lighting devices with a diameter of up to 6 mm. This is a flat wire for hidden and open wiring, which consists of one flexible core.
For electrical wiring, distribution shields of any type are suitable. You can also say about sockets and switch. True, the socket for hidden wiring takes up less space and looks more aesthetically pleasing.
Boxes for hidden wiring are selected based on the type of walls. They are for hollow and continuous structures. Sometimes for this purpose, sockets are used, which are closed with homemade lids.

To reliably combine the ends of the wires, purchase plastic caps of PPE or terminal.
For the installation of a cable you need a tool for stroke. A home electrician for this task is enough for a perforator. For concrete work, a capacity of 1.5 kW will be required. You will also need a cable trim and a spatula for plaster.
And for attaching the wire in the furrows, stock up on dowel-homuts, a mounting strip and a solution of alabaster.
Hidden wiring with your own hands
After determining the type and compilation of the wiring scheme, the stage of its installation occurs.
At the place of entering the cable into the apartment, install the distribution shield.
If the repair involves plaster 0.9 cm or more, fix the wires in it. Sometimes the wires are laid along the walls and closed with a baseboard. This does not particularly save money, but exposes the risk of electrical communications.
More reliable and practical than placing hidden wiring in the furrows. In order not to stumble upon metal fittings, preliminary a place for the wiring is checked by a metal detector.

The width of the strob should contain all the wires. Then, due to friction, they firmly lie in the channel and do not fall out of it. The depth of the furrow corresponds to the thickness of the cable plus a place for alignment with plaster. Usually enough 8 10 mm.
Places for sockets and boxes for hidden wiring are made with a punch with a crown. If the power of the tool is not enough, then the nozzle is replaced with a drill.
For the reliability of the wire, they are supposed to be placed in the cable channels. The result is initially necessary to fix in the shtrob. And the wires themselves stretch inward with a flexible wire.
If additional protection is not used, then the wiring is attached in the furrows by alabastr.
The ends of the wires are no more than 10 15 cm in length into the sockets.
Rosettes and their external frames are installed.
The wires at the intersections of the wiring are connected in branch boxes. They protect the ends of the cables from dust, moisture and mechanical exposure.
The strobe is plastered on top of the general level.
Usually replacing the internal wiring in one room takes 2 3 business days.

Wiring hidden wiring in a wooden house
Especially attention should be paid to the electric networks in a wooden house.
An ideal option is the integrity of the cable without using boxes. So each wire from the machine drives a separate end to the load point.
It is necessary to remove the wiring from a flammable structure as much as possible. Therefore, laying of wires on top of a wooden base is prohibited. And the impregnation of wood with non -combustible substances is useless over time.
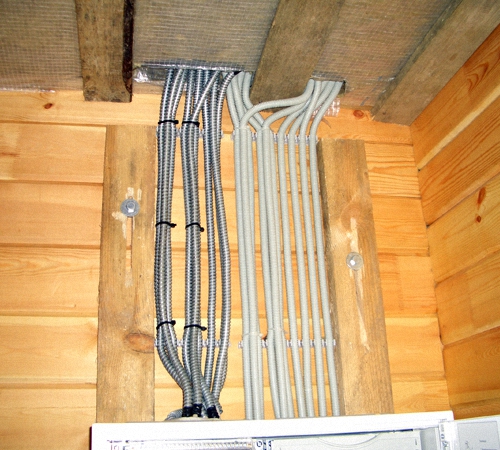
The wiring is laid in a metal sleeve. So that in case of fire, not to endanger the house. The pipes are tightly welded together. Or attached with bolts.

The plastic analogue is not so durable. And rodents may enjoy him. If the wiring is still in plastic pipes, protect it with non -combustible materials. For example, concrete, alabastr or plaster.
The cable should occupy no more than 40% of the place in the pipe. And the thickness of its wall is selected based on the cross -section of the cable. So for copper wires:
- With a diameter of a vein of 4 mm, a sleeve metal is at least 2.8 mm,
- from 6 to 10 mm - 3.2 mm,
- from 25 to 35 mm - 4 mm.
For aluminum wires, two times less requirements. So with a cable diameter of 7 cm, a pipe of 4 mm thick is required.
Rosettes are placed in metal sockets.

The wiring is carried out using wires with a non -combustible coating. For example, VVGGG, RKGM, NYM and VVGGGG LS.
All metal pipes are grounded. To slow down corrosion processes, the metal is covered with special paint.
The copper sleeve is more expensive, but more durable and easier in installation than a steel analogue.
For safety, you need to install two shields: with machine guns and switches.
The power grid is thought out so that there is access to it, without the destruction of the wooden frame of the house. For safety reasons, distribution boxes remain in the public domain.
Hidden wiring tips
1. Put the wiring at the initial stage of the repair. When, in addition to the rough walls, floor and ceiling, there is nothing.
2. Before installing the wires, check their integrity indicator. After repeat the action.
3. For the accuracy of the wiring, draw lines of laying wires on the surface. This is easy to do using a building level and/or rangefinder.
4. During wiring, there is no lighting. Autonomous energy generator or neighbors will help solve the problem.
5. After stroke, it is necessary to clean the furrows from dust using a brush. After treating with a primer.
6. When installing wiring in drywall structures, be sure to use protective shells.
7. Do not forget to leave the margin of wire length in the joints with sockets, switches and boxes.

8. Use the same cables: copper or steel. The connection of two different metals is more subject to corrosion.
9. New electrical wiring requires permission to connect to an external power source. Therefore, you can not do without a specialist.
10. The switches are usually placed at a height of 1.5 1.7 m on one side throughout the apartment. At the same time, so that the open front door does not close access to them.
11. According to fire norms, at least one socket is on every 6m, three in the kitchen.
12. If it is necessary to cross the wires, their insulation increases. To do this, 3 4 circulations of islands around each cable are made.

it is not clear which one
it is not clear what sequence: from the beginning to manifest the cable and then fix the distribution or on the turn
naturally, first fasten
naturally, first fix the distribution station)
If the distribution is not mounted, not fixed in the wall (alabastr, cement, and best of all with a rottlant), then the wire cannot be stretched. And when all the boxes are installed, the wire is easily stretched and fixed until the moment when it is smeared in strobes.