If we talk about the arrangement of the ceiling plane, then at the moment in this ...
|
|
In order to improve the site and make it suitable for living, ... |
Today it is very difficult to imagine a modern bath without such a decorative and ... |
A wooden ceiling device
The external beauty of the ceiling coating is only its visible part. For a comfortable living in the room, it is necessary that the wooden ceiling be made according to all the rules. So, it must be insulated, have a soundproof layer and is protected by vapor barrier. All this will provide a long service life and the correct microclimate in the house. The article will talk about the device of a wooden ceiling with your own hands.
Content:
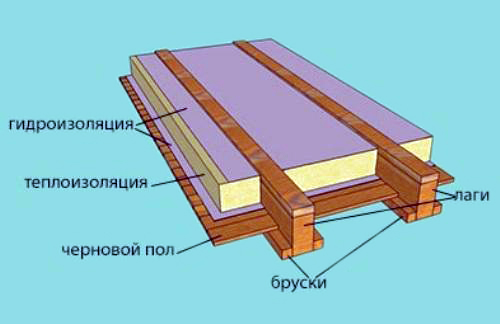
A properly executed wooden ceiling consists of insulation, membrane and lining material. Consider separately each layer of the structure of the pie.
Vapor barrier device
- The vapor barrier of wooden floors is an important point in construction or when repairing a house and an apartment. It is intended to protect the insulation from the formation of condensate, which means to extend its operation without loss of important characteristics. Thanks to modern roller materials, this process will not take much time, and it is easy to do it with your own hands.
- Even when processing wooden lag with protective compositions, steam, which is inevitably formed in residential premises, begins to destroy them. And cotton heaters can get wet. It is especially dangerous if ordinary sawdust was used during insulation (which is quite common), there is a great probability of molding in them. Therefore, it is recommended to make a vapor barrier layer not only in bathrooms and in kitchens, but in all rooms.

- To date, there are membrane fabrics not only protecting against steam, but also creating a thermal insulation layer. And for a house with an unlevened attic, it is recommended to use special hydro- and windproof membranes.
Tip: It is important to make a vapor barrier layer as efficiently as possible. Not only leaving the necessary allowances, but also gluing all the joints. With a significant difference in temperature inside the house and outside, partial pressure is formed. Which drives steam with greater strength to drive up, looking for all the cracks in the ceiling for its penetration.
Vapor barrier for wooden ceilings
In fact, membrane fabrics are identical in composition and are equally suitable for both wooden floors and concrete or metal. Even at the stage of preparatory work, you should figure out which species is needed for a particular case and in what price category. For vapor barrier, depending on the purpose of the room, a polyethylene film or reflecting breathable materials is used.
- Film. Due to its low price and availability, it is very popular. It is used in the construction of country houses, baths and repair of apartments in houses with wooden ceilings. When installing, it is necessary to constantly monitor its tension so that there are no sagging. In addition, to ensure ventilation, you will have to leave gaps. Otherwise, condensation is formed into insulation. Most vapor barrier films have different sides, one of them is rough, and the second is smooth. When installing it, it is necessary to ensure that the smooth side is turned to the outside.
- Membrane. This is a modern high -tech material. She, protecting from the couple, also performs the function of the hydraulic boar. They are divided into 4 main categories: one -sided, bilateral, single -layer and multi -layer.
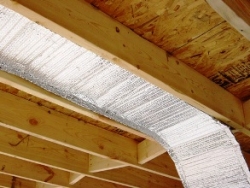
- Reflecting materials. This type includes quite a lot of types. But the most popular and famous are craft paper and foil. The latter is used in saunas and baths, for long -term holding high temperatures. The characteristics of foil vapor barrier indicate that it withstands up to 120 degrees without changing the physico-mechanical properties.

DIY vapor barrier
- Steaming can be carried out before or after insulation. Each case has its own advantages and disadvantages.
- So, if the insulation is carried out with soft or loose material, then first you need to pull the vapor barrier on the bottom. In addition, nothing will be crumbling on the head and in the eyes. Therefore, during the construction of a new house, this sequence is chosen.
- Another thing is if repair work is carried out or not access to the upper room. Then the vapor barrier is mounted after the insulation layer.
- For work, a construction stapler, tape, screwdriver and fixing profiles (or rails) will be required.
- First, the width of the ceiling is measured, the vapor barrier is measured and cut off with allowances on each side of 10-15 cm. Starting from the corner, it is applied to the wooden flooring and fixed with a stapler. To avoid distortion, it is recommended to attach the opposite angle of the same side.
- Do not forget that the canvas stretches with maximum tension.
- When the corners of one side are fixed, the stapler passes along the entire length, after which, as stretching the fabric as much as possible, begin to cling to the second side.

- The next canvas is attached according to the same principle with an overlap on the previous 10 cm.
- After the entire ceiling is passed, all the resulting transverse seams are glued with tape.
- Then the prepared rails are taken and screwed to the lags, thereby strengthening the location of the fixation with a stapler. The arrangement of vapor barrier is ready for this.
- Sometimes, during work, you can accidentally break the already stretched vapor barrier. You can’t leave this, but you need to make a patch. A piece with allowances of 10-15 cm is cut out of the fabric. It is placed inside the hole, all edges are smeared with superglue. On top of the incision itself is still glued with tape.
Manufacturers of vapor barrier materials
- Penophol. Composite multilayer material made of foamed polyethylene, one or both sides of which is covered with a foil layer. He copes immediately with three tasks: heat, steam and waterproofing of the room. There are several varieties:
- Penophol A is the main in the lineup, the main function of which is vapor barrier. It has a foil coating. The most budget option;
- Penophol B has the same characteristics as the previous one, but foil on both sides;
- Penophol from one of its sides is self -adhesive;
- Perforated foam has high thermal insulation characteristics.
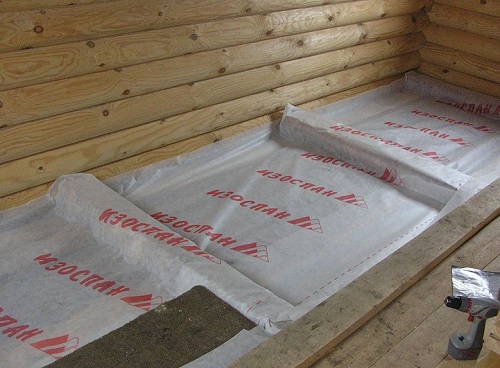
- Isospan. A membrane canvas produced in rolls. Depending on the marking, it is used for internal vapor barrier of the room or for wind protection of external walls for facing. It has a front and wrong side. One protects against the penetration of the steam, and the other does not prevent the penetration of excess moisture. Thus, a favorable microclimate is created in the room and you can not worry about the safety of structures and materials. Today it is the most popular material for vapor barrier of a wooden ceiling.
- Alcraft. The main layer is polyethylene, with one side it is covered with a foil coating, and with the second craft paper. Great for lining the ceiling with lining.
- Armofol. It is fundamentally different from previous models, as it consists of a glass mesh. It is indispensable for vapor barrier in rooms with high humidity and temperature (baths, pools, bathrooms). On sale you can find this material with a self -adhesive surface.
How to insulate a wooden ceiling
The methods of insulation of the ceiling are divided into two types: work is carried out from the side of the dwelling or outside (from the attic or upper floor). The decisive, as in the case of vapor barrier, will be the conditions in which work is underway. Either this is a house under construction, or repairs in an apartment with a wooden ceiling.
When warming from the room, it will be necessary to sacrifice the height of the ceiling. If thermal insulation is carried out on an unheated attic ceiling, then additional waterproofing of the material will be required.
Insulation of the wooden ceiling of the attic, the pie will look as follows:
- roofing material;
- crate;
- vapor barrier material for external walls;
- thermal insulation;
- vapor barrier for rooms (usually with labeling B);
- finishing.

Wooden ceiling insulation with polystyrene
Due to the low weight, low cost, easy installation and good thermal insulation characteristics, it is often used to warm the ceiling from the outside. But due to low environmental friendliness, it is not recommended to be used inside the dwelling.
Stages of work
- It is convenient if the size of the foam sheet coincides with the distance between the wooden lags. In this case, the process of insulation will be fast and without unnecessary garbage. But if necessary, to adjust the material in size, it should be borne in mind that although it is cut quite easily, it is very quickly stupid the blade. And then it is very difficult to get rid of the garbage formed at the same time.
- The foam is attached to the ceiling on a special glue that resembles tile in consistency. It is applied pointily in several places or covers the entire surface. When gluing the stove, you need to press and hold it for a couple of minutes.

- For greater reliability, it can be fixed at 5 points with self-tapping screws. If joints are formed, they are closed with mounting foam.
Insulation of a wooden ceiling ecowide
This modern environmentally friendly material is based on cellulose with different additives. At its core, this is processed paper. But the output is a thermal insulation material with excellent characteristics. It is often used in the insulation of inter -story ceilings and the whole house. It is environmentally friendly, cheap is cheap, and a team of professionals with a special sincer gun for 1 working day is able to insulate a box of 150 squares at home.
Stages of work
- To warm the horizontal ceiling surface, it is not necessary to hire specialists or rent expensive equipment for blowing.
- From below, the ceiling should already be sheathed with boards and have a vapor barrier layer. Ecowata is poured directly from the bag, evenly distributed and compacted tightly as possible. The better to do this, the less the probability of further shrinkage will be. It is necessary to fall asleep in several layers and each of them is trim. Everything, on this insulation work is over.

Warming of wooden ceramic ceramic
This is an ancient material made of burned clay. It has high thermal insulation properties and low weight. It is used everywhere, up to the manufacture of expanded clay concrete blocks for the construction of a house, which differ in their energy -efficient features.
Stages of work
- As when working with any loose insulation, work is carried out from the side of the second floor or attic. Ceramzite is spilled out on the lag prepared and closed and closed by the film. The smaller its size, the better. Since it adjoins each other more tightly, leaving fewer air spaces.
- After the backfill, it will be trimmed. And then you can go in two ways. If the ceiling is insulated in a country house, then the backfill is enough and you can put the floor. For a suburban cottage, whose beams are strong and allow you to withstand a large weight, it is recommended to make a concrete screed with a reinforcing mesh.

Warming of a wooden ceiling with sawdust
They are chosen by adherents of natural materials or those who want to save. This method is more time -consuming, as it requires preparatory work. But in general, he has been tested for years and legally deserves attention to himself.
Stages of work
- First of all, you need to prepare a mixture of sawdust and cement for insulation. To do this, it is best to choose an average chip in size, and not saw it. It is desirable that the material is already unimportant and processed antiseptic composition. Most often, the chips are soaked for a day in an aqueous solution of copper sulfate, after which it is well dried.
- Calculate the required volume of sawdust simply. It is enough to multiply the insulation layer of 15-20 cm by the ceiling area.
- Now prepare cement milk. In a convenient container, cement with water is mixed in a ratio of 1:10. After the solution is ready, chips are poured into it and mixed until smooth.
- By the time of preparation of the mixture, the ceiling should already be ready for insulation. To do this, the floor is dismantled from the attic, the entire space between the lags is cleaned and the wooden structural elements are treated with special compounds. A dense film is laid on the bottom with a single canvas. The overlaps are glued.
- The insulation mass is evenly laid between the lags and trim. When it is completely dry, you can walk along it.

This is the cheapest way to warm a wooden ceiling. Sawdrops or shavings are given for free on all sawmills, and cement consumption is very small.
Warming of a wooden flow in an apartment with mineral wool
Mineral wool is the most popular way of warming a wooden ceiling. It does not require the preparation of the composition, its heat and sound insulation characteristics are higher than the plate analogues. It is environmentally friendly and affordable. The cost depends on the density, so, the most soft and cheapest cotton wool are sold in rolls. But its installation will be more complicated. Accordingly, more expensive hard mats of high density, but even one person can warm them.
Tip: Despite the environmental friendliness of the mineral wool, it is recommended to work with it only in protective clothing and respirator. If it enters the skin, particles of the material cause severe itching, which will be very difficult to wash off. And the clothes, after working with him, are thrown away.
Stages of work
- The width of the plates is 60 cm, which, as a rule, equally width between the lags. Therefore, they are simply inserted into this space. The thickness of the plates is 5 cm, for insulation 3 or 4 layers are made. They are checkers in order to exclude the formation of cracks, and in the case of insulation of the attic stream of cold bridges.

- After installation, it is tightly tightened with vapor barrier cloth from the living room, so that the mineral wool does not sag.
Finishing a wooden ceiling
Before proceeding with the ceiling, it is necessary to take into account the features of wooden structures:
- not only new buildings give a natural shrinkage. But when changing seasons, they can walk. This is associated with a feature of wood to absorb moisture or give it. Why often cracks appear on its surface (the exception is glued beam). Therefore, when putting down the wooden ceiling, there is a high probability of cracks;
- if the house is built for a long time, then its walls breathe. And this does not always indicate the beautiful vapor -permeable properties of wood, but also that cracks appeared in the ceiling or walls. In the cold season, this can negatively affect the stretch ceiling;
- the wooden ceiling belongs to the class of fire hazardous, therefore, for its cladding, it is recommended to use materials with high fireproof characteristics or treated antipyretics;
- wooden floors make a restriction on a possible load on them. For example, a bath is recommended only on the ground floor.
But in general, a wooden ceiling does not make restrictions in its decoration. It is permissible to use all the same materials as for concrete floors. But more and more modern designs are designed to emphasize the beauty of the tree, and not hide it.
Wooden ceiling photo

- The easiest way to sheathed a wooden ceiling with suspension structure. It will hide all the irregularities of the base, and thanks to the mobility of the design, you do not need to worry about the shrinkage of the house. In addition, this will hide all communications and make additional insulation. But this will lower the height of the ceiling by 10 cm.
- The same advantages have and stretch ceilingwho, despite the artificial origin, harmoniously fit into the interiors of modern wooden houses. True, their installation will require hidden wiring for the ceiling space, which in wooden houses is not recommended to be done. It is important that all the wires are hidden in the protective corrugation.

- When the task is to create an atmosphere using a beautiful wooden ceiling, you should use decorative beams. They are easy false structures of hollow inside, they will allow us to hide communications in them. They are made from natural materials or plastic. The finish will decorate the wooden ceiling, allowing you to leave the floor boards in sight. A variety of their designs will not be difficult to choose the right option. Fastening is carried out on screws using bars.

- But the most popular in country houses and in summer houses is log. It can be of different price category, which depends on the variety of wood and on the quality of the material (the presence of knots). Despite the fact that the finish with the ceiling seems outdated, with some design tricks it opens in a new light. For example, when painting it is not varnish, but with white paint, it looks fresh, modern and capable of expanding the space. It also looks beautiful in combination with massive false beams. Thanks to the locking method of connection, its installation is simple and quickly perform. The result is a flat, beautiful wooden coating.

- Often for a wooden ceiling, chosen a sheathing drywall. It has special refractory sheets, which, although they cost more than ordinary ones, are recommended for use in such cases. In addition, it is an environmentally friendly material with high vapor permeable properties. It is plastic, suitable for lining rounded ceiling structures. It is chosen when it is necessary to bring a note of modern urban design to the interior of a wooden house. It looks great in a combination with wooden ceiling elements.
- If you use cheap boards for the ceiling, but I want to have exactly a wooden ceiling, then you can buy block house. It imitates the surface of allocated logs or a beam. One panel has the relief of two or three planks. It is made of solid natural wood, therefore it is universal in use (suitable for lining the ceiling on the veranda or in the gazebo). In the interior, such a ceiling looks primitive and very atmospheric. But the high price of such a wooden ceiling makes it less popular compared to the lining. It is attached to the crate, the panels themselves are fixed with locks.

![]()
StrPort construction portal 2011-2018. Articles about repair, construction, building materials.
Copying information from the site is possible only with permission of the editorial office Or indicating a direct link to the source. Legal justification