At times, there is a need to dismantle a stretch ceiling. The reasons can be ...
|
|
The garage is a mandatory building for the car owner. Those who live outside the city ... |
The center of country life can safely be called the veranda. This is a kind of continuation of the house in ... |
DIY dry screed with your own hands

One of the most difficult stages of repair is rightfully considered to be filled with screed. Indeed, such work takes a lot of time, effort and money. But the time is inexorably and already in the bright head of one tired screed master, a brilliant idea originated: why not come up with a way of aligning the floor that would cost inexpensively, and would not have to spend so much time and time? And I came up with the same! Now the dry screed of the floor has become so popular that concrete analogues gradually fade into the background.
Content
- Advantages and disadvantages of dry screed
- The technology of laying dry screed on expanded clay
- The cost of the installation of dry screed
Advantages and disadvantages of dry screed
The principle of dry bulk floor is simple to disgrace on the base, quartz sand or expanded clay is filled up, and sheets of plywood, chipboard or gypsum fiber are laid on top of it. In conclusion, the entire structure is fastened with special glue and self -tapping screws. Brilliant, isn't it?
But not only the high speed of styling and relative cheapness became the cause of mass worship of a dry screed, but also a few more very attractive moments.
- Cleanliness during work. The technology of dry screed does not provide for the use of water, as is the case during pouring cement-sand mixture. Hence the absolute purity without gray-grunt puddles and a heap of sand.
- Additional floor insulation. Due to the use of claymzitis as a pillow of expanded clay, it turns out warm and maximally protected from winter cold.
- Light weight of the structure. Air expanded clay and thin sheets of plywood or Glv weigh quite a bit, so the dry floor screed is ideal for old houses with time with wooden ceilings.
- Convenience of communications. In a layer of expanded clay or quartz sand, it is much easier to lay vital communications: telephone and Internet cables, electric wires, film heaters and any other equipment.
- The shortest periods of completion of finishing work. Having finished the installation of a dry screed, you can immediately start laying the finish flooring, while to completely dry the cement screed will take several weeks.
But if everything is so good, then why is the subtitle mentioning the minuses of a dry screed? Indeed, this technology for leveling the floor has one very significant drawback is moisture. If GVL, chipboard or plywood gets on the slabs, moisture begins to destroy the structure of the material, which leads to the swelling of the floor and the appearance of defects on the surface of the flooring.
The technology of laying dry screed on expanded clay
For a more detailed consideration of all the nuances of installing a dry screed on a clay pillow, watch a small video video.
And now you can cover in detail the subtleties of the process, breaking it into several parts.
Preparation of the base of the floor
Remove the old coating and check the condition of the screed. If cracks, gaps, gaps between floors and walls are found on the surface of the concrete, then they must be embedded using a classic cement-sand mortar. After drying the mixture, notice the floor with a broom. The base is ready for the installation of a dry screed.
Laying waterproofing
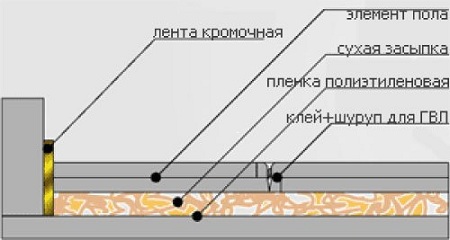
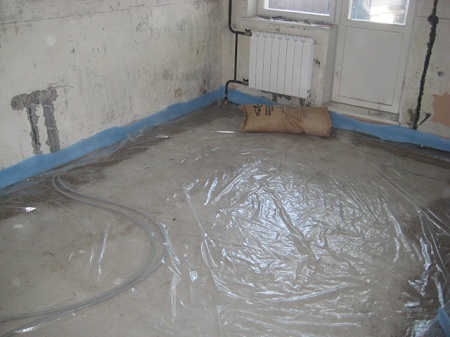
Steamproofing (waterproofing) is a layer of pergamine or dense plastic film, which is laid on the concrete base. The thickness of the film should be at least 200 microns. In addition, you can use special paper saturated with bitumen or vapor -insulating materials, which are sold in large quantities in construction stores.
The film is overlapped (if the stripes are narrow), while the edges of the bands should come to each other by 15 centimeters, and in order to increase the efficiency of vapor barrier, the joints are glued with tape. In addition, the film should enter the walls of centimeters by 7-8.
The waterproofing layer will avoid damage to the screed in case of water leak, condensation on concrete floors or emergency in the basement or apartment located under yours.
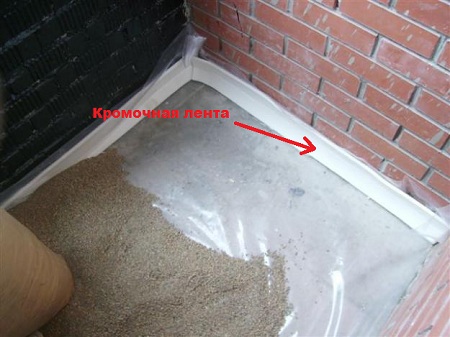
Gluing the bromous tape
Installation of a dry screed necessarily provides gluing with an ingenutic or dumpfer tape, which prevents the appearance of unwanted creaks and knocks that arise from the contact of GVL sheets with the walls. A soft plug is a strip of foamed vinyl with a self -adhesive surface.
Having removed a special wax strip from the back, just glue the tape around the entire perimeter of the room directly on the vapor barrier. Thus, you will receive a single working space, fully protected from moisture and steam.
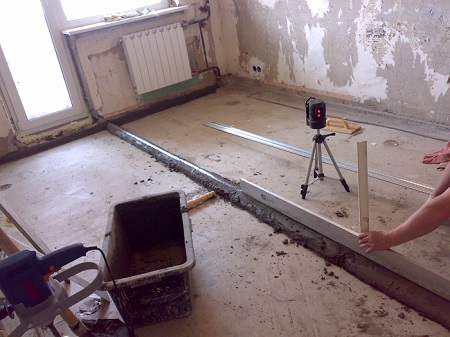
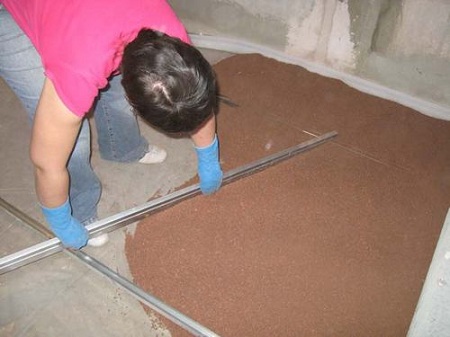
Installation of lighthouses
Lighthouses are needed in order to flatter a layer of expanded clay, thus creating a perfectly even base for a future screed. If the concrete screed of the floor, the technology of which will be considered in the next article, is not conceivable without lighthouses, then dry may well be limited to your own eye. But still with the guides it will be much more convenient and easier to level gravel.
To install lighthouses, you will need screws, T-shaped guides, a rule, a screwdriver and a laser level.
Install the level in the center of the room. At a distance of 0.5 cm from one of the corners of the room, screw into the floor of the self -tapping screw. Put a rule on it and mark the point of intersection of the laser and rail with a pencil or marker (of course, the mark must be made on the rule (rake)).
The next step will be the twisting of the second screw at a distance of 15-20 cm from the first along the wall. Again, put the rule on the self -tapping screw and check that the laser clearly passes through the early mark. If this does not happen (level or higher, or below the mark), then simply adjust the screws with simple twisting or twisting it. By this principle, mark the whole room.
Now you can install guides. Put a small pile of cement mortar on each screw and, by installing a profile on these heaps, press it tightly until it rises to the screws. Remove the remnants of the mixture with a spatula and leave your beacons to dry.
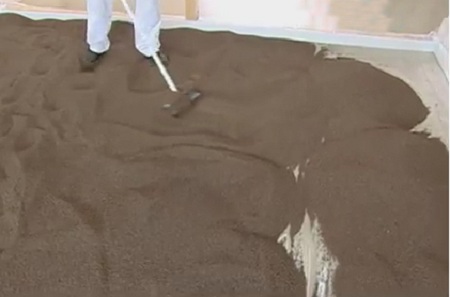
Filling expanded clay
As a pillow for sheets of plywood, GVL and chipboard, not only expanded clay can act, but also quartz sand, and fine -grained slag, and even plates from extrusion foam polysterol. The latter, by the way, is very convenient to use if the surface of the base is perfectly flat. Expanded clay for a dry screed can be in the form of granules, slag or small crushed stone, but the size of the inclusions should not be too large. Otherwise, the screed sheets will lie unevenly.
The thickness of the backfill depends on the quality of the surface of the base (the magnitude of the irregularities and their number), as well as on the characteristics of engineering communications laid in the layer of expanded clay. As a rule, 3-4 cm is enough to provide a dense and even base for the future screed.
During the backfill, make sure that the thickness of the clay pillow is at least 3 cm, otherwise the GVL sheets will walk under your feet after their laying, which will ultimately lead to the destruction of the structure.
It is necessary to fill up the expanded clay portioned so that you have the opportunity to flatter the layer, standing confidently on two legs, and not staggering and slinging on round granules. Having laid the layer of expanded clay, the GVL sheet is mounted, then the next portion is falling asleep and the GVL sheet and so on to the end falls on top of it.
However, you can use another way of backfill of expanded clay, in which the entire room is first covered with gravel, then it is divided by a rail and after that the installation of a dry screed is carried out. During leveling, you can lay small scraps of GVL or plywood, which will subsequently become a kind of bridge that protects the layer of expanded clay from random damage to the legs.
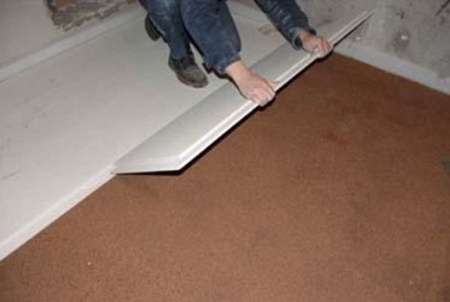
Laying sheet material
The technology of laying sheet material is determined by the type of sheet used. So, GVL fits on expanded clay in two layers. It is necessary to fasten the sheets with each other with glue and self -tapping screws (for mobile reliability), and the seams and joints formed during the fasteners are plucked and polished. Such a floor can withstand the same loads as the concrete screed.
Plywood and chipboard are laid in one or two layers (depending on the thickness), and after installation, their surface is covered with bitumen waterproofing.
Start laying from the far wall, gradually pouring expanded clay, leaving it and damaged new sheets. If you immediately fell asleep the entire area, then start work from the doors, moving towards the opposite wall. Use the bridges built at the stage of backfill of expanded clay.
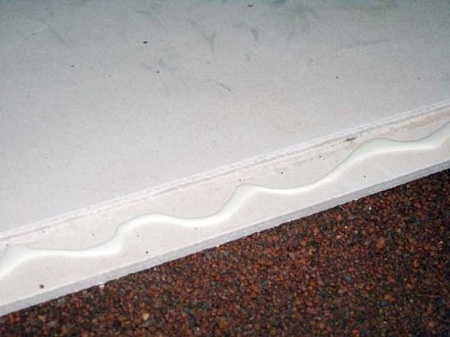
Break each fold of the GVL sheet with glue, and after the combustion with the next fasten them with each other with self -tapping screws with a length of 19 mm. Such self -tapping screws have a zeno head, which is deeply recessed in the material, which allows GSL to be laid without differences.
At the end of the work, do not forget to cut off the remnants of the brip tape and film with a knife, and the joint between the wall and the screed is sealing with a sealant.
The cost of the installation of dry screed
The cost of work may vary depending on the materials used to align the floor. So, the dry screed of Knauf, which has established itself as one of the most effective floor aligning systems, is significantly inferior to other similar analogues in its cost. In addition, such a screed has a minimum thickness of the structure, a high limit of strength, excellent thermal conductivity. Thus, a dry screed, the price of which is several times less than the cost of concrete, is an example of an ideal way of leveling the floor.
The laying of a dry screed is not a complicated process, but requiring a certain share of patience. All work can be done in one day, and if desired and in a few hours. Good luck to you!
![]()
StrPort construction portal 2011-2018. Articles about repair, construction, building materials.
Copying information from the site is possible only with permission of the editorial office Or indicating a direct link to the source. Legal justification