In search of optimal material for the construction of a suburban cottage, it is inevitable ...
|
|
Car owners pay special attention to their maintenance, because not always ... |
Breeding - a popular material in the roof decoration. But, so that the roof is from ... |
DIY facade insulation: step -by -step instructions
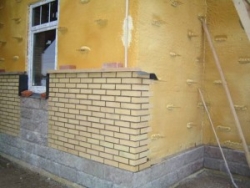
For several decades, humanity has been trying to find ways to reduce energy consumption, the lion's share of which has been heating buildings. Having reduced heat loss, you can count on a significant economic effect. New progressive technologies that have proven themselves in all climatic conditions were found more than 30 years ago. The technique is improved from year to year, manufacturers make various building materials for the insulation of the facades. In some countries, energy conservation programs are launched, which are based on the ideas of wet facades insulation.
Table of contents:
- How to insulate the facade
- The choice of material
- Preparation of walls
- Fixing the basement
- Installation of external window sills
- Glue
- Heater sticker
- Adding insulation
- A reinforced layer device
How to insulate the facade
The insulation of the facades is a popular way of external decoration of buildings and energy conservation at the same time. Such a procedure solves several problems at once: protects the walls from adverse weather factors, holds heat in the house and decorates facades. Today, many companies offer their services for external wall insulation. However, the price of facade insulation does not meet the quality of the materials used. For this reason, developers choose the option of their own wall insulation with polystyrene or other insulation.
The choice of material
Supporting the walls of the house, you can rationally and creatively approach the choice of materials. It makes no sense to warm all the walls with the material of the same thickness. Combine the insulation. Since more heat falls on the southern wall, you can use a heater of various thicknesses. Be sure to limit access to all kinds of rodents by hearing the basement of the facades with extruded foam polysterol. For angles, take a thickened layer of insulation.
Mineral wool
For insulation of facades, various materials can be used. Mineral wool is inorganic fibrous material, which is made of silicate melts of rock, mixtures of sedimentary rocks and metallurgical slags. For insulation of facades with mineral wool, basalt (stone) and glass materials are taken. Mineral watering slabs are used to warm facades with a wet method or a hinged ventilated facade.
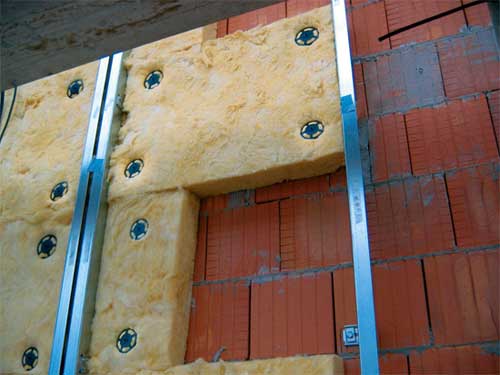
Mineral wool withstands a temperature of more than 1000 degrees Celsius and does not melt at the same time, is characterized by high thermal insulation properties and significant resistance to mechanical influences. Minvata does not absorb moisture, has high biological and chemical resistance, as well as good sound -absorbing properties, reducing noise by 20%. Mineral wool operation lines reaches 30-40 years.
Styrofoam
Foam is one of the popular materials intended for wall insulation. This substance began to be made in the 30s of the last century, and at the moment the polystyrene has not lost its leading positions. Excellent thermal insulation properties of foam are provided at the expense of a certain production technology, when polystyrene is foamed using special equipment, and as a result of this, small bubbles filled with air are formed.

The foam consists of air by almost 98%, which provides the material with lightness and moisture resistance. Another advantage is the low cost of manufacturing and the price of the facades insulation with foam. The facades trimmed with polystyrene, reduce heat loss by approximately 70%. Modern foam does not support combustion and actively resists this process. But if your site has problems with rodents, it is better to abandon this venture.
Preparation of walls
The functionality and durability of the conducted insulation depend on the correct preparation of the base. Initially, all the protruding structures and elements, such as ventilation grilles, storm gutter, external blocks of climatic equipment, window tows, lighting devices, are removed from the walls. The communication passing through the facades should also be removed, falling into the plane of the insulated wall. In old houses, very often brick masonry has many decorative elements, which are located near the cornices and windows.
We check the plastered walls with taping the strength of the outer finish. Using plumbs, long rules and cords, you should find general deviations of the wall from the vertical or detect local irregularities. Designate the problem areas with chalk so as not to lose sight of them. If large levels of level are observed on the plane and poorly holding areas are contained, then the work on the insulation of the facades on such a basis should be carried out after dismantling the protruding and breathing cakes of the plaster.
Particular attention should be paid to areas on which oil paint remains, which has a low level of adhesion and poor vapor permeability. Be sure to remove the fungus, mold, fats, sullen and rust from the walls. Large potholes and cracks are primed with deeply penetrating compounds with the help of maclaws and are embedded after completely drying with putty for external work. Cracks that have a width of up to 2 millimeters, it is not necessary to close up. Large local depressions are usually aligned with gluing pieces of insulation.
When the walls are leveled, the communications are laid, the external brackets are elongated, all wet work is completed inside the building, the roof and waterproofing are arranged, then the surface can be primed and the facade insulation with polystyrene foam.
Fixing the basement
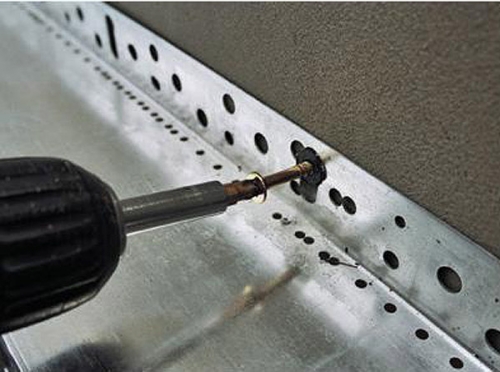
According to the project, it is worth determining the lower point of the insulated surface, then with the help of the hydraulicarian transfer this mark to all external and internal corners of the structure, and then connect them with a coated cord to get the starting line. According to the markup, you need to install a basement profile to hold the first row of insulation plates, because they have a very serious progress on the raw ginger.
The starting bar is selected in size, which corresponds to the width of the insulation, and fixed using dowels with a diameter of 6 millimeters with an interval of 300 - 350 millimeters, it is recommended to wear washers on a clogging nail. The starting bar is joined on the corner by the method of oblique sections or using the use of an angular connector. Between the profile sections, connecting and end elements of plastic are placed, which compensate for the temperature expansion.
Installation of external window sills
The installation of external window sills is best done before the installation of insulation on the facade. The ebbs are attached directly to the window itself. The removal of the window sill is made taking into account the external insulation of the facade (the thickness of the insulation + 1 centimeter) in such a way that the window sill behind the finished wall protrudes 3-4 centimeters. Sometimes the window is placed on the starting profile. In this case, under the windowsill, a cavity in which moisture condenses is obtained. The cavity should be filled with pieces of insulation mixed with adhesive mixture, can be thrown out with plaster.
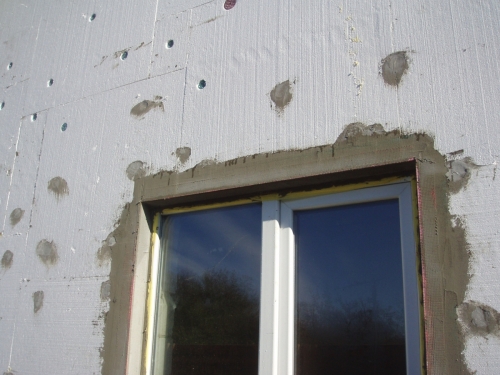
Next, it is necessary to insulate the external slopes of the plastic windows. After installing windows, as a rule, 20-30 millimeters remain for insulation. Take the foam less thickness than the material for the facade. And do not forget that there are still other layers except the insulation that take 1 centimeter. When warming the slopes, the foam should be 1 centimeter for the slope. That is, the material does not need to be cut, focusing on the wall.
Glue
Cooked adhesives for stickers of insulation should be used for a couple of hours, so they are kneaded on the construction site in the required amount. The desired amount of water is poured into a voluminous plastic bucket and a dry mixture is filled up. The components are mixed with a low -cost drill until a homogeneous mass is obtained without lumps. The solution ripens close to five minutes, after which it is mixed again for a minute.
If the adhesive mixture thickened a little during operation, then it just should be mixed. To lure the thickening adhesive mass, it is forbidden to add water to it. Depending on which on the plane you need to compensate for the differences, you can choose one of these options for applying glue to the insulation.
If irregularities reach 15 millimeters, then a glue is applied around the perimeter of the plate 20 millimeters high, and then several beacons are evenly applied in the middle of the stove. In case of defects up to 10 millimeters of the glue strip, are applied along the perimeter of the plate and in the middle. The width of the strips is 3040 millimeters, the glue should cover 5060% of the total area of \u200b\u200bthe sheet.
Heater sticker
When the insulation is glued to the slopes, and the window sills are installed, you can start glue the material on the walls. The technology of insulation of the facade involves such a fastener of insulation when it is first glued and then nailed. We start gluing the foam from below, where we install the starting bar. For gluing you will need 2 spatulas: small (80mm) and large (200 mm). We use a small tool to apply an adhesive mass on a large spatula.
The mixture is usually applied not on the sheet, but on the wall. As a rule, the wall is not entirely flat. Therefore, you can put more mixtures there if you need to remove irregularities. Thus, the mixture is not uniformly smeared. We smear only on perfectly flat. Sheets should be attached in such a way that T-shaped joints are obtained.
The sheets should be applied to a place with a slight displacement, close to 2030 millimeters, then they are pressed by a long half -length or the rule into the surface of neighboring plates. On the inside of the plates and from the surface of the base, you need to remove the that performed glue. The verticality of the sheet installation is checked by the level, the direction of the plane is controlled by control threads.
All sheets should be tightly pressed with each other at a distance that should not exceed 2 millimeters, so it is worth watching so that the mixture does not fall into the seams. If in the end the gaps turned out, then they can be filled with stripes of insulation, or blowing with polyurethane foam. At the joints of the products, the permissible difference is not more than 3 millimeters in thickness.
It is important that vertical joints with side slopes do not fall into the doors and windows near the doors and windows. The connection must be done over the opening or under, the displacement should reach at least 200 millimeters. If various materials are connected on the basis, then the slabs in this place should not joke, you need to provide displacement of at least 100 millimeters.
On the external and internal angles of the facades, a gear connection of the insulation must be carried out. Plates of the corresponding rows should be wedged into the surface of adjacent walls so that a long vertical seam does not form, which is subjected to cracks. At the slopes and corners of the slabs are mounted with sufficient release for the dressing. After grasping the glue and the formation of the angle, the insulation can be cut.
Between gluing the insulation and the nail should wait three days so that the glue is grasped properly, and all the material sat down. With independent insulation of the facade, foam can be done differently and glue the house in plots. Half of the work will have to be performed from the ground, and the second half - from any scaffold. Therefore, it is more advisable to carry out the procedure in parts so as not to rearrange and not carry the scope several times.
If you warm the whole house at once, then the foam will remain in the sun for two weeks. And this will not bring him benefit. In addition, in case of rain, the insulation will gain excess moisture. Plots in height should be in height of the growth of the stacker and as a width of the width.
Awriting of the insulation
It is recommended that the insulation is nailing three days after the completion of the gluing. If you start drilling the material with a non -dried adhesive mixture, then it can move away from the wall. Nitting along the fresh, there is a possibility of falling into a recess under a sheet, which provokes raising the edges of the sheet.
The glued insulation should be attached to the wall with fungi. This dowel is a plastic circle, which has a plastic sleeve, and a nail clogged into this sleeve. Nails are plastic and metal. No matter how strange it sounds, it is better to choose plastic products, because the metal ones create an additional cold bridge, and are also more expensive, which leads to an increase in the cost of the facade insulation.
As a rule, fastening is carried out in the center and at the corners of the plate, 68 dowels per 1 square meter. At the corners of the construction, near the door and window slopes, in the area of \u200b\u200bthe base, it is necessary to equip additional fasteners, which are located 200 mm from the edge of the plates. The step and number of additional arrangement of nails is determined by the dimensions of the house, the size of the plates, the supporting characteristics of the fasteners and wind loads.
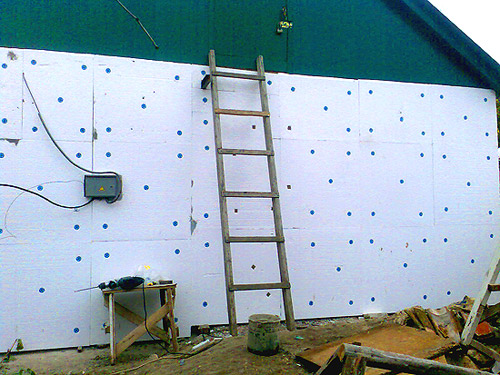
The holes of the desired depth and diameter are drilled with a perforator, dust is removed. The length of the fungus is determined in this way: the thickness of the insulation plate + 1 centimeter (thickness of other layers) + 4 centimeters into the wall. The holes are recommended to be made in depth of more than 10-15 millimeters than the length of the rod. If you drill holes in depth equal to the length of the fungus, then the garbage, which crumbles during operation, will not allow the dowel to beat it normally.
Next, you need to insert a dowel into the hole and score a spacer nail with a rubber hammer. You can just knit a fist. A nail hat should be at the level of the surface of the insulation, or protrude no more than 1 millimeter. If the mushroom does not achieve and sticks out to the norm, then maybe a drill is stuck, or a too short hole is made. In the latter case, you need to pull out the mushroom, finish and insert it again.
A reinforced layer device
The reinforced layer implies the creation of an auxiliary, enhancing net layer. The corners near door and window openings need to be glued with patches from a reinforcing grid. The size of such patches should be 200 by 300 mm or more. Such an operation allows you to prevent the appearance of cracks near the internal angles of the opening.
All external corners of the building, including protruding decorations and slopes, should be strengthened with plastic or aluminum Perfogans, which are produced with strips of the grid. First, the adhesive composition is applied, then a pre -trimmed Perfangle should be tightly pressed to the insulation with a spatula and set horizontally or vertical levels.
The speaker must be smooth on the plane of the wall. If the need for Perforta occurs, it can be temporarily fixed, leveled, pulled, inserted into the plate plate through the perforation holes. After the preparatory layer and fixing the reinforcing elements are completely dry, we install the main mesh.
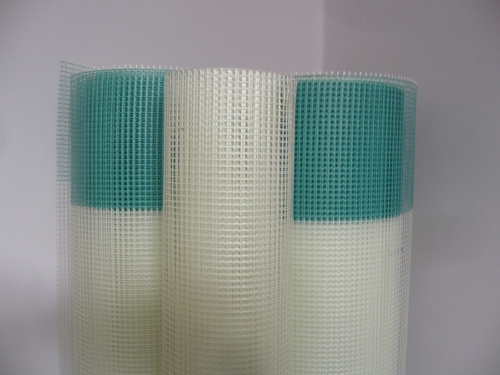
To strengthen foam, a grid is used, which is specially designed for facade work. It is made of alkaline -resistant fiberglass, which is able to withstand calculated loads. To protect the installation of the reinforcing mesh, a special mixture is used, which is slightly different from the one with which the facade is insulated with cotton wool.
Before starting work, the glued slabs are polished with hand graters using sandpaper of a large fraction to eliminate possible differences at the joints of the sheets. The surface before applying the solution should be cleared of grinding, dust and various contaminants. The grid is cut in stripes that are equal to the height of the walls. On the walls with vertical stripes equal to the width of the canvas, glue is applied.
The solution is applied with an uniform layer, the thickness of which is close to 2 mm. To do this, it is most convenient to use a metal grater. The prepared canvas should be unwound over the entire surface length, attach to the solution and fed into it using a smooth metal spatula. The net must be carefully smoothed from the middle to the edges. Calm the protruding glue on the surface.
On the glued reinforcing layer, wet on the wet one is necessary to apply another layer of solution. The second layer is aligned more carefully, the grid in the finished version should not be visible from it. The next day, the reinforcing cake can be changed using sandpaper, you can also under the packet of small shells. After about 3 days, the walls will dry out completely, they should be treated with a primer with quartz sand, which simplifies the application of decorative plaster.
And finally. The technology of insulation of the facade with a foam involves the performance of work at air temperature on the street from plus 5 to 25 degrees and relative humidity is close to 80%. At each stage, working surfaces should be protected from exposure to sunlight, strong wind and rain. Subsequently follow the recommendations described above, and you will succeed!




thanks for the info.
thanks for the info.
These hard workers are technical card
Did these hard workers see the card?
((((((Since more heat
((((((Since more heat enters the southern wall, you can use a heater of various thicknesses.)))))))
How could you write this?
Super thank you too
Super thanks, we also insulated ordered here http://utepleniefasadov.io.ua/
They insulated the facade. Super! Warm
They insulated the facade. Super! Heat in winter.
It's cool in the summer! Gas costs fell by half. The boiler works at least. Very satisfied
Thanks to the guys:
http://vashfasad-rostov.ru/
Thank you!
Thank you!
http://yteplenie-fasadov.by/
http://yteplenie-fasadov.by/
http://otdelka-brest.by/fasad
http://otdelka-brest.by/fasadnye-raboty.html