Frame houses are a wonderful option for a quick and inexpensive individual ...
|
|
Previously, tiles made solutions for ceramic tiles on their own ... |
Not every garden has a barn. Some areas simply have very little space to ... |
DIY bake
The trendy heating device has long ceased to be a curiosity of a modern interior, and therefore, having learned about the development of new models, consumers tirelessly increase their requirements for their ergonomics and functionalism. One of these structures, which fully satisfied the requirements of consumers, was the Dutchflower, which is widely used in construction, both unpretentious summer houses and stylish cottages. It is one of those unique structures in which both simplicity of design and enormous work efficiency coexist at the same time. Unlike the classic of the Russian stove, the Dutchman’s stove is characterized by significantly more modest dimensions and lower wall thickness, which contributes to its faster warming. Given this, the Dutchwoman’s heating oven becomes the most popular choice of owners of stylish and modern cottages who want to not only economically dispose of their budget, but also equip their home in accordance with all the rules of ergonomics. Due to the fact that the services of professionals related to the masonry of the Dutch stove are worth a lot of money, we strongly recommend that you equip the Direk -based Dutch stove using our recommendations.
Content
- Drylander's stove: Historical certificate
- Design features of the Dutch furnace. Differences from traditional furnaces
- Advantages and disadvantages of the Dutch furnace
- Dutch furnace arrangement: advice to help a beginner?
- DIY Direk Bake: Materials and Tools
- Making Dutch furnace: step -by -step instructions
- Oresh the stove Dutch
- Tips and recommendations of experienced masters
- In conclusion
Drylander's stove: Historical certificate
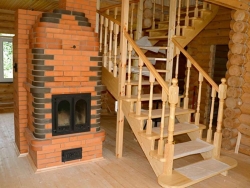
The Dutch stove has been known since Columbus, but despite this, it has gained true world popularity only in the 16th century, when the Netherlands became an independent state. Since the 18th century, the arrangement of the Dutch furnace has become practically the norm, and the 19th century was marked by the massive recognition of the Dutch furnace, after which this design became dominant when choosing heating devices. In the era of the Middle Ages and the New Age, the Dutch woman began to be associated with exquisite tiles depicting paintings by great artists decorating the stove, and since then the tiles and bake the Dutchwoman are inseparable. Currently, this method of decor has lost its significance, but despite this, to this day it is a historical companion of the Dutch stove, the photo of which can be seen below.

Bake Dutchman photo


Design features of the Dutch furnace. Differences from traditional furnaces
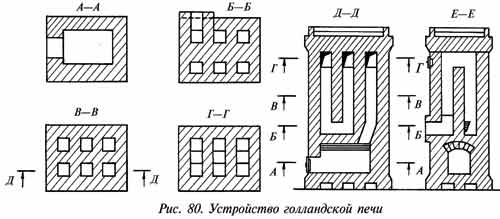
Despite the fact that you can build a Dutch oven of any shape, whether it is oval, round or square, the classic version is characterized by a strictly rectangular shape. If you decide to allow the variability of the form of the furnace, you should know that the shape of the fuel, in spite of everything remains constant rectangular. The main difference between the Dutch stove from other varieties is the absence of a grate. The design, for the manufacture of which a full -bodied ceramic brick is used, is characterized by the presence of the following constituent elements:

- The fuel, also called a firebox, is a furnace niche, which is located at the base in the lower part of the furnace and is designed for laying coal or firewood;
- The chimney, an integral part of which is the exhaust pipe, forms a six -channel system consisting of 3 lifting and 3 -sized channels, which are located one under another, which ensures the sequential passage of gases through the system. But, unlike traditional furnaces, the design of the Dutch does not imply the presence of a grate.

- Due to the absence of a blowing and a grate, firewood in this furnace are characterized by low combustion intensity, since oxygen coming to the fuel only through the fuel door is not enough to maintain active combustion.
- Due to the fact that this furnace is characterized by small dimensions, it will successfully fit into the interior of any room, and, importantly, it allows you to equip systems of both gas and water heating.
- The door for cleaning the stoves from soot.
- In addition to the traditional constructive version of the furnace, exceptions can be found: Dutch stoves equipped with a fireplace, a hob or an oven.
- Experts recommend building walls with one brick thick for small structures, and two bricks for more massive structures. Only this thickness will be able to provide maximum heat transfer with a minimum fuel flow characteristic of the Dutch furnace.
Advantages and disadvantages of the Dutch furnace
What do you need to know about the advantages of the Dutch stove?
- Variability of the structure. With the exception of gross technical errors, variations of the design will not have the slightest effect on the strength and effectiveness of the device;
- High functionality: Dutchwoman, originally designed for heating, can be equipped with a hob and used for cooking;
- Small dimensions of the Dutch stove may not exceed 0.5x 0.5 m;
- Smaller compared to traditional furnaces, the consumption of material, not exceeding 650 bricks for the massive structure, while the minimum consumption of brick for the Russian stove 1300 bricks, and the small Russian stove will be much worse;
- The low weight due to the small consumption of materials allows you to install the Dutchman on the upper floors of country cottages, since the maximum load from the furnace does not exceed the maximum permissible load for standard intert -storage ceilings;
- Unassuming materials characteristic feature of the Dutch. It is due to the rational design of the furnace and a small thickness of the walls, which makes it resistant to deformations under the influence of temperatures. In this connection, even hollow brick can be chosen as the main material for the Dutch, which will not affect its functional characteristics. The only thing that cannot be saved is on the furnace, it must certainly be made of refractory bricks;
- Due to the fact that the Dutch man quickly warms up and slowly cools down, with regular use of the furnace, you can forget about the overspending of fuel;
- High level of heat transfer: unlike the Russian furnace, barely cope with the heating room, the area of \u200b\u200bwhich is 45 square meters. m, the Dutch man easily heats 60-70 square meters. meters.

And now a few words about the shortcomings:
- The chimney, which is based on the channel system, acts as a siphon through which heat is blown. This contributes to the rapid cooling of the furnace and related to it, low efficiency;
- It is not recommended to drown the Dutchman with fuel, characterized by instant combustion: it includes brushwood, dry reeds and straw. In the process of combustion, due to the channel system of the chimney, the furnace does not have time to warm up properly. In this regard, the qualitative functioning of the furnace is possible only when the fuel is in smoldering;
- If the Dutchwoman is used for the furnace of the Dutch, this is fraught with excessive sedimentation of soot in the chimney, which can cause a fire.
- It is very important not to flood the Dutch furnace, since, overheating, it begins to release carbon monoxide.

Note! The optimum temperature of the Dutch is 50-60 degrees. This temperature is easy to determine by touch: if, with your palm to the furnace, you can still endure, and when contacting the back of the palm with the stove, you feel a strong burning sensation, which means the temperature does not exceed 60 degrees.
From a mechanical point of view, the principle of functioning of the furnace is extremely simple. Gases heated in the fuel, first of all, enter the chimney, or rather, in the first lifting channel. Having passed through it, and reaching the top characterized by a fairly low temperature, pass through the second opening, without ceasing to give thermal energy to the stove walls. Having reached the furnace, they again undergo heating, after which they rise again, but already on the third channel. The same principle underlies the passage of heat through the fourth and fifth channels. Only after that the air reaches the fuel and exits through the chimney through the sixth mine.

Dutch furnace arrangement: advice to help a beginner?
The beginner who first decided to try his hand at the construction industry, experts strongly recommend that the furnace pre -stove in accordance with all the recommendations presented, but without the use of concrete solution. Having conducted this experiment, which received the prosaic name dry masonry, it will save time on the development of the oven drawing and at the same time prevent the most common errors. So that the quality of the masonry of the finished furnace does not fail you, you need to clearly follow the instructions and drawings proposed by professionals. This will avoid the main mistake of beginners of low quality masonry, due to the common construction by eye.

DIY Direk Bake: Materials and Tools
Before you start planning the system, provide a place for its placement in advance. It will be perfect if you do this at the stage of building a house. The next stage is the selection of quality materials and tools. For a typical Dutch stove, designed to heat a room with an area of \u200b\u200b40 square meters. m, the following materials and tools will be required:
- 200 refractory bricks;
- River sand, preferably sifted;
- Wire, easily amenable to bending;
- Gravel gravel and blue clay necessary for a more persistent adhesion of the solution;
- Cement;
- Roofing material necessary for waterproofing;
- Door for arranging a fuel, preferably factory production;
- Dry glue for laying furnaces with refractory.
- Of the tools you will need a construction level, trowel, shovel, roulette and other tools from a standard set.

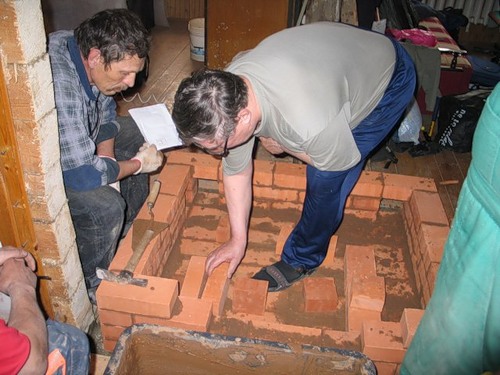
Making Dutch furnace: step -by -step instructions
In order to prevent the occurrence of gross technical errors in the process of installation, before starting installation measures, experts recommend drawing up a future design scheme, according to which you will subsequently carry out the installation of the structure.
Drylander stove a scheme


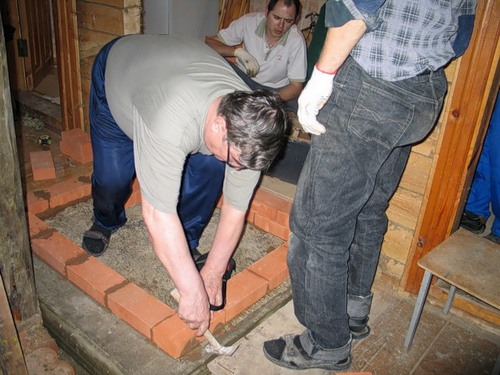
At the first stage, it is necessary to dig a hole, with the following parameters: the width of the sides is 50 cm, the depth is 75-80 cm. Pour the bottom of the pit with river sand with a layer of a layer of 10 cm and a 10-centimeter layer of gravel. Put a reinforced mesh on top so that it occupies the rest of the pit area. Then prepare a concrete solution based on the ratio of cement to the sand, like 3: 1. Prepare the formwork of the corresponding dimensions from plywood or wood and pour the site with concrete solution, then leave it for 7 days until it dries completely.


After the final drying of the foundation, lay two identical pieces of roofing material on it, and evenly apply clay on top, which was soaked in water for at least two days in accordance with the following ratio: 8 kg (or rather 900 g) of thermal -resistant adhesive must be taken 8 liters of clay (more precisely 900 g liters of clay. and 2 buckets of sand. Before applying the mixture, mix it evenly and, making sure that the consistency of the mixture resembles a thick sour cream, proceed to its application.

Oresh the stove Dutch
If objectively you do not consider yourself professionals in the construction sector, experienced craftsmen recommend starting with dry masonry, that is, Dutch furnace masonry without use, which will help to avoid possible mistakes. The diagram of the Dutchki furnace is very variable and depends on the size of the structure. In our article we will describe the procedure for the construction of a small furnace.
The first row of brickwork is located on a sand moistened with water, which is laid out over the entire area of \u200b\u200bthe concrete foundation. It is important to know that before pouring the solution it is necessary to check the level and according to the measurement results, it should be strictly vertical;
The first and second rows of furnace masonry should be continuous. In this case, we must not forget about the rules of the ligament between the bricks;
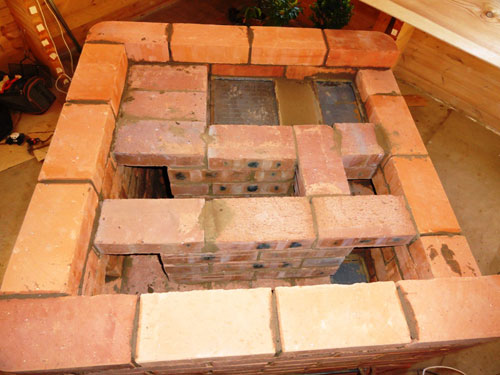
At the third row level, it is necessary to begin the formation of a ash chamber, which is a space for an oven, which is connected to a horizontal channel. After you started the formation of the ash chamber, you can start installing a door for a ash chamber;
The masonry of the 4th row is based on building a common array of the furnace, and therefore, at this stage, the furnace door begins, which necessitates laying parts of a metal wire, which will be required to fix the door. At this stage, it is necessary to mention the features of the masonry: if during the masonry process the first three rows of bricks were stacked, the masonry of the fourth row involves their installation on the rib up to the upper edge of the door;
At the level of the fifth row, a ash is installed, and in the process of laying the sixth, they return to the increase in the Dutch furnace again;
After you have made a backbone door, at the level of 7 row it is blocked, and bricks are again stacked. The same thing is repeated on the 8th row;
If your furnace arrangement scheme implies the presence of a hob, it is necessary to free a place for it, which can be achieved by shifting the 9th and 10th levels slightly back. After that, the furnace hole is equipped. After laying the 9th row, non-combustible material (asbestos cord) is placed at its top, and a hob is installed on it. The 10th row is associated with the formation of the base for the future chimney. In the furnace, characterized by lightness and slight weight, a metal chimney is installed, since the brick chimney significantly weights the structure.
In the process of laying the 11th row, a valve is installed, which is characterized by the presence of asbestos seal. At this level, the masonry is performed in a quarter, since it is here that the joint of the chimney and the furnace is localized;
At the level of the 14th row, the furnace is blocked in the upper part, and in the posterior wall it is necessary to leave a hole designed to release excess smoke. The same is performed at the level of the 15th row;
The 16th and 17th row is associated with the formation of a food door, which can be replaced with ordinary brick laid without concrete solution;
By laying the 18th row, it is important to remember that it is the base of the furnace chimney. After its formation, a stove pipe is installed, which can be purchased or made of bricks of a similar type.

Tips and recommendations of experienced masters
- For a room whose area is 40 square meters. meters, you can calculate the necessary dimensions of the furnace. With a furnace height, which is 210 mm, the size of 780 x 580 mm is considered optimal.
- To improve the quality of the masonry, before using bricks, experts advise each of them to immerse for several minutes into water, which helps to remove air bubbles from them. Thanks to the implementation of this procedure, the brick will not absorb the solution, which will improve the quality of the masonry;
- Since the door frames installed during the masonry process are subject to temperature exposure, before installing a Dutch, they must be wrapped with asbestos cord or varnish with refractory properties;

- The most common problem requiring the repair measures of the furnace, previously former in operation, is to abandon the brick in the ends and corners of the furnace. To prevent this, in the process of masonry, they are finished with specialized plates of various shapes;
- Another important indicator of the quality and long -term operation of the Dutchki furnace, according to experienced stovers, is the distance between the chimney pipe and roof ceiling. Ideally, it should be at least 15 cm.

In conclusion
On many sites, you can find a large number of articles in which they naively argue that the arrangement of the Dutch stove is not any difficulties and even the most inexperienced developer will cope with this. But this is far from the case, and if you do not feel confidence in your skills, we recommend that you be patience and zeal, as well as carefully study the recommendations presented in the guidelines that are written by more experienced craftsmen. In our article, experienced craftsmen shared with you the experience of building a Dutch furnace, and if you clearly follow it, you can equip a Dutchman's bake with your own hands, avoiding serious mistakes, which can often turn into a tragedy. In this regard, we recommend that you do not engage in amateur performances and experiments in the stove, and clearly follow the advice of masters.
Bake Dutch Video
![]()
StrPort construction portal 2011-2018. Articles about repair, construction, building materials.
Copying information from the site is possible only with permission of the editorial office Or indicating a direct link to the source. Legal justification