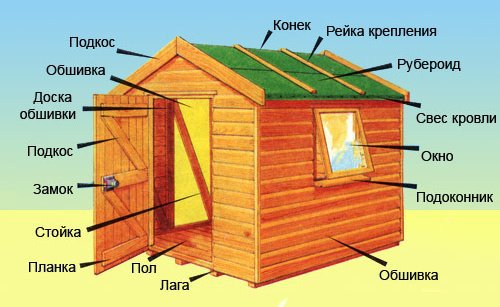
The roof of the building is one of its main protective systems from bad weather, ...
|
|
Properly performed waterproofing of the floor avoids the problems associated with ... |
The range of flooring has dozens of different names. Among all ... |
DIY bar construction
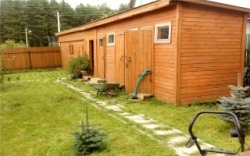
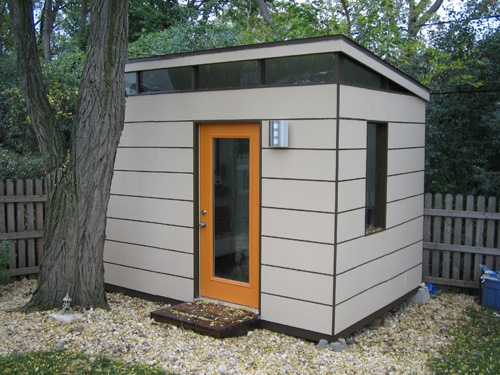
Not every garden has a barn. Some areas simply have very little space to place it also. Sometimes people who have large gardens cost a garage for storing garden equipment. In general, this is not the best way, since to get, for example, a lawn mower, you need to drive a car. The tightness is inevitable, besides, the car can also be scratched if you move the inventory. Therefore, if you have free space and desire, then the construction of a barn with your own hands in your yard simply needs.
Content:
- The purpose of the barn
- Start of construction
- The foundation for the barn
- The frame of the barn
- Frame sheathing
- Rafters and crate
- Laying the roof
- Antivated system
- Installation of the door in the barn
- Interior decoration
The purpose of the barn
Each summer resident buys a plot to break the garden and rest in the summer. In these cases, a place is required for the content of inventory, tools, equipment and barbecue. Even if there is a small country house in addition to the cottage, then it will be primarily used to accommodate people, but not accessories.
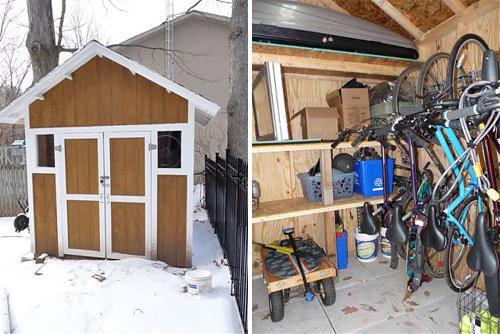
For this purpose, a small structure is most suitable, which is called shed and built of brick or wood with a shallow foundation. The purpose of the barn determines the size of the structure and its interior decoration. Most often, sheds are erected in the dachas for storage of a rake, shovels and other garden equipment, buckets, boxes, various containers, as well as firewood, coal, sawdust, straw and hay.

In the barn, vegetables and fruits grown on the site are often stored. Fans of outdoor activities in such buildings store sun loungers, hammocks, chairs, tables, chairs, barbecue equipment and similar accessories. Sometimes sheds are built under the arrangement of the workshop.
In addition to storage functions, the barn performs another function. It can be used as a room for breeding birds and animals. During the summer period, some summer residents manage to grow chickens, geese, ducks, pigs and other living creatures. In this case, it is necessary to build a much larger shed and carry out the corresponding interior decoration.
Start of construction
As a result of the construction of the garage, you will receive not only a room in order to store garden equipment, but also a place where you can just work. Experts recommend building a barn a little larger than it might seem sufficient. Sarai most often build 2 by 2.5 meters.
The dimensions of the structure often depend on the area that is designated for development. The area, of course, can be limited, then it is best to choose a place that is not notable to grow plants. The barn is usually located a little further from the house, claiming that it spoils the whole view. This, of course, is not always fair.
An uncomplicated building can be easily masked with lattices with some curly plants. The most ideal option is to start building a barn somewhere near the house and lay the track to it. In order to easily roll the equipment into the barn, the bottom of the doorway should be located at ground level.
With such a large -scale construction, a minimum of tools for working with iron and wood is required: drill, chain, an electric grinder, a grinder, a screwdriver, a disc saw, a large and medium hammer, a tree hacksaw, an ax, a building corner, level and a wide chisel. As additional equipment, prepare a roller or a wide brush for applying fire protection, drill, pencils, a construction stapler and a knife.
For the construction of the barn, such materials will be needed: brick, sand-gravel and sand-cement mixture, roofing material, plaster, threaded bar, boards, beams, bar, antiseptics, white spite, corner, screws, nails and wooden door.
The foundation for the barn
First of all, you need to make markings for the foundation. To make an accurate markup, you will need roulette, rope, steel twigs or sharpened pegs, as well as a hammer or ax to score all these pegs. Next, you need to mark and score pegs. There are no difficulties here. Do not forget to measure the diagonal of the markings. You need to do everything exactly and the corners should be straight.
The soil may not be abyss, but ordinary sandy, then the foundation for the bar must be made in columnar brick. To do this, you need to dig 15 pits under the columns of brick, every meter and a half. At this stage of work, you can save either on the purchase of materials, or at work when digging holes.
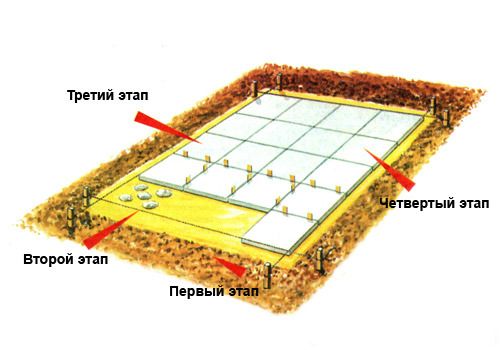
The depth of the hole for the construction of a barn from foam blocks or wood should be at least 40 centimeters, and 15 centimeters of a sand and gravel mixture are falling asleep to the bottom. Then the brick lies. In the central and corner columns, it is necessary to put steel pins in order to accurately install vertical bars. Fundamental brick columns must be checked by level. After the erection of brick columns is completed, the surface must be plastered with a mixture for external work.
This is, firstly, to protect the brick, and, secondly, for aesthetics. To do this, you need 2 bags of the mixture. In order for the waterproofing of the brick columns of the foundation to be better, before filling with sand, they must be treated with special mastic (waterproofing). The mastic should be black on a bitumen basis, which is sold in any construction store.
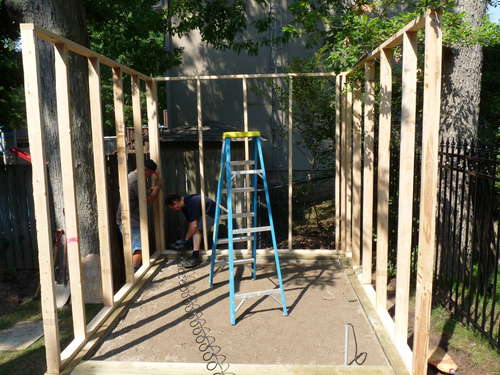
The frame of the barn
Before starting work, you need to find out the prices of the construction of the barn and set the base from the beam under the entire frame of the barn. The joints of the beam can be made in half a man. To do this, it is necessary to make neat cuts, the size of the floor in the size of the floor, and then knock out the excess with an acute ax or a wide chisel.
Before making installation, it is necessary to process a beam that goes under the logs of colorless fire-bi-bio protection is a mandatory operation, if you want your barn to stand for a very long time. It is better to use fire-bio protection with a tint, not colorless. Then the already processed places will be better visible.
Naturally, a waterproofing is usually laid between the foundation brick column and the beam in the form of a piece of roofing material. The diameter of the central pin is 10 millimeters, and the hole in the beam, respectively, is drilled with a diameter of 10 millimeters. It is necessary to constantly control all the slopes of the hydraulic level and the dimensions of the roulette.
In the beam, which is installed vertically, it is necessary to drill the guide holes under the pins in size of 10 millimeters. A cut beam in size, manually is installed on the pin, which sticks out of the base so that its edges coincide with the edges of the base, and presses, turning a little around the axis. And as a result, marks are formed at the end of the beam, where the hole under the pin is drilled.
Whether it will not be necessary at all. In the process of building a frame barn, after installing on the pin, the beam should stand as a native. The one that is installed in the barn on the front is vertically has a size of 3 meters, and the one that is located on the back wall is 2.2 meters. It turns out a slope of about 30 degrees and this is enough to drain snow and rainwater.
Those bars that are installed vertically at the corners of the country barn need to be treated with an electric grinder from two inner sides, and those that are located in the middle of the barn of the barn are already on three sides. It is necessary to remove the chamfer on all sides of the beam that look inside the barn with an electric rhuban at the corners.
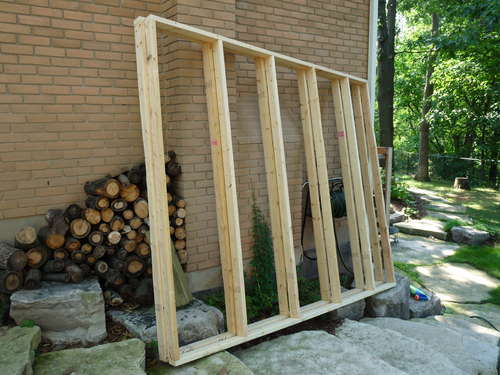
The parties that will later be offended by the outer boards can be left and not processed with a ruban. Next, it is necessary to impregnate the entire surface with a special fireproof composition. Such impregnation has not only protective properties, but also carries a certain aesthetic load, while very pleasing to the eye. Vertical bars should not stagger, so they are attached to the base of the shed with steel corners and self -tapping screws 4.2 by 70.
In order for the installation of transverse beams to be easy, you can apply the usual fastening scheme. At the top, on the supporting pillars (vertical), you need to mark and install steel corners, while fixing them with self -tapping screws. And then, just lay the chopped beam on these corners. And the last thing to do during the construction of a wooden barn is to pull through the entire vertical beam with their screws to the corners and pierce with nails from the end.
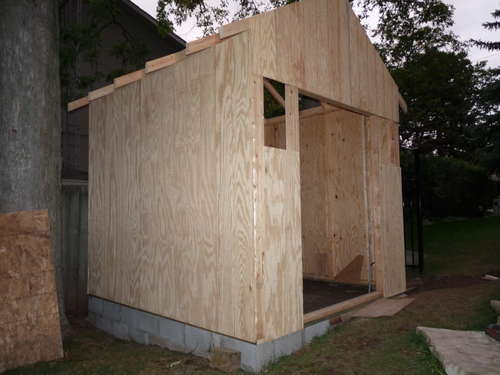
Frame sheathing
For lining the walls of the barn, a lining, siding or a profiled board is usually used. In some cases, the lining may not fit, because it is very thin and can only be applied as an additional decorative component. It is best for the upholstery of the walls of the barn is the usual inch board (25 by 150 millimeters). You can use the style of an American in which the first American immigrants were offended at home.
This method is unique in that the boards must be filled from the bottom up with a small overlap of 2-3 centimeters. And when the wood dries, the cracks do not form between the boards.
If the barn is conceived as two in one - a small workshop and a woodwriter, then only the walls and the front part of the barn can be overtaken by an American.
And where there will be a woodcock, you need to fill the boards V - figuratively, with a small gap between the boards of 1.5 centimeters. This is done so that the firewood is ventilated and dry, and also for beauty. The outer side of the boards can be rebuilt by an electric rhuban. This allows you to save on expensive fire protection. In addition, water will not linger on the surface of the boards.
There is nothing complicated in the construction of the barn in the country and installation of the boards. First you need to determine where it will be for the barn, for the workshop, and also prepare the windows. The southern or eastern side is best for the location of the windows, then there will always be a lot of light in the barn. It is necessary to start the installation of the boards with the bottom board of the barn around the perimeter. And then stuff each next board with an overlap of 3 centimeters.
It is necessary to fill the boards on the frame in a circle - on the front part, and then from the back and side. The result will turn out evenly and beautifully. It is better not to fill the boards on one side, and then on the other, because it will still be higher on some wall. In this case, a water level or roulette will help.
There are no difficulties in arranging the floor, only accuracy must be observed. First, the required size of the floorboard along the bottom of the frame is measured. To do this, the sections around the racks are cut in the floorboard and lay on the length of the lag-bruis along the length.
To continue the work, you need to watch a video about the construction of the barn. It is better to use a board, the thickness of which is 40 millimeters, and lay it along the length of the barn. The boards before laying are treated with fire protection. They can not be fixed, as usual, but simply fixed with self -tapping screws on the side, while hiding their hat.
Rafters and crate
The rafters can be made from boards of 40 to 100 millimeters. To do this, you need to make all the measurements in departure and the length of the rafters already beyond the boundaries of the frame. The departure of the rafters should be about 300 millimeters in front and about 200 millimeters from behind.
Having measured only one rafter, and at the same time making it precisely on it, cutting in places of support for the upper undergrowth beams, it can be used as a template, and they must be prepared in the required quantity. The rafters and the entire top must be treated with fireproof protection.
There is a small nuance before preparing the rest of the rafters according to the template, for starters it is better to measure the entire barn of the barn. In width, the size of the upper frame can swim, then it is better before making each rafter, it is necessary to check with the place of its fastening.
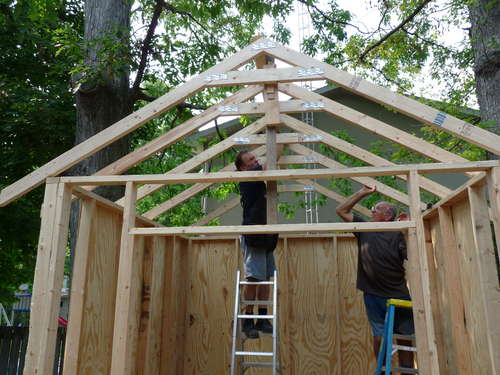
The installed rafters are necessarily fixed with long self -tapping screws on the side and a nail from above. The step between the installed rafters should turn out about 50-60 centimeters.
After you looked at the photo construction of the barn and installed the rafters, you can start installing the crate, and then to the installation of waterproofing, and naturally to the installation of the roof itself.
To do this, you can even use the same inch board, which will then go to the skin of the walls. The width of the shed and the length of the boards should be the same, then the boards can be handed at right angles from one end and staggered in a checkerboard pattern to ensure a removal of 300 millimeters from the sides beyond the perimeter of the barn.

The remote rafters will be 300 millimeters from the back, but the front is 450 millimeters. This length of the protrusion above the frame was justified precisely by the installation of the anti -vein system. Its width should be a multiple of the width of the board.
Next, the crate from the boards is attached to the rafters with self -tapping screws or nails 2 pieces per each.
In order to strengthen the roof in the middle of the barn where the beam passes under the rafters, you can install stands from a board in size of 40 by 100 millimeters. It is attached to the rafters and the beam naughty self -tapping screws.
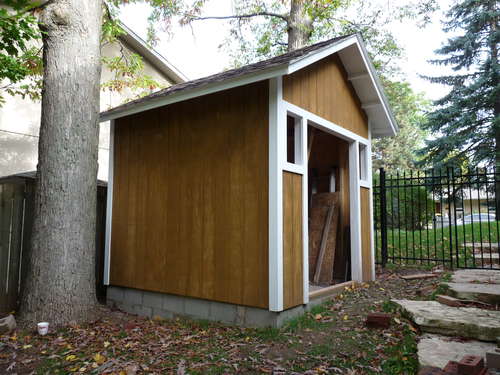
Laying the roof
If you have a desire to save, then you can buy ondulin, but it is best to choose a professionalist or metal tile, because these materials are not combustible, because they do not include resins, as in Ondulin. For the roof, it is also necessary to purchase special nails that have waterproofing hats. About 20 nails will need one sheet of Ondulin. When purchasing this material, you must not forget to take instructions for its installation.
Under Ondulin, a roofing rate can be laid as waterproofing, while grabbing it to the boards of the crate with a stapler. The installation of ondulin sheets is better to start on the right side, then you do not need to slip the next under the previous sheet.

First, it is necessary to put the first leaf of ondulin from below and very carefully handle it around the perimeter of the roof. This is a fairly responsible moment and you can’t make a mistake here, because by the end of the roof you can get a mowed structure. It is better to nail each on one nail and only making sure that everything is fine, you can fix it as it should be.
The sheets are breaking through with a nail above the ridge, as well as in those places where the crate board is located.
Behind and in front of the sheet from the edge of the roof, it is necessary to make it accordingly about 5 and 8 centimeters. Such work does not require any qualifications, just accuracy and attentiveness.
Antivated system
The anti -covered system is designed to protect the roof from strong gusts of wind. If you look from the aesthetics from the side of the aesthetics, if the rafters are sewn up with the boards from below, then they look much prettier. The rafters are sewn with boards from the side and below. The result is a finished and very nice appearance of the tier.
If the width of the board is 150 millimeters, then the width of the anterior overweight of this system should have the width of three boards, that is, 450 millimeters. Two boards must be spent on the rear and the sidewalls of the barn, because the removal of the crate and rafters in these places will be 300 millimeters.
The next stage is the trim of the bottom of the front of the anti -white defense using three tanned boards. They are sewn with self -tapping screws or nails from below to rafters.
Next, you need to nail the front board. If its length is less than the total length along the front of the roof, then it can be increased by trimming.
It is impossible to fix the boards from the bottom from the sides, so it is necessary to fill the segments of the same inch board from below the crate, the length of which is 300 millimeters. The lower boards and the lateral front protection of the barn of the barn are attached to them. On both sides, it is necessary to nail no less than 3 pieces of the same pruning, so the board will not bend down in waves.
Installation of the door in the barn
You need to start installing the door to the shed with the assembly and installation of the door frame. It is better to take the doors whole -driven, prepare three bars with drunk, made under the door leaf, taking into account the door gaps. Fasten the box on one side to the vertical wall beam, for fastening on the other side you can put a vertical rack from the board, which remained after the manufacture of the rafters.
To a horizontal beam and floor, secure this rack with metal corners using self -tapping screws. Next, you should install the loops. First, put the lower gap between the box and the door with the helped corners, which allow you to adjust the gap, reducing or increasing it by pulling out or clogging the corner.
After that, mark the location of the lower and upper loop, remove the excess wood (2-3 millimeters) with a set of chisels so that the loop is slightly drowned in the door leaf and the block. At a couple of screws, attach the lower and upper loops to the door, put the woods under the door leaf, which are suitable in size, finally fit the loops to your places and fix the door in the box.
On the front side, process all the boards with a shirt. At the same time, impregnation for wood is saved and the resistance of wood to adverse effects of water increases. The inner wall can be sewn with boards in the bottom, having previously processed them on all sides with a shirt, paying special attention to the rib to minimize the cracks. After that, make and install door platbands and a visor above the door.
Interior decoration
The interior decoration of the barn depends exclusively on the fantasy of the owner. You can, for example, equip it with many different departments, each of them is equipped with the necessary shelves. The interior decoration of this country building depends on which the gardener will be engaged in the activity of the garden. If you plan to fit a lot of things there, it is recommended to equip the construction with niches and shelves.
Strengthen the racks in several rows along the walls. The largest of them, which are intended for storing bulky items, are fixed at an altitude of 0.5 meters from the floor. Build the next row from smaller shelves. And in this way, get in order to decrease sizes to the top. On the very top shelf will be the smallest details that are used less than all.
In the center of the building, place a table of sufficient sizes for master's needs. By the way, you can also make it yourself. The shed windows are double and single. It is advisable to equip the door with a mortise lock, if desired, you can use a hinged one. If you plan to store vegetables in the barn, equip the racks with boxes. For the maintenance of animals and birds, divide the space of the barn into functional zones.
Thus, the barn is needed for any gardener, because it can be used to store garden and household equipment and tools, arranging a workshop and the maintenance of animals. If you have taken up the construction of this building, then try to immediately find out the cost of building a barn and provide all the subtleties of this process.
![]()
StrPort construction portal 2011-2018. Articles about repair, construction, building materials.
Copying information from the site is possible only with permission of the editorial office Or indicating a direct link to the source. Legal justification