If necessary, profile pipes are used in the construction of the canopy. Farms from profile ...
|
|
Corrugated board - universal material used not only in the construction of fences ... |
The shed is necessary both in the territory of a private house and a summer cottage. It allows ... |
DIY drain installation

Abundant rains, as well as the stormy streams of water that fall from the roofs, forced people to come up with all kinds of drainage methods. Owners of private houses usually collect talus and rainwater into various containers, and from high -rise buildings it is sent to a drainage system or a storm sewer. Installation of gutters in the country or on the roof of a country house will help fight the rotting of the walls and the formation of mold is more efficiently.
Content:
- The need to install drains
- Types of gutters for the roof
- Installation of the drainage system
- Heating of the gutters in the winter period
- Service of drainage systems
The need to install drains
The house in which, when building, did not pay much attention to the drainage system, will lose its external beauty during the first year under the influence of moisture. The most important thing to remember is that in the general state of the structure the moisture affects adversely. The lack of drainage causes the appearance of mold and damp spots on the walls, an unpleasant odor in the basements, as well as in other rooms of this building.
If such a problem is not engaged in, then the foundations of buildings are waterlogging and weakening, and the basement of the basements are filled with rainwater. The base of the buildings is also destroyed. Mold and dampness are poorly affected by the health of people living in this house, and financial expenses have no end. Also, melt and rainwater, draining, creates a noise that interferes with the normal rest of the residents of the house.
Distribution systems are used almost everywhere for the removal of rain flows from the roof of buildings: water flows from the roof into special gutters and is diverted along the drain pipe from the structure. The gutter is intended specifically in order to collect water from the roof. Further, the pipes enter the work, water is given water to a safe place. To install the drainage system on the building, not only pipes and gutter will be needed, but also their connectors, knees, bounces, fasteners.
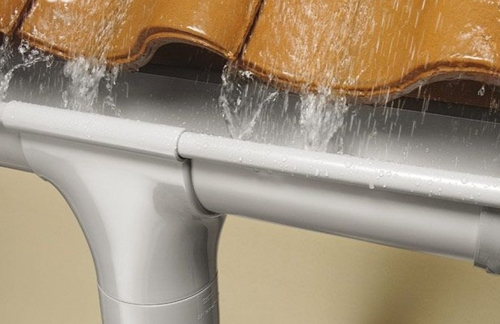
In addition to collecting and removing melt water and precipitation, the drain makes it possible to direct water into the storm sewer system, while preventing the hollow on the walls, as well as the destruction of the blind area. When installing the gutters for the roof, the service life of the building is extended also because modern latest drainage systems do not make it possible to accumulate water in the basements and at the foundation.
Thus, preserving the drainage system in working condition, you can protect all the main elements of the structure from destruction. Only in the climatic zones, where there is relatively little precipitation, an inorganized spillway is justified. Do not spare funds and time for the installation of a thorough and practical system of drain, you will protect yourself from large costs if your house and space around it are flooded.
Types of gutters for the roof
A well -chosen type of drain and a combination of roof material with spill materials gives a finished look to the house, emphasizes a harmonious transition from the very design of the facade and walls to the roof. According to the principle of collecting melt and rainwater, drains are divided into two main categories: internal and external. Special brackets, with the help of which the gutter is attached, are installed directly on the wall, on the ends of the rafter legs or a frontal board.
And the same category, includes pipes and drainage gutter, fastening elements and water intake funnels. In this case, it is possible to use plastic or metal gutter of various sections: rectangular, semicircular, trapezoidal. To prevent the overflow of precipitation over the edge of the gutter, it is recommended to install such a structure as a semicircular groove, which has an internal rib of stiffness along the edge.
According to the material used for the installation of the drainage system, the design is divided into several types. Which is better to use a drain to install, it is customary to solve, based on the climatic features of your region and your financial capabilities. Let's look at these materials in more detail:
- After a while, galvanized steel is a tendency to rust. Also, the manufacture of pipes from it, gutters and water intake, requires the involvement of specialists.
- Plastic, which is used as a material for the drainage system, is quite durable, light and inexpensive, but with fairly sharp changes in the ambient temperature (frost heat) it may crack. The installation of plastic gutters is appropriate in the southern regions, where in winter there are no low negative temperatures.
- Polymer steel. To date, the most popular drainage systems are systems made of steel with a polymer coating. A fairly large selection of color scheme, which is offered by manufacturers of such a metal, makes it possible to make a drainage system and roofing the house harmonious.
Installation of the drainage system
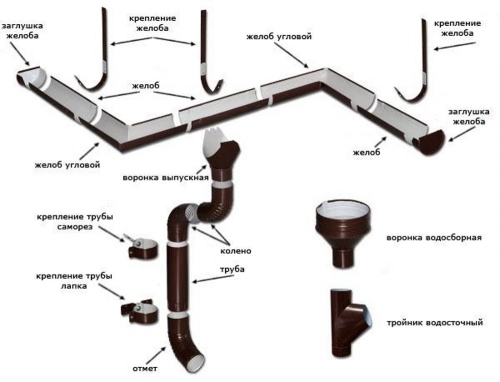
The entire drainage system is mounted from the main elements, which are a gutter attached along the edges of the roof, and the drain pipes, along which the liquid collected by the grooves flows into a special receiver, and then goes from the walls of the building. Both gutter and pipes, for the convenience of assembly are supplied additionally by all elements. And it is quite difficult to imagine the installation of drains without installation at different angles of rotary elements, funnels intended for collecting water, fasteners and plugs made in the form of clamps and brackets.
Calculation of materials
Before installing the drain, you have to calculate the number of all materials as accurately as possible. When calculating, the main parameter is the area of \u200b\u200bthe roof, which directly affects the number of funnels and the diameter of the gutters. This must be taken into account so that the materials do not occur.
When acquiring the elements of the drain, it is necessary to determine the number of gutters. Plastic grooves are usually sold 3 or 4 meters long. The meter of the necessary gutters is determined based on the number of roof slopes and width. The desired length of the drain pipes determines the distance from the ground level to the lower edge of the roof, as well as the number of points of drain of water.
For gutters, the turns are calculated based on the configuration of the roof itself, for the drain pipes the rule is this: one turn near the ground is 45 degrees. With the number of clamps of the brackets, things are a little easier: they are installed through each meter of pipes or the length of the gutters.
The entire system can be calculated independently with the following recommendations:
- If the house is not too large, for example, a bath or cottage that has a roof area of \u200b\u200bno more than 70 meters square, then, respectively, the diameter of the gutters should change from 70 to 115 millimeters, and the pipes should be 50 - 75 millimeters.
- For a house with a roof area of \u200b\u200bup to 100 meters, square pipes should have a diameter of 75 - 100 millimeters, and the section of the gutter - from 115 to 130 millimeters.
- If the roof area is more than 100 meters square, then the gutter should be with a diameter of 140 - 200 millimeters, and the cross section of the pipes should be 90 - 160 millimeters.
It is very important to be guided by the rules for the installation of gutters and when choosing a gutters installation. If the gutter turns out to be small, then it will be overflowed with water, and if the angle of the funnel is very large, then it will not be able to skip the right amount of water. The tilt of the gutter should withstand from 2 to 4 millimeters per meter length.
Production of drains
You can make drainage gutter, pipes and drain yourself. For such a purpose, you need to take a sheet of steel with a thickness of 7 millimeters. Further, be guided by the next algorithm for performing work:
- To obtain a folder connection, it is necessary to bend the longitudinal edges on the sheet. Using special roller tools, we roll out the workpiece of the product, giving it a semi -cylindrical shape or gutter shape.
- We carry out manually. We take a heavy block of metal, a piece of rail or a straight pipe, then we bend the element gradually until the necessary shape is obtained. The folds of the sheet are connected by a folding seam.
- For independent manufacture of a funnel, a cone, a glass, a rim must be cut out of leaf steel. In this case, it is necessary to remember the following rule: the diameter of the rim should be equal to the diameter of the side of the cone, with which it will need to be connected, and the diameter of the drain must necessarily correspond to the diameter of the lower part of the glass. In the opposite case, unwanted system leaks may occur. The funnel itself and its parts are connected to the pipe with a special fold seam.
- As for the manufacture of the drain itself, there are no restrictions and rules. For the manufacture of plums, a obliquely cut pipe is usually used, connected under the slope to the drain pipe. If the drain pipe consists of several elements, then to connect one side of the link, to make a bite of 5 millimeters. In order to limit the deep input of parts, the ledges of 7 millimeters are made at the ends of the links.
Installation of drains
Installation of drains is carried out, as a rule, at the stage of building a house, that is, before laying the roof. One of the most complex stages of installation is the mounting of brackets for gutters. Consider the instructions for the installation of drains and all elements of the drainage system:
- Installation of the gutters usually begins with fastening of gutter holders (or brackets, hooks). Even at the installation stage, metal brackets of the roof crate are attached to the rafters (the cornice will be laid on them then). It is wonderful if the step of the rafter is equal to the recommended step of the gutters themselves, this is about 50-60 centimeters. If, nevertheless, a step of the rafters is more, that is, for example, one meter, then additional brackets are attached at the required distance to the crate. The hooks must be placed with a small slope (approximately 5 centimeters per 10 meters of the gutter) horizontally so that normal drainage of water is provided. For this, after we calculate the number of brackets on one side of the roof, you should calculate the difference between the extreme hooks in height, put everything in a row and indicate the angle of inclination with a pencil, according to which they will be mounted (you can also numbered them just in case). If the brackets are long, then they can be bent at an angle of inclination of the roof. If they are short, then attach to the vertical side of the crate. If your house is too long (say, 20 meters), then you can make 2 slopes for draining water in two funnels. To do this, there is a report from the center of the side of the building to decline to the edges.
- Before installing in the groove, the funnels must be cut out or cut a hole through which the water will drain into the funnel, and then into the pipe. You should also not overdo it with the size of the opening under the funnel so that the water does not flow past it. The hole can be cut with a hacksaw. You have to note exactly the center of attaching the funnel to the gutter so that there is a hole exactly above it. Next, we fix the funnel with the gutter: we adjust on the one hand under the groove of the fold, and on the other, we are bend the lock from the opposite side.
- The gutter is put on the end of the bracket and is completely laid on it. Next, it is fixed with clamps on the bracket, as shown in the photo installation of the drain.
- It is necessary that the plug is with a rubber seal on the lower arc to snuggle tightly to the gutter. If the sealant is going on separately, then we put it in the arc of the plug up the ribbed part. Next, we make a jail dock with a ribbed part of the sealing material and put on a plug on the gutter, while proceeding while completely enters the groove.
- Combine the gutter with the help of connecting elements. The connector should also be with the seal. If you use the sealant separately, then insert it into the connector's arc upward side. In the center, the connector is put on both gutters at first with the same side that without a lock, and then a lock is fixed from the opposite side. Remember that the gutter should not be in contact with each other, withstand a distance of 3-5 millimeters.
- Each corner of the gutter must support the brackets from all sides of the corner. The connection with the groove of the angle is performed according to the method with the connectors described above. It is also advisable to install from the connector on both sides along the bracket in order to avoid sagging the connection.
- The knee of the drain is worn from below the funnel. This is done so that the drain is closer to the wall, and you can fix the pipes with clamps. A knee is still put on the knee from the funnel, which is directed down the end in order to then put a pipe on it.
- If the distance between the wall and the aforementioned drains is still decent, then a not very large connecting pipe is inserted between them.
- The pipe is inserted into the knee itself, and is also fixed using clamps. If the height requires that several pipes are used in one drain, then just one pipe is put on the other.
- Clamps are for a wooden wall or for brick. For a brick wall, you need a clamp with a pin so that it can be driven into a dowel. The dowel is inserted into the hole that is drilled for it. The pipe itself is fixed on both sides with a clamp, which is divided into two arcs, which are twisted at the edges with bolts or put on the pipe and then fixed.
- The drain is put on the end of the pipe that looks like a knee. On this installation of gutters with your own hands is over.
Heating of the gutters in the winter period
In winter, the resulting water from the melting of snow, flowing through the very cold areas of the roof and the drains themselves, may freeze. This in gutters creates ice congestion. Water is gradually layered on such a mash, overflows and becomes icicles over the edges.
In order not to arise in the icing system, it is necessary to perform work on the installation of heating of drains and roofs. Anti -icing systems based on special heating cables will protect the roof reliably from these unpleasant phenomena.
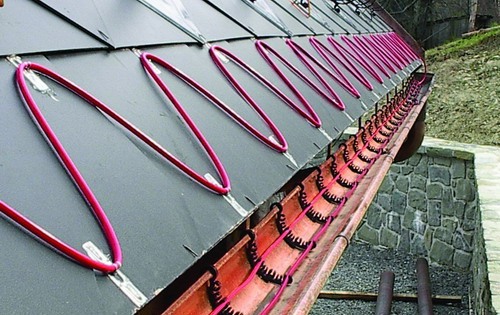
Such systems have such advantages: they protect the system from damage and blockage by ice, the formation of icicles and ice, do not need to carry out additional mechanical cleaning of gutters and roofs in winter. The anti-icing system reduces the cost of roofing, also in such a system, minimal energy consumption is due to the fact that it works only when the snow is melted and precautioner, with the probability of ice and icicles.
In order to correctly make a project of the anti -blocking system, you need to take into account the climatic zone where this system will be applied, the type of heated roof: cold or warm, roof material, type and size of the drain, as well as many other important factors. If we take into account all these parameters, you can correctly design the system for all sorts of features of the heated object.
Service of drainage systems
The decision to quickly carry out the installation of internal gutters and forget about the system forever in the fundamentally incorrect. Any drainage system for normal operation requires constant maintenance and repair. And even a perfectly made drainage system needs regular cleaning of drains due to the fact that the leaves and dust brought by the wind, seeds of various plants and other garbage, very quickly the entire system will disable. The need for repairing the drainage system arises if:
- Metal pipes began to rust, and plastic pipes cracked due to temperature changes;
- There were places of leaks at the very joints of the drain pipe or gutters;
- In the wind, the drainage system begins to swing and rattling, which suggests that weakening of fasteners has gone;
- During the rain, the water goes badly into the drainage system, which shows the clog of water intake and pipes or indicates that the slope of the gutters is chosen incorrectly.
Repair of drains in the presence of cracked or rusted pipes and gutters consists in their change. If the fasteners weakened, then they must be inspected and more reliably fixed or rearranged. Rarbation of the brackets will correct such a defect as the incorrect slope of the gutters.
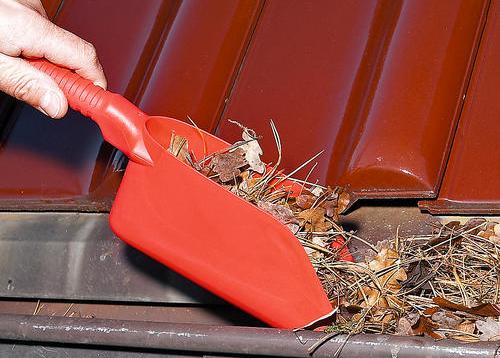
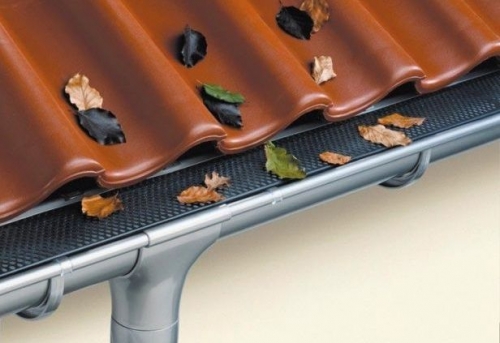
The drain pipes are cleaned by washing: from the hose, which is directly inserted into the pipe, water is supplied under a strong pressure. If rather large blockages have formed, then you can use a round brush that is worn on a long stick. The gutters are cleaned manually from the stairs or from the roof attached to the wall. For reliable protection of drain pipes and water intakes from getting various large garbage, it is necessary to use protective metal or plastic nets, which are directly installed in the funnels.
In places of joints, leaks can be eliminated by applying patches from a metallized tape with a butyl. For plastic pipes, silicone sealant and rubber gaskets are used. Before applying a patch, the leaks are cleaned with an iron brush and then neutralized. Then they apply silicone mastic and make a clamp from a metallized tape for drain pipes. Silicone mastic must be applied in such a way that when it is hardened, it does not create obstacles for water.
Thus, the correct installation of gutters is the key to the integrity and safety of your home. When installing the drains, the basement, facades and attic will be dry, and this suggests that there will be no infection such as mold in your house, which is quite difficult to get rid of. The more functional and better the drainage system, the less the cost of repairing the building will be.




In the first paragraph of the section
In the first paragraph of the section "Production of drains" is clearly an error: "A sheet of steel with a thickness of 7 millimeters." Probably meant a sheet of steel with a thickness of 0.7 mm.