Fiberglass wallpaper differ in many advantages, among which, first of all ...
|
|
A lot of people who carry out repairs in their house have faced such a problem ... |
Screw piles are becoming increasingly popular in the construction of various types ... |
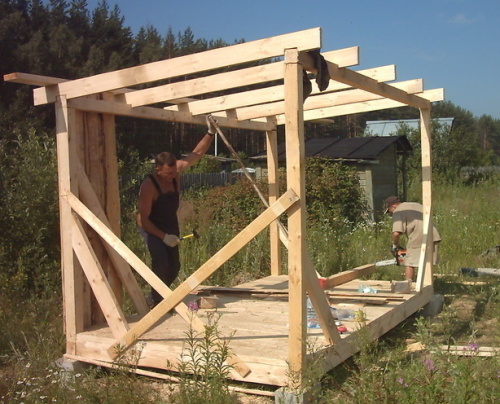
How to build a frame barn with your own hands

The shed is necessary both in the territory of a private house and a summer cottage. It allows you to solve many economic problems. This room is intended for storing firewood, fertilizer, garden inventory or any equipment, for example, lawn mower. You can also install a workbench in it, equip the workshop. There are many ways how and from which materials to build it. In the article we will consider how to build an inexpensive frame barn with your own hands.
Content:
- Several important points when designing a barn
- The construction of the frame barn
- Plastic or metal frame shed
- Frame shed photo
Several important points when designing a barn
Despite the simplicity of the design, some nuances should be taken into account before its construction:
- the barn should not be visible from the main entrance to the territory, it is better to place it in the background. No matter how neat he was, this is still an economic block;
- the approach to it should be free, since here it is possible to skid and the removal of large -sized things (when repairing in the house) or building materials;
- it is better to arrange it on a hill, thereby you can protect the building from melt or rainwater. This will prevent the appearance of dampness in the room, corrosion on metal details and rotting of wooden frame elements;
- a carefully thought -out layout of the room will help to avoid changes during construction or additional outbuildings after its completion. Perhaps it will be equipped with a workshop, a game room, a summer kitchen or planned places for chicken? Then it is advisable to divide the room into two parts: household and workshop (game, etc.). In this case, it is recommended to make two separate entrances;

- undoubtedly, the frame of the frame type has a long service life. For the construction of walls, ordinary lumber and OSB are more often used. You can give a more pleasant and accurate look to this building by lining it with lining or siding;
- the household with brick walls will last an eternity, but it will cost much more. In this case, it is recommended to perform a base of three to four rows of the clinker, lay waterproofing and continue the construction by logs.
- a single -sloping roof is usually performed in the frame shed, but a gable option is also carried out if desired. For the roof, a Euro -shifer or a profiled sheet is more often used, but here, of course, you can choose the material that covers the roof of the main structure to maintain a common style;
- before construction, it is necessary to accurately determine the location of the door and the slope of the roof, otherwise rain drops or meltwater will drain directly above the entrance;
- do not forget about waterproofing, applying, for example, a film that should be pulled over the rafters, and then fixed the counterparty.
The construction of the frame barn
Foundation for frame shed
You can protect the wooden frame from moisture using a strip foundation, the best option will be if you make a base (30-40 cm) from concrete. It should be remembered that it is not suitable for sedimentary and peat soil. This base is also suitable if it is planned to perform the first few rows from the clinker, then the need for a basement disappears.
Stages of work
- To do this, a trench is prepared with a depth of about 30-40 cm and 25-30 cm wide, 10-15 cm of a sand cushion is poured.
- The insulation is necessarily laid on top, otherwise, when pouring concrete, milk is immediately absorbed into the sand, thereby decreases the strength characteristics of concrete.
- Then the formwork is mounted. The height of this design above the ground should correspond to the height of the base. If necessary, the upper part of the formwork is strengthened with support. Particular attention should be paid to the corners, because it is on them that the main load accounts. Following the reinforcement 10-12 mm thick is laid, it is knitted with wire or strengthened with special locks, welding of cells is unacceptable.

- Concrete laying (M200, 250) is advisable to carry out with one entry. It is not recommended to perform these work in the rain, and in hot weather it must be regularly wetted with water in order to avoid microcracks, which, in turn, will further affect the strength of the entire base.
- After 10-14 days, you can start installing vertical supports, as a rule, by this time concrete gains up to 70% of the strength.
The column foundation is also applicable to light buildings.

Stages of work
- To do this, along the perimeter of the structure and necessarily in the corners with a step of not more than 1.5 meters, the so -called charged brick chairs are exhibited. Where their width will be 240 mm - two bricks, and a height of 195 mm (3 rows of brick).
- Masonry is performed with seam dressing, for the solution the cement of the M400 is better for the solution. To prevent the construction from distorted, it is necessary to monitor the vertical and horizontal of the columns.
An alternative can be hollow concrete blocks(390x190 mm), later these voids are filled with a sand-cement mortar.

Stages of work
- Here, pits are dug up about 0.5 m deep, covered with sand and crushed stone (each layer is compacted) and then blocks are installed.
- They are necessarily mounted at the corners of the structure and then are distributed around the entire perimeter, the recommended distance between them is about 1 meter.
- An additional series of concrete blocks can be launched under the floor of the future barn.
Wooden foundation It is advisable to perform a larch with a thickness of about 300 mm from log logs, they must be treated at least 2-3 times with liquid bitumen.

Stages of work
- The holes are drilled and prepared wooden piles are installed in them. Pouring the soil, thoroughly compact it and then sawn down at the desired height (30-40 cm).
- For reliability, a concrete solution can be poured into the hole.
- Instead of logs, metal piles will also serve as constructive elements.
Floor. Walls. Roof
Tips:
- the fastening of the strapping beam to wooden piles is carried out by nails, be sure to obliquely driven;
- to brick and concrete grillage, installation is performed by T-shaped anchor hairpins.
- At the stage of installation of the strapping, waterproofing should be laid (for example, roofing material in a couple of layers), and with lumber is already tied on top.
- For the frame, a beam of 100x100 mm is used, their joints at the corners can be made in the floor, where we cuts out of about 50x50 mm at half the thickness of the beam (on both sides). If necessary, a chisel or a sharply sharpened ax is adjusted in the corners of the frame.

- Balk-lags are laid from the board 50x100, put on a rib with a step of not more than 600 mm. All elements are connected by nails or screws.
Tip: For the convenience of work, a work site is performed (black floor). For flooring, boards of 30x150 mm are used, with a tight fit for each other or sheets of plywood, chipboard 16 mm thick.
- Before installing the racks for the walls, you need to check all the horizontal lines and the diagonals of the resulting lower strapping.
- The vertical racks of a beam of 100x100 mm are attached using MA-shaped metal mounts or ordinary nails with oblique slaughter. The distance between them should be no more than 1.5 m. For greater reliability, they are fastened diagonally with a 40x100 mm board.

- Unexplored supports can be strengthened with ugsin so that they do not disperse, after the upper binder, they are removed.
- The location of the door racks depends on its type and size. If the door is same -sex, then there are 2 options for installing vertical supports:
- on the one hand, a corner beam will serve as a support for the box, and then one additional stand is additionally installed;
- but if the door is planned in the center of the wall, then 2 racks are mounted. The distance between them dictates the width of the door with the box.
- Next, the installation line of the horizontal bar comes, which should correspond to the height of the door. On the walls, in places for windows, bars of the necessary sizes are also exhibited.
- Then the upper binding is performed, the same lumber is used here. At this stage, it is necessary to insert into the racks. The bearing lags of the ceiling from boards 50x100 mm are also installed.
- For a single -sided roof, one of its sides must be sewn (lifted) with bars until the required slope, which should not be less than 25. When installing the rafters, you need to remember that they should protrude about 300 mm beyond the edge of the roof. Be sure to exhibit toothed legs (supports).
- Cross boards 50x100 mm are also installed with a protrusion, a step of not more than 600 mm. Then a crate is performed for the installation of roofing material. Depending on the material, it can be continuous or discharged. An ordinary roofing material or a membrane film will perfectly act as waterproofing.
The following is a detailed video on how to build a frame barn with your own hands.
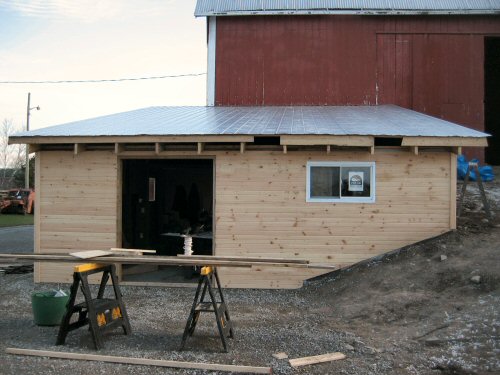
Facial barn cladding

- Any material is used for the skin, usually it is a profile or boards, the fasteners of which can be performed both vertically and horizontally, with an overlap of 2-3 cm or without it.
- You can take a lining, but this option will be an order of magnitude more expensive.
- The inside of the household unit is insulated at will, depending on its purpose, sheathed, divided by a partition, installed a workbench, racks, and determine the place of residence of chickens.
The amount of material for the frame of the frame barn 3x6 m
Before you build a frame barn, you need to draw up a drawing so that you do not have to stimulate the plan on the go. The plan will allow you to correctly calculate, and then purchase the required material. It should be noted right away that the entire lumber from all sides is carefully treated with a variety of impregnations, antiseptics, so it will last an order of magnitude longer.

The dimensions of the boards, bars depend on the type of attachment: complete deforestation (incomplete in the floor of the tree) or with the help of steel planks, corners.
For fixation, nails, self-tapping screws, screws are used, special L-shaped strips are used for more reliable fastening, especially at the corners of the structure.
Below is the calculation of the material necessary for the construction of the frame of the household unit 3x6 m on a strip base, with one window of 1.5x1 m, a door 80x200 cm (in the center of the wall).
- Lower and upper strapping and lags (floor beams) Barsia 100x100 mm 6 pcs. 6000 mm and 8 pcs. 3000 mm.
- Paul flooring 6000 mm boards 25x150 mm are carried out, they need 20 pieces.
- Vertical supports Bars are 100x100 mm 11 pieces of 2400 mm, two of which will go to the door racks.
- Roof tilt You can create in 2 ways: build 50 cm with bars, for this you will need 4 pieces, or when installing vertical supports on one side on which there will be a slope, should be initially shorter (below).
- Black ceiling Plywood or fiberboard, DSV, OSP or 25x150 mm boards are also covered with sheets.
- Raftersthey are made of bars 100x100 mm taking into account 300 mm of the ass, 2 pcs are needed here. 6600 mm.
- Rafter legsin this case, with a step of 90 cm - 6 boards 50x100x3600 mm are mounted.
- Crate The discharged type is mounted with a step equal to 600 mm from the boards 25x100x6600 mm, they will need 7 pieces.
- Tips (Vetroviki)they are installed according to the ends of the structure, for this, 25x100 mm lumber is used. Accordingly, 2 boards are needed 6600 mm and 2 3600 mm long.
- For a window and doors, you will need additional horizontal crossbars: 2 Brush 100x100x1500 mm and 1 bar 100x100x800 mm.
Plastic or metal frame shed
A new word in the construction of a shed of plastic or metal.

Advantages
- These options are ideal for those who value their time and do not accept construction dirt on the site.
- Parts of the economic unit are packed in boxes, thereby providing convenient transportation to the desired point.
- This structure is easy to move if necessary, because its installation/dismantling is quite simple and takes less than two hours.
- The shed of these materials has an aesthetic appearance, thanks to a variety of color color.
- One of its advantages is practicality, it does not need special care, such as: antiseptic treatment or annual painting. Caring for such a household consists in washing ordinary water.
- It is not required to install it for its installation, here the base of crushed stone or sand-gravel mixture is suitable. And the frame reinforced with reinforcement will help to withstand snow and wind loads.
- When erecting or installation of a finished frame barn or cabinet, it should be remembered that any construction should be removed from the street by at least 5 m, and from the neighboring section 3 m. The remaining nuances position in the territory, orientation to the cardinal points is already like It is said, a matter of personal taste.
Frame shed photo


![]()
StrPort construction portal 2011-2018. Articles about repair, construction, building materials.
Copying information from the site is possible only with permission of the editorial office Or indicating a direct link to the source. Legal justification
shed and garages can be built
sarai and garages can be built at a distance of 1 meter from the boundary