Thermal insulation and sound insulation of the room in which it ... depends on the quality of the insulation.
|
|
In the process of choosing what to build a house - a log, is quite popular ... |
Laying tiles in the bathroom or in the kitchen an integral stage of major repairs, with ... |
Installation of multi -level ceilings made of drywall
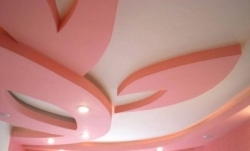
Each of us is trying to diversify the interior of our home, choosing the original decoration of walls or ceiling. Multi-level ceilings today have not been luxury for a long time, but for some reason they remain a dream for many. However, if you decide to equip such a ceiling in your house, you will not regret subsequently, since it will bring a highlight to the interior of housing.
Content:
- Features of multi -level ceilings
- Advantages of multi -level structures
- Sketch of a multi -level gypsum cardboard ceiling
- Surface marking for arranging the ceiling
- Installation of the frame of a multi -level ceiling
- Installation of drywall sheets on the ceiling
Features of multi -level ceilings
Many developers prefer to divide the spaces into several zones for their functional purpose. When arranging a multi -level ceiling in this case, zoning can be mirrored on the ceiling. The boundaries of functional zones on the ceiling look different - these are color transitions, and level changes in height, and the contrast of lighting.
Accents are most often made in the living room in the working and dining area, but the cinema hall and the recreation area remain muffled. Multi -level drywall ceilings are an excellent solution for large rooms, in which just a smooth ceiling looks inappropriate. Another thing is the prospect in the vertical direction.
The simplest version of a multi-level ceiling made of drywall is two-level drywall ceilings. To do this, on a single -level ceiling, another level is built around the perimeter along the walls. You can make simple ledges, or with niches under the hidden multiple lighting of the ceiling. Depending on the design of the decorator, the ceiling cornice along the walls is round or rectangular.

Three -level ceilings from two -levels are distinguished only by the number of layers created in the previous layers sequentially. With an increase in the number of levels, it becomes necessary to strengthen the supporting structure of the overlying layers. Standard calculated loads are calculated based on the permissible value - 14 kilograms per square meter.
Different levels of drywall ceilings are customary to be distinguished by coloring of different layers with different colors and using decorative backlight. It is worth noting that equipping a curved multi -level ceiling is more difficult than a traditional straight ceiling or multi -level structure with straight lines. The main difficulty is to apply lines, according to which the vertical part of the circles, bends and waves will subsequently pass. Simply put, the exact marking is the key to successful work.
Advantages of multi -level structures
Having chosen a multi -level ceiling from drywall for arrangement in your housing, you will not lose, because this design has a lot of advantages. Consider the main ones:
- Convenience in work. Even the simplest single -level ceiling is mounted much faster than the classic ceiling. In a maximum of two days, the ceiling will be ready for the finish.
- Changing the geometry of the room. Multi -level plasterboard ceilings with their diversity of curved forms and various lighting options can optically increase the overall space, rebuilding the shape and geometry of the room.
- Camoufting communications. Multi -level ceilings are able to close different defects of the original black surface, mask the electrical wiring, communications of ventilation and air conditioning systems, and sometimes even pipes.
- Functional zoning. A multi-level gypsum plane ceiling will successfully divide the studio apartment and large rooms, where the installation of interior partitions on functional areas is not provided.
- Original lighting. When installing a multi -level drywall ceiling, you can equip an original and unique lighting system using the halogen light bulbs that are common in our time, spotlights, modern chandeliers for multi -level ceilings and LED lighting.
- Environmental purity. Drywall is environmentally friendly material. In addition, its moistulating properties allow maintaining a normal microclimate in the room.
- Price-quality ratio. Multi -level drywall ceilings are almost no equal in this price category. Along with these advantages, multi-level drywall ceilings have high durability, which is checked by more than 20 years of operation of the first drywall structures.

Sketch of a multi -level gypsum cardboard ceiling
To analyze how a multi -level plasterboard ceiling will fit into the interior of the room and look relative to furniture, it is recommended to pre -develop a sketch of this design. The main thing in the drawing of a multi -level ceiling observance of scale, accuracy and correctly calculated sizes, without errors.
On the sketch, you should draw all the walls in the room and mark the windows and doors without fail. This moment is especially important if you yourself come up with the shape of the ceiling. Everything should be thought out to the smallest details, for example, whether hidden cornices for curtains will be located above the windows, and how the ceiling from the doorway will look.
After that, at least schematically mark the placement of furniture in the room in the figure. These should not be too bright features so that attention is not distracted from the boundaries of the ceiling itself. Having completed these sketches, you can start drawing the multi -level ceiling itself. If you saw somewhere a photo of a multi-level gypsum plasterboard ceiling that you liked, then you can choose the same configuration for yourself by adapting it to the shape of your room.

When creating a sketch of a multi -level ceiling, consider the number of levels based on what the height of the main ceiling in the apartment. Remember that the more you plan to make tiers, and the more the distance between them, the lower the ceiling will turn out to be. Therefore, it is not recommended to equip an overly bulky design in low -flowing apartments of old buildings.
The first part of the ceiling is the lowest level of a multi -level ceiling made of drywall and one fourth circle located in one corner of the room. The two remaining parts, which are wave -shaped forms, will be placed on the same level and in the middle between the ceiling itself and part of the circle.
The wave -like shapes and bends of the middle part of the future multi -level ceiling can be drawn by hand with the additional use of the circul. By applying all parts of the ceiling to the sketch, it is necessary to take into account its real dimensions. Also at this stage it is recommended to stock up in advance by lamps to create backlight, before the start of work.
Surface marking for arranging the ceiling
Immediately before the surface marking, it is recommended to clean the ceiling from the old coating. If the panels are attached to your ceiling, they must be removed and cleaned of the remains of glue and various irregularities. If you turned white, you can not clean it if you do not observe it from the surface of it from the surface and cracks.
Chalk, which is applied in several layers and is poorly held, will have to be removed, since it will gradually gradually fall off and fall on the drywall fragments. It is advisable to remove the old painting, which you can do with a spatula or metal brush. The old stretch ceiling is dismantled, removing fasteners.
After cleaning the surface, you can start marking the ceiling. First of all, it is recommended to outline the place of the first level of the future multi -level ceiling, as in the video about multi -level ceilings made of drywall. It is customary to make markings along the walls, given the fact that lamps will be located between the levels. Therefore, make sure that the distance allows them to place them.

Next, you need to select the angle with the smallest value of the height and at the distance you need from the ceiling make a mark that indicates the placement of the drywall sheet. In this case, both adjacent walls should be noted on the sides of the corner. And the next stage is the marking 3 of the remaining corners.
This is easiest to do with a laser or water level. But you can also use the following mathematical calculations. From the height of each subsequent angle, you need to subtract the height of the original. Add the difference to the distance to which a new multi -level ceiling will be lowered, and take the amount from the level of the main surface.
We give a simple example. If in the room the lowest angle is located at a two -meter height, and the next one is at a height of 2.1 meters, the difference will be 10 centimeters. If you want to do the first level 10 centimeters below the base, then in the first corner the marking should be at an altitude of 1.9 meters. In the second corner, make markings, retreating from the main plane of 20 centimeters.
After such markings, it is necessary to start marking to attach future pendants and profiles. It is customary to draw parallel lines under the profiles to indicate the places of fasteners of suspensions - put points. Profiles will be located on all seams of drywall, that is, the edges of the material in the air should not hang.
The suspension step is 60 centimeters, and the step of the profiles is about 40 centimeters, the suspensions are also located at the end of each profile. Based on the overall dimensions of the room and the shape of the mounted ceiling, you need to determine the direction of the profile, following the path of the smallest resistance, in other words how it will be more convenient for you. Very often there are persistent recommendations that it is worth installing the supporting profiles in the perpendicular direction to the window so that the seams on the material are so not noticeable under the rays of the sun.
However, when choosing the direction of installation of the profile, it is more correct to take into account its length, placement of drywall sheets, type of dressing between sheets and the number of transverse seams. And in order for the seams to be less noticeable, you need to try at the putty stage.
Installation of the frame of a multi -level ceiling
To perform work on the installation of a multi -level gypsum plasterboard, you will need the following tools and materials:
- marker or pencil for marking;
- scissors for metal or a grinder for cutting supporting profiles;
- electric jigsaw or painting knife for cutting patterns on the sheets of drywall;
- drill for making holes for mounting;
- a bromic rubbish for cleaning the chamfer of 45 degrees for future putty;
- needle roller for creating a bent surface on drywall;
- protective gloves for the maintenance of hands when working in the safety and prevention of cuts and corns;
- protective glasses to protect the eyes from crumbs and dust, which during work will be raced in large quantities.
Before proceeding with the arrangement of a multi -level ceiling made of drywall, you should attach the frame to the walls and the main ceiling. The main UD profile is attached around the perimeter of the walls, which is a supporting structure. In the future, it must be supplemented with cd profiles that increase the rigidity and stability of the entire system. The UD profile on the walls is installed using dowels. They are placed in a step close to 25 30 centimeters.

After that, it is necessary to start the installation of intermediate CD profiles, which are customary to connect the metal-metal type with self-tapping screws. Now we can say that the work for installing the first level of drywall ceiling is completed. To install the second level and subsequent elements, it is necessary to additionally set the supporting levels.
To do this, you will need distaners who also call suspensions. They need to be attached to the main crate, they act as carriers of the second level. The suspensions should be fixed with the help of self -tapping screws, and the second tier of the drywall ceiling will be suspended further on them.
To make the profile bend, it needs to be cut. If the area of \u200b\u200bthe room is more than 20 meters square, then the profiles must be placed at a distance from each other, not more than 40 centimeters. Tags for CD profiles are made on the ceiling or walls approximately every 50 centimeters. Here you should fasten the brackets for fasteners.

Measure the distance between the walls, then cut the CD profiles by about 0.5 centimeters less than the distance obtained as a result of calculations. Now you can insert CD profiles into the UD-profiles, raising the latter a bit. Therefore, each profile will have to be pulled out by the middle bracket for fastening, then bending it under the profile.
Bright the auxiliary frame stretch the thread along the level of its plane. On it you need to set all auxiliary profiles. Then it will be necessary to attach them to the main self -tapping screws or fasteners. The ends of the brackets should bend up or to the sides.
After you can sew the frame of the first level, only you should not forget about the dressing of the seams, jumpers and stock, which should be left for the first level. Unnecessary angles must be removed immediately, so that the structure is not excessive to load with additional weight. So, the first level is ready, and you can transfer the drawing from the sketch to the ceiling.
Installation of drywall sheets on the ceiling
After the manufacture and installation of the frame, you can start mounting on the first level of drywall sheets, according to the instructions on the multi -level ceiling made of drywall. I would like to warn you that it is not worth it to cut drywall so that it repeats the wave lines. Do it differently. Measure the sheet in such a way that it is placed without problems in a designated place, but it would play a little beyond the borders of the wave. After the sheet is grabbed, you can cut everything superfluous with a sharp knife.

To do this, it should be carried out with a knife on the back of the sheet, focusing on the wave and using it as a ruler. Then break the drywall a little in such a way that the line gets down from below, and draw a knife along it. After that, scroll through the edge of the screws. Then it is necessary to trim the ends. Well, at the end of all the work you need to cut a broken cardboard, although this is not mandatory.
It is customary to suspend drywall to the first level, and you should not start at all from the wall. You can leave the perimeter free, since here you will set the subsequent levels. It is recommended to attach sheets to the frame with special self -tapping screws. About 60 pieces go to each sheet.
Consider the future backlight when installing sheets of drywall. The eyeliner for it needs to be carried out before fastening sheets to profiles. In shape, the second level will depend on your imagination. If you have chosen a rounded shape. To do this, draw a circle and attach the second-level ceiling frame in the marking, the basis of which is also the UD profile. It must be attached to the first level, preferably in places where the planks of the first tier will take place.

After that, it is necessary to insert CD profiles into the main profile, which are customary to be attached to the first level CDs through drywall. To do this, you will need screws for metal, which have a length of 60 70 millimeters. The sheets are screwed, and then cut. It is convenient to do this using an electric jigsaw or ordinary knife -haired woman for metal.
Now you can start creating a third level. However, remember that the price of a multi -level ceiling made of drywall in this case will increase. In general, the arrangement of a multi -level plasterboard ceiling implies the presence of any number of tiers. However, it is not recommended to do more than 3 levels, otherwise the ceiling will become too low. Do not forget to remove the eyeliner for lamps, otherwise otherwise you will have to dismantle part of the done.
![]()
StrPort construction portal 2011-2018. Articles about repair, construction, building materials.
Copying information from the site is possible only with permission of the editorial office Or indicating a direct link to the source. Legal justification