Before you start installing windows on the loggia, you need to decide on their model and ...
|
|
Sooner or later, each of us is faced with the need to build or repair ... |
In order to protect your plot or house from extraneous invasion, it is protected ... |
Laying and cycling parquet
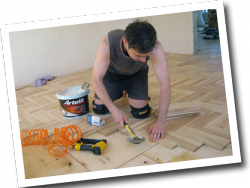
Since ancient times, the tree has been considered popular building material due to its unique properties of durability, environmental friendliness and high strength. Wood is suitable for the implementation of all kinds of creative ideas, including for laying flooring in the room. For many years, the parquet floor has been relevant for any interior, as it is perfectly combined with various style solutions, whether it is designed according to all the classic rules, an ultramodern high-tech or the colorful style of Ethno. Today we will consider the most popular ways of laying parquet, the process of cycling of the parquet board and the procedure for varnishing parquet
Table of contents:
- What is parquet
- Preparation of the floor for laying parquet
- Parquet laying
- Parquet boards
- Parquet varnishing
What is parquet
Parquet is a variety of flooring, which has been used for a long time in country houses, cottages, apartments, state and other institutions. They make a parquet of various kinds of wood, so the parquet adopted all the advantages of the tree - environmental purity and strength, aesthetic beauty and long service life. In addition, this flooring for the floor does not need special care.
The tree looks just fine in the apartment, creates warmth and comfort. The parquet board has a thickness of 8 15 millimeters and is produced from such wood of wood as black and red wood, walnut, hornbeam, oak, beech, cherry and pine. Parquet can be laid in the bedroom, living room and corridors.
Preparation of the floor for laying parquet
Laying a parquet board begins with the preparation of the surface, because the life of the flooring depends on the quality of the base. When carrying out such works as laying the screed, installation of parquet and cycles of the board, a technology tested by time is used, so in the end you will receive a perfectly laid floor, which will serve faithfully for many years.
The properties of the screed
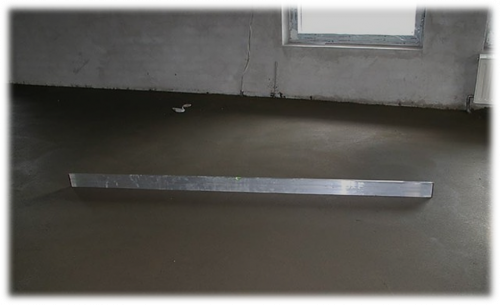
The surface of cement or concrete should be strong, even and dry. The screed can be considered even if the difference is less than 2 millimeters on two meters. In order to prevent the peeling of the parquet surface from the screed, the strength of the latter should reach 25 IMs.
A relatively simple and cheap way to check the surface for strength is to test it using a metal crane. On the screed, it is customary to draw a lattice with a cell of 10 centimeters. The surface can be considered durable if the sand is not painted at the places of intersection of lines.
The humidity of the screed should not be more than 2%. Humidity is recommended to be measured with a special carbide device. In the case of the use of an electronic tool for measuring humidity, but such devices have a fairly high fraction of the error.
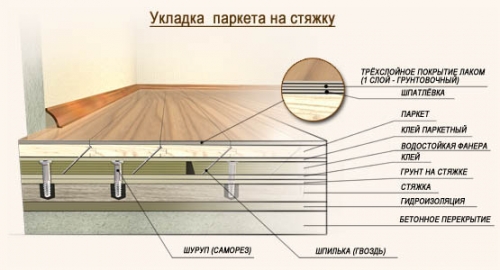
Gluing and installation of plywood
To obtain good adhesion of glue, which will stick plywood to the screed, you need to primed the surface. A type of primer should correspond to the type of glue. For example, if you plan to use rubber glue for gluing plywood, then the primer should also be chipped.
After the primer dries, you can start gluing plywood. If the humidity of the coating for laying the parquet is more than 2% (maximum 4%), then it is recommended to make a waterproofing barrier using a polyurethane primer. A similar primer should be applied in two layers with a roller with a break of one hour.
Do not wait until the second layer of primer dries, it still needs to be sprinkled with quartz sand in order to improve adhesion of glue. The remains of unaccounted sand are removed by a vacuum cleaner after the primer dries completely. After applying the hydraulic tank, it is recommended to use exclusively polyurethane adhesives.
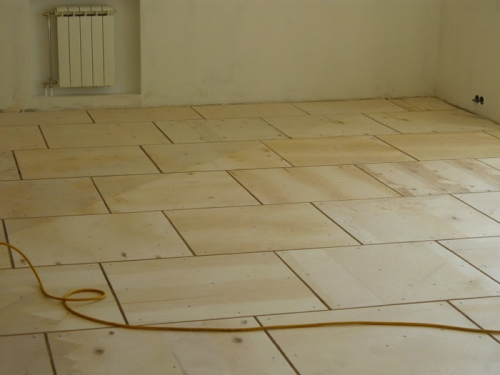
In the process of laying a parquet board, a predominantly moisture -resistant plywood is used, which has a size of 1.5 by 1.5 millimeters and a thickness of 12 millimeters. Plywood sheets should be cut into 4 identical parts. When installing plywood, it is advisable to leave compensation seams between tiles with a width of 0.5 centimeters, and between the stove and the wall - 1.5 centimeters.
Sometimes the installation of plywood is carried out without gluing by screwing plywood on the screed with screws. In this case, you can not use the primer. Such a technology is cheaper, but with prolonged use of parquet it leads to a creak, because not glued plywood can bend under loads. To be secured from the problems described above, plywood should be mounted with glue and screws.
For gluing plywood sheets, you can use rubber glue or water glue based on PVA dispersion. On the not yet dried glue, it is necessary to lay a sheet of plywood, drill holes under the dowel and fix the screws. You can calculate the number of dowels like this: to lay one sheet of plywood (0.75 by 0.75 meters), it is customary to use at least 9 screws. 48 hours after the glue drying, plywood sheets for better adhesion are advisable to sand and primed.
Parquet laying
Before determining which parquet styling options are suitable for your home, remember that wood is a living natural material on which such parameters as temperature and humidity in the room have an effect. Remember that the moisture content of the wood should correspond to the relative humidity in the room.
If the room is too dry, then the parquet in this case will refer, losing its size and shape, which will ultimately provoke the formation between the strips of cracks. If the room is too raw, then the parquet coating will gain moisture and increase in size, which will certainly lead to raising the planks.
The parquet rivets before installation should be stored for several days in the room where they will be glued. Immediately before work, the moisture moisture moisture meter should be measured. The indicator should be in the range of 7 - 11%.
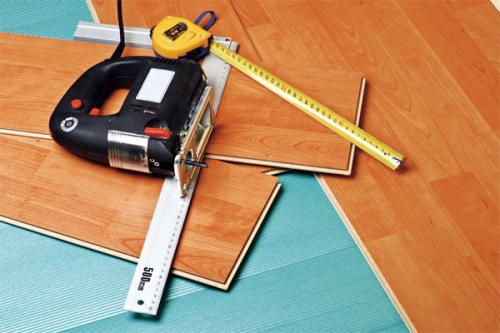
Parquet will retain optimal equilibrium humidity with such parameters: air temperature from 18 to 24 degrees above zero, relative humidity is close to 40-60%. For laying your own parquet, you will need the following tools: spacer wedges, saw, drill, hammer, roulette, knife, carpentry and wooden wedges close 30 centimeters in length.
Parquet laying on a screed
There are different ways of laying parquet. The simplest but most unreliable way of laying the parquet is to lay the rails on a concrete screed. Such installation is carried out when it is to be dealt with with an uneven sex. The size of the planks should be selected, given the area of \u200b\u200bthe room. Small trims are able to significantly increase the room, and large boards, on the contrary. The optimal dimensions of the strips fluctuate in width from 3 to 10 centimeters and in length from 15 to 40 centimeters. The thickness can vary within 15-20 millimeters.
Planes should be attached using their constituent elements of ridges and grooves. Using a special spatula, parquet glue is applied to the plywood. To squeeze out excess glue, as well as provide a long and uniform fit with a special pneumatic or mechanical tool, a parquet board is shot. Depending on the type of laying, the shooting is carried out from several studs to each parquet bar to shooting at a few planks at the same time.
Parquet has the ability to narrow and expand over time, so it should breathe - between the border of the parquet bar and the wall you need to leave gaps of 10 millimeters. Similar gaps are also recommended to be left around pipes, doorbells and other obstacles. The technology of laying parquet involves the direction along the light, in other words - perpendicular to the window plane.
Along the wall is the first row of parquet board. The boards are interconnected by the principle of a spike into a groove. The first board of each subsequent row at an angle is pressed to the board of the previous row, and then falls flat. Slightly hit the connection if the gap remains between the strips.
2-3 days after installation, a parquet cycle can be carried out. You should also thoroughly put the gaps. The time for laying the parquet floor depends on the size of the rails, the complexity of the picture on them and the area of \u200b\u200bthe room.
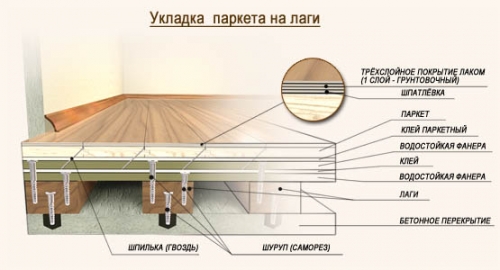
Laying parquet planks on the lags
Installation of the parquet board on the lags is carried out at a limited period of installation of the coating, since this technology for laying the parquet does not require time for which the screed will have time to dry. There are additional amenities: under wooden bars, you can place pipes and cable communications, lay the insulation and other insulation.
Laying a parquet coating on lags with an impregnation with an antiseptic is considered acceptable in cottages and country houses. Broaches are used strict, with a cross section of 5-5.5 by 7-10 centimeters. Their humidity should not be more than 12 %. The room where the lags will be installed should be carefully ventilated, otherwise water vapors are formed under the parquet.
If the room has high ceilings and threshold, then it is necessary to put 2 layers of plywood on the bars, having fixed one layer to the lags with screws, and the second - glue to the first with glue.
It is necessary to lay bars across the direction of the rays of the sun from the windows, and in a room with a certain movement of people, for example, in the corridor, perpendicular to movement. Lags to the concrete base are attached with screws and dowels. The mounting step should be placed at least 50 centimeters.
Before laying the parquet on the lags, you should mandatory the alignment of wooden bars at one level. If the lag is above the set level, then you need to remove the ledge with a shirt. If the bar is located below the level, it is recommended to put chips on it for leveling in level.
To make the parquet not only attractive from an aesthetic position, but also durable, under the parquet it is worth placing insulation, which is able to improve sound insulation. In addition, the house will become much warmer.
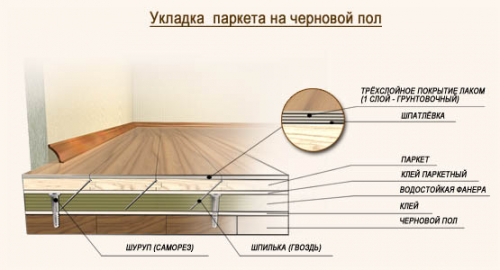
Laying a parquet board on a black floor
A similar option for installing parquet is perhaps the simplest and most economical, which can be seen by typing a parquet photo in the search engine and looking at the proposed options. Additional time expenses for drying the concrete screed and the installation of the lag are not required. The parquet coating is usually laid directly on the old wooden base. However, with obvious simplicity, this option is considered the most responsible.
Before installing a parquet board on a black floor, it is recommended to check the surface quality. The floor should be even and horizontally fixed on the well -dried and impregnated with the antiseptic of the lag. Under no circumstances, the floor should have changes, move when walking and creak.
It is customary to lay the water -resistant plywood on the old flooring processed with glue and attach with screws. The screws of screws should be shed 3-5 millimeters. After the flooring, the plywood should be laid the rest of the pie.
Parquet laying by swimming method
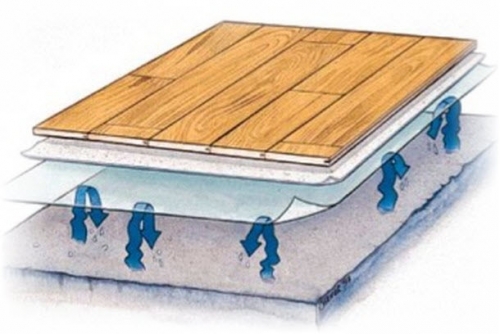
Installation of the parquet board by a floating way means that the coating to the adjacent surfaces or the base is not attached in the usual way. Instead, a substrate is used. Parquet boards are attached to the Spoon and glue these compounds. As a result, the so -called freely floating surface is obtained, because parquet strips fit out of the floor loosely.
Apply parquet glue in the parquet groove or the upper edge of the protruding coating. When gluing parquet rails, it is necessary to apply a sufficient amount of glue, when connecting parts of the parquet, the glue should protrude beyond the limit of the units. Only in this case, good tightness when installing a parquet board is ensured.
The first row of a parquet board must be laid along the wall, aligning the row with small wedges or bars, which are customary to insert between the wall and the first row to preserve the clearance. During the laying process, the boards are tightened. For this type of work, a methodology for connecting parquet strips on the back of the metal brackets is provided, and the butt seams are glued.
Parquet boards
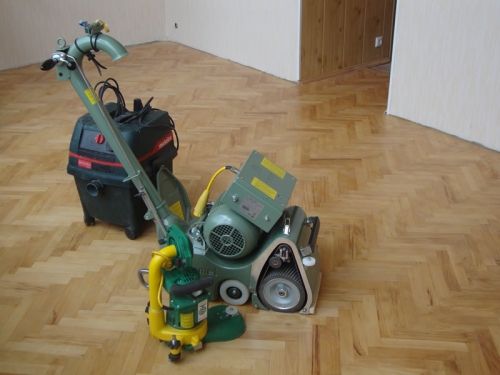
The cycle of parquet consists in grinding, aligning and removing the upper layer of wood, on which the remains of the old varnish and scratches can remain. Before covering the parquet coating with varnish, it is customary to cycling, and then grind it with sandpaper.
Various cycles of boards are applied to different wood, because solid and soft rocks have different properties. The cycle of the parquet board can be done several times: for a parquet with a thickness of 15 millimeters - up to 5 times, for a thin parquet of 8 millimeters - up to 3 times.
The instrument plays an important value for the cyclist. The width of the blade should be slightly wider than the processed parquet board - by 1 1.5 centimeters. The length of the protruding end of the cyclic should reach 35 40 millimeters. In the center of the cycles, it is necessary to break through a hole for the handle. The blade, which is sharpened at an angle of 35-40 degrees and a little round, will serve well.
Then you can process the parquet. Incorrectly cycle the bar behind the bar. Quickly and easily you can go through the whole floor at an angle to the parquet, paying special attention to dementes and places of joints. If you organize the work correctly, then you can clean the parquet in a room with an area of \u200b\u200b20 meters of square hours for 3 4. When processing, it is recommended to moisten the parquet board with a clean rag. At the end, be sure to polish the spitting coating with a coarse -grained sandpaper and remove dust using a vacuum cleaner.
Parquet varnishing
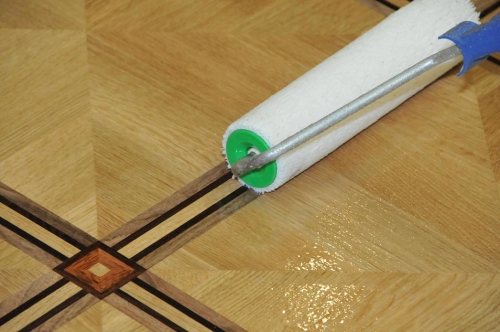
After cycling, it should be covered with oil or varnish. There are different types of polyurethane and water varnishes on the market. The choice of the required varnish depends on the purpose of the parquet and the size of the user's wallet.
In order to protect the floor floor in the necessary way, at the first stage, the floor should be trapped, and at the second - apply a primer.
The varnish should be applied with a finishing coating of at least three layers. In rooms where there is a high risk of erasing varnish from a parquet board (trading institutions, entertainment centers and restaurants), the use of special oils guarantees the best effect than the use of varnishes.
Thus, the durability and beauty of the parquet depends directly on the quality of the parquet board and on the styling method. Installation of parquet coverage and a do -it -yourself cycle is a complex and time -consuming process that requires performers of high professional skill.


In recent years, on
In recent years, a serious struggle for the minds and hearts of consumers has unfolded in the Russian construction market. We are talking about those who started large -scale repair or “cosmetic” finishing work in their housing, and for this purpose acquires wooden flooring (parquet, parquet board, laminate, etc.)
Everyone knows that these finishing coatings require laying on a hard, even base, with a difference not exceeding 2 mm per 2 linear meters, and their flooring on a base with high humidity is unacceptable.
In the case of manufacturing the base of the floor of wet materials (“concrete screed”, which appeared on the market recently “half-dry screed”, etc.) The result requires thorough drying-at least 30-40 days, depending on the thickness of the base. Failure to comply with the requirements for the permissible moisture of the base of the floor leads to the appearance of mold on a wooden flooring and its rapid failure. Failure to comply with building standards associated with the stiffness or evenness of the base leads to the appearance of creaks, cracks and the subsequent indifference of such a flooring.
The foregoing tasks earlier, from the mid-90s of the last century to recently, decided three sex systems competing among themselves.
Depending on the purpose of the room,:
Concrete multilayer alignment
Adjustable structures
Or a dry screed "KNAUFF".
An attempt to reduce these three technologies led to deviations from existing building codes and rules. As a result, the mass distribution of low -quality products in the Russian construction market that do not meet the requirements of modern flooring materials to prepare the base.
Sellers of this, frankly, consumer goods are disordered by the fact of reducing the service of the finishing coating, in the case of an incorrectly prepared base. Consequently, we increase the amount of investments in the arrangement of the floor, and the result “laid and forgot” can really be forgotten - the costs of such “repair” will grow exponentially.
How to spoil with your "improvement" high -quality concrete multilayer floor
Experienced builders know:
In concrete multilayer alignment is used:
technology of rough alignment of concrete screed;
technology of more accurate alignment - leveling screed;
Group leveling of the flooring of a plywood sheet 12 mm thick.
The struggle of the floors. Divorce in Russian.
Each of these layers (with a floor thickness of not more than 3-5 cm) together with work and materials will cost the consumer from 600 rubles per 1m2. For parquet coatings, the use of all three layers is required (the parquet is glued to the base); For a parquet board or laminate (covered with a floating way, with fixation around the perimeter and without fastening to the base), two layers are enough, however, to the detriment of the comfort of the floor (loss of sound and heat-insulation, the lack of protection of the finishing coating from the moisture difference).
Thus, the cost of a multi-layer concrete base depending on the quality is 1200-1800 rubles per m2. And this is not the limit!
When lifting a given floor level per size of more than 5-7 cm, this method becomes even less profitable, since its price increases significantly.
Also, keep in mind that the use of such a weighted structure is not always possible due to the growth of additional loads on the floor slab; And the screed, using wet processes, requires drying from 30 days, which is not always informed to the consumer. Nevertheless, despite the difficulty of making the foundation in this way, with mandatory observance of all of the above requirements, a parquet or laminate coating on such a floor will last for many years.
The struggle of the floors. Divorce in Russian.
The so-called “know-how” “screed in a day” proposed in the last few years in the market is a simple client’s inflation, who wants “faster and cheaper”. Such a screed is made of a small fraction of sand and cement with polymer additives, which gives the concrete mass the appearance of a dense cottage cheese until it dries. The “cottage cheese” is distributed using a special pump, and then smoothed manually. The cost is 650 rubles per m2, cheap and angrily, everyone is happy. At first sight. Misleads the consumer and the name of this method - the method of semi -dry screed. But manufacturers are silent about the need to further level this innovation in order to achieve the required difference required by the standards (a maximum of 2 mm per 2 linear meters), and the mandatory removal of moisture.
The result is no 1200 rubles per m2. Cheaper? And the same 30-40 days of stretching moisture from the screed, in front of the flooring of the finishing coating.
How to spoil with your "improvement" high -quality adjustable gender
The struggle of the floors. Divorce in Russian.
A modern alternative to concrete multilayer leveling is the floor using adjustable structures.
Two types of DNT adjustable floor - floor along adjustable lags and floor on adjustable slabs - are designed to align the floor with different initial quality.
Options are distinguished by the thickness of the adjustable screed-3-5 cm (adjustable plates), 5-12 cm or 10-17 cm or more (adjustable lags). Both of these designs with a floor lifting height (the thickness of the adjustable screed) 5-12 mm cost an average of 1200 rubles per m2, which corresponds to the cost of the base made by the method of multi-layer concrete screed in the economy version (2 layers, without plywood). With an increase in this parameter, the price, unlike the previous method, changes slightly. At the same time, plastic tilt bolts and bushings (from a polymer of special strength) interacting directly with wood (plywood or lag) are used as fixing adjusting elements. A mandatory element of the adjustable floor is plywood or DNT plate, on which the finishing coating is laid.
Attempts to “improve” the technology of adjustable floors of DNT used in the Russian market for more than 20 years have led to a change in the type of fasteners and materials from which they are made. On the Russian market there are 2 main options for "pseudo-rationalization." In one case, furniture metal hairpins are injected directly into the thread of wooden lag, and in the second they are inserted into its holes and are tightened on two sides with nuts with washers.
Advertising themselves in the regulated sex market, manufacturers of the indicated “improved” structures at a comparable price with adjustable DNT floors (1200 rubles per m2), say supposedly increased reliability of the floor design, precisely due to the use of metal studs instead of a polymer.
Fundamentals of materials science in relation to adjustable floors
These statements are not substantiated and contradict the laws of materials science. Let's look at the loads for materials more carefully.
The struggle of the floors. Divorce in Russian.
In the first version of the “know-how”, the thread in the soft tree under the dynamic load is quickly cut off with hard metal, which leads to the appearance of the backlash and the rapid loosening of the structure. In the traditional case of patented DNT technology, the plastic bolt has approximately the same characteristics in stiffness with wood and interacts with it, without violating the integrity of the connection for at least 50 years (official tests of the Mosstroy and Academy of Subtle Chemical Technologies).
The struggle of the floors. Divorce in Russian.
In the second version of the “pseudo technology”, the wood from which the lag is made, drys out of the temperature and humidity drops, which requires constant dismantling of the floor and twisting the nuts on the stiletto. If this is neglected, then a gap appears between the nuts and the tree, and the backlash of the structure arises as a whole. Now imagine how easy it is to constantly dismantle and again lay the parquet, which is attached directly to the base?!
I also want to note the adjustment of the lag using corners attached to the floor. The lag aligned along the horizon is fastened from the sides with a corner of self -tapping screws. The unreliability of this design is obvious - with constant dynamic loads on the lag, part of the load is redistributed to mounts in the form of self -tapping screws screwed into the sidewalls of the lag, at an angle of 90 degrees, which leads to their bend and loss of strength of the entire floor structure.
Dry screed Knauuff
Another type of alignment of the base of the floor, also comparable in price with floors made of multi -layer concrete screed (economy version) and an adjustable floor, is a dry CNAUF screed (1250 rubles per m2).
The small faction of expanded clay is poured in the room on the base, and is aligned by smoothing it on the surface and mandatory tamping, followed by the flooring of GVP sheets with their attachment by the junction of the junction.
The struggle of the floors. Divorce in Russian.
With a faction thickness of not more than 3-5 cm, a well-compacted fraction does not sit from constant dynamic loads. But in order to achieve the required density of the screed when tamping it, it is necessary to repeatedly water this fraction with water and use special tamping machines. Of course, in this case, the indicated screed cannot be called dry, since the moisture accumulated during tamping requires its removal, before the flooring of the finishing layer of the floor. That is, we are dealing with a wet screed again, although “dry” is written on the package.
It is important to know that with a floor height of more than 5 cm, the use of this method of alignment for wooden flooring is not at all acceptable! In places of constant loads on the bulk mixture of such a thickness, it begins to sag, which makes a parquet or laminate into the worthlessness, covered on top.
conclusions
If you do not remain in the illusions of the sweet stories “Sharash Montazh” about the builders about remarkable leveling and preparing the base of one square meter of floor for 650 rubles for parquet, parquet board or laminate, then, whatever one may say, to make a durable and reliable floor according to all the rules and standards In construction is cheaper than for 1200 rubles per m2, it will not turn out to be any of the above methods. You can use the online calculator and first estimate the cost of preparing the base for the floor.
The struggle of the floors. Divorce in Russian.
At the same time, the same competitive advantages between concrete multilayer alignment, aligning the adjustable floor DNT or dry screed “KNAUFF” are the same with a thickness thickness of up to 5 cm. The difference is very significant, that during installation of the adjustable floor, wet processes are not used. This significantly saves time. In addition, the design based on the adjustable sex has increased heat and sound-insulation properties, unlike its competitors.
But if it is necessary to raise the floor to a height of more than 5 cm, adjustable DNT floors have a serious competitive advantage in terms of price-quality ratio in comparison with other methods of high-quality leveling of the floor for wooden flooring. In this case, the use of adjustable lag technology is most appropriate.
And, of course, none of the previously used technologies will give such an ease of installation of communications and various heating systems “warm floor”, like adjustable floors - after all, they have an air gap under the coating. Hofro channels of communications and pipes of water warm floor are conveniently placed in it, and additional heat-insulating mineral slabs can also be laid to achieve maximum insulation of the room from noise and cold.
So we advise, planning to repair and replace the floor, not to succumb to the sweet speeches of sellers, but carefully study the proposals, compare and make the right choice!