Using seamless polystyrene tiles is a great way to do ...
|
We lay tiles without seams with our own hands. Ceiling tiles without seams - installation technology
|
The loggia turned into a cozy and warm continuation of the apartment not only gives ... |
A wooden house is undeniably durable and reliable, but it also has ... |
Floating screed: installation features
What is the difference between a floating field and ordinary black base? Global difference in independence. The floating screed does not have a rigid link to the structural elements of the structure.
In the article we will consider the advantages and purpose of a floating screed, describe the design of such a gender and give the sequence of independent installation.
- Advantages and scope of the floating screed
- A floating screed device
- Basic requirements for the arrangement of a floating screed
- Floating floor screed: do -it -yourself installation technology
- Errors when installing a floating screed
Advantages and scope of the floating screed
Swimming screed a variety of cement-sand screed. The main difference from the traditional screed is that the floating is not related to the adjacent walls and the base of the floor. This type of screed has an additional layer that improves thermal insulation and waterproofing of the floor, and also increases the adhesion of building materials.

The use of a floating screed has a number of significant advantages:
- Despite a more complex design (compared to concrete coating), the installation process is quite simple.
- Increasing the soundproofing of the room (almost 50%), which is especially true for residents of apartment buildings.
- The amortization effect is created, which has a positive effect on the human musculoskeletal system.
- Reducing heat loss.
- The costs of buying building materials for screed are reduced.
- The multilayer floating screed provides the strength of the coating, which is not deformed and is characterized by a long service life.
- Simplicity of care.
- The floating screed levels the irregularities of the coating.
It is advisable to arrange a floating floor screed in the following situations:

- With prolonged, regular contact of the floor with moisture. For example, on open verandas, loggias, arbors, terraces, etc.
- On a raw base. If the filling of the draft layer was performed directly on the ground.
- In rooms where sharp temperature changes are observed and the humidity of the bathroom, laundry, baths are constantly increased.
- When installing warm floors.
- In private houses, cottages, cottages and on the first floors of apartment buildings. Especially if the basement or basement is not heated.
- When installing engineering communications. In private houses, some communication elements are laid in a screed.
A floating screed device
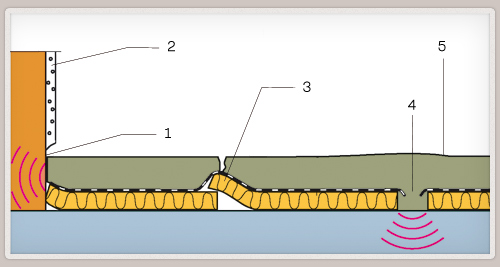
Since the screed performs several tasks at the same time, including sound and waterproofing of the room, the solution is located on a layer of insulation, and not on the surface of the base.
The design of the floating screed can be displayed schematically:
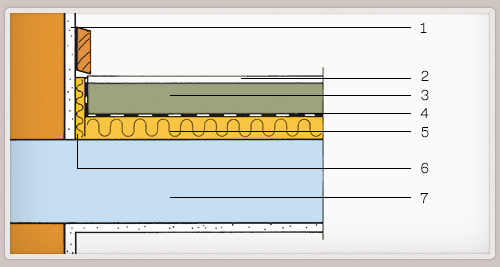
- layer of plaster;
- floor covering;
- calcium-sulfate/cement-sand screed;
- dividing layer;
- sound and/or thermal insulation material;
- carcial (damping) tape;
- overlap the base of the floor.
The separating layer It prevents the ingress of the solution into the gaps of sound-and thermal insulation material, prevents the appearance of acoustic bridges. In addition, the layer prevents the wetting of the insulation. As a separator, a polyethylene film with a thickness of 0.1 mm can be used (for arranging a warm floor 0.15 mm).
Thermal insulation layer can be two -layer. Insulation and soundproofing material must meet the following criteria:
- Elasticity/springiness (dynamic rigidity) of the material, the lower the indicator, the higher the protection against noise.
- Compression of insulating material:
- for residential premises, a heater with a marking of SR5 5 mm compression is used;
- for industrial structures, a material with an index of CP3 3 mm.
Advice. To improve the soundproofing properties of the screed cake, experts recommend using mats made of wood wool and mineral wool

Dampfer tape It is laid along the ascending structures in the room (columns, supports, partitions, etc.), with which the screed has a pairing. The thickness of the rebound at least 10 mm should remain a sufficient supply of compression caused by a change in the geometric dimensions and the shape of the screed in the process of shrinkage and operation. The height of the tape corresponds to the height of the total flooring from the flooring to the base. The tape is mounted in front of the insulating layer, pruning the remains after the final laying of the flooring.
The coating of the floating floors completes the design of the pie. Usually it is a cement mortar (cement-sand screed). However, it can be replaced with calcium-sulfate or calcium-sulfate fluid. The main task of screeding the distribution of loads.
Swimming screed device: video
Basic requirements for the arrangement of a floating screed
In order for the floating screed from the bulk floor to perform all the stated tasks and was operated without problems, when masonry it must be adhered to a number of rules:
- The thickness of the screed should be equally even throughout the area:
- cement-sand and calcium-sulfate minimum 45 mm;
- for calcium-sulfate (fluid) floating screed, a thickness of at least 35mm.
- During the drying of the screed in the room, there should not be sudden changes in temperature and drafts.
- The laying of the flooring can be proceeded if the humidity of the screed is not more than 2%.
- To prevent the appearance of cracks and a more efficient distribution of loads, you can additionally use a reinforcing layer of a metal mesh of rods with a diameter of 2mm with cells of 50*50 mm.
- The reinforcing grate is laid on small pebbles so that there is a small gap between the insulation and the net.

Floating floor screed: do -it -yourself installation technology
Consider the phased course of work on how to make a floating screed with your own hands.
Selection of tools and materials
For work, you need to prepare the following materials and tools:
- As a thermal insulation layer, you can use:
- foamed polystyrene foam (PSB-S-50 or PSB-S-35);
- mineral wool for floors;
- extruded polystyrene.

- Sound insulation of the room will provide the following materials:
- Schumanet-1002;
- Schumanet-100 super;
- Izolon PPE.
- Metal mesh for reinforcement.
- Carbon tape.
- Components for the preparation of the solution:
- construction sand;
- cement of the brand PTs-500Do;
- plasticizer.
- Capacity for kneading solution, shovel.
- Building level.

For the arrangement of the floors, other roll insulation marks are used for the installation of screeds
Paul marking and preparation of the base
The preparation of the base includes the following measures:
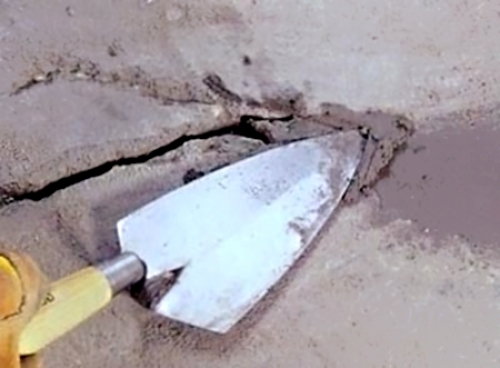
- Carefully clean and wash the overlap - this will allow you to see defects of the base.
- Visible shells and cracks are sealed with concrete solution.
- If on the basis there is mold, it is necessary to need the walls of the wall and treat the base with an antiseptic composition. This procedure is especially relevant for rooms located above basements, pools and baths. Such a measure will reduce the risk of premature destruction of the material from the fungus/mold.

After cleaning the base, it is necessary to mark the screed. On the perimeter of the room (on the walls), draw two horizontal lines. The lower line must correspond to the location of the insulating layer, and the upper layer of the cement-sand screed.
Arrangement of steam and waterproofing
If unexpressed polystyrene foam or cotton insulation is used as a thermal insulation layer, it is necessary to lay a vapor barrier. It can be a plastic film.
In the premises over the heated basement, the vapor barrier is laid in the form of a trough, it is necessary to provide for the overlaps of the film on the walls of the expected level of the screed. In the houses above the cold basement, it is enough to mount a damper or a polyethylene tape along the perimeter of the walls.

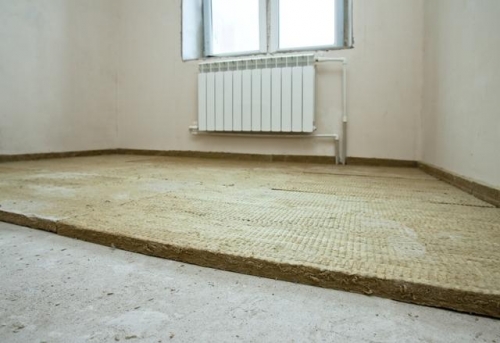
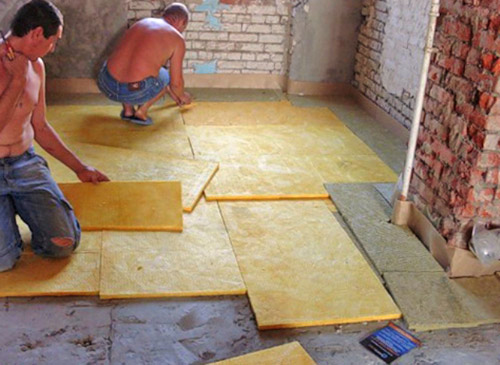
The styling of the insulation
Before laying the insulation, you need to make sure that the base is leveled. If the concrete ceiling is not laid evenly, then the base can be leveled with sand. Pour sand to the low places of the base so that the thermal insulation material does not swing on the ceiling.
Alignment can be performed by other methods:
- below pour crumbs made of insulation;
- cut the thermal insulation plate from the bottom.
Sour the heat -insulating material on the surface of the floor so that it covers the entire base.
Lighthouse installation and reinforcement
If the room is large enough, then the marks on the walls will not be enough to uniform filing the screed will need to install lighthouses. For guidelines, trimming of rods and rails are suitable.
By placing beacons, it is important not to damage hydro- and sound insulation. It is enough to make shallow holes in the insulation plates and install lighthouses in them. The upper parts of the guidelines should be at the same level.

The reinforcing mesh fits the stops of wooden bars or plastic supports. Ideally, a layer of reinforcement should be in the center of the cement-sand screed (in thickness).
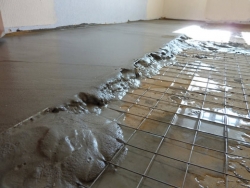
Preparation of the solution and laying the screed
For passing rooms, the solution should be used in the proportion of 1 part of the cement and 3 parts of the sand. The screed for residential premises is prepared in a ratio of 1: 4 (4 parts of sand). The number of plasticizer is calculated in accordance with the recommendations of the manufacturer.
Important. For screed, it is necessary to use building sand. The round shaped shape of the grain of river sand reduces the hitch with cement. As a result, after drying the solution will crumble
Squeeo of preparation of the solution:
- Pour water into the container.
- Add cement and mix thoroughly.
- After the formation of a homogeneous mass, the sand is gradually introduced into the solution.
- Add the plasticizer and repeat the mixing of the components.

Pour the surface with the solution to the height of the installed beacons. Alignment is carried out using the rules. After the screed should grasp it a little with a plastic film, this will reduce the intensity of evaporation, which means that the mass will dry evenly throughout the thickness.
Caring for screed
Three days after pouring the screed, it is necessary to control so that the solution under the film does not dry out. If the screed begins to dry out, then it must be moistened by sprinkling with water from the spray gun. The main task during this period let the solution dry gradually. It is important to prevent the screed. There should be no condensation on the inside of the film.

It will be possible to step on the screed after three days, and begin to perform further repair work (installations of plumbing, installation of windows, doors, etc.) in five days. For the first eight days, it is better not to load the floor with heavy objects, and after four weeks, the floor is the smoothness of the floor. If necessary, polish the screed or lay an additional leveling layer of self -leveling solution.
Errors when installing a floating screed
When installing a bulk or dry floating screed, the master can make typical errors, the appearance of which is easier to prevent than to eliminate.
- A chomic tape is not used. Such neglect of technology leads to the appearance of sound bridges.
- The surface of the partitions/walls was not plastered in a timely manner (before the arrangement of the floor screed).
- Cracks in the screed are triggered by uneven laying of insulating material.
- Sound bridges also occur if the insulating layer is leaky.
- The surface of the screed is not leveled.
Floating screed: installation technology
![]()
StrPort construction portal 2011-2018. Articles about repair, construction, building materials.
Copying information from the site is possible only with permission of the editorial office Or indicating a direct link to the source. Legal justification
Video not on the topic
Video not on the topic
Mistakes are listed among
Errors are listed among which untimely plastered wall, and in one of the photos this error is just.