The arrangement of the garage from the sandwich panels has a mass of advantages, among which ...
|
|
Laminate coating is particularly wear -resistant. However, when exposed to ... |
Each developer is faced with the question of the exterior decoration of the building. The cladding at the same time ... |
How to make a black floor right
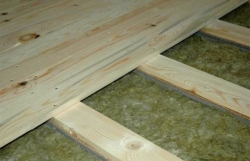
Behind the concept of the draft floor, not just poorly processed boards are hidden, but a real pie from various materials, which together form a strong base for the final sex. By the way, the draft floor does not have to be wooden, it can be a concrete screed on the ground. The technology of arranging a draft floor includes a set of measures that provide hydro- heat and sound insulation of the base. In this article, we consider how a strong and reliable black floor can be made on which any finish can be laid.
- How to make a wooden black floor on the ground
- How to make a wooden black floor on a concrete base
- Clamps from concrete on the ground
How to make a wooden black floor on the ground
In the country house, the arrangement of the floor is responsible and time -consuming. A wooden floor on the ground can be performed without restrictions. Even on condition of temporary residence in the house, when heating does not work, the wooden floor serves for a long time unchanged, since the underground is well ventilated through the vents in the foundation.
For wooden elements of the floor structure, it is necessary to choose a high -quality dried wood, with a humidity of not more than 12%. This is important, since a wet tree can lead during operation. For the draft floor in the house, conifers of wood spruce, pine, fir, larch are chosen. The wood saturated with resins is less susceptible to rot and development of mold.
Also, wood and black floor wood must be treated with antiseptic and antipyrene.
The underground of the wooden floor on the lags should be well ventilated. To do this, in the foundation, fictions are performed, which are closed with a mesh with a cell of not more than 8 mm so that the mice do not penetrate inside.
Wooden floor base
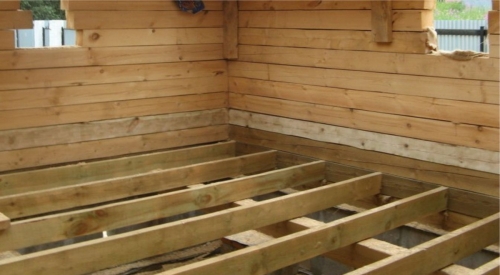
The design of the wooden floor on the ground suggests that the floorboards will be laid on the lags of longitudinal beams. Depending on the characteristics of the house, the lags can be laid on the support beams, a embedded crown or on supporting columns.
If the room is large enough, it will not be enough to fix the lags on the beam with the ends, the design will turn out to be fragile. Therefore, in the intervals between the walls, support columns are installed on which the lags will be laid. The step between the columns depends on the cross -section of the lag. For example, if a beam of 150x150 mm is used as a lag, then you should make a distance between the support columns of not more than 80 cm.
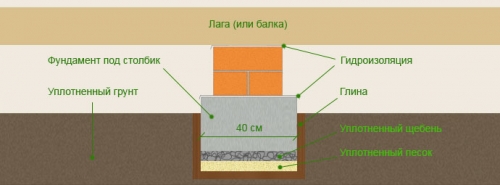
How to make support pillars for lags:
- First, we make a marking where the lags will be located. We make notes on the support beams or the foundation of the house. Then we pull the cords through the underground. We pull the cords at a distance of 80 cm or anyone across the future lag, which is equal to the step between the columns. In places of intersection of cords or ropes, supporting pillars will be located.
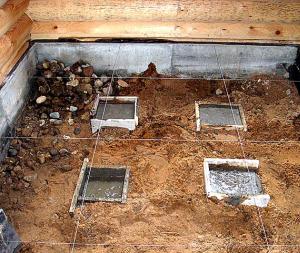
- In places where we will make support pillars, we dig a hole 40 60 cm deep, with sides 40 cm.
- At the bottom of the pit, tamp the soil, pour 10 cm layer of sand, and then 10 cm crushed stone. Alternately, we carefully compact each layer. It will be our pouring for the foundation of the column.
- We install a wooden formwork for filling the foundation under a concrete column in the pit. If the support columns are made of brick, then the height of the foundation should be such that it towards 5 10 cm above the ground level. If the entire support column is cast from concrete, then the formwork height should be such that the lags laid on the column are located horizontally.
- Inside the formwork we insert a reinforcing frame associated from steel rods of 6 8 mm cross -section.
- Pour concrete.
Important! If the entire column is poured out of concrete, then it is necessary to control that the surface of the column is exactly horizontal and so that all the columns are at the same level.
- After the concrete has completely dried, we cover the surface of the column with a roofing material or glass insult of 2 3 layers. Be sure to be without sprinkling. We smear the surface and joints with mastic.
If you want to make brick support columns, then the masonry must be fastened with a cement mortar. For a column with a height of less than 25 cm, the masonry should be 1.5 bricks, for a higher column, a masonry of 2 bricks will be required.
After the concrete dries, you can remove the formwork. For greater reliability, fertile soil from the underground is best removed. It must be removed to a depth of 20 cm. Instead of the soil, it is advisable to pour 10 cm of gravel and 10 cm of sand and carefully tamped with a vibrating plate.
Laging lag on the base
Before starting the arrangement of the base, it is necessary to treat beams, lags and black floor boards with an antiseptic. Lags can be laid immediately on the embedded crown or foundation and on the support columns, or you can first install the support beams on the pillars, and already from above across the lag. Any option is correct. Only laying the lag across the beams provides a more stable and strong design if the distance between the lags is very small, 40 60 cm.
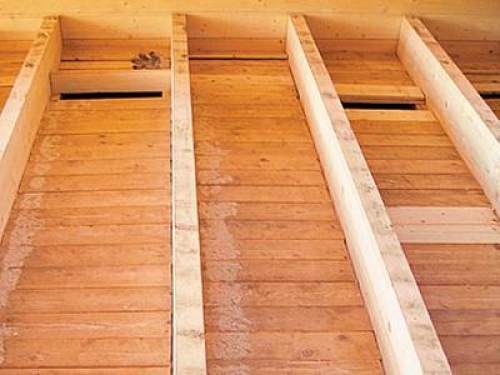
The cross -section of the lag must be selected taking into account the thickness of the thermal insulation material that will be laid between them. For example, if the thickness of the insulation is 150 mm, then it is necessary to take a beam with a height of 180 mm. It is always necessary to leave a ventilation gap of 30 mm.
The step between the lags is selected taking into account the thickness of the boards of the future sex. More accurate instructions can be viewed in the table below.
Table 1. Step lag.
Consider the laying of the lag on the support columns:
- We lay the lags on the embedded crown (support beams, foundation) and support columns. We control their even location, horizontal. On the surface of the support columns for the lags, you can put a fusser-gap material. But this is not necessary, since the roofing material or other waterproofing material that is covered with the surface of the pillar is good and sounds.
- If, nevertheless, the sagging of the lag is noticed somewhere, it is necessary to put wooden bar on the support columns for the lags and fix them firmly. If somewhere the beam is bulging, then it can be cut off with a shirt.
Important! The maximum permissible deviation in the evenness of the location of the lag is 1 mm per 1 m.
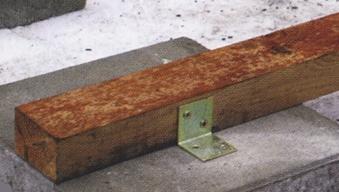
- We fix the lags to the supporting pillars using fasteners. On the side of the wood, we fix with screws 50 mm long, and from the side of the concrete column we tighten the anchor.
- The first to lay the so -called lighthouse lags, which are located at a distance of 2 m from each other. Next, we will navigate on them.
- By analogy, we put all the lags and check their even location.
After all the lags are fixed, you can proceed to the arrangement of heat and waterproofing.
Thermal insulation and waterproofing of a wooden floor
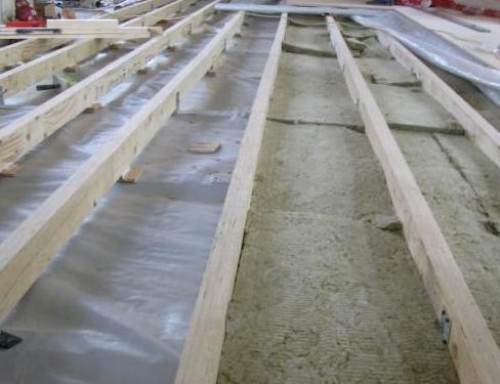
Materials of waterproofing and thermal insulation are laid between the lags. To fix them, it is necessary to equip the base. This can be done in several ways.
Method 1. From below the lag can be beaten with moisture -resistant plywood. This design will turn out as reliable as possible. To do this, you will have to work from the side of the underground, which is not always possible.
Method 2. In the lower part of the lag, you can nail the skull bars with a thickness of 20 mm, make a roll from the boards on top. This work is more painstaking, since you will have to cut a lot of boards with a cross section of 15 mm and a length equal to a step between the lags.
You can choose the method that you like more. The main thing is that a sufficiently strong base is obtained.
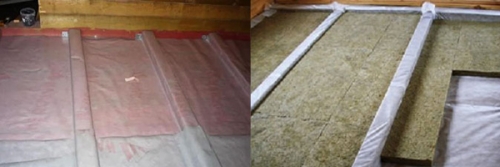
- We lay a layer of waterproofing with an overlap of 15,100 cm, glue the joints with construction tape.
Important! Be sure to use a superdiffusion vapor permeable membrane. We need waterproofing material to produce moisture from the room, but not let go inside from the side of the underground. Therefore, it is impossible to use ordinary polyethylene film.
- On top of the film between the lags we lay the thermal insulation material. We cut the roll material with a width equal to a step between the lags plus 1 2 cm so that the material enters the gap between the logs of the display.
Important! As a heater for a wooden floor, you can use mineral wool in rolls, plates, basalt cotton wool, you can blow out an ecovata, sawdust. You can not use polystyrene and extruded polystyrene foam. These materials are completely vapor permeable, the wooden floor simply cannot breathe.
On top of the insulation it is necessary to leave a ventilation gap 2 3 cm.
Black floor laying
Now you can lay a black floor in the house. There are several options for arranging black flooring. As a material, you can use a floorboard with a thickness of 15 25 mm with minimal processing. You can also use a rogue board for the floor, if finances allow. The price depends on the draft floors on the cost of the materials used. If you use a thick massive board, then it makes no sense to lay a black floor from the floorboard. And you can lay plywood sheets, and on top to lay the final flooring.
Black floor from a floor board:
- We start laying from the wall. Cut the spike and apply the board to the wall, leaving a gap of 2 cm.
Important! The indentation from the walls is required, since the tree is plastic, gaining moisture, expands, and drying, refers. The gap will provide an unhindered opportunity to expand and refer to wood.
- We fix the board to the lags. From the side of the wall, screw the screws directly into the board, then this place will be hidden with a baseboard.
- From the spike side, screw the screws into the spike at an angle of 45 degrees.
- We move the next board close to the first. We insert the first board into the groove.
- In the groove of the second board, screw the self -tapping screw, fixing it to the lag.
- We put all subsequent boards by analogy.
Important! If the boards are the same length as the room, then you can lay exactly parallel to each other. If the boards are shorter than the room, then they need to be laid with a displacement of a frame.
The last board is fixed so that you can hide the hats of the screws under the baseboard. On this black floor is ready. The main thing is to tightly adjust the boards to each other. On top you can lay the flooring.
How to make a wooden black floor on a concrete base
In apartments with concrete floors, you can also make a wooden floor. Lags are laid on a concrete base, but for this it should be even. A several centimeter height drop is unacceptable. Therefore, the option when wooden bars are not suitable for bending lags. Over time, the lining will quarrel and deform, from which they can easily fly out and the floor will begin to creak.
Preparation of the base: hydro- and noise insulation
Before laying the lag on the concrete floor, it is necessary to level the base. To do this, pour the cement-sand screed. Further work can be continued only after the concrete dries completely, i.e. a month later.
On the surface of the concrete screed we lay a waterproofing film with an overlap of 15 20 cm, glue the joints with tape.
Under the lags we put noise insulation lining. To do this, you can use cork materials or foamed polyethylene 1 4 mm thick. Lags lining are needed in order to extinguish shock noise.
Laying lag on concrete
It is advisable to use a beam with a length equal to the length of the room. If this is not possible, then you can take the beam shorter and connect to the end. The joints should be located at the same time.
- We lay the lags on the prepared base.
- Check the horizontal location of the lag.
- We fix the lags to the floor using corners. Do not forget that the corners themselves are attached to the concrete floor with anchors.
- After laying and fixing all the lag, we lay the insulation between the lags in the same way as in the case of the floor along the ground.
Do not forget to leave a ventilation gap 2 3 cm.
Installation of the draft floor
On top of the lag we lay the black floor. As already mentioned above, it can be a plywood, or there may be a sexual board.
Consider the option of arranging a black floor from plywood:
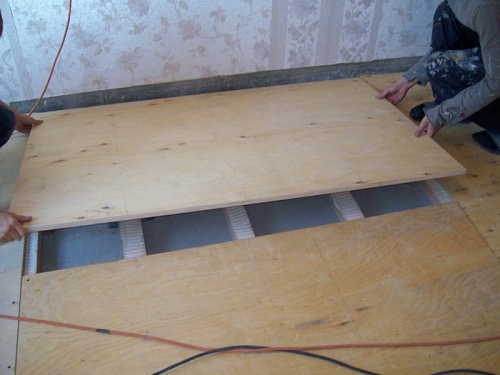
- We take a sheet with moisture -resistant plywood with a thickness of 22 mm.
- We lay a sheet of plywood on the lags and fix it with self -tapping screws with a step of 15 cm.
- We have sheets of plywood in a checkerboard pattern. To do this, part of them will have to be cut.
- It is impossible for the joints of the sheets of plywood to be one line.
Do not forget that there should be a gap of 2 3 cm between the wall and the draft floor. Such flooring can be covered on top of the plywood base: laminate, linoleum, ceramic tiles, vinyl tiles, parquet, parquet board, massive board.
Clamps from concrete on the ground
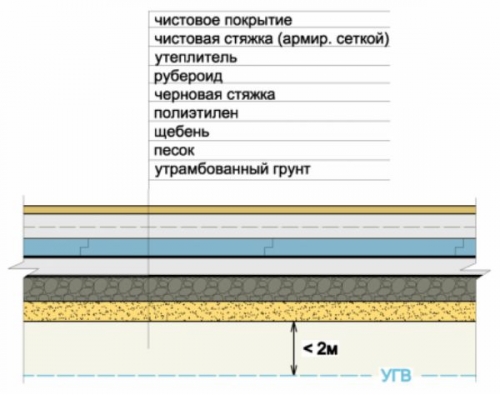
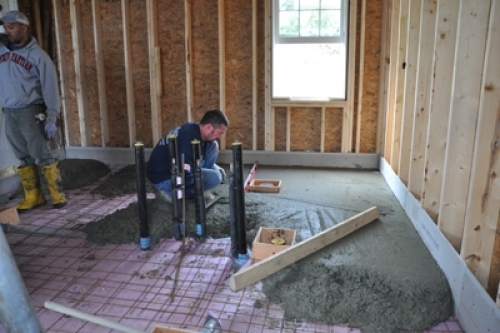
It is not always possible to fill a concrete floor in a private house on the ground. There are certain restrictions. Firstly, soil waters on the site should be quite low at the level of 4 5 m. Secondly, the soil should be stable, not mobile, otherwise the concrete floor can collapse. Thirdly, people should constantly live in the house or will even be more correct to say whether it should be heated in the cold season. If all conditions are met, you can safely pour a concrete plate on the ground.
Earthwork and the preparation of the foundation
First of all, it is necessary to outline the zero mark the level of future sex. It is necessary to navigate the bottom of the doorway. It is necessary to mark all the walls so that in the future it would be seen before what time to fill in concrete.
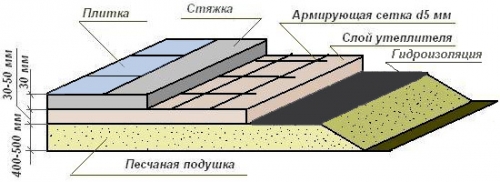
- The floor on the soil is a multi -layer structure 30 35 cm thick. To equip it, we remove the upper layer of the soil until the height from the zero mark to the bottom of the pit is 30 35 cm.
Important! If the soil level is below 30 35 cm from the floor level, then it is necessary to level the soil surface, compact it, add the sand to the required level and also carefully compact.
- We compact the base of the pit.
- Pour 10 cm layer of crushed stone and thoroughly compact. If the backfill thickness is difficult to control, then we score several pegs into the ground with the desired mark. After leveling and tamping, pegs can be removed.
- Pour 10 layers of sand, water with water and also trim.
- Pour a small layer of crushed stone with a fraction of 40 50 mm on top.
- Sprinkle with sand, forming a thin layer, thoroughly compact.
Important! If suddenly the sharp edges of the crushed stone fractions are observed on the surface of the base, it is necessary to expand the pebbles and put so that there are no sharp corners anywhere.
At all stages of the execution of the spray, it is necessary to monitor horizontal.
Waterproofing, thermal insulation, reinforcement
- We lay a waterproofing material on the surface of the base - a polyethylene film with a density of 200 microns, a roofing material or glassizole. The main thing is that the material is not damaged about the edge of crushed stone.
- The waterproofing material is put on the walls to the mark 2 cm above the floor level. We lay with an overlap 10 15 cm and glue with tape.
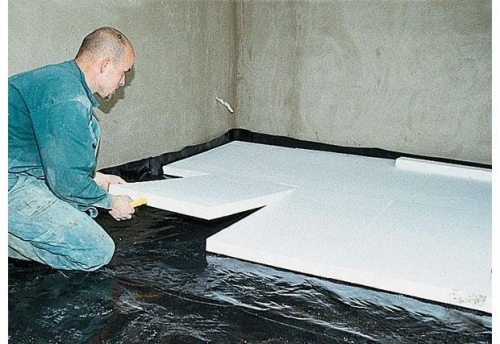
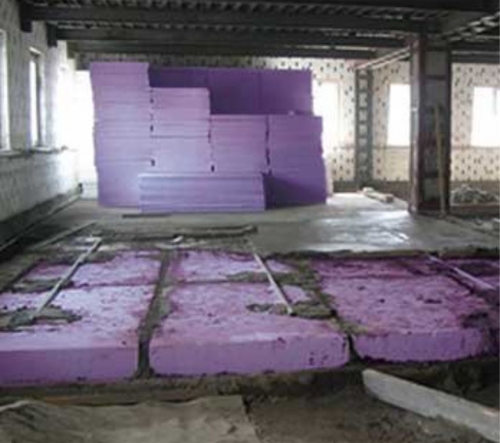
- At this stage, you can lay a durable thermal insulation material. For example, extruded polystyrene foam or basalt wool in plates, perlite or expanded clay is suitable. You can also place the thermal insulation layer above, on top of the concrete base.
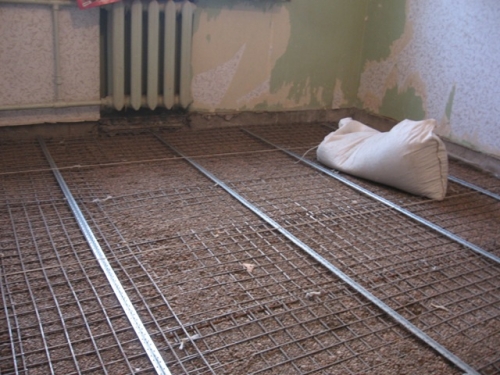
- The concrete floor must be reinforced. To do this, use a metal mesh with cells of 10 cm.
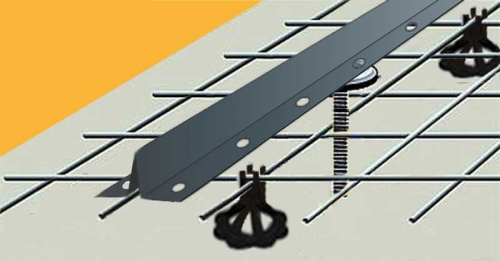
- We install the reinforcing mesh on the stands 2 3 cm high so that the mesh is completely inside the concrete.
Installation of formwork and guides
To comply with the horizontal floor level, it is necessary to lay the so -called beacons or guides. For these purposes, you can use round and square steel pipes, wooden bars. We have them with a step of not more than 1 m. We fix them with a thick cement mortar. Also, their height can be controlled by adding to the guides more solution.
Between the guides we set the formwork for filling the floor. This is not necessarily, but greatly facilitates the task of pouring a concrete floor manually.
We process the guides and formwork with oil or working out so that after pouring them can be easily removed.
Black screed of the floor filling concrete
It is necessary to fill the concrete floor in the house in one or two sunset. If you take big breaks, then the base will turn out to be fragile.
- We begin to pour concrete from the corner opposite to the front door.
- Pour several cards at once, then leveled with a shovel.
- We compact concrete with the help of a deep vibrator.
- We align the surface using the rule. We set the rule on the guides and pull it to us. Excess solutions are distributed into cards in which there is not enough solution.
- We take out the cards and fill the voids with concrete.
- When the entire floor will be poured with concrete using this technology, it must be covered with plastic film and let it dry for a month.
For better drying of the concrete black floor, its surface must be wetted with water.
After the concrete dries completely, you can perform the final screed and lay the flooring.
DIY Black Paul with your own hands is a very responsible task, because a strong foundation is much more important than a finished coating. For example, you should not lay a new floor covering on top of the old black floor in the old house, if its overhaul is not carried out.


great article))
great article))
Very clear and
Very clear and intelligible, thanks!
use moisture resistant
it is impossible to use a moisture -resistant plywood for a draft floor.
You will die from the evaporation of phenol -formaldehyde glue (it is not for residential premises)
Thank you for the article. C.
Thank you for the article. Respectfully the master for the hour Remsgroup.ru
The article is normal, only
The article is normal, only lags and beams are different structural elements, so you do not need to confuse them
The beam is the main supporting element of the ceiling, that is, it is based on the walls or (in the case of shortened beams) on the crossbars. Transfers operational loads and loads from the weight of the entire overlap on the walls or crossbars. More often has two points of support.
Lags - bars of crate for flooring. They can be based on beams, on a concrete base, on the soil (with aligning antiseptic lining). When used on top of the beams, they are laid perpendicular to the last. As a rule, have several points of support. Because of this, they may have a smaller section. Their purpose is an increase in the rigidity of the flooring and uniform distribution of loads from it on the underlying elements of the ceiling.
By drawing an analogy, you can compare the beams with the rafters, and the lags with the crate.
There is a term floor on the ground -
There is a term floor on the ground - a stove. And the wooden floor on the ground is an eagle. The tree rests either with lags, or on beams, or on the cabinets, and what does the soil have to do with it?
Even the foundations of the furnaces
Even the foundations of furnaces are forbidden to rigidly associate with the foundation of the house. You pinched the beams to the lower crowns or the foundation and rested them in the middle on the cabinets to either break the walls or floors with the movements of the soil. These foundations will always live their lives due to various operational loads. For these purposes, the floor of the concrete soil is made floating, and your version is suitable for rocky soil, gravel and pure large sand without clay impurities. What does not indicate in the article