Wallpaper is one of the most popular materials for interior decoration. They distinguish more ...
|
|
Own estate requires the owners much more effort than an apartment in the city. AND... |
Trends prevailing in the construction market, which is in a state ... |
Infrared floor for tiles with your own hands
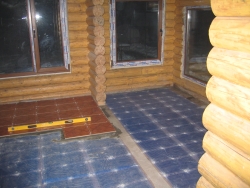
The heating of the house will play an important role in ensuring comfort and comfort. One of the innovative methods of insulation is the laying of infrared warm floor. Installation of such a sex is performed for different types of coating, including tiles.
Consider the appropriateness of the use of an infrared floor for tiles, describe the features of the types of film insulation, as well as give a step-by-step instructions for arranging a warm floor with our own hands.
- Infrared floor for tiles: for and against
- The choice of infrared floor
- Technical characteristics and calculation of a warm film floor
- Infrared floor for tiles: installation technology
- Basic requirements and recommendations for laying infrared warm floor for tiles
Infrared floor for tiles: for and against
Infrared warm floor is one of the most functional and effective modern housing heating methods. Its popularity is due to comfortable, high -quality and uniform heating.
The main idea of \u200b\u200bheating is the use of a special thermal puff. The polymer coating emits infrared rays, the size of which ranges in the range of 5-20 microns. The main emitter in this case is carbon carbon carbonate, placed in a protective polyester film.

Thermal insulation material in itself as an infrared film is quite universal. Unlike water floors, it can be used in different rooms (apartment, residential building) for various coatings. However, disputes about the advisability of laying infrared floors under porcelain tiles or tiles do not subside between experts. Of course, the tile is cold finishing material that needs additional heating, but there is an opinion that the installation for such an infrared insulation coating is not desirable. This is due to a number of reasons:
- Low adhesion of the film. If you immediately lay the tile on the film coating or pour the screed, you will get a floating floor, unstable to deformations. When tapping, concrete makes an empty phrase, and if a heavy object is dropped on such a floor, then the screed has every chance to crack. Some masters try to make a lot of serifs and cutouts to increase the coupling. But if these micro-fame is not affected reliably, then later the floor can be beaten from leaks, while the RCD will constantly work.
- The risk of a short circuit. Tile solutions and adhesives for screeds have an alkaline environment. After a while, the polyester film is corroded regardless of the quantity and thickness of the layers. The least dramatic outcome is a short circuit, the worst sparking from bare electrical connections.
Advice. Infrared floors are optimal for dry installation for linoleum, laminate, PVZ tile or carpet. For porcelain tiles, tiles, ceramics, it is better to use cable or core electric floors.
Despite the listed disadvantages, not everyone is ready to abandon the infrared insulation of the tiles. During installation, special technologies are used to reduce shortcomings and risks to a minimum. Such perseverance is due to the significant advantages of infrared floors:

- effective and uniform heating of housing;
- simplicity of installation;
- duration of operation;
- minimum loss of the space of the indigenous floor thickness from 5 mm;
- acceptable cost of the infrared floor for tiles (price);
- the heating of the room improves due to the secondary convection of heated objects;
- the concentration of negatively charged ions increases by 4 times this positively affects the quality of air in the room;
- minimum electromagnetic radiation;
- the work of the infrared film is not accompanied by noise, vibration or dust release.
It is interesting! 90% of the cure for the infrared floor freely passes through the screed and tile, heating not only the air in the house, but also the human body
The choice of infrared floor
There are two categories of IR underfloor floors used for tiles: rod and film.
Features of rod floors acting on the principle of infrared cure:

- the laying of the system is permissible directly in the adhesive solution;
- the use of additional reinforcing mesh is not required;
- the installation of the rod floor is simply performed independently without involving specialists;
- the automatic mode of adjusting the heating system with maximum performance includes economical mode of operation.
During the laying of the film type, it is important to observe certain requirements, which will affect the increase in the cost of repair. The infrared film, in turn, is available in two versions: with a carbon and bimetallic heating element.
In the first version, the role of heating elements is performed by carbon fiber (carbon paste with different additives). The basis of the material is a lavsan film with such qualities as: wear resistance, strength, elasticity and good dielectric characteristics.
Infrared floor for tiles: photo

Hearing elements are sealed in two layers, the supply of electricity is carried out through copper or silver-honey conductors. Connection of a warm floor occurs according to a parallel circuit.

Important! Carbon infrared film can be used to warm vertical surfaces and ceiling
The best version of the IR film with graphite spraying. The material is characterized by increased reliability and long service life. Lack of high cost.
The structure of film heating with a bimetal heating element consists of two layers: aluminum and copper with additives.
The basis of the bimetallic sexes is polyurethane elastic film. The scheme is necessarily supplemented by a grounding wire, and the installation procedure is slightly complicated. Connection is performed through the RCD and AVDT.
Important! The bimetallic IR floor cannot be laid under the tile.
Technical characteristics and calculation of a warm film floor
Infrared warm floors for tiles have the following characteristics:
- maximum energy consumption in heating mode up to 250 W/sq.m.;
- energy consumption when setting a thermoregulation mode 35-85 W/sq.m.;
- the length of the radiation waves 5-20 mk;
- peak percentage of infrared radiation in the spectrum of about 90-95%;
- maximum heating temperature 130C;
- work voltage 220 watts.
High operational parameters allow the use of film heating not only as an auxiliary, but also as the main element of the heating system.

When planning the arrangement of a warm floor, it is necessary to pre -calculate the area covered with infrared film and coating electrical consumption. The empirical value of thermal power for normal heating of the room is taken for 100 W/sq.m. heated area. Given the efficiency of the IR film in 90%, this value is equal to 111.1 W/sq.m.
For the effective use of a warm floor, IR film should cover all places free from furniture. For example, if the free area is 80%, and the entire room is 25 sq.m., then the size of the IR film will be 20 sq.m.
In thermoregulation mode (35%), the electric consumption will be: 0.35*220 W/sq.m.*20 sq.m.*1 h \u003d 1.540 kWh.
Infrared floor for tiles: installation technology
Necessary materials
To arrange an infrared floor for tiles with your own hands, you can purchase a finished set of warm floor or buy materials yourself.
Standard equipment of the film warm floor:
- thermal male in the roll;
- contact clamps;
- set of electrical wiring;
- glue -based bituminous insulation;
- pVC isolation;
- detailed installation instructions.
Additionally, you need to prepare:
- polyethylene film (heat -resistant);
- heat -reflecting insulation;
- the temperature regulator (selected based on the power of the warm floor and the type of installation of the invoice/built -in);
- box for the thermostat;
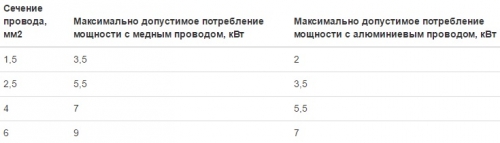
- wire for installing a thermostat; When choosing a cross -section of the wire, you should be pushed away from the material of the wire itself and the calculated power of the system;
- a temperature sensor (if it does not come in the kit);
- double sided tape;
- dry self -leveling mixture for a thin tile screed;
- installation power tools: pliers, nippers, etc.;
- indicator electric screwdriver, multimeter;
- tile glue;
- measuring tools: square, meter, roulette;
- level;
- tools necessary for laying tiles.

Step -by -step instructions for laying a warm floor
The base for the warm floor must be even, without hollows, protrusions and other visible defects. The permissible difference in height is a maximum of 3 mm. Before laying, the surface should be checked with a level and, if necessary, align to make a concrete screed in level. Let the screed grab (28 days), clean the surface of dust. After the preparatory measures, you can start installing an infrared floor.
- Installation of the waterproofing layer. Film waterproofing is necessary to protect the heating system from moisture.
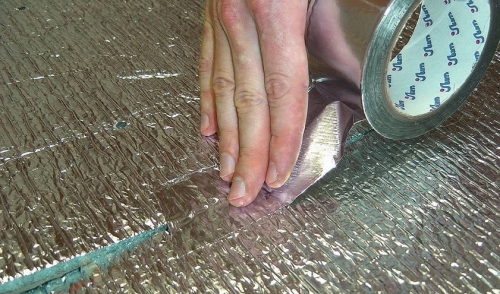
- Laying of heat -reflective material (penophy, isolon, etc.). The heat insulator is placed by the reflecting surface up. Isolation allows you to reduce heat loss, thereby increasing the efficiency of the system and reducing power consumption. Lay the material on the floor, straighten it, glue with tape at the joints.
- Make a laying scheme and determine the place for installing a thermostat optimally 15 cm from the floor level. When compiling, it must be taken into account that the warm floor is not mounted under household appliances and stationary large furniture. If the infrared floor is used as the main heating system, then it should occupy at least 70% of the area of \u200b\u200bthe room. If the floor is additional heating, then 40%are enough.
- The layout of the warm floor in accordance with the compiled scheme. Make styling, observing a number of requirements:
- the first row is located at a distance of 10-40 cm from the wall;
- the heating film is laid out with the copper sides of the contacts down in the direction of the wall, where the thermostat is located;
- between strips of the film floor, it is necessary to leave the gaps of about 5-10 mm; It is important that the stripes do not overlap each other;
- glue the rolls of the warm floor along the edges to foil thermal insulation with tape.
- Connection of a warm floor:
- in places of electrical connections, where a copper tire is like, install terminal clamps, squeeze with electrical ticks or pliers; The protrusions at the terminals should be a little bit of plastic, providing contact with a copper strip;
- insert the ends of the mounting wire into the terminals and squeeze;
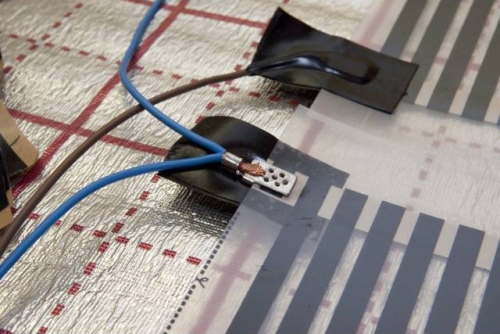
- perform a parallel connection of chopped pieces of IR Pola; Clean the terminals of the terminal on both sides of the terminal, closing the bare ends of the terminals and wires on both sides of the terminal;
- insulate the bare ends of the copper wire;
- connect the wires of the desired length to the place of the estimated exit to the thermostat;
- put a thermostat with a wire under a film floor and connect to a thermostat; The header's head is mounted from below to the black silicon strip of the film floor with bitumen isolation, and a cutout is made at the installation site in the heat insulator to prevent the appearance of the tube.


Important! It is better to entrust electrical installation work on installing a warm floor.
After connection, it is necessary to check the performance of each heating strip at a temperature of up to +30C. If the system works well, then you can proceed to the next stage filling the screed and facing the surface with tiles.
As an additional protection against leaks, lay a polyethylene film on top of the IR floor. Then cover the surface with a painting (plaster) mesh this will improve the clutch of the film and screed. Pour the floor with a self-burning mixture or screed, the thickness of the layer is 8-10 mm. Leave the floor for 3 weeks for the coupling and lay out the tile.
Installation of infrared floors for tiles: video
Basic requirements and recommendations for laying infrared warm floor for tiles
- In order for a thermal attenter during breakdown, it can be replaced, the device is passed through the strob inside the corrugation.
- If the IR-Paul consumes a total of more than 2 kW, then it is advisable to connect it through a separate machine.
- Before pouring the cement screed, the integrity of the chain should be re -tested so that later the tiles do not have to beat off.
- After the bay of the screed, the warm floor can only be turned on after completely drying out, namely not earlier than after 28 days.
- If during the installation work the in-film was damaged, then it is better to infuse it with aluminum tape on both sides.
- When laying tiles, you can not use a metal reinforcing grid.
- Paul laying must be performed exclusively on a dry surface.
- You can not place a warm floor over heating elements, for example, a stove or fireplace.
- You can not bend the film at an angle of more than 90.
- It is undesirable to lay a segment of the film floor exceeding 15 meters.

![]()
StrPort construction portal 2011-2018. Articles about repair, construction, building materials.
Copying information from the site is possible only with permission of the editorial office Or indicating a direct link to the source. Legal justification