The procedure for repairing in the room requires mandatory calculation of the area of \u200b\u200bthe walls, ...
|
|
Despite the widespread gasification, firewood boilers continue to be widely used ... |
No wonder the overhaul is compared with a spontaneous disaster. Think over the design before ... |
DIY Wooden Paul dismantling

Quite often, during the repair, there is a need to dismantle the old sex. The reasons may be a complete replacement of the coating, the reconstruction of individual components of a laminate or parquet.
The article describes how to remove the wooden floor, without resorting to the services of third -party specialists, what tools to use with independent dismantling. In addition, some methods of repairs of the flooring without removing wooden floorboards are given.
- The need to dismantle a wooden floor
- What should be taken into account when removing a wooden coating
- How to dismantle a wooden floor: work order
- Wooden floor repair: Removing creak
The need to dismantle a wooden floor
The wooden floor is considered the safest, environmentally friendly flooring. Subject to installation technology and proper operation, such a floor will last more than 50 years. However, over time, the boards can become unusable and need partial or complete replacement.

The main reasons for the dismantling of old sexes:
- wear of the floor covering;
- increased humidity in the room, the wooden floor is better replaced with waterproof coating (tile, linoleum);
- damage to the floor with fungi and insects;
- cracks with wooden boards, the appearance of a creak, etc.
Advice. When planning a major overhaul, it is better to get rid of the old wooden floor. Of course, such work is very laborious and dusty, but fully justified. The new coating will lie down evenly and stop creaking.
Before proceeding with the dismantling work, you must carefully examine the floor. Take out excess furniture from the room, remove the accumulated dirt. Particular attention is paid to the uniformity of the sexual rail and the degree of its wear. If the coating has not been deformed, then it is enough to carry out cosmetic repairs. Sometimes, the wooden floor is surpected, turning the available boards to the wrong side.

The situation is not uncommon when the repair is required for a separate section (corridor, the passage of the room). In this case, damaged boards are removed and replaced with new ones.
Advice. Determine the rotten floorboards will turn out by tapping the floor with a hammer. The boards that make a dull sound are subject to replacement. If most floorboards require update, then the old floor is in the way to completely disassemble.
What should be taken into account when removing a wooden coating
Dismantling of old wooden floors has some features:
- Depending on the condition of the coating and plans for the arrangement of the new gender, dismantling is carried out by one of the methods:
- If the old material is not subject to repeated use, then the surviving boards does not make sense to keep in integrity. In this case, the removal is quickly carried out the old floor with a nail and other tools is removed, the garbage is disposed of.
- With repeated use of the boards, the wooden floor is removed as neatly as possible. Old boards can be used to reconstruct the floor covering, the flooring of the new sex.
- If the old material is not subject to repeated use, then the surviving boards does not make sense to keep in integrity. In this case, the removal is quickly carried out the old floor with a nail and other tools is removed, the garbage is disposed of.
- If the floor will be crossed with old boards, then when dismantling it must be numbered and subsequently put in the same order. First, the boards are removed from the edge of the room, lifting the floorboards over the lags with a chisel or mount. Then carefully remove the rest.
- Spooned panels with protrusions for joints and grooves are better to remove with blocks so as not to break the slopes. Disconnect the boards with each other after dismantling.
- Flexing floor boards when walking a consequence of a rare location of the lag. Therefore, when performing construction and vehicles, it is necessary to provide for the placement of additional beams. The optimal step between the lags is 50-60 cm.
- On a wooden floor and under it there are sometimes different communications. During dismantling, the wires can be damaged, so the work must be done carefully. Sometimes in old houses underground non -functioning ventilation is found. After dismantling, the ventilation ducts can be cleaned or removed at all.
- There is often a lot of garbage between the lags of the old flooring, which will have to be disposed of.
- A cement screed under a wooden floor also needs reconstruction. The durability of the future coating largely depends on the strength and quality of the restoration of the cement screed.
- To dismantle the old fiberboard from a wooden floor, a saw on wood, a nail and a carpentry hammer are used. Work on removing the flooring begins with the front door so that it was subsequently easier to take out construction garbage.


How to dismantle a wooden floor: work order
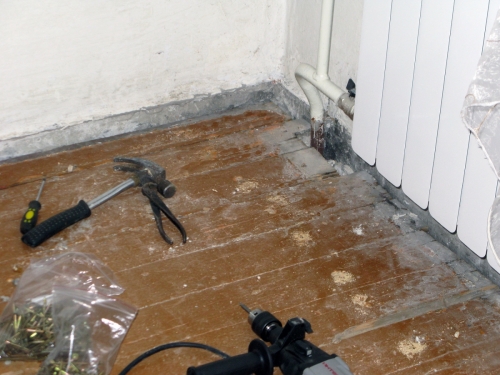
Preparation of tools
The following tools may need to be dismantled or other wooden coating:
- nail;
- sledgehammer or mounting hammer;
- pliers, screwdriver and ticks;
- daw or electrician for cutting long boards.
Note that to dismantle the concrete screed under a wooden floor, an additional punch and chisel will be needed.
Removing the plinth
It is customary to start the dismantling of the floor in an apartment or private house with the removal of a wooden or plastic skirting board. Sequencing:
- Take the furniture from the room, remove the designs arranged on the floor, wipe the working surface with a damp cloth, this will reduce the amount of dust raised during dismantling.
- Removing start from the corner of the room, otherwise the baseboard will begin to strain and break. Between the floor and the baseboard, insert the sharp end of the nail. Having made efforts to pull out the first nail half of the skirting board.
- Do the same with subsequent nails.
- Return to the first nail and pull it completely.
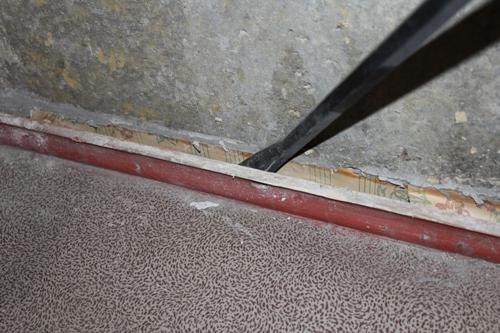
It is much easier to remove the skirting board, fixed with screws, you just need to unscrew them. The dyed skirting boards, on the contrary, are more complicated in dismantling. To remove their nails, it is necessary to drive a piece of wood to the point of support. If the nails are very long and the stroke of the nail is not enough, then you need to put a bar.
Typically, skirting boards are nailed with nails and painted in 2-3 layers with paint. In these cases, most likely, the fasteners are located at a distance of 50-70 cm. Removing nails, the nail should be slightly staggering to knock down the shuttlecock so easily removed without damage.
The procedure for removing the skirting board recorded on the wall is the same as the floor.
Dismantling of the whole floor
After removing the baseboard along the perimeter of the room, you can proceed directly to the dismantling of wooden boards. Considering that the installation of the floor begins with the floorboards facing the wall with a spike, the removal is carried out in the opposite direction, this will maintain the integrity of the wooden material and use it in other repair work.
If the floor is attached to the screws, then all the latches are twisted, and the boards are removed sequentially. In those cases when the floorboards hold on the nails, you must act in this sequence:
1. Determine the side of the floor where the last board is laid.
2. Under the board, score a nail with a hammer or hand.
3. Raise the floorboat 1-3 cm from the lag. 
4. Press the board so that the floorboards lay back. As a result of the work done, the nails of the nails will stay over the surface of the floor. If the first time it did not work, then the board must be re -raised and lower.
5. Put a plank under a nail and remove nails with a nail. A layered plank will protect the floorboat from pushing.
Important! In order not to damage the floorboard, lift the floorboat from the lag no higher than 3 cm.
To remove the extreme board, you need to remove all the nails in the described method. Then, gradually with the help of a chisel, increase the gap between the floorboards.
When dismantling, there is a chance of damage to the groove and spike of the board. This can happen with a strong press on a nail or due to the poor state of the wood itself (the presence of cracks, the appearance of rot, etc.). The broken upper part of the groove will be restored with glue or nail a small nail. The appearance of the board to deteriorate somewhat, but the functionality will not suffer.

During dismantling and construction work, certain difficulties may occur, for example, a tight fit of wooden boards to the wall. If a nail is difficult to put in the gap, then it will have to be scored with a hammer. With such a removal, there is a risk of damaging the plaster. Sometimes you have to resort to the use of a drill to remove part of the floorboards. In the formed space, it will be possible to drive a nail.
Removing the lag
The dismantling of the lag and concrete screed is best entrusted to specialists. Removing the base of the floor is quite a complex event that requires special technical means.
With independent dismantling, they act in the following order:
- Typically, the lags are installed on the substrates between which the insulation is located. Pull out thermal insulation material. When removing glass wools, it is necessary to use personal protective equipment.
- Loggs to lift or break the lags depends on the wear of wooden elements.
- After removing the lag, the dismantling of a concrete screed and filling a new base may be required.

It is necessary to evaluate the state of the lag. If the lags rotten to be thrown away. In place of the old ones, it is necessary to mount new, qualitatively dried wooden. It is important to choose the dried lags that will not give shrinkage during operation, and the floor will not be crumpled.
If the old lags look more than tolerably, then the wooden floor can simply be strengthened by installing additional new lags between the old elements.
Advice. To extend the life of the lag, they must be impregnated with olifa and painted. This will protect wooden elements from moisture, fungi, mold and exposure to other microorganisms.
Dismantling the old screed
To remove the floor screed, you will need a jackhammer, a punch or the use of diamond cutting circles. At home, where you have to work on a small scale, you can arm yourself with a hammer, a chisel and a sledgehammer.
The dismantling process is significantly complicated in large areas, where the screed is equipped with reinforcement. It is difficult to remove a metal grid from cement and a hammer. It is better to cope with this slave to cope with a diamond circle.

The screed first needs to be crushed, after which it can be easily removed from the surface. The residues of concrete are folded in bags and taken out of the room. If the garbage is not planned to be taken out immediately, then the bags must be placed under the cover in case of getting wet in the rain, the concrete is weighted and the loading process will significantly become more complicated.
The dismantling of a concrete screed is a very dusty and noisy process. Such work must be carried out in the daytime, having coordinated actions with neighbors. In addition, it is necessary to follow the safety rules and put on a respirator so that the smallest particles of construction waste do not get into the respiratory system.
Wooden floor repair: Removing creak
Very often it is the appearance of a creak that is the reason for the dismantling of a wooden floor and the pouring of the base with concrete. However, do not rush to solve such a problem in one way.
The first method. In the creaking floorboard above the beam, drill a hole with a diameter of 12-16 mm and pour it with a cement diluted with water in a ratio of 1: 1. After 2 days, drive a wooden pin soaked in glue into the hole to the opening to the floor panel. After completely drying, this site is plugged, sticking, open with varnish or paint.

The second method. Between the creaking boards, drill a hole at an angle of 45 with a thickness of 6-8 mm. In the hole, score a wooden pin, greased with carpentry glue. The protruding part of the staff is cut off with a chipper, the repaired area is putty.
The third method. In apartment buildings with central heating, often a creak is due to excessive dryness. This drawback can be eliminated by lubrication. The usual talc triggers into the cracks through the rubber pharmacy pear. It is necessary to act carefully so as not to wake the talc on the surface of the floorboards, otherwise white stains will remain on the floor after wet cleaning on the floor. After processing the gap, plunging.
![]()
StrPort construction portal 2011-2018. Articles about repair, construction, building materials.
Copying information from the site is possible only with permission of the editorial office Or indicating a direct link to the source. Legal justification