Foam is a sought -after building material, which is massively used ...
|
|
If you are the owner of a private house or cottage, you probably know that ... |
Fiberglass wallpaper differ in many advantages, among which, first of all ... |
Adhesive ceilings: with your own hands it's fast and simple!
No wonder the overhaul is compared with a spontaneous disaster. To think over the design to the smallest details, to navigate in the variety of finishing materials, to make an estimate taking into account the family budget is not easy. Therefore, more and more often in the desire to reduce costs and time for construction and repair work, the owners of apartments and country houses choose ceiling panels or tiles as finishing materials.
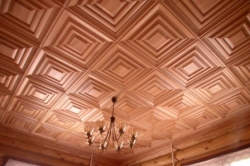
Adhesive ceilings are one of the types of decoration with rectangular or square sheets of polystyrene foam or polyurethane with a coating that imitates the surface of the stone, various wood species or the relief of stucco decor. Tiles for the ceiling can be mounted on any of the surfaces, whether it be concrete, drywall or brick. The sizes of polyurethane products are relatively small. Therefore, the material is quite simple in installation and transportation.
Content:
- Calculation of ceiling tiles
- Types of ceiling panels and tiles
- How to choose tiles?
- Glue for ceiling tiles
- Surface preparation
- Installation of ceiling panels or tiles
- We glue the ceiling plinth
- Conduct for adhesive ceilings
The creation of adhesive ceilings with your own hands is long, but not complicated. All that you need to choose the necessary materials for this is to arm yourself with patience and get acquainted with the installation technology.

Calculation of ceiling tiles
To avoid excessive expenses, it is worth calculating the necessary materials in advance. To do this, you need to take measurements of the room and count the number of entire sheets that are placed in width and length. Change these numbers. Now add one tile to conceal each of the large gaps and one sheet on two smaller cracks, if any. The number that turned out as a result of counting the number of sheets that will be needed for pasting the room.
It is better to buy panels or tiles with a small (approximately 10%) margin. Indeed, in the process of transportation and installation, part of the material can be deformed. Even if several sheets are cut incorrectly, then the remaining amount is quite enough to perform installation.

Types of ceiling panels and tiles
Depending on the manufacturing technology, the ceiling tile is divided into three types: extruded, injection and stamped.
Injection Tiles are made of polystyrene by pressing under the influence of high temperatures. The use of this technology allows you to create material with high aesthetic indicators. A fairly wide range of reliefs, colors and ornaments makes it possible to use it as finishing the ceilings in any of the rooms (bathroom, corridor, dining room, living room, etc.), the thickness of the product ranges from 9 to 14 mm. The tile packs in small blocks of 8 sheets size 5050 cm, which greatly simplifies both the calculation and the installation of the material. One packaging is enough for pasting two square meters of ceiling.

Stamped or pressed Polystyrene ceiling tiles are one of the economical materials of acceptable quality. On special equipment, thermal stamping of sheets with a thickness of 6-8 mm is performed.

Extruded The tile is made of polystyrene striped, laminated by decorative film. The absolutely smooth surface of the product can be plain or with a variety of textures. Such tiles are resistant to deformations of various kinds (it is characterized by the ability to recover after a slight press with a finger), unpretentious in care, much more durable than sheets of other ceiling coatings. The edge of the tile is somewhat bent, which makes installation more convenient.

Tiles or panels can be laminated or non -dilaminated. Laminatedceiling tiles are covered with a thin protective film (white or colored). The surface of such a polyurethane tile can be voluminous to imitate wood threads or gypsum reliefs. Laminated panels are much better tolerate increased humidity, resistant to sticking soot and dust. That is why manufacturers recommend installing such products in bathrooms or in the kitchen. Uplaced The products are smooth, with a grain surface of white. After installation, it is recommended to paint the necessary shade with acrylic.
How to choose tiles?
In the process of choosing tiles, you should carefully inspect the surface of the sheet. Polystyrol should be moderately granular, but not porous. The more granular the structure, the better the ceiling panels will be.
It is necessary to check the size of the sheets in the pack and compare the linear dimensions of products from different batches. They should not differ. The slightest errors can cause marriage in the surface decoration. Be sure to pay attention to the corners of panels or tiles. If they are too rounded, then it will not work to achieve impeccable docking of the edges.
If ceiling tiles made of polystyrene foam is made in violation of technology, then it becomes fragile. Take the leaf corner with two fingers slightly shake it. During such manipulations, tiles should not break.
Glue for ceiling tiles

When decorating the ceiling, the Moment -Installation of No. 40 is traditionally used, but the use of mastic and ready -made mixtures of Dragon, Titan or Eco - Extra Polish production also gives a good result.

Eco -toe glue - the extragers are applied to the back of the product and left in a horizontal position for 1-2 minutes for better adhesion of adhesive and surface. Then the tile is neatly applied to the base ceiling and is held for several minutes for optimal fixation.
The gluing of the ceiling using polymer glue Dragon based on synthetic resins is carried out in the same way as with Eco Nete Clay - Extra.
Titan is a universal polymer glue. It has increased resistance to natural factors. Therefore, it can be used in rooms with high humidity. Titan SW glue is also frost -resistant, which makes it indispensable when decorating ceilings in summer cottages and other rarely heated rooms.
The mastic for adhesive ceilings based on styrene-acrylic latex is used to finish ceilings with a rough surface (concrete, plaster, etc.). Fixation of tiles after gluing is not required. It is enough to apply the glue in a point method to the surface of the product from foam or polystyrene in a checkerboard pattern.

Surface preparation
Before proceeding with the finish process, the surfaces should be cleaned of the previous layers of finishing materials, pollution and, if necessary, align with putty. If the surface is sheathed with plywood or sheets of chipboard, then it is necessary to apply a primer.
Glue is applied only to tiles. It is not necessary to treat the ceiling with glue or mastic, since the weight of the product is small, therefore, the load will not be large.
Installation of ceiling panels or tiles
Seamless adhesive ceilings are rather from the field of fantasy, but mounting tiles or panels so that the seams are as neat and small as possible. And if you use tiles with ornaments and wavy edges, then you will not notice joints at all.
Installation of tiles made of polystyrene foam is recommended to start with the center of the room. For this, diagonals are determined and marking. Then the first sheet is fixed exactly in the center of the room.
The figure below with the number 1 indicates the place of the sticker of the first tile when using the method at right angles and digit 2 if the tile is glued along the diagonal.

Tile mounting diagram at right angles:

Tile location diagonal:

How to glue the tiles diagonally, you can find out from the video tutorial.
This method is also used when finishing the ceiling in a checkerboard pattern with products of two colors. In the process of fixation, it is important not to overdo it, since with a strong press the surface of the panels can be deformed.
Sometimes proceeding with the installation from the center is not economically rational. If the room is small, then it is advisable to start pasting from one of the corners of the wall located opposite the entrance to the room.
The glue on the surface of the panel is applied pointily: in the corners and in the center of the product. After the tile lay down for several minutes, the leaf is attached to the ceiling. The protruding excess glue must be immediately removed with a dry cloth. The tile is held with a hand in the places of application of glue for 1-2 minutes.
Even with a difference in linear sizes of tiles of several millimeters, difficulties can occur when combining the ornament. Then, before mounting the product, attach it to the already glued panels and cut it off with an overlord with an overwhelming knife. It is better to cut the tile under a metal ruler on a sheet of corrugated cardboard. If there are irregularities on the ceiling, then the appearance of small gaps cannot be avoided. You can hide them using white acrylic sealant.
We glue the ceiling plinth

Make sure that the gaps between the edge of the panel and the wall are no more than the thickness of the Scabel (plinth). Ceiling strips product of polyurethane or polystyrene of various shades and textures. They are glued around the entire perimeter of the ceiling. It is better to disguise large gaps with a small strip of panel. When installing fillets, difficulties with a docking of corners often arise. Therefore, it is better to use a knock for cutting strips. The ceiling filler is installed in the knock and, clutching tightly, cut it with a hacksaw.
Installation of planks is carried out both before pasting wallpaper or painting, and after. In the first case, the cracks in the places of junction of the fillets and walls using putty is much easier to eliminate. But when carrying out the installation of the baseboard at the last stage of finishing work, it is easier to fix minor defects in the wallpaper pasting.

Rosettes, cornices and other accessories resembling stucco are used to decorate large rooms. All these additional decor elements can be white or with a color pattern. White, in a classic style, fillets and outlets are better to paint with acrylic paint, since when exposed to sunlight, such products turn yellow quickly.
Conduct for adhesive ceilings
Compliance with several simple rules will help improve the operational qualities of tiles:
- as they become dirty, wipe the tile with a damp cloth from dust;
- to remove traces of fat, use alcohol -based products;
- it is not recommended to use solvents for cleaning the product from polyurethane;
- for processing panels with laminate coating, use a warm soap solution;
- it is strictly prohibited to place tiles near open -fire sources (despite the protective layer, polystyrene and polyurethane products melt).

The advantages of finishing ceilings with polyurethane or polystyrene tiles are obvious: ease of installation, ease in periodic maintenance, as well as a large selection of coloristic coating solutions. The cheapness of products makes this product even more in demand on the market of finishing materials. A successful choice and proper installation of such tiles can change the design of the room in a matter of hours. Both cheap and beautiful!
![]()
StrPort construction portal 2011-2018. Articles about repair, construction, building materials.
Copying information from the site is possible only with permission of the editorial office Or indicating a direct link to the source. Legal justification