In order to align the surfaces of the ceilings and hide the laid on it ...
|
|
If there is a reconstruction, construction of a country house, cottage or bath, where ... |
The toilet is clearly not the place where we only do that we look at the ceiling ... |
How to remove grout from the seams with your own hands
Interpretation seams The weakest place in the tile. They are most susceptible to rapid wear, the appearance of cracks and burning out color. The surface finish loses aesthetics, attractiveness and may need a complete replacement of the grouting material. How to perform this work correctly and not damage the tile is described in the article.
- The reasons for the premature wear of the grout
- Assessment of the state of the old grout
- How to remove grout from the seams of tiles with chemical reagents
- Removal of grouting mechanical methods
- Folk methods for removing old grouting
- Restoration of inter -seams
- How to remove grout from the seams: general recommendations of specialists
The reasons for the premature wear of the grout
During the operation of ceramic tiles, situations often arise when the coating itself has not yet exhausted the service life, and the grout of the seams has lost its aesthetics and does not perform its moisture -insulating functions. A similar problem may be the result of some factors:

- Incorrectly selected grouting composition. The solution should be selected taking into account humidity, temperature and the purpose of the room.
- Errors made when applying grout. The most common sealing seams with passes or not to the entire depth.
- The manufacture of the solution is not according to the instructions. The liquid consistency of the grout reduces its strength and durability. With independent kneading, a dry mixture must adhere to the recommendations of the manufacturer.
- Incorrect care for ceramic tiles. Cleaning products with acid destroy the structure of the grout.
- The appearance of mold on the walls of the bathroom and the penetration of microorganisms into the inter -sequinuspace.
- Increased humidity and dampness of the room due to the lack of sufficient ventilation.
- Fast pollution of light seams.
Before deciding that it is time to remove the old grout from the seams must carefully examine it and evaluate the degree of destruction.
Assessment of the state of the old grout
First of all, the seams should be thoroughly cleaned. If the grout has no cracks and just has a desire to update the color, then the grout will be avoided. Things are worse when deformations appear, fungus and mold between tiles.

You can determine the need for a complete replacement of the grout by the following signs:
- There are gaps in the seams, the grout crumbles and disappears.
- When cleaning the seams with sandpaper, the color of the upper layer of the grout does not change. This indicates the spread of mold and requires the removal of an old grout, followed by disinfectant processing of the seams.
Depending on the tools and consumables used, two main methods of removing the grout are distinguished: chemical and mechanical. To protect the tile from cracking, clean the seams correctly, adhering to the selected technology.
How to remove grout from the seams of tiles with chemical reagents
The most gentle option for removing the grout is the use of chemical reagents. Special solvents corrode frozen filling, without damaging the tile itself.
Important! The chemical composition is selected for the type of grout. Work with the reagent must be carried out strictly according to the instructions using personal protection products (rubber gloves and respirator).
Remove the grout of the tile joints will turn out to be the following solvents: Sopro ZEA 703/ ZSE 718, Atlas Szop/ Szop 2000, Clean, Keranet and Litoclean.

Most of the compositions are designed on the basis of acids, which, if used improperly, can damage the surface surface. Some solvents can leave white spots on the tile.
We describe the order how to remove the grout of the tile with a chemical solution:
- A thin brush or a special dispenser, apply a reagent at the seams.
- Leave the solution for a while (about five hours). Chemicals begin to act and the grout softens.
- Try to slide out the grout with a construction knife. If it leaves poorly, then you need to re -make a reagent. To remove cement grout, processing will have to be performed twice.
Some substances completely dissolve the grout and after a certain time it is enough to rinse the wall.
Removal of grouting mechanical methods
The choice of a suitable tool
The following tools may come in handy for the purification of inter -seams:
- A construction knife, a small screwdriver, a stighal or a small chisel. Removing the grout of the listed tools takes a lot of time, but the risk of damage to the tiles is minimal.
- Suture dug, designed specifically for cleaning hardened grout. The tool is convenient to work, but buying it for the sake of one use is not advisable.
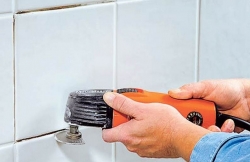
- The electric drill allows you to quickly get rid of the old grout. Working as a power tool, it is important to choose a thin drill so as not to hook the tile. This method is suitable for removing the grout, if the tile is firmly held on the basis.
- Dremel is a kind of electrician equipped with a flat half -dog. With neat use, remove the grout in a matter of minutes.
- The screwdriver will also cope with the old inter -sealing material. A nozzle with a ruff is put on the tool, consisting of a small disk from metal villi. This method is more suitable for floor tiles, resistant to abrasion.

Removing the grout by electric drill
Before you remove the epoxy grout from the seams, it is necessary to perform preparatory measures:

- Prepare the solution by mixing water and table vinegar in equal parts. The last component can be replaced with citric acid, this will avoid the appearance of a sharp acetic smell.
- Moisten the sponge in sour solution and grease all the seams abundantly. When using vinegar, the impregnation must be withstanded for about 30 minutes, and when using citric acid 24 hours.
- Put a thin drill on the electric drill, the width of which does not exceed the thickness of the inter -seam.
- Turn on the tool on the minimum power and slowly walk between the tiles.
- After the complete removal of the grout, the resulting furrows are cleaned with a hard brush.
- Rinse the seams and treat them with an antiseptic composition.
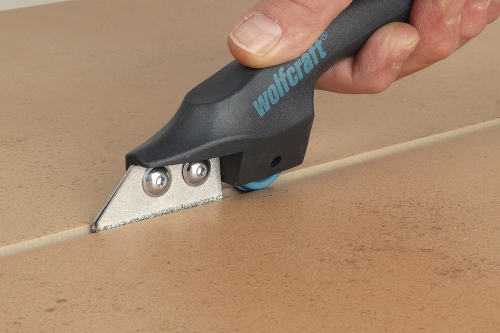
How to remove the grout between the tiles with a knife: step -by -step instructions
If there was no drill under the hand, then the seams with a knife are to be stripped. For work, it is important to choose a tool with a comfortable handle, since the process is long.
The procedure for removing the grout:
- Install the knife in the center of the inter -seam. If the blade does not penetrate deep enough, then you should knock on the knife with a hammer.
- Attach an effort and draw a line to the entire depth of the grouting seam.
- Cut the putty from one edge of the tile to the line of the section. Repeat the actions from the other edge of the tile.
- The remnants of the grout mixture should be cleaned with fine sandpaper.
- Treat the seams with an antiseptic and antifungal primer. After the primer dries, you can proceed to re -fill out the seams with a new putty.
Folk methods for removing old grouting
Popular methods are suitable for supporters of the use of improvised means.
Method 1. Using a concentrated solution of vinegar or citric acid. The prepared reagent is applied to the grout and left for a day. Over time, the grout is removed by a spatula or a construction knife. The acidic components can be replaced by a means to combat lime on plumbing or a detergent for acid -based dishes.
Method 2.Prepare a solution from one part of glycerin and three parts of water. Process the seams with the mixture and leave them for a while. Remove the old grout with a plastic spatula. The glycerin solution is also useful to solve the issue: how to remove the dried grout from the tile?. The cleaning technology is similar to the described procedure after applying to leave for a while and wipe with a rag.

Method 3. If the grout fell on the tile and dried up, then it will not work to wash it off with water. For this purpose, you can use a solution of water with white spirit or kerosene. In the divorced composition, it is enough to moisten the sponge, slightly squeeze and wipe the surface of the tile with it.
Restoration of inter -seams
Sometimes there is a desire to simply update the interior of the bathroom or kitchen. In order not to do a long and expensive repair, it is enough to restore grouting. Restoring the original type of inter -seam is possible with the help of simple technology:
It will make sure that the grout did not crack and was not damaged by mold.
- Pour the edges of the tiles with a painting tape so as not to damage the tile during restoration work.
- Wipe the top layer of the old grout with sandpaper. To work more conveniently sandpaper, you can wrap the screwdriver.
- After removing the upper layer, treat the seams with antibacterial soil and leave the composition until completely dry.
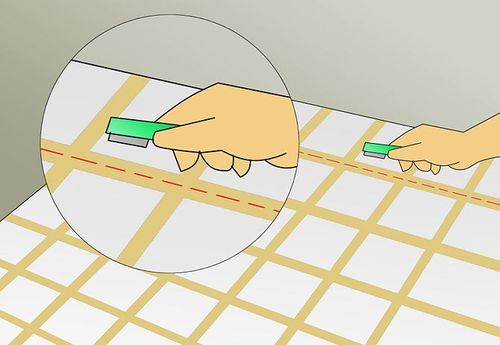
- Apply a new layer of larger material or paint the seam with a special marker with a rubber spatula.

- Upon completion of the work, remove the protective film from the film and wipe the surface with a soft cloth.

How to remove grout from the seams: general recommendations of specialists
The stripping of the joints of the tile is not a particularly difficult operation, but the performance of the work will require attentiveness and perseverance from the contractor. To prevent the tile coating, and the new grout served for a long time to adhere to the described technologies and advice of specialists.
- Before performing work from the room, it is advisable to take out furniture and things, since a lot of dust will stand out as the seams open.
- Removing the grout is fraught with certain difficulties and requires mandatory observance of the safety of using the respirator, overalls and gloves.

- The room should be well ventilated. This recommendation is especially relevant when working with chemical reagents.
- For bleaching of inter -seams, hydrogen peroxide is suitable. The method is recommended for the restoration of white grout and checking the material for mold.
- When removing grout from porcelain or marble tiles, acid -based solvents cannot be used.
- Before applying grouting, the surface of the tile should be protected with a mounting tape or treated with ordinary soap.

So that often it is not necessary to solve the question of how to quickly remove the old grout between the tiles, it is necessary to properly take care of the tiles and periodically clean the seams. Thus, it will be possible to extend the original appearance of the cladding and not resort to repair work ahead of time.
How to remove grout from tile seams: video
![]()
StrPort construction portal 2011-2018. Articles about repair, construction, building materials.
Copying information from the site is possible only with permission of the editorial office Or indicating a direct link to the source. Legal justification
Thanks a lot. You are real
Thanks a lot. You really helped me.