The scope of ceramic brick is extensive. It is used for laying load -bearing walls ...
|
|
Any painting work using a brush or roller is quite time -consuming, ... |
Modern construction sites are not without the use of mounting foam, ... |
DIY ceiling in the toilet
The toilet is clearly not the place where we only do that we look at the ceiling. We pay attention to him only at the moment when we go into the room. The rest of the time we should be interested in completely different matters. Nevertheless, it is also not worth it to treat the ceiling in the toilet either. If you have a marafet, then everywhere. In addition, most often this in all respects an important room is so small that the walls, the floor, and the ceiling in it are perceived as a whole. Therefore, all details need to be paid attention to. The abundance of finishing materials in the modern market allows you to choose the most optimal option with which you can finish the ceiling in the toilet. Color, texture and design should be selected with taste, so that the decoration in the toilet does not resemble the Hermitage and does not distract from the main business. All work on finishing the ceiling can be easily performed independently without resorting to the help of specialists and without spending a lot of time.
- Ceiling requirements in the toilet
- How to choose the right color of the ceiling in the toilet
- How to whitewash the ceiling in the toilet
- How to paint the ceiling in the toilet
- How to paste the ceiling in the toilet with panels or tiles
- How to make a plastic ceiling in the toilet
- How to make a suspended ceiling in the toilet
- How to make a stretch ceiling
Ceiling requirements in the toilet
The toilet in all respects is a specific room, it has risers of pipes, at least sewer, it contains a toilet, and sometimes a boiler. In this regard, certain requirements are imposed on the decoration of the toilet. After all, the pipes can drive away at any time, there will be a leak, all this should go through with minimal consequences for finishing materials.
- The ceiling in the toilet should not be afraid of condensate, mold should not form on it.
- The ceiling should not interfere with access to the pipes.
- The design of the ceiling in the toilet should minimize the space.
- The ceiling should be combined with the walls and floor.
When choosing which ceiling to make in the toilet, you should take into account all the requirements and pay attention to those methods that will give the maximum overview for pipes, look aesthetically pleasing, minimally take the height of the room and make the ceiling with moisture resistant.
How to choose the right color of the ceiling in the toilet

The choice of color for the ceiling in the toilet depends on only two factors of the height of the room and wall decoration.
If the room is very low, then the ceiling should be made lighter than the walls. All pastel colors, light green, light blue, light pink are suitable. Also, for a visual increase in space, you can use mirror panels, glossy, glass or silver/golden/chrome color. The combination of matte and silver shades also allows you to expand the boundaries.
If the room vice versa Too high Compared to the total area, the ceiling must be visually closer. For this, dark purple, red, blue, the same golden are suitable for this, but provided that the wall decoration will be light. In this case, lighting devices should be placed on the wall and directed to objects located below the ceiling to switch attention to them.
It is not worth it on the ceiling in the toilet to make an artistic painting or photo printing with the image of a night city, in public places such delights can make a favorable impression, and in a home environment they will simply be distracted.
How to whitewash the ceiling in the toilet

Watching is a classic version of the ceiling. He has a lot of advantages, the speed of execution, aesthetics, pleasant white color and texture. Lime whitewashing is not afraid of mold, allows the surface to breathe. In case of flooding, it gets wet, but is this such a drawback? But you can immediately see where and where it flows, excellent access to the pipes. To whitewash the ceiling will take no more than 15 minutes.
To whitewash the ceiling, it is necessary:
- Comers the surface of the ceiling with putty. The need to perform this type of work is ranked to the disadvantages of whitewashing, but let's look at a little more detail. The ceiling in the toilet is the surface of one floor slab, without joints. Unlike the ceilings in rooms where the difference between the plates can reach 4 5 cm. Alignment of the surface of one plate is reduced to simple putty.
- For putty, you will need a finish putty, two types of spatulas, a capacity for kneading and a drill with a mixer nozzle.

- The prepared putty solution dries quite quickly, but taking into account the fact that the room is very small, one batch will be enough to thicken the entire ceiling. We pick up the putty on the spatula and draw it on the surface of the ceiling with a sharp semicircular movement, smearing the solution. To remove surplus, we perform movements in the perpendicular direction.
- When the putty is applied as smooth as possible, leave it to dry for a day. The next day we grind and pour it, cutting off small flaws.
- We prepare lime whitewashing, dip the cyst into it and apply to the surface of the ceiling. We try not to leave uninvited places. Repeat the procedure several times.
When the whitewashing dries, it will acquire a bright white color. In the future, it does not require any special care. Dust does not accumulate on it. Only in case of flooding, when red spots can appear on it, only then it will be necessary to update the coating.
How to paint the ceiling in the toilet

One way to make the ceiling in the toilet waterproof is to paint it. To do this, choose a paint designed for operation in conditions of high humidity. This category includes oil paints, based on latex, silicone, acrylicsome positions water-dispersion colorsor water -based colors.
The tremendous selection of colors and shades of modern colors will allow you to choose the ideal option, combined with the color of the walls. For painting the ceiling in the toilet, its surface will also have to be leveled with putty, as in the case of whitewashing. After the putty composition dries, the paint is applied with a roller.

It is advisable to paint the ceiling in several layers, 3 4. This will not only make the color saturated, but also protect the ceiling from moisture as much as possible.
A drops of accumulated condensate will form on the surface of the painted ceiling in high humidity conditions. They will not do any harm. They can simply be erased with a rag, or you can wait until the water itself dries, if the ventilation works well enough.
How to paste the ceiling in the toilet with panels or tiles
Playing the ceiling with tiles allows you to make a beautiful finish without losing the height of the room. The surface of the ceiling is waterproof. A very important nuance of the tile size must be selected so that it does not disfigure the already small room. It should be either very large to cover the entire area of \u200b\u200b4 tiles, or vice versa small enough, this will expand visually the boundaries.
PVC panels
PVC tiles or panels are glued directly to the ceiling without additional fastening. They are light, easily mounted, cheap. This method of decoration is cheaper than a suspended ceiling from the same plastic panels. The only drawback they can deform and peel off. Also, poor -quality plastic can change the color, for example, yellow, and even unevenly.
PVC tiles gluing to the ceiling:
- The surface of the ceiling is primer with waterproof glue.
- Then apply glue on the back of the tile or panel at at least 6 9 points.
- We attach the panel to the surface of the ceiling and press.
- We have the following tiles close to the first, leaving no gaps. By the way, PVC tiles can be glued next to hot pipes of water supply.
For greater aesthetics, a ceiling plinth can be glued along the ceiling contour.
Cork panels

Camping slabs and panels are a natural option of finishing, which also allows you to soundproof the room. True, such panels are always sold in dark color solutions, so only the owners of rooms with high ceilings can be used. In addition, the price of cork panels is quite high. They are glued in an absolutely identical way.
Foam tile
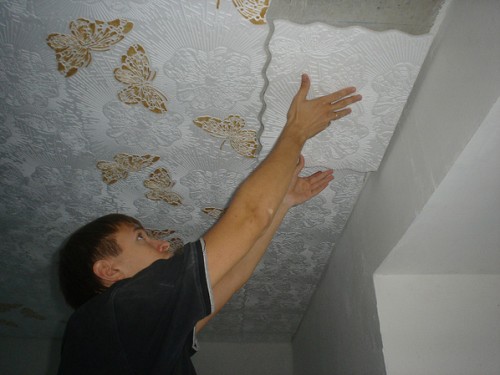
Foamed polystyrene tiles (polystyrene foam) is so intricate at times that it resembles stucco molding. A small selection of shades, mainly such plates are white. But the variety of embossed drawings is amazing. Foam plates are very light, quickly glued, but they have three deficiencies accumulating, turning yellow over time, easily breaks during the installation process.
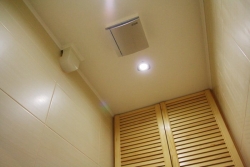
How to make a plastic ceiling in the toilet

Plastic ceiling panels are quickly mounted, easily washed, not afraid of moisture, have a wide color scheme. The installation of plastic panels on the ceiling reduces its height by 3 4 cm. Since this method of finishing is actually almost a suspended structure, there are two ways to do with pipes. The first to cut the holes in the panels for pipes and mount the panels for the entire area of \u200b\u200bthe room. The second option is made for pipes a separate box cabinet. And the installation of the panels will then be made on the remaining space with the trim of the panel along the length.
Plastic panels can be selected for the color of the walls, install mirror panels or hameleon panels, matte, glossy, with embossing, relief, 3 d panels, rough for every taste.
Ceiling PVC panels are two plates, between which stiffeners are clamped. The panels themselves are not strong enough material, it is easy to break through or damage it in another way. The strength of these panels is determined by the amount, quality and strength of the ribs of stiffness. PVC panels are seamless, i.e. There are no gaps and gaps with their installation, relief, i.e. Between the panels, a seam resembles a lining, and rust panels, after their installation, the seam resembles the seam between the floor panels, small and neat. These differences can be seen on the plastic ceiling demonstrating in the toilet photo.
Installation of plastic ceiling panels:
- On the ceiling, we beat a crate from longitudinal bars. You can use wooden bars of 30x30 mm, having previously treated them with an antiseptic. The step between the bars is not more than 40 50 cm. We fix the bars to the ceiling using 70 mm anchors.
- If it is planned to install lamps in the panels, then at this stage we lay an electric cable to the place of their location.
- We begin installation from a special initial profile Start and finish. Then we measure the distance between them, it will be the length of the panel.
- We cut off the panel to the desired size of a regular hacksaw for metal.
- We start the panel in the side profile, promote to the starting profile, in which we fix it.

- We attach the panel to the frame using self -tapping screws or a construction stapler, twisting into a groove.
- We start the next panel from the side profile, move to the first panel, insert the spike into the groove and snap. We also twist the screw into the groove of the panel, fixing to the crate.
- Repeat the procedure for all panels. The latter should go in a groove or cut edge, if it was uneven, into the finish side profile.
The hole for the lamp can be cut using a drill with a crown, first a lamp is inserted, then the panel is mounted.
The width of plastic panels for the ceiling must be selected taking into account wall decoration. For example, if ceramic tiles are on the walls in the toilet, then the width of the panels should correspond to the width of the tile.
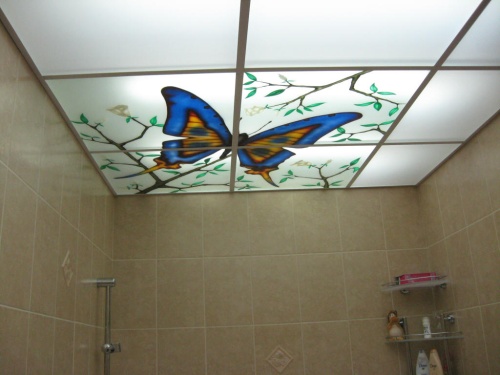
How to make a suspended ceiling in the toilet
The suspended ceilings in the toilet began to be done recently. Their advantages are beauty and attractiveness, resistance to humidity, the ability to hide all the shortcomings and irregularities of the main ceiling, durability, easy installation and dismantling for need. The disadvantages include only one thing worsens to the pipes. This nuance must be considered well and select only those designs of the suspended ceiling that can be easily disassembled and assembled again.
Cassette ceiling in the toilet
In a very small toilet, this type of suspended ceiling will look ugly. Even the diagonal arrangement of the guides will not save, which will visually expand the room. But in the bathrooms of the middle and large area, the arrangement of the cassette ceiling will be winning. The height of the toilet is also important: if the ceilings are high, you can safely make a cassette ceiling, if low ones cannot be.
Cassette ceilings are of two types: with an open suspension systemand with closed. For example, mirror and glass ceilings are mounted on an open system, and aluminum French ceilings on a closed one. Different panels are produced for these systems. For an open system of the panel with a flat edge or with a stepped, and for a closed panel with bent edges, which is convenient to insert into the holes in the mounting profile.

For toilets with low ceilings, aluminum cassette ceilings with a closed system are better suited. In addition to the fact that they are moisture resistant, can be painted in different colors, easily wash, relatively cheap, such ceilings also allow you to easily reach the main ceiling or pipes. It is enough to easily remove one or two panels, carry out repair work, and then insert the panels back.
Cassette ceiling in the toilet with your own hands:
- We perform a drawing of a closed -type cassette ceiling with exact dimensions. This will facilitate further installation and help to properly place the panels.
- We mark the ceiling, apply a zero ceiling level on the walls. It should be 150 mm below the main ceiling.
- At zero level, we attach the corner profile to the walls. We put the holes in the walls, insert the dowel, then apply the profile and twist the screws. The step between the dowels should be at least 40 cm.
- We make notes above the corner profile, where the main guides will be mounted. We pull the cord or thread between the points on the opposite walls. Focusing on the cords, we make a note on the ceiling, where the suspensions should be located.
- We fix the suspension to the ceiling using anchors of 13 mm.

- Install the main guides. The step between the guides should be equal to the width of the panel. We support them on the corner profile, then align strictly along the cord and fix it to the suspensions. We strictly control their even location in the horizontal plane.
- We fasten decorative panels to the main guides. We insert the edges of the panels into the grooves on fasteners and snap them to the end. We move the panel to the edge of the structure. Repeat the procedure for all panels.
- If there is a need to install a smaller panel, then cut the panel and cut the cut out to the corner profile. There are special elements on this profile, bending which you can reliably fix the panel.
The installation of a cassette ceiling with an open system is slightly different, in addition to the main guides it is necessary to install the transverse guides and strictly hang the corners of 90 between them. The panels are inserted into the formed cells, simply laid on the edges of the profiles.
Rack ceiling in the toilet

Another modern way to make the ceiling in the toilet with a spectacular, catchy and at the same time functional and easy to care, it is to install a rack ceiling. This type of ceilings is made of aluminum or galvanized steel, so that it does not rust and is not afraid of moisture, mold and completely fireproof, easily washed and easily removed. The backlight can be placed directly in the rails/panels, hiding the wiring.

The choice of color solutions for rack ceilings is very large, but it is in the toilet that the panels of light matte shades of larger width in combination with golden, silver and chrome panels of smaller width, which are decorative intermediate inserts, will look better.
Installation of the ceiling in the toilet REKED CEART:

- We mark the zero level of the ceiling on the walls.
- We fasten the angular wall profile with a step of 50 60 cm.
- We note the places where the fasteners will be placed.
- On the line of the future location of the comb, we install suspensions with a step of 60 cm. The first should be located at a distance of 20 30 cm from the wall.
- We install the first comb in a suspension at a distance of 20 30 cm from the wall, fix it with self -tapping screws. Cut the comb along the length with ordinary metal scissors.
- We install all subsequent combs with a step of 60 cm. We check the horizontal structure.
- We measure the distance between the walls and remove 1 cm for the convenience of installation. Cut the panel to the desired size.

- We install the rack panel on the comb, snaping it between the teeth. A characteristic click should be heard. Between the first panel and the corner profile, the gap should not remain.
- The next set the narrow panel/rail of a mirror shade.
- By analogy, we set all the slats in the sequence: wide narrow. If you plan to install lamps, then cut a hole in the panel, install the lamp and mount the panel itself.
Typically, the color of the corner profile is selected the same as the color of a narrow rail-panel. In the process of installation, it is necessary to ensure that there are no cracks between the panels. We start narrow edges of the rails over the corner profile to hide the slice of the panels.
Drywall ceiling in the toilet

To equip the ceiling in the toilet, exclusively moisture -resistant drywall is used. The advantage of this type of suspended ceiling is the possibility of installing a two -level structure, which can be given any shape, for example, in the middle there can be an oval or circle. After installation, sheets of drywall are spit and stain in any color you like with paints for wet rooms.
Hypsum cardboard installation technology in the toilet consists of several stages:
- Installation of guides.
- Installation of drywall sheets for screws.
- Gluing joints with tape.
- Putting plasterboard.
- Coloring.
The difference between the ceiling made of drywall and other suspended structures is that the surface is perfectly flat, without joints, cracks. But he also has a significant drawback of the impossibility of light dismantling in case of leakage or unscheduled pipes repair.
How to make a stretch ceiling

The stretch ceiling in the toilet is inappropriate for the same reason as the ceiling made of drywall. Firstly, it is necessary to separate the pipes with a partition. Secondly, access will be difficult for them. Thirdly, the stretch ceiling is quite expensive even taking into account the fact that the area of \u200b\u200bthe toilet is very small.
But if you really want to, then you can install a PVC ceiling with a harpoon system that allows you to remove the canvas as needed. That's just for repeated installation, you still have to call specialists with a heat gun, which in itself is costly and not profitable.
There are many options for arranging the ceiling in the toilet, there is something to choose from for every taste and wallet, both for a residential building and for public places. In addition to all of the above, it is separately noted to glue the ceiling with moisture -resistant wallpaper on a vinyl -based or base of fiberglass. This is one of the simplest, most low -cost and easy ways to ennoble the toilet.
![]()
StrPort construction portal 2011-2018. Articles about repair, construction, building materials.
Copying information from the site is possible only with permission of the editorial office Or indicating a direct link to the source. Legal justification
Hello everyone
Hello all the presented ceilings you can buy in Moscow and the region on the Potolkitorg.ru website at the best prices! The site has a wide selection of hanging ceilings for home and public premises, also if you need consultation, take a call back, call us, call us -Or write e-mail. Let's be glad to help you!