Preparation of the surface, one of the main stages before laying the coating. ...

|
|
Frame houses are a wonderful option for a quick and inexpensive individual ... |
Warm floor in the kitchen is a modern level of comfort, turning the usual ... |
Slits in the windows. What to close the slots in the windows
One of the most vulnerable places in the house where heat loss most often occur is windows. Of course, it is impossible to ensure the perfect heat and noise insulation in this place, but everyone can reduce the noise and loss of heat to a minimum. The thing is that the cause of increased noise and heat loss are cracks in the windows. This applies not only to old wooden windows, but also by more modern metal -plastic ones. We will talk about how and how to smear the cracks in the windows in the windows.
Causes of cracks in the windows
As one sage said, it is better to eliminate the cause of the disease than to constantly treat consequences. So with the cracks in the windows should also be done. To do this, it is enough to understand the reason for their appearance and eliminate it once and for all.
Reason first: crooked installation

It is no secret to anyone that one or another design will be on the level of professionalism of the master, how durable and reliable. So with the windows the same way. Errors at the stage of installation of windows lead to the fact that it blows from under the window, and the noise from the street does not allow to sleep.
It is almost impossible to control the quality of work. For this, it is necessary to have certain knowledge. But something can still be done. It is just that you need to check how high -quality all the cracks are between the window frame and the opening. You can do this with a simple lighter, bringing her flame to the joints. You should also pay attention to the outer side of the window. Places of the frame of the frame to the opening should also be reliably vicious or blended with mounting foam, and their surface is painted or soldered. The same thing from the inside.
Reason the second: wear of the seal

Unfortunately, there are no eternal building materials yet, and gaps in the windows appear during operation. And in conjunction with the errors of installation, the period of their operation will only decrease.
Problemn are all the same places for the adjacent to the opening. If for some reason, sealing materials were not painted or plastered, then under the influence of temperature changes, ultraviolet radiation, wind and precipitation, they quickly wear out. Installation foam, even the one that is designed for external work, is exhausted, gradually exposing the voids between the window and the wall. Foamen or other seal is reference, crumbles and blows, thereby increasing the gaps. To extend the service life of the seal, it is enough to conduct an inspection once every two to three years and maintain the integrity of the protective layer. It is best to do this in the spring, when it is already warm and there is no precipitation.
Reason is the third: wear of the frame and accessories
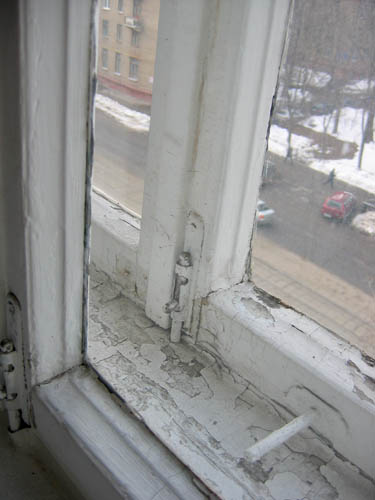
As well as the seal, window frames and accessories have their own resource. Over time, the sash begins to fit poorly to the frame, as a result of which the cracks appear. This is especially true for wooden windows. A characteristic problem of wooden frames is the link of wood, which leads to the appearance of cracks. But in metal -plastic windows, the rubber seal on the sash most often fails.
It is impossible to avoid wear, but it is realistic to extend the life. It is enough to conduct regular seasonal inspection and maintenance of windows. This is primarily painting wooden windows, adjusting accessories, so as not to dangle.
How to close the cracks in the windows
Despite the fact that today the majority of the windows are metal -plastic, their owners after a certain time are faced with the problem of cracks in these ultra -modern and reliable windows. As for the wooden windows, the cracks are inevitable satellites. We will consider how to get rid of the cracks about how to get rid of the cracks.
How to remove the cracks between the frame and the wall

If during installation the master did not apply the protective layer to the stoiled sections, then over time the foam will collapse, and the gaps will inevitably appear. The gap between the window and the wall, the window and the windowsill is quite common in such cases.
To eliminate them, you need:
- narrow spatula;
- long screwdriver;
- assembly gun for sealant;
- rag or usual rag;
- newspaper or polyethylene film;
- gloves.

From the materials you will need:
- white Spirit;
- mounting foam;
- acrylic frost-resistant sealant, you can also use a roof rubber-bitamous or polyurethane sealant.
Important! In no case should you use silicone sealant. Under the influence of temperatures, he rolls and becomes unusable, thereby exposing the stoiled cracks.
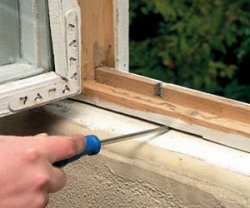
Getting up with everything necessary, we start work. We start with preparation, namely, we eliminate the old foam. To do this, do the following:
- We unscrew 2 3 self -tapping screws on the tide, if any.
- We begin to clean the groove and the substitute. We take a screwdriver and pick out the old brown foam. She is quite easy to crumble, and the remains are blown out.
- We clean the foam in the joints of the walls and window profile with the same screwdriver. For reliability, you can go through a brush to remove its remains.
Important! At this stage, one more person will be required to insteraterate so that you do not accidentally fall out of the window.
Having finished with the preparation, we proceed directly to the sealing of the cracks. To do this, do the following:

- We take a cylinder with foam and blow it all the joints and cracks. To process narrow, inaccessible cracks, the nose of the supply tube can be added.
- Without waiting for the foam completely completely dry, we fix the tide.
- We leave the foam dry for 24 hours.
- Using an ordinary stationery knife, we cut off the excess foam.

- We take a cylinder with a sealant and cut its nose at an angle, so that it is more convenient to fill the seams at different angles.
- Gradually squeezing the sealant, apply it over the foam;
Important! At this stage, one more person will be required to insteraterate so that you do not accidentally fall out of the window. Excess sealant on the nose is removed with a rag saturated with white spirit. With the same rag, you can remove the remnants of the sealant from the frame.

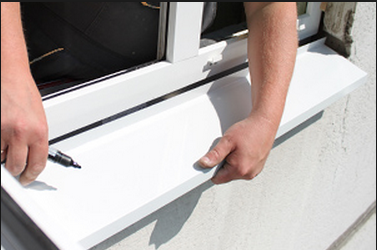
- With the help of a narrow spatula, we level the sealant flush from the window towards the street and leave it to dry.
- After drying the sealant, it should be painted with ordinary alkyd paint in order to protect against external influences.
Particular attention should be paid to the area under the tide. Here is the most uncomfortable place, so a certain dexterity will be required. But if everything is done correctly, then the gap between the window and the windowsill will be eliminated once and for all.
How to remove gaps between the frame and sashes

It was previously noted that the cracks in plastic windows may also appear due to wear of the rubber seal. The elimination of such cracks is quite simple to get a new seal and make the following:
- Gently remove the old seal from the groove in the window frame.
- It is advisable to wipe the grooves and clean them of possible dust and dirt.
- Then we take a new seal and with the help of a special tool or a small wooden shoulder blade, season it into the groove.

Important! To extend the operation of the sealant, it must be treated once a year with a special silicone spray to protect against drying out.

The described methods are suitable if you decide to eliminate the cracks in wooden windows. But the following should be noted.
- Firstly, at the stage of preparation, wooden windows are checked for the presence of damaged or rotten stacks. If any, they should be replaced.
- Secondly, the seal between the frame and the sashes can be used rubber, or foam rubber can be used. But unlike metal -plastic windows, the seal is simply glued to the frame.
- Thirdly, between the frames as a seal, you can fix the foam rubber, just do not glue it.
The most reliable way to get rid of cracks in the windows

The sealing of the cracks and the protection of the seal from wear and tear solve only part of the problem. Like it or not, from time to time you will have to update the protective layer. To avoid all this fuss, it is necessary to create reliable protection. To do this, you will have to make external slopes.
Of the materials will be required:
- plastic pprofili 8 mm;
- plastic panels;
- mounting foam;
- sealant;
- primer;
- white Spirit;
- three wooden spacers for the full height of the window opening and three on its width.
From the tool you will need:
- assembly gun for sealant;
- electrolobesis or hacksaw for metal;
- roulette, ruler and marker.
All work on the creation of external slopes is as follows:
- We clean the walls from dirt and construction paint.
- We make measurements of 3 slopes. First, remove the size of the upper slope, then the side.
Important! Each slope is a trapezoid, so you should be careful when removing measurements.

- We mark future slopes on the plastic panels and carefully cut them to the required size.
- For vertical panels, we put on a P-shaped profile on each side. Only for the upper panel, the P-shaped profile is worn only on the outer and inside, and the side remains empty.

- Installation starts with the upper slope. To do this, we apply foam to the black side zigzag.
- We install the upper slope in place and start struts under it. We install two spacers at the edges, and one in the center.

Important! In order not to damage the plastic surface, pieces of foam or rags can be placed under the spacers. Side slopes should be installed after the foam on the upper slope is dry enough and the spacers can be removed.

- We take vertical slopes, apply the installation foam zigzag and install them in its place. Install the spacers.
- After drying the foam, we proceed to the sealing of the outer part of the slopes. To do this, apply a sealant, level it. Let us dry and paint with alkyd paint.
Important! When performing the creation of slopes, you can accidentally stain the panels with a sealant or mounting foam. Therefore, we use a rag moistened with a white spirit to eliminate flaws.
The creation of external slopes is somewhat more troublesome than simple sealing cracks. But as a result, you will receive much more reliable protection for many years. In addition, it is better to get rid of the cracks in the windows in this way than to close them with a simple mounting foam without a protective layer. In the end, I would like to note that the reliability of protecting the interior of draft and dampness depends on how attentive to the work you will be attentive.
![]()
StrPort construction portal 2011-2018. Articles about repair, construction, building materials.
Copying information from the site is possible only with permission of the editorial office Or indicating a direct link to the source. Legal justification