The service life of the foundation of the house is from 50 to 100 years, and in principle we compare with ...
|
|
Despite the fact that the last decade is associated with the advent of many the latest ... |
If the house has already been built and landscaped, and all communications are summed up, but suddenly arose ... |
How to make a warm floor in the kitchen
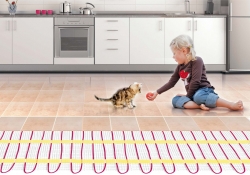
A warm floor in the kitchen is a modern level of comfort, turning the usual working environment for cooking into a cozy room, where you want to relax and enjoy a cup of aromatic coffee. The use of innovative heating systems allows you to create an atmosphere that has friendly gatherings in the kitchen.
We will try to decide whether the warm floor is needed in the kitchen and consider how it can be equipped.
- Arguments for and against the warm floor in the kitchen
- Varieties of warm floors
- Electric systems
- Water warm floor in the kitchen
- Recommendations of specialists in the installation of a warm floor in the kitchen
Arguments for and against the warm floor in the kitchen
The insulation of the room with the help of warm floors is becoming more and more popular every year. However, such technology has both supporters and critics, claiming that the warm floor in the kitchen is not particularly necessary. Here are some arguments for and against.
Obvious advantages of warm floors:
- Comfort. Poppy, but the main advantage of the system is a warm floor is a sensation of a warm surface and the ability to walk around the kitchen barefoot (it is especially important if the flooring is made with tiles).
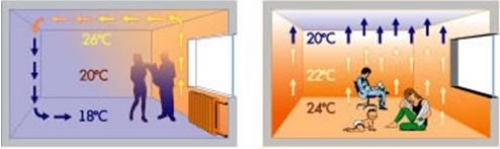
- Uniform heat distribution. Warm air in accordance with the laws of physics rises up, and cold air pockets appear below. Thus, standard heating radiators warm the ceiling. The use of a warm floor helps to accumulate warm masses of air in the lower plane of the room.
- The variety of modern floor heating allows them to be used for different coatings: tiles, linoleum, laminate, etc.
- It is in the kitchen, during cooking, that emergency ventilation situations often arise. This can provoke fogging the floor. The warm floor system prevents such phenomena.
- Most housewives refuse to use tracks and carpets in the kitchen or loggia, due not to the practicality of their operation. In such a situation, the warm floor becomes the best solution.
- Temperature gradient. It is well known that a person feels comfortable and comfortable if the legs are in conditions of a higher temperature regime than the head. Such parameters can be achieved using the warm floor technology.


Critics of floor insulation emphasize the high cost of the installation and operation of the system. Some note that when using windows with heat -saving double -glazed windows and modern radiators there is no need for warm floors.
It should be noted that the effectiveness of the warm floor in the kitchen largely depends on the correctness of its choice. When arranging the system, it is necessary to take into account the type of room (house, apartment, etc.), the presence of individual/central heating, type of flooring (laminate, tiles, etc.), thermal insulation characteristics of the structure and other parameters.
Varieties of warm floors
There are several ways to install a warm floor. The most popular water and electric floor.
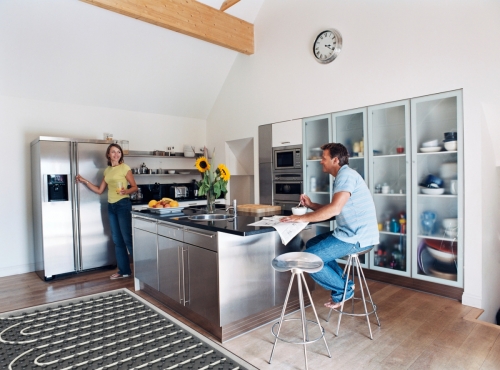
Warm floor of water In the kitchen, it connects to the heating system of the room. In fact, this is a modern version of the usual heating system on radiators. The main advantage of such systems is the possibility of using existing coolant to heat. In terms of operation, this is the most economical option.
Water warm floor in the kitchen: photo

Disadvantages of water floors:
- The possibility of arranging such a sex only in private houses. The installation of a warm floor system in the apartment is illegal. Connecting an additional pipeline to a centralized heating system lowers the temperature of the coolant, which means that in neighboring apartments it will become colder.
- The installation of the water floor is associated with certain risks of flooding due to quite high pressure.
Electric heating of the floor It is carried out using a special heating thermal cable, which is mounted under the coating. The installation of the heating element is carried out directly into the concrete screed, the thickness of which should be about 3-5 cm.
The main minus of the cable floor is the duration of the installation and the relative high cost of operation. The pluses of electric heating: a high level of efficiency and the ability to use in different rooms.
The following subspecies of warm floors are distinguished depending on the type of heating element:
- film;
- rod;
- cable.
According to the method of electric heating, such systems are classified into convection floors and coatings, heated using infrared radiation.
Film warm Paul is extremely easy to install. The film creeps under the flooring and does not require the arrangement of cement screed. Such characteristics reduce installation time. Film insulation is allowed to be used for different types of flooring. Parquet, laminate and linoleum are used as a finished floor.

Important! It is undesirable to lay a film warm floor under a tile or carpet. When using a wood coating, it is necessary to control the temperature of the heating, it should not exceed 28C
The film floor is produced in various performance:
- Bimetallic heaters consist of two layers: the first aluminum alloy, the second alloy of copper with different elements.
- The carbon film contains two layers of copper, carbon and lavsane elements. Usually these films are available in the form of rolls, which are freely cut into suitable segments.
A special place among heating systems occupies infrared film floors. The principle of solar radiation (infrared spectrum) is laid in the operation of the coating. The radiation does not heat the air itself, but the surrounding objects, which subsequently give heat to the atmosphere. A distinctive feature of these sexes is low energy consumption and significant saving of funds during operation.
The rod warm floor It consists of carbon rods that are mounted in a thin cement-sand screed. As an option, such a coating can be mounted on tile glue. A significant advantage is the ability to use for any flooring: ceramic tiles, linoleum, laminate, carpet, etc.

Cable warm floor A special cable produced in the form of heating sections or a regular cable bay. The basis of such floors is a single -core or two -core cable.
Electric systems
Warm floor in the kitchen: a cable floor device diagram
A warm electric floor without fail includes:
- thermal insulation;
- a layer of a black screed;
- aluminum foil;
- metal mesh (sometimes neglect this coating);
- heating cable;
- mounting tape for fixing the cable;
- cement-sand screed (2-5 cm);
- finish.
In addition, it is necessary to provide for the adjustment of the floor temperature and install the thermostat with the temperature sensor.
Electric warm floor in the kitchen: device

Warm floor laying technology
First of all, the area of \u200b\u200bthe heated surface is calculated. It is necessary to prepare the plan of the kitchen and mark the location of stationary furniture and equipment. At the same time, furniture on the legs (tables, chairs) are not taken into account.
The useful area of \u200b\u200bheating is equal to the difference in the total area of \u200b\u200bthe kitchen and surface, caused by stationary objects
The length of the heating section is calculated by multiplying the estimated area of \u200b\u200bheating by the value of the specific power. The specific power indicator is normalized:
- not ›120 watts/sq.m., if the system is operated as an auxiliary heating;
- not ›150 watts/sq.m. If the warm floor is used as the main heat source.
The preparatory measures include the dismantling of the old flooring and the alignment of the base.

Electric cable installation procedure:
- Preparing a place for installation of a thermostat. Using a perforator in the wall, cut a niche under a box of the thermostat. Downs the wall and floor, perform a stroke under the power cable, sensor, etc. In the channel made, place the corrugated tube for the sensor so that the deaf end of this hift attic is from the wall at a distance of about 6 cm.
- On the aligned black floor, linen the reflective thermal insulation by the foil side up, glue the joints of the canvas with tape.
- At the thermal insulation layer, attach the mounting tape to further fix the heating sections. The tape is attached to the base of the dowel with nails.
- Make a cable laying evenly and smoothly, avoiding the intersection and breaks of the cable.
- Pour the floor with a concrete screed (3-5 cm).
- Periodically moisturize the concrete base of the floor.
- After completely setting the screed (about 28 days), perform the floor cladding using standard technology.
Laying a warm floor in the kitchen: video
Water warm floor in the kitchen
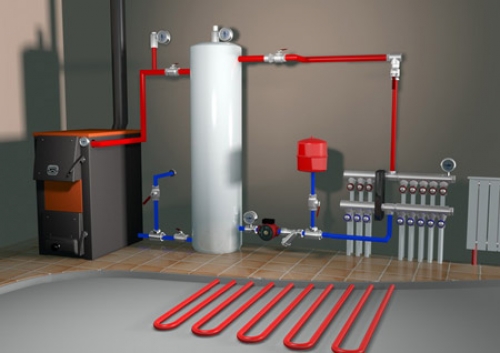
Water floor device
The water floor is composed in installation, but if desired and the presence of building skills, it is quite possible to realize a similar heating system.
The general design includes the following elements:
- Water heating boiler. The unit should have a power sufficient for heating the coolant in the peak hours of the contours. Tentatively, this is the total power of all thermal floors, increased by 15-20%.
- The circulation pump will be needed if the area of \u200b\u200bthe room exceeds 120-150 sq.m.
- Controversial cranes are mounted at the input/output of the heating device in case of repair or prevention of the system of a warm floor.
- Collector equipment responsible for the distribution of water through heating contours, adjustment and tuning of warm floors. Devices with adjusting valves make it possible to adjust the water consumption of each circuit, which achieves more uniform heating of the whole house.
- Pipes for laying a warm floor. Usually use:
- polypropylene (preferably with fiberglass reinforcement to reduce linear expansion during an increase in temperature);
- metal -plastic;
- from stitched polyethylene.

Important! Regardless of the material, the pipes should have a heating mark, withstand the temperature up to +95C and the pressure in the system 10 bar. The optimal diameter of the pipes is 16-20 mm
Methods of laying water floors
Method 1. Concreting. It involves laying pipes on the prepared base and pouring them with a concrete screed. The main disadvantages of the method: the complexity of work and the complexity of installation, the large weight of the system.
Method 2. Nasty option. The pipes on which the coolant will circulate are laid in the collected flooring. A peculiar frame is made of wooden bars or plastic modules. The lack of such a system increases the time for heating.

Laying a warm floor in the kitchen with your own hands: step -by -step instructions
Consider step by step how to make a warm floor in the kitchen, laying the pipes in a screed:
- Determine the place for installation of the collector. Typically, equipment is installed in a special cabinet mounted in the wall. The collector is placed so that the length of the pipes from each room is approximately equal. It is allowed to approach the device to the largest and long circuit. The main condition is installed above the level of a warm floor. Otherwise, problems may arise in the air removal system.
- Put a layer of thermal insulation and fix the damper tape around the perimeter of the room.
- Install the reinforcing mesh. If special mats are used as thermal insulation, then the use of reinforcement is not required.
- Make a layout of the pipeline in one of the ways: spiral, loops, snakes, etc. The distance from the wall to the nearest pipe is at least 8 cm, the laying step is 10-40 cm. The pipeline is fixed to the reinforcing mesh with plastic clamps. At the same time, it is important not to squeeze the elements, since when heated the pipe expands and can be deformed. The step of the arrangement of fasteners of 1 m. The turns of the pipes are carried out carefully in compliance with the requirements for the minimum permissible radius of bending.

- Connect the stacked pipeline to the collector using European -Konus systems or crimping fittings. The start of the heating circuit pipe is connected to the supply of the collector’s output, the end of the pipeline to the reciprocal collector. In that part of the pipe that is located near the deformation seam, it is necessary to put on a corrugated tube.
- Check the system. Submit water under a pressure of 5-6 bar to the pipeline. After checking (after 24 hours), carefully inspect the pipeline for possible leaks and extensions.
- If the control launch is successful, then you can start filling the screed. It is performed with water filled with water under the working pressure in them.
- Leave the screed until it dries completely for 28 days. Then perform the finish flooring.

Recommendations of specialists in the installation of a warm floor in the kitchen
- The calculation and compilation of the project is best entrusted to professionals with the experience of arranging a warm floor in the kitchen (reviews about the work of performers can be found on the Internet). Professionals will competently calculate the length of the pipe, its power and installation step, given the many parameters and nuances. Independent miscalculations sometimes have errors that can lead to the impossibility of operating the entire system or reduce the effectiveness of its work.

- Equipment for a warm floor should be selected high quality, since it is very difficult and expensive to repair the system.
- Before installing a warm floor, you need to make sure that the base is even. The maximum allowable drops of 5 mm.
- The installation of a warm floor does not tolerate rush. It is important to observe the recommended terms for solidifying a concrete screed.
- For gluing and grouting, use the best flexible mixtures that are optimally suitable for heating floors.

![]()
StrPort construction portal 2011-2018. Articles about repair, construction, building materials.
Copying information from the site is possible only with permission of the editorial office Or indicating a direct link to the source. Legal justification