Over the past 10 years, the number of roofing materials has increased significantly, however ...
|
|
One of the main places of heat loss in the house is the roof. This conclusion can be drawn ... |
The front door is a remedy that separates the personal space inside the house from the external ... |
Building a fence in the country with your own hands
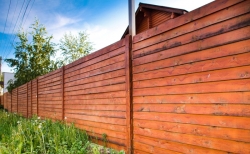
The construction of a summer cottage is a fairly laborious process. However, thanks to our instructions, you will learn how to make a fence in the country and significantly save time and time. In the last article, we examined typical options for summer fences, on the example of which you can build a fence from any material. But the features of the construction of the structure from each of them we describe below. A huge role in the durability and strength of the whole structure is played by the reliability of supporting structures and foundation.
Table of contents:
- The foundation is the basis of the design of the fence
- The fence from the corrugated board
- A fence from a net grid
- Gorbyl fence
- Lady in the quality of a summer fence
- Decorating a dull fence
The foundation is the basis of the design of the fence
In order for the summer cottage to stand on your site for more than a dozen years, you need to come up to its construction thoroughly. The guarantor of the reliability of the fence is the correctly laid foundation and competently installed supports. The foundation of the fence, like in residential buildings, is a strip and pillar.
Ribbon foundation
It is customary to pour the strip foundation under heavy structures of the structure, on the heaving soil, if it is necessary to create a completely fenced area that is not visible from the outside, if it is necessary to exclude penetration of wild animals and other animals.
The foundation for the fence is made using this technology:
- Dig a trench with a depth of 30 - 80 centimeters, for greater reliability, delve into a depth of 1.5 meters.
- Make a sand pillow, which is plentifully water with water.
- Tie the reinforcement, vary the size of the cell depending on the desire.
- Bring the formwork of the fence foundation in such a way that the fence canvas is located at an altitude of 30-50 centimeters above the ground.
- The formwork is filled with concrete solution. If you use pillars as a support for a canvas, they should be installed and aligned in level before filling the foundation.

Pillars of the foundation
The pillar foundation is more economical and is suitable, first of all, for light enclosing structures. When erecting a wooden fence on a pillar foundation, it is important to process all the wooden parts using a special composition that prevents decay, because such structures are more exposed to moisture from the grass on them. A well -thought -out and correctly made fence on such a foundation is no less durable than a fence on a strip foundation.
The technology of pouring a pillar foundation for a summer cottage:
- Garden drill sore pits under the poles, which have a depth of 100-150 centimeters. Make the diameter more than 15-30 centimeters than the diameter of the pillars. The distance between the pillars should be 2-3 meters, depending on the required width of the span.
- Pour 20 centimeters of sand with gravel or sand itself into the pits, pour abundantly.
- After you have leveled the pillars in level, pour the pits with a solution of sand concrete, add crushed stone if desired.

The result was cemented pillars for a summer cottage. Next, it is customary to attach spans to the pillars if you use finished designs, for example, from a net grid, or horizontal guides, where the picket fence is filled or the fence canvas is attached.
The fence from the corrugated board
One of the popular materials for the construction of a country fence is corrugated board, which has many advantages. The installation of this type of fence in the deduction provides significant time savings, because the work is fast enough. It is required to simply determine the line of the fence around the perimeter of the site, put the drains and pillars, which should be sheathed with corrugated board.
The advantages of corrugated board
Such a fence does not provide third -party opportunities to observe what is happening on the land plot, in contrast to fencing from a lattice or rabits. The corrugated board reflects sound well and is durable material, and also does not require involving professionals, you just need to buy some tool.

For the fence, it is recommended to choose corrugated board with a corrugation height of not more than 21 millimeters. It is not profitable to buy material with a greater height, as it is intended for the flooring of the roof and has greater stiffness to withstand the seasonal mass of snow and rain.
Installation of fence from corrugated board
Before building a fence from corrugated board, it is worth calculating the perimeter of the structure. You need to outline the position of the summer fence and determine the place of the gate and the gate, as well as determine the places of pillars for support with the installation step of 3 meters. Then you need to determine what the height of the fence around the perimeter, as well as the height of the gate and the gate. The length and number of sheets of corrugated board depends on these parameters.
Now install the support pillars, which can be metal pipes, which have a diameter of at least 80 millimeters. The side of the pillar, which is directed up, must be brewed so that the moisture does not fall inside the pipe.
To place the pillars, you should dig pits with a depth of 1-1.5 meters and 1.5 meters wide. Make the foundation according to the above technology. When it froze, you can start installing a transverse steel profile, which should be attached to corrugated board.

As a profile, take a profiled pipe, which has a section of 40 by 25 millimeters. Determine the number of pipes based on the height of the fence. If the height of the fence is up to 1.7 meters, then two rows of pipes are enough, which are parallel fixed and installed at a distance of 30-40 centimeters. If the height of the fence is 1.7 - 2 meters, then you need to install pipes in three rows.
Fix the profile and supporting pillars using electric welding. After cover them with a primer in order to protect against corrosion. At the final stage, sheets of corrugated board should be fixed on the frame. This material, as a rule, is attached using screws at a distance of 50 centimeters. Neighboring sheets are customary to join the overlap.
When you install a fence from the corrugated board in the country with your own hand, do not forget to put on gloves, because you can get hurt about the sharp edges of the material. If scratches arose during the installation on the corrugated board, it is worth using spray cans to eliminate them. To achieve a better aesthetic species, you can close the supporting pillars with brick or stone cladding, on this the installation of fences from corrugated board can be considered complete.
A fence from a net grid
As a skin of fences of a summer cottage, a grid-shirt in its popularity remains out of competition, because it meets all the requirements of reliability, light permeability and service life.
Types of nets-shirts
Today, such types of metal nets are offered on the market: not galvanized, galvanized and plastic grid-wrap. The first solution immediately disappears, because the time of its useful operation is minimal due to the lack of protective coating from corrosion.

The wire grid, which is faced with PVC, is primarily intended for building fences in warm climatic zones and on the coast of the seas, since plastic provides good protection against atmospheric moisture, but does not withstand seasonal drops in low and high temperatures. The optimal solution is still a galvanized mesh.
Installation of a net grid
The arrangement of a fence from a net grid begins by marking the position of the poles of intermediate and stretch. The first columns are usually installed with a step of 3 meters, the second after 9 meters. Use metal profiled racks as pillars, pipes that have a diameter of 60 millimeters and corners from 50 millimeters are suitable.
Under the intermediate pillars in the soil with the help of a drill, drill a hole up to 40 centimeters with a depth of 40 centimeters, under the stretch pillars you need a hole with a depth of 60 centimeters. On clay and loams, concreting pillars is meaningless, because heaving soil is able to push the base of concrete along with a pillar in cold weather. If the soil is light loam or sandstone, then the base of the pillars can be concrete.

After installing the stretch pillars on the places in the corners of the future fence, connect them with neighboring pillars of supports from a metal corner with bolts or welding. There are enough pillars for attaching a net grid, which are displayed at a 3-meter distance. In this case, the canvas will not sag.
However, such a fence is not reliable, because it is easy to raise the lower part of the skin and penetrate the fenced country area. Therefore, we need a katanka with a diameter of 3 millimeters, which should be passed through the mesh cells at three horizontal levels. To pull the rollery between the pillars, in each of them, drill three through holes.
Start fixing the grid on the pillars Put its roll near the support pillar vertically and make sure that the bent ends of the lines are located in the upper side of the roll. Pick up the upper line of the grid to the top of the pillar and move to the next pillar, gradually unwinding the roll. Having passed the roller ribs between the neighboring pillars, get its ends into the prepared holes, pulling the wire and fixing it on the pillars using stretch bolts.
Gorbyl fence
Humplings are essentially waste on any sawmill that look like chips with chips. As a result, we can note the low cost of the cubic meter of the hump. If you are interested in which fence to put in the country, so that it emphasizes best of all your frame house, choose a fence from the horseman. On the one hand, this material is outwardly unpretentious, but, nevertheless, it retains all the attractiveness of the tree in itself, which allows you to create at the same time a cheap and pretty country fence.
Preparatory work
It is customary to start working on the creation of the fence with the cries of the horseman if you leave the bark, then the structure will be affected by a beetle and collapse and will collapse soon. Removing the bark is not an easy activity that requires the use of a special tool - a flat shovel with an acute blade, a small carpentry hatchet and scobel. Having removed the bark from the hill, you need to fabble its surface and cover with several layers of antiseptic.

Supporting pillars for fencing from the humps can be wooden and metal. A pipe is suitable for metal racks, which has a diameter of 76 millimeters and a wall thickness of 3.5 millimeters, with welded plates, which serve to fasten horizontal wooden gouvens.
The wooden pillars of the fence are made of oak, pine or larch diameter of the trunk of 20 centimeters, length 2.3 meters. The side of the pillars, which will be placed in the ground, are covered in several layers of Kuzbass-laca or hot resin. If you plan to perform runs from the hump, then make a distance of 22.5 meters between the fence supports.
Carbon fence for the fence
On loamy soil, metal and wooden pillars are simply clogged into the soil without additional creation of measures to strengthen, in the places of their installation it is only necessary to drill holes with the help of a drill and score the pillars with a sledgehammer.
Black -earth and sandy soils require significant efforts for each pillar you need to dig a hole 60 centimeters of the depth, 2 times more wide than the pillar. Then, pour 10 centimeters of gravel to the bottom of the pit, compact, put the pillar in its center, pour over the perimeter of gravel, control the vertical position of the pillar with the construction level and plumb and tightly compact the gravel after the pillar is set.

Carbon fence with a heavier is performed vertically or horizontally. In the first case, you need to attach a beam of 50 by 30 millimeters on both sides to the support pillars and the hump by wrapping for self -tapping screws or nails of the hump by the hump by wagon.
For the vertical sheathing of a country fence, the horseman must be cut along the runs, fixed the cutting side with the convex side, leaving the gaps of 4050 millimeters between it, then close them with a hump, which is placed outside the convex side. For more useful operation, the finished fencing from the humps should be painted or varnished, the ends of the pillars should be closed with metal or plastic cones as a summer cottage, it will last about 10 years.
Lady in the quality of a summer fence
Compared to other fences, the watershed material almost does not require costs cheaper only to do without a fence. However, such a fence will last no more than 34 years and only a decorative fence, which is unlikely to confront hacking, will provide owners.
Bulletin of the material
The design of the wattle fence from the device of other types of fences is no different to make the foundation, you will need metal and wooden supports, and flexible rods for the skin. Wooden racks are made of pine, and for lining are best suitable fornnecks and willow, in the absence of which it is worth using the branches of aspen, alder or birch.
Harvesting rods for lining of a wattle fence is accepted in early spring or late autumn. First, watch a video about giving fences. Select even and straight rods that have a thickness at the cut from the barrel at least 30 millimeters and a length of 1.5 meters. Before the workpiece, you need to check the branches of the bush or wood on the break, cutting one twig and examining its cut.

If the core of the branch is large and has a reddish-brown tint, such rods for casing are not suitable, because they will break in the process of laying. Therefore, you need to go to the next tree and evaluate the core of branches cut off from it. The core should be barely noticeable. Having discovered the material that is suitable for creating a wattle fence, cut the branches of the desired diameter and length that do not have damage, knots and growths.
Dry the chopped rods for a couple of hours, then remove the bark from them, having previously soaked in water. For soaking, tie the rods in a bundle with a rope and immerse in the water, laying the load on top. The scenery period is 714 days. Using a special tool, do the scorch of the rods. After removing the bark, sort the rods by length and thickness, then you can proceed to the arrangement of the fence.
Building a wattle fence in the country
Typically, the distance between the supports is 350 millimeters or more. If for this you plan to use metal racks, then feel free to score them in pre -marked places. If the supports are wooden, then the stakes themselves should be prepared: to sharpen the lower part of the stakes that are designed for the supports of the wattle fence, smear the heated resin on the segment, which slightly exceeds the depth to which the supports will be driven into the ground.
To drive wooden supports and placing rods between them, a rubber or wooden kiyanka is required, because a metal hammer is able to break wood. The supports that are placed along the edges of the wattle fence must be put at a not too large distance from the racks that are located nearby.

Before weaving, soak the rods for several days, they will become more flexible. To fasten the twigs, prepare an flowed wire and copper. The weaving is customary to perform from the bottom-up, press the comel of the first rod to the extreme support of the support with your right hand, circle the rod along the second rack with your left hand and take it to the third.
Put the next twig for the first support with the top, hold it with your right hand, with the help of the left hand, circle the second rack and take it to the third. The alternation of the tops and komels will reduce the presence of cracks between the twigs and avoid the slope of the rods that are already intertwined, to one side of the wattle fence.
So that when weaving, the rods fit tightly to each other, they are knocked down with a mallet. Fasten the ends of the rods to the racks with an flowed wire. To protect the ends of the support from getting wet during the rain, equip them with jacket caps or put on clay kings on them.
Decorating a dull fence
Often, the owners of private houses and summer residents have a question how to decorate the fence for a summer residence. Indeed, looking at a flat plane of a large area near its country house is not too interesting. Sometimes our fences are very long, and such deaf walls do not decorate the space.
The first thing that comes to mind is the closure of a dull fence with curly plants or shrubs, the use of vertical landscaping techniques. Choose actinidia, girlish grapes or fragrant hops for this purpose. You can plant annuals that curl along the wire or ropes, which are in advance vertically.
Painting and painting is another option for decorating the fence. Also, on a dull fence, you can hang a pot with ampel plants with petunias and pelargonium. These unpretentious plants can bloom almost all summer! Deep fences will serve a good service in the construction of the gazebo, because you already have one wall, you need two more supports, then you can start the roof device.
Along the fence of summer cottage, you can make several flower beds raised above the ground. This technique can visually break a long fence into several parts, which will no longer look so monotonous. Plant high flowers and shrubs with bright foliage in raised flower beds. If you prefer conifers, then remember that they are sensitive to the bright spring sun.
The construction of the fence allows the owner and his family from prying eyes, as well as protect his country site. Next to the residential building that looks beautiful, any fence will look good, and if the structure is made with your own hand, this is even better. Modern technologies help in the aesthetic possibility of erecting a fence that can be made of almost any durable brick material, corrugated board, grids, plants. The fence can be low, high, medium, exactly the way you see it in a summer cottage.
![]()
StrPort construction portal 2011-2018. Articles about repair, construction, building materials.
Copying information from the site is possible only with permission of the editorial office Or indicating a direct link to the source. Legal justification
We ordered a few fence
We ordered the fence a few months ago, the guys worked well, quickly and accurately, we had no complaints, the quality of the material is excellent
It's all good. But I
It's all good. But I have a question about the depth/width of the pits under the columns for the fence from the corrugated board: are you digging too deeply? This source http://metkonstrakt.vn.ua/zabory_iz_proflista/ says that 60 cm is enough and 40 in width, and you offer at least 1*1, so who of you is right? Have you had bitter experience in building fences with less depth and twisting pillars, or maybe fences leaning to the side? Thanks in advance for the answer!
Thanks for the useful and
Thanks for the useful and interesting information. If the main task is to completely hide from neighbors and just passers-by, then a brick, sheets of corporate, a fence of plates or high boards: http://postroem-vse.ru/kak-postroit-zabor/
Thanks for the useful and
Thanks for the useful and interesting article!
Of course, you can build a fence yourself, if there is time and desire, besides, there is nothing terrible and complicated in construction. If there is not much time, then you can pay the masters who will quickly erect the fence: https: //postroem-vse.ru/kak-postroit-zabor/