Each company for the production of metal -plastic windows offers its installation services ...
|
|
In order to align the draft floor, adjustable ... |
Of course, the reliability of the concrete floor has been tested for years. The popularity of this option ... |
DIY garage construction
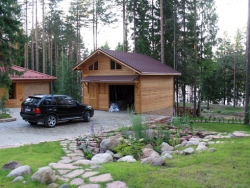
A car for real motorists is not only a means of transportation, but also a reliable ally, friend and a fascinating designer. The car is looked after, the spark plugs are changed, oil is poured, excellent fuel is poured. But the highest manifestation of care is the construction of a garage with your own hands. Such designs are rightfully called the most reliable, since they were erected by scrupulous owners of vehicles, who best know what kind of living space is needed for their four -wheeled iron friend. In addition, money from the family budget is saved, since unnecessary materials are not purchased and various expensive services are not used.
Collect a garage designer in a few days
Table of contents:
Paperwork
The homemade garage, which is built on a land plot, which is not intended for construction, is considered a self -construction in terms of legislation. The same applies to the situation when work is carried out on the ground that does not belong to the owner of the car. The permits for the finished building do not need to be executed if:
- the garage is not capital (metal and frame buildings);
- the structure was not erected for commercial purposes in a summer cottage or garden plot;
- the construction is a supporting structure.

All other options for unauthorized development are subject to legalization. A plot of land is also subject to design, if such a procedure was not carried out before.
Types of garages
Car shelters are differently built. It all depends on the financial capabilities, personal preferences and the existing territory for development. The garage can be attached to the house from the end of the country or residential building or behind it, or built into the house itself.
There are garages built -in with the displacement of floors, however, this arrangement creates inconvenience during operation. On sale there are prefabricated structures. If desired, you can arrange a canopy. The price of the construction of the garage of this type is tolerable. This structure is the simplest, but at the same time unreliable option.

But the most popular are separate garages, which are best to be closer to entering the land plot so that valuable square meters are eating through the entire territory. You can place the garage on the line of development line so that the garage gate exits directly to the street. Such buildings are capital of brick with a gable or flat roof, part of the household block or prefabricated metal structures.
Garage construction on its site
So the long -awaited time of the start of the construction of the garage came. Like any other work, the construction of a car shelter will cause a lot of trouble, but also not a little pleasure, allowing him to save significantly. Having viewed a photo of the construction of the garage, you will receive a sea of \u200b\u200bpositive emotions. And the result will not upset you!
Garage project
The beginning of any construction is a project. You do not have to use a roll of drawings, but if you intend to create something truly worthwhile, the object should first draw and describe.
First of all, at the design stage, you need to determine the following:
- The tasks that will solve the garage. Decide whether the shelter will serve exclusively to the parking lot of the car, or will there be repair work? Can you need an observation pit? Write down all your wishes on paper.
- The sizes of the shelter in height. These parameters are determined based on the characteristics and size of the site on which the garage will be erected, and from the tasks that it will solve.

If it is needed only for parking a car, enough area of \u200b\u200b3 by 6 meters (if your car is not a hammmer). In such a room, you can freely place a car up to 2 and a length of 4.5 meters. At the same time, 50 centimeters will remain along the garage on both sides to open the doors and a convenient exit from the car, and in front of it is a parking space.
The height of the garage must be made sufficient for the passage of the machine - 1.5 - 1.9 meters. But it is better to tie this indicator to the size of the gate with a height of 22.5 meters. If you are not the owner of a prestigious foreign car, which has a length of up to 5 meters and width up to 1.9 meters, the size of the garage should be increased.
If it is planned to place an additional cellar and a workbench, the sizes, of course, must be increased yet. However, in a large garage it is convenient to repair and maintain a car, and on racks and shelves you can have tools, utility utensils and seasonal tires. When covering shelter for two cars, in addition to the machine -reckoning between transport, it is necessary to provide an additional distance of at least 70 centimeters.
Choosing a place
To choose a place for the construction of a garage, it is recommended to develop a general plan of the land plot and place all the buildings of the estate on it, taking into account fire and sanitary and hygienic standards. It is also necessary to take into account the location of the garage relative to the boundaries of the land and house, as well as the convenience of entering the garage.
The garage can be placed on the development line and in the depths of the site, if the doors when opening do not prevent the movement of cars along the roadway; At a distance of 1 meter from the neighboring land, if the water does not fall on it, flowing from the roof of the garage.
The entrance to the garage according to the accepted sanitary standards should be located no less than 10 meters from the windows of neighboring houses.

Fire norms also dictate their requirements: a separate garage is recommended to be placed no closer than 9 meters from the house and no closer than 15 meters from the buildings that are finished with polymeric materials.
At this stage, it is necessary to transfer sketches on a sheet of paper to a real area. For this stage, a dozen pegs are required, which have a length of forty centimeters, a heavy hammer, five meters roulette, more, and a nylon cord. To bind the garage to the terrain, you should determine the point at which one corner of the garage will be located, and the position of the car for the machine relative to this point in space.
Materials for construction
When building a garage with your own hands, you can use various building materials:
- brick is the most familiar and very common material, the construction in this case is quite reliable;
- reinforced concrete allows you to build a reliable garage, which will be collapsible, you can dismantle such a design at any time;
- cinder concrete costs less than a brick, but more labor -intensive in the process of work, and the safety of shelter is below;
- the metal allows you to quickly build the structure, and the cost of building a garage is not sky -high, since there are no large costs for laying the foundation;
- a tree is not the most suitable material for the construction of a garage, not reliable and in need of constant care.

Earthwork and foundation
During the construction of the garage, earthworks are performed manually. A trench under a monolithic foundation must be digged with a width of at least 40 centimeters. Depending on the level of freezing of the soil in a certain region, the depth is selected 0.6 - 1.2 meters. As a rule, there is enough meter depth.
Make the bottom of the trench not loose, that is, the soil should be chosen to a layer with a natural density. Process the walls with a shovel so that they are vertical and even. There are a huge number of foundations for garage. But we will dwell on a bottle -concrete foundation, which is quite simple and relatively inexpensive.

The button foundation is simply made: it is customary to lay a laughter stone in the trench in rows, and shed each row with a cement mortar until the trench is filled to the top. To pour missiles, take a solution of not lower than the marking 150. For this, mix the Portland cement 400 with sand, based on the calculation of 2.5 buckets of sand per bucket of cement. Pour the water until the necessary mobility of the solution is achieved, near the bucket.
Garage base
Along the perimeter of the trench for a basement device, you should install a formwork of boards with a width of about 10 centimeters. It is customary to set the formwork in level. If you have an uneven platform, then take the highest place as a basis, add ten centimeters to the basement level and already mark the horizon from it.
On the basement, it is necessary to arrange horizontal waterproofing from several layers of roofing material, which is laid dry. Waterproofing is needed so that the walls of the garage do not absorb capillary moisture from the ground. Before the construction of the garage and walls, it is necessary to install the garage gates, which will be fixed in the laying as the wall is erected.
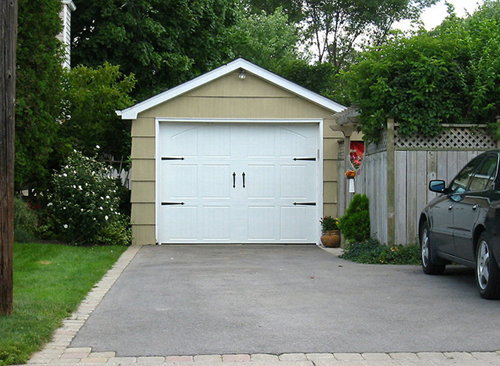
Garage Doors
The gate should be reliable and convenient to use. They are swinging, sectional, rollene and lifting and dwelling. The gates can open automatically and mechanically. The first option is preferable, since the product opens with the control panel without leaving the car. However, it is worth providing a manual mode in case of lack of electricity.
Make the gate sash frame from wooden bars, which have a width of 90-100 and a thickness of 50 millimeters. The outer side of the frame is painted and bend a 6-mm plywood on raw paint. Turn the workpiece and fill the empty cavity between the bars with the insulation directly onto the fresh paint to prevent the insulation down.

After that, you should paint the frame on the other hand and nail the plywood or organ, also previously painted over the entire surface. The result is a warm sandwich from plywood, insulation and organ. The sash of the garage gate must be hung with three metal loops in such a way that the canvas enters the quarter, which is selected in the doorbell, tightly.
To increase the strength of the connection with the wall to the gate frame, embedded parts are welded - round rods with a diameter of 10-12 millimeters. When laying the rod, you need to close in the seams. The gates are installed vertically, practicing checking with a plumb line or level. Check the vertical on the gate frame, left and right. You can move the gate with small crowbar, or flat stones that are placed at the corners.
Walls in the garage
After installing the garage gates, it is necessary to start laying the walls, lay the slag block (foam concrete or brick) with a wall width of 200 millimeters with a brick - ordinary chain masonry: the subsequent row should overlap the seams of the previous row. The masonry should start with the corners. Then it is worth pulling a thin cord between them, and lay the rest of the blocks along this cord. Then we raise the corners, and the process is repeated.
The verticality of the walls is recommended to be checked with a plumb line, paying special attention to the verticality of the angles. The level check the horizontal rows. Take care of the appropriate slope to ensure normal rainwater drain. The end walls of the garage for this purpose do different heights, making the upper cut of the side wall with a slope.
The slope must be equipped based on changes in height: for each meter 5 centimeters. For example, with a garage length of 6 meters, the total difference will reach 30 centimeters. To make the slope even, pull the cord along which you will navigate.

In addition, it is recommended to take care of the scaffolds that are necessary when laying walls above 1.5 meters. You can make a present -up from anything - old door leafs, boards with the condition that they can easily withstand the weight of one person, several buckets with a solution and 5 6 building blocks. The total weight is about 170 200 kilograms.
The solution for laying the garage walls is mixed at the rate of one bucket of cement with a marking of 400 by 4.5 buckets of sand. Do not make a solution too liquid, it should reach the consistency of thick sour cream. In order for the solution to be more plastic and not relaxed, add about half a gear of ordinary clay or lime dough to it.
Make a wall height from the gate about 2.5 meters. The height of the wall in which the slope is going on should be about 2 meters. If necessary, the height of the walls can be fearlessly increased to 3, even to 4 meters, but the masonry in this situation must be reinforced with a metal mesh every 4 5 rows.
Overlap and roof
The overlap for the garage can be performed on metal beams with boardwalking. For overlap, you need to stock up on steel beams with a height of 100 120 millimeters. Such beams can provide an overlap of the garage, which has a width of up to 6 meters. Choose the length of the beams of 20 25 centimeters more than the width of the garage so that they go into the wall by at least 10 centimeters.
The beams need to be laid across the garage, in parallel to the shortest wall with a step of 80 centimeters. It is recommended to lay the beams and close into a long wall, and then repeat its slope. After that, proceed to the suturing of the ceiling. Put the boards with a thickness of 40 millimeters on the lower shelves of the beams, trying to move them as tightly as possible.
Place the roofing material on top of the boards, rolling a roll across the garage, so that the edges bend 10 centimeters up. Pour a slag, expanded clay or semi -rigid Ministry of Plutus along the roofing material. The roof in front and behind should protrude at least 20 centimeters behind the garage wall in order to protect the wall from water. The visors are made from the board, launching under the upper shelf of the beam.

On top of the slag, make a screed from a cement mortar, which is prepared in the proportion as for masonry. The thickness of the screed is ideally at least 20 mm, and it is better if it reaches 30 35 millimeters. The screed needs to be performed, avoiding strong tubercles and depressions. In this form, the roof of the garage will absorb moisture, flowing even with a slight rain.
In order to avoid such situations, it is worth covering the roof with waterproof material, using roller roof materials varieties of roofing material. The roofing material and all modifications (bicrost, aquaizol and rubles) are customary to stick on the roof with two methods: using bitumen mastic or by the method of supplement.
It is recommended to treat the cement screed in front of the roofing roofing material with a bitumen primer or primer, otherwise it will not stick. You can cook the primer yourself: for this you need to mix melted bitumen and diesel fuel, or bitumen and waste engine oil in a ratio of 1 to 3. It should be remembered that bitumen is poured into oil (diesel fuel), and not vice versa.
It is necessary to stick a roofing rubber carpet together. They begin to stick from a low part of the roof, moving up the slope, across the glue of the roll, with an overlap at least 10 centimeters. At the end and at the beginning of the roof, the roofing material is usually stolen on the end board of the visor. Before installing the beam, it should be painted 2 times, treat the boards with an antiseptic and paint on both sides.
Floors and blind area
In the garage, it is customary to arrange a floor at the level of a clip of the basement. Since the car will drive in the shelter for the car, the highest requirements are imposed on the strength of the floor. The material for the floor is concrete. The thickness of the layer reaches 8-10 centimeters. The earthen basis before laying the concrete mass is thoroughly cleaned and aligned on the horizon.
If you need a pouring, it can be performed with small gravel, or with the help of sand followed by trim. For the floor, the finished concrete M200 is ordered. Or prepare the solution independently based on the following proportion: 1 bucket of cement, 3 buckets of small crushed stone and 2 buckets of sand. Take no more than a bucket.

To make the floor even, you need to pull on the laces, or set the beacons from the profile pipe in terms of level. When placing the floor in the garage, it is customary to lay concrete in portions without interrupting. If you decide to set the beacons, then put the concrete between the beacons of the stripes. Concrete after laying must be thoroughly wiped, and if desired, and litter.
Outside the garage, you need to arrange a blind area 50 centimeters wide. They perform work similarly to the floor, having first arranged a crushed stone base and laying concrete on top. The thickness of the concrete on the blind area should be about 4-5 centimeters. The blind area should be with a small slope directed from the garage, since its purpose consists in the removal of melt and rainwater from the walls.
Finishing and heating
The garage does not require special finishing, but it will not be superfluous to wipe the wall with a cement mortar, or even in one layer, it is plastered and whitewashed. Insulation of the car shelter is an open question, but no insulation will save in a winter cold without primitive heating equipment. Warming can be carried out using polystyrene plates with a thickness of 5 centimeters, or semi -rigid mineral wool plates.

The attached and built -in garages are usually warm, because they are heated with a domestic boiler room. Garage heating is water and electric. You can also install oil convectors and infrared heaters. But in any case, the temperature in winter should be at least 56 degrees Celsius in it.
Remember that in too warm room cars do not live for a long time. High temperatures contribute to the formation of condensate on the body, lead to corrosion of car parts and reduce its service life.
Garage ventilation
Arrange in the garage good supply and exhaust ventilation, through which the smell of hot oils and gasoline will be removed from the room, as well as exhaust gases, which contributes to drying the machine and creates normal air exchange, which is 180 m3/h for one machine.
Effective ventilation involves 610-fold air exchange. To ensure it, it is customary to use three ventilation modes: combined, mechanical and natural. The most inexpensive and simple way is natural air exchange. In the lower part of the gate, set the supply grilles. A special exhaust device will be removed from the garage through the deflector, which is located at the end of the exhaust duct.
The duct in the garage is located near the opposite gate of the wall. A similar design works in this way: heavy fresh air itself enters the garage through the supply grilles, displacing a less dense worked out. To ensure effective ventilation, the cross -section of the supply system should be more than the extraction of exhaust by 2 times. But the natural regime has its drawbacks, because it depends on various external factors: the difference in internal and external temperature, as well as wind pressure.

If a exhaust fan is installed in the garage, a combined ventilation system is obtained. It is mounted in the duct, which passes through the roof of the garage, or into the wall. The disadvantages of such a system are in the constant operation of the exhaust fan, the lack of filtration and heating of the air that comes from the street.
Mechanical ventilation does not have the listed flaws, because in this case, special devices of the exhaust and supply system are responsible for the removal and flow of air. The supply ventilation consists of a filter, fan and heater. The air enters the system through the ventilation duct, heats up, filters and enters the room through the air distributor. The spent air is removed through the exhaust fan.
Overfield
The observation pit is considered the desired part of the garage, since modern cars from time to time require maintenance and repair. For some car owners, the device of the observation hole is most likely a tribute to fashion and habit than necessity.
But if you decide to be a pit, then start working with its marking on the surface of the garage site. It is recommended that the observation pit be shifted by 10-20 cm to the right relative to the central axis in order to increase the free space on the left side for the movement of the driver and the layout of the workbench.
The length of the pit should be equal to the length of the car minus the width of the bumper. This is done so that you do not accidentally get into an open hole. To repair the rear and front of the car, the car must be advanced forward or backward.
It is better not to equip the entrance to the pit due to injury hazard, in addition, in the pit there will always be increased humidity, and therefore the wooden staircase will rot very quickly. Instead of the stairs, it is recommended to make several steps 30-35 centimeters wide and 30-40 centimeters in steps. The steps must be poured with concrete with the walls of the pit.

The surface of the steps is good to use during tools for tools, you can rely on them to create additional effort when lifting heavy parts of the machine. It is advisable to handle the upper borders to protect against destruction. The corners must be reinforced - to weld the metal bolts or rods for hard attachment in the concrete of the box of the observation pit.
Mandatory is the installation of a restrictive bar along the edges of the contour of the pit, from the outside, it is necessary to make an oval that the car is repelled from the pit - when it arrives at it, the wheel will slip from the bar to the outside.
Next, you can use different options for closing the pit with lids. The framing contour of the pit and the lid is collected from shields that consist of three to four boards, which have a thickness of 40 millimeters. To facilitate the movement along the pit of the shields in the lower part of the boards, balls are inserted, which differ with a diameter of 15-20 millimeters.
Entrance to the garage
The road to the garage must necessarily enter the design documentation. The type of coating on the one hand should correspond to the style of shelter for the machine, on the other hand, you need to take into account the feature of the soil, the level of groundwater and the geology of the site. A lightweight masonry version involves the fastening of bricks or tiles with a solution, some solutions involve the backfill of sand, gravel and the arrangement of drainage.
Finally, the access road needs to be linked into a single harmonious system with garden paths, given the needs of the owners of the house, because such transport highways are divided into functional zones. It is recommended to provide stylistic compatibility of various coatings.
The access path to the garage should have a solid and even coating, which can be made of concrete plates, curly elements of paving or asphalt. Such a solid foundation will protect the track from the split under the weight of the machine. During the construction of the access road to the garage, it is necessary to comply with the technology of building a garage and road, since without it, with the onset of spring, the track may swap the path, and the tile can leave.
Thus, you already know how to build a car shelter with your own hands. To fix the material, watch the video about the construction of the garage, after which you can stock up on the necessary materials and the tool and immediately start work!
![]()
StrPort construction portal 2011-2018. Articles about repair, construction, building materials.
Copying information from the site is possible only with permission of the editorial office Or indicating a direct link to the source. Legal justification
A very interesting article about
A very interesting article about the construction of a garage.
A very successful article, a lot
A very successful article, he emphasized a lot of useful things for himself. To finish my garage, I used the Dagestan stone, because The house is lined with the same material. He did not bother himself and turned to the "Studio of the Stone" http://studiya-kamny.com. The guys did everything quickly and efficiently. The wife was satisfied.
When it comes to
When it comes to construction, I prefer rapidly pleaded buildings from sandwich panels and metal structures. This significantly saves time and budget. I found a high-quality partner from whom I regularly order sandwichpanels and more,-the website of the SP-Paneli.ru http://sp-panel.ru. They arrange me in everything: they do everything promptly, at an adequate price, do not fail with delivery time. In general, I recommend refusing capital buildings in favor of modern construction.