Mostly a sealant for a tree Actual when servicing wooden ...
|
|
You plan to make the attic residential, or just decided to insulate the roof of the house, but do not know ... |
Modern architecture and design capabilities allow you to equip at home and ... |
Preparing the roof under the soft roof
Roof materials cannot be counted today. For every taste and wallet. Among them, a special place is reserved for soft tiles. If you prefer this coating and decided to arrange a soft roof on your roof, then be sure to read the basic rules for its installation. But before that, think about the installation of the roof under the soft roof. After all, this process is very important and requires a special attitude to itself.
Content:
- Features of the soft roof
- Working conditions with soft tiles
- Preparing the roof under the soft roof
- Creating a crate for a soft roof
Features of the soft roof
Bitumen (soft) tiles appeared about 30 years ago. Subsequently, this roofing material has gained wide popularity. They produce soft tiles for the roof and a lining for it from such raw materials as non -woven polyester or fiberglass. The latter is impregnated with the help of bitumen. The polyester, unlike the glass -chief, is inherent in greater strength. It should be used in areas where a large load is observed on the roof. These are skates, yendovs and different junction nodes.
There is a spill on top of the flexible tile, which consists of a basalt gran or mineral crumb. From below the material is a self -adhesive layer made on the basis of bitumen. It also has a plastic film that is necessarily removed during operation. So that individual sheets do not glue during the time until the tile is stored at your home, manufacturers refuse to fasten the protective film and sprinkle its lower surface with sand.
Soft tiles are produced in plates. They have a length of up to 1 meter, the width reaches 0.3-0.45 meters, the thickness is 3-5 millimeters. For different manufacturers, the material is characterized by color and shades. The price of the material, which is made on the basis of glass and power, will be much lower than that of the tile, which is reinforced with polyester. Thus, it is more advisable to buy the last option to form the main coating if the strength level does not matter.
It will be possible to equip a soft roof if the slope of the roof under a soft roof is at least 11-12 degrees. If the slope is greater, then on the surface there will be a stagnation of rainwater. And this will cause the destruction of the structure. When laying bitumen tiles, the shape of the roof can be any, even the most complex design. The finished roof takes the shape of a rectangle or oval. The type of hexagon or any other geometric figure is possible.
Working conditions with soft tiles
When working with soft tiles, adhere to certain working conditions:
- You can equip a soft roof if the ambient temperature reaches at least 10 degrees above zero. The lower layer of the material that is able to glue will when warming the heat of the sun spontaneously pester the base. After gluing, a completely monolithic carpet will be created, which is not able to get wet.
- If the temperature is lower on the street, then the glue layer does not melt. The lower part of the material in this case will have to be heated forcibly. To this end, bite yourself thermofen.
- For industrial facilities, a special shelter called Tepelak is possible. This is a wooden structure or metal structure that is arranged on top of the roof in case of roof installation in the frost and warms up until the temperature reaches the desired value. However, in particular cases, this option will not be beneficial, as it is expensive.
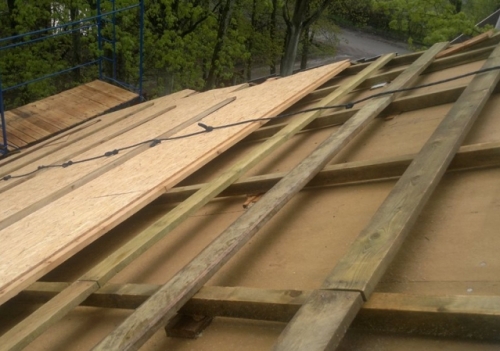
- Remember: if the weather is raw in the yard, then it is better to refuse to lay soft tiles. Of course, lay the material on a wet base. But it will quickly rot under the coating. Thus, the best time for work of this type is summer. And in winter you can do preparatory work. For example, make a rafter system, as shown in the photo of the roof under the soft roof.
- All this time you will store soft tiles. Create the material for suitable conditions of detention. There should not be direct access to the sun in the selected place, since the adhesive layer should not melt under any situations. In no case should the temperature drop below zero.
Preparing the roof under the soft roof
Laying bitumen tiles, as well as the installation of other roofing material, begins with preparatory work.
1. The arrangement of the base under the soft roof
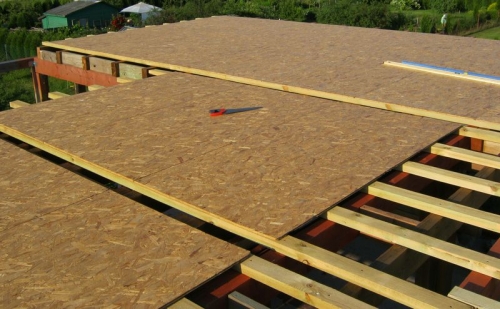
The base for soft tiles should be continuous, even, since the material to it is not only glued, but also to bend:
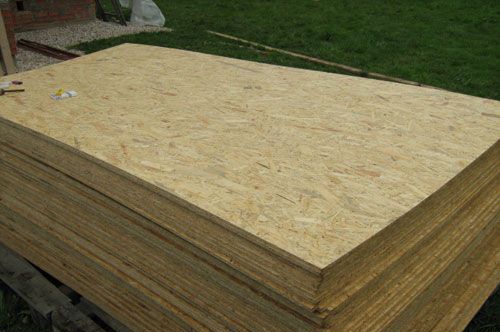
- Well, if for the base you take OSP (OSB) a plate or a trim. Plywood is also suitable. Use moisture -resistant or dodgy.
- Remember that you can not use wet material. The level of its humidity should be minimal not more than 20% of the total mass.
- When creating the base under the soft roof, the joints of the boards are located in the places of the supports. At the same time, take boards with a length of at least 2 spans between such supports.
- With such work, it is worth considering the ability of boards to expand. This is a common phenomenon for wood and it is caused by a change in the temperature regime and moisture level. Between the boards, leave a sufficient gap.
2. Creating ventilation gaps
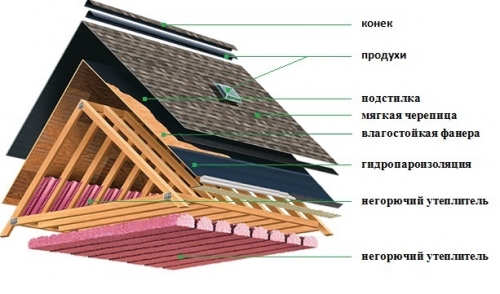
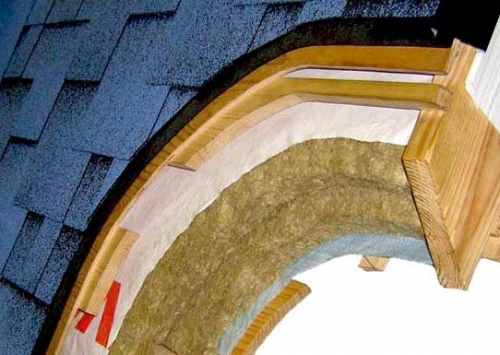
When preparing a roof for a soft roof, always leave an air gap. Remember that it should be done large enough. Its dimensions should be at least 50 millimeters. Place a higher exhaust hole. And at the bottom of the roof, make a hole for the air supply.
Ventilation gaps will provide for a long time the soft tile service. They are required, as they perform many functions:
- They remove humidity from thermal insulation material. The design of the crate and the roofing cake also relieve it.
- When arranging ventilation, the number of icicles and ice decreases, which is formed in winter on the roof.
- In the summer, the optimal temperature regime will be maintained in the middle of the roof.
3. Installation of the lining carpet
Be sure to equip the lining layer under a flexible tile:
- To do this, prepare an isolation material in rolls. It is better to give preference to materials that are recommended by manufacturers of soft tiles. They contribute to better sintering into a whole roof pie.
- Ruberoid should not be used, as it is inherent in a short service life. Its use with such durable material as soft tiles is impractical.
- Put the lining material parallel to the cornice. At the same time, they choose the direction from the bottom-up.
- Make an overlap that should reach at least 10 centimeters.
- Fix the edges with nails, withstanding an interval of 20 centimeters. Select the seams with glue.
- Sometimes, when fastening the drainage system, it is necessary to install special brackets, which is needed to install the lining layer.
- If the slope of the roof is more than 18 degrees, the lining layer is allowed to be arranged only in places where leaks most likely occur. This includes skates and cornices.
- Also make waterproofing in the yendov and the end of the roof.
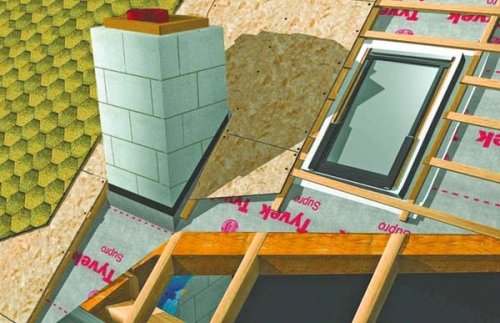
- Be sure to put the lining in places where the places of adjacent to the walls go through the roof.
- Do not forget about the chimneys and attic windows.
Creating a crate for a soft roof
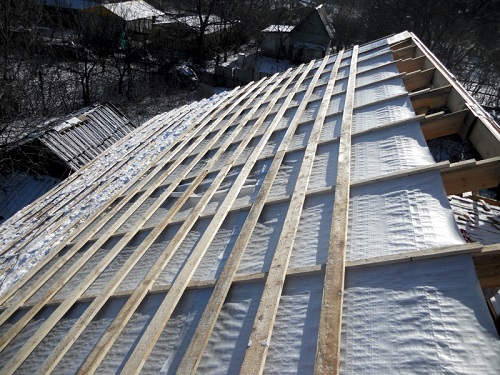
After preparing the base under the soft roof and the installation of the lining carpet, make the manufacture of a special crate. It consists of bars and boards, which should be located perpendicular to the rafters. The crate will be the basis for which workers attach flexible tiles.
1. Material and requirements for it
With the flooring of the crate, adhere to the following requirements:
- The material that is used for the crate should be strong enough to withstand the weight of the roofing, a person and snow in the winter season.
- Make a hardy crate that has great reliability.
- Arrange a design that is not able to respond to environmental factors and mechanical effects.
- There should be no tubercles and sages on the crate. Cracks are allowed no wider than 6 millimeters. And there should not be protruding nails at all.
To make a crate for laying a soft roof, prepare a material that is mandatory to meet the established standards of quality:
- Toleled board. Its width should be 140 millimeters. Choose only durable high quality material.
- Wooden bars. It is good if their humidity is not more than 20% of the total weight. The overall dimensions of the bars will change in the course of performing a step of the crate.
- Diffuse film. You can also use a cheat -up film. It is needed to improve thermal insulation and increase the waterproofing properties of a soft roof.
- Roof ruffles. They will strengthen your roof, make it more stable, give reliability.
- Plywood. On this material you will have a board. So you will achieve a perfectly flat crate.
2. Recommendations when creating a crate
Not only roofing material is responsible for the quality of the roof. This function is entirely on the crate. Therefore, in the manufacture of a crate for soft tiles, follow the following recommendations:
- Before arranging the crate, parallel to the skate, lay the bars on the rafters. Hold the interval of 5-10 centimeters. On top of the bars, place the tes from the skate along the descent to the overhang.
- Despite the fact that several types are distinguished, use only a continuous crate under a soft roof. Make a crate in 2 layers.
- Be sure to follow the evenness of the structure. Remember that you should exclude corners and breaks. Excessive piercing soft tiles is fraught with consequences. Therefore, adjust the material very high quality so that there are only smoothed even lines.
- In the manufacture of a crate under the flooring of a soft roof, one important point must be taken into account. Always take into account the condition of the boards used. Woods during storage are capable of dealing. As a result, hollows and bulges appear on its surface. If you want to properly lay the roof that will serve for a long time, place the boards in this position - with a tray outward. So moisture that leaked to the roof through the roofing, drains down. If you do not consider this, then after some time you will find the consequences on your roof. Water at the junction of the roof will fall into a subcutaneous space. After that, the materials used will finally spoil.
- There is another nuance that cannot be forgotten when creating a crate under a soft roof. This is the correct manufacture of the finish layer. It must be continuous. To form it, prepare the frontal boards. Crush them in the ends. So on the bitumen tiles there will be only smooth excesses, and you can forget about the fragments.
3. Instructions for creating a crate
Carry out work in the following sequence:
- Attach the bars of the crate to the supporting roof structure. The direction of work is from the bottom up.
- Buy the lower crate. It is attached directly behind the cornice of the board. It is required to fix the first row of soft tiles.
- Put a basement tape. It is placed horizontally in relation to the roofing skate. Put the first strip at the cornice. The following are placed with an overlap. So do the work to the roof skate.
- A subcutaneous tape is fixed between the rafters and the bars of the control facilities. This must be done to form normal ventilation gaps.
- Fix the first block to the face of the rafters. First of all, in the area of \u200b\u200bthe cornice.
- Install the second block behind the lower edge of the first. Take a distance of 300-350 millimeters between them.
- Attach the following bars. The step in this case is 370 millimeters.
- The last block is attached to the skate board. For this, ordinary nails are used. The distance should be about 200 millimeters.
- Remember that all bars should be located strictly horizontally. To create a reliable crate, to achieve the strength of the fasteners of sheets of the soft roof and does not worry about the accuracy of the compounds, strictly observe the distances between the bars.
Thus, the soft roof has many fans today. The quality of its flooring and use will directly depend on the quality of the preparation of the roof, the correctness of the creation of ventilation gaps and laying the lining carpet. But the arrangement of the crate is the greatest importance. Pay due attention to its design, selecting quality material and studying all the nuances of work.

