Honestly, such a decorative coating on ordinary wallpapers is not much like it ... It ...
|
|
To look beautiful, fit, young and energetic, it is not at all necessary to be ... |
When building a garage after the construction of the walls, the question arises of how to competently build ... |
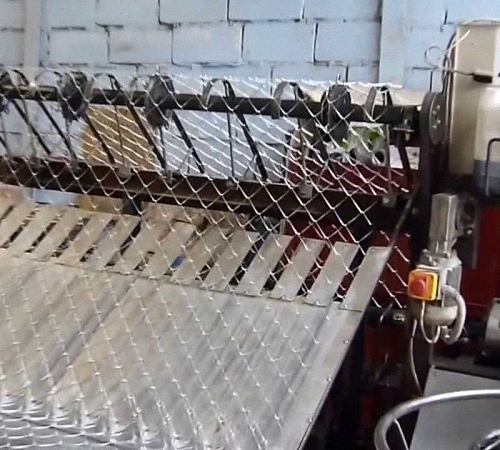
Weaving a rabid grid. How to weave a netting grid
The labycle grid is widely used both in construction and in landscape design. In order to weave it on your own at home, a special device will be required. We will consider further about the features of its manufacture.
Table of contents:
- Wash rabitsa - a general concept and features
- Walling machine for labitsa grid: manufacturing and using
- DIY rabid mesh
- Tips for working with a machine for the production of a rabitsa grid
Wash rabitsa - a general concept and features
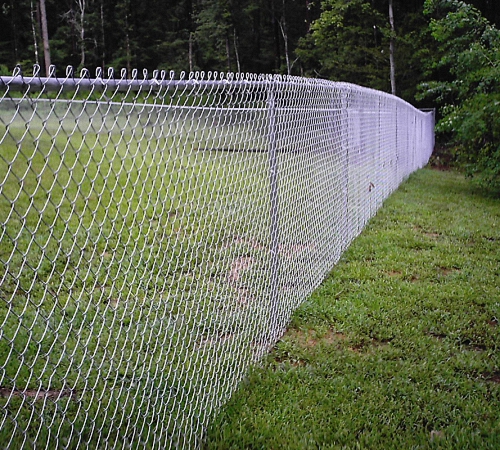
The slab grinder is a structural material that is used in construction for the construction of fences, fences, and dog avliers, is used in sifting sand and as a frame for weaving plants.
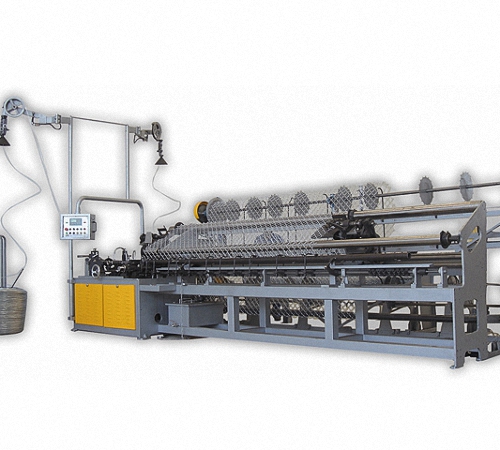
The grid got its name on behalf of its inventor Karl Rabitz. To make such a grid, both simple machines are used, on which spirals are screwed into each other, and high -quality automatic machines that make a large amount of mesh in a short period of time. The basis for the production of the rabitsa grid is a wire of low -carbon steel, it is still possible to use galvanized or polymerized wire. Stainless steel wire is very rarely used.
The labyfield grid is a material for the construction of fences, used in mining, in construction work, is the basis for insulation of surfaces, and animal cells are made from it.
In the ratio with the forms of cells, the mesh of the rabid happens:
- rhombic, with a sixty -degree angle;
- square.
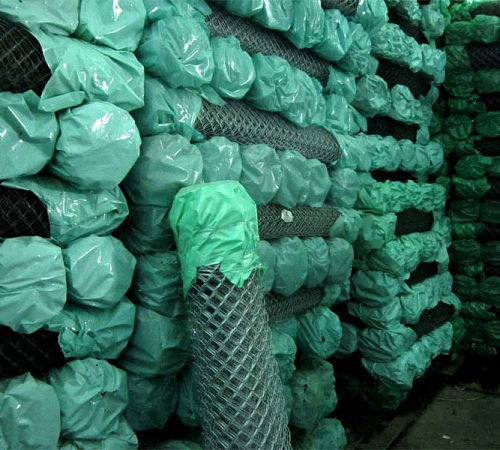
The purchased grid of the rabits is transported in roll, the height of the roll is 150 cm, and the length is about 1000 cm. Depending on the manufacturer, adjustment of the height and length of the roll is possible. If the grid is made on a simple or manual machine, then its final parts do not bend, otherwise, the spiral ends bend down, and they are connected twisting in the roll. To transport this material, its ends are wrapped with artificial fabric or plastic film.
The scope of use of the rabitsa grid is directly related to staying on the street, so it is constantly influenced by atmospheric precipitation. If it is not processed using special technology, then after the first effect of moisture it will be covered with rust.
There are several ways to protect the net of rabid from moisture: moisture:
- painting;
- galvanizing;
- polymerization.
The most common way is galvanizing. In most cases, in the production of the grid, a galvanized steel is used, so you should choose steel on which there are as many zinc as possible. The production of wire involves applying zinc on its surface using a method of hot galvanizing. If the wire is made in this way, then its service life will be from twenty to twenty -five years.
If zinc is applied to the wire using an electrolytic method, then its service life is significantly reduced and is no more than three years.
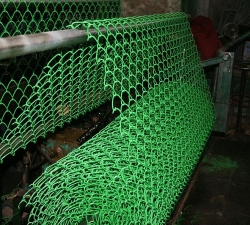
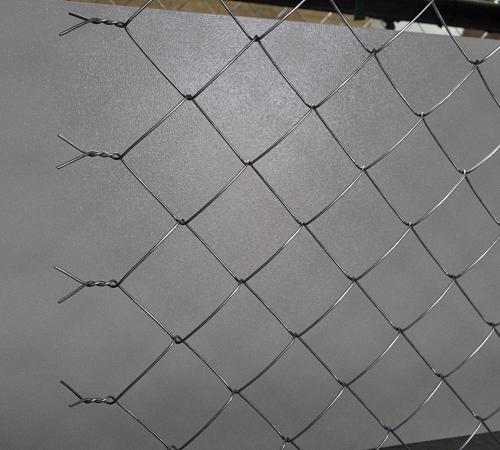
Rabitsa grid photo:
When using a galvanized high -quality mesh of rabits on the shore of ponds, rivers or seas, it will still quickly rust. In this case, it is recommended to make a grid of a slabita made of steel covered with polymers. If such a coating has low quality, it will quickly burn out, crack and fade. When choosing a steel mesh of a rabid with a polymer coating, you should give preference to more expensive options and trusted manufacturers, which guarantee the stability of the wire before ultraviolet cure and frost. When choosing a rabid grid with the presence of a polymer coating, pay attention to the spiral surface, the absence of cracks on it speaks of the quality of the product, otherwise the mesh will not last more than a year, since water will get through small cracks to the metal and it will neighing. The size of the cells and the diameter of the wire directly affect the strength characteristics of the rabid grid.
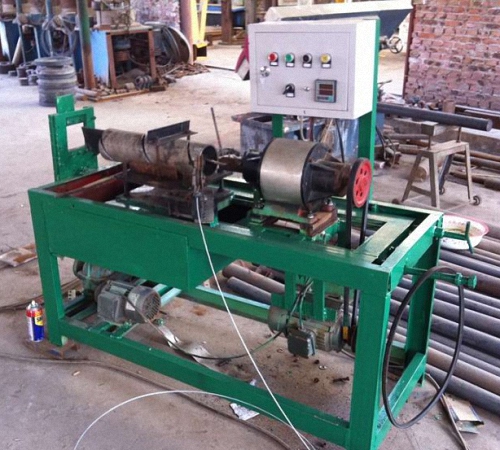
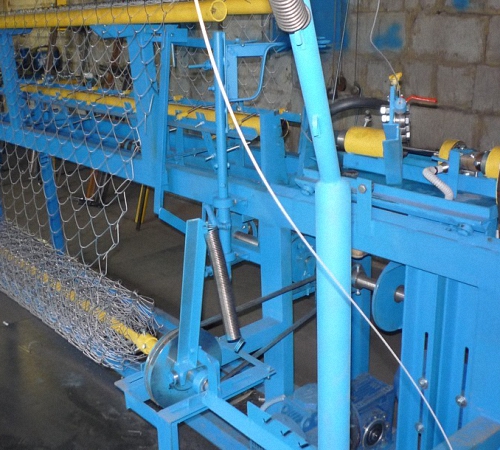
Walling machine for labitsa grid: manufacturing and using
To make a net with your own hands, you should use a simple person -manufactured device. To build this design, it is enough to have initial locksmith abilities.
If we compare the grid of rabits with other designs of the same type, then against their background it has several advantages. The process of its manufacture does not require point welding and electric drive.
There are industrial purchased machines for weaving labits' stacks, but if it is required to make it in a small volume, it is better and cheaper to make a small machine with your own hands.
To carry out work on the construction of the machine, you will need:
- a small part of the pipe;
- plates;
- several metal segments;
- bearing clips;
- rollers;
- Bulgarian;
- High -quality metal corners;
- rope and chalk;
- file;
- Fighting.
The formation of the mesh frame occurs by connecting a flat wire. The main point is the construction of a snake in the form of a zigzag. This will require mechanisms that stretch and winding. The stretch prevents excessive twist, and winding strengthens the structure. A spiral spiral is very difficult to wove into the main part of the canvas. Since the wires go softly, then hard, then their constant adjustment is required. When the wire is bending, it is modified and friction with the machine occurs, therefore, its lubricant is mandatory, for example, using waste oil.
The wrapping system is characterized by certain dimensions that cannot be adjusted, the shape and diameter of the cell depends on it. When the turns are formed, the line is directed in such a way that it harmoniously flutters into the net canvas. After that, an unnecessary fragment is cut off.
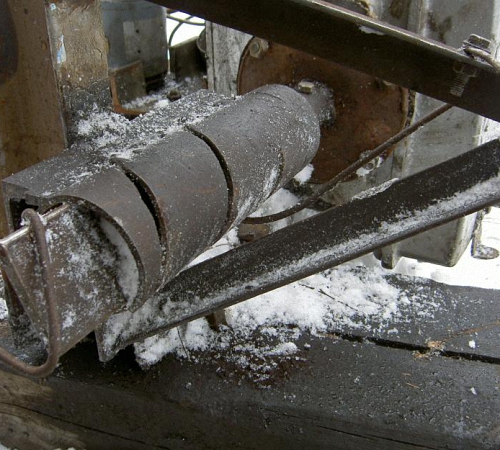
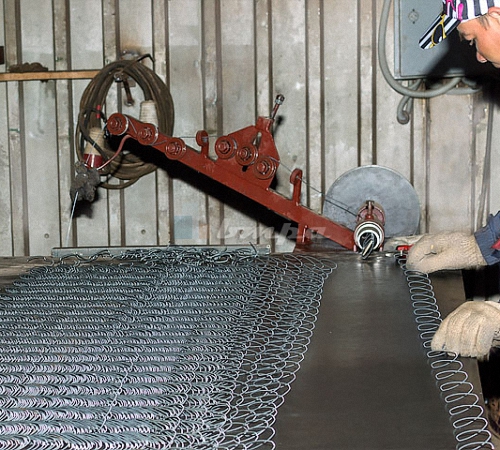
We offer to get acquainted with the phased structure of the mechanism that is engaged in weaving the rabitsa grid. The main working tool is the design of the hanging unit, which includes a screw (screw sleeve and vitar), a hanging plate and a knife. These parts are engaged in the formation of the shape of the spiral and amenable to severe wear. Therefore, they need to be made from high -quality and strong components. The rotation of the knife is responsible for the formation of turns of the required size. The main function of the screw is the creation of the correct distance between the turns. Thus, a mesh with the same cell size is obtained.
As a plate of hung, a flat metal strip is a hole at the end, which is attached to the handle. When using wire with increased rigidity, the plate is twisted in a screw form by no more than sixty degrees. The higher the rigidity of the structure, the more degrees twisting.
The screw looks like a steel pipe that has a spiral incision over the entire area. It is better to purchase such a sleeve, or order it from a locksmith, since its independent manufacture will not lead to the desired result.
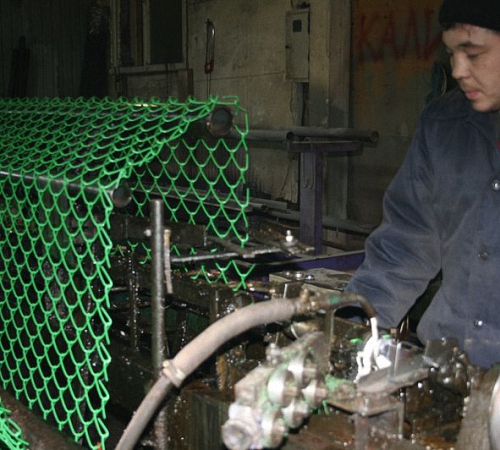
Place all the components so that the person working on the machine easily rotates the handle and directs the wire. Do not allow the wire confusion during weaving, in order to avoid this in the middle part of the bay, you need to put a bucket upside down, and put a piece of a metal pipe or other cargo at the end of the wire. This procedure will help prevent ringing. Draw the end part of the wire through the tension rollers, and with the help of the screw adjust the gap between them. Next, you need to insert the wire into the winding mechanism and is twisted, first one or several times, until the necessary size of the cell is obtained. Follow the evenness of the outgoing line, to check it along it to check it. With right -sided or left -handed twisting of the wire, adjust the tension of the wire. When the wire is ideal - start twist the net until you make its right amount.
The construction of the machine for the manufacture of a netting grid is not a complex process that requires close attention and some skills in carpentry. To improve this unit, an option to install a controller is possible, which will independently calculate the turns and facilitate the process of manufacturing wire.
Also, such a device is equipped with an electric engine that, using an electric drive, sets the handle in motion. Although the presented model of the machine is simple in the assembly, it is most suitable for home use and is able to make a small amount of grid.
DIY rabid mesh
Before considering the process of production of the rabitsa with your own hands, we propose to get acquainted with its advantages over other building materials.
If you use the rabitsa grid as a fence, then its installation is much more profitable than the installation of an ordinary wooden fence, which requires periodic staining and repair. Moreover, it is possible to make a grid at home. To do this, it is necessary to have a special machine.
To perform work, the presence of a machine wire will be required, the main function of which is the formation of a spiral, on a liner.
We offer to familiarize yourself with the manufacture of a hand -machine for a grid of rabits. It has a very simple design. Before starting work, you should determine the width and length of the zigzag, which will turn out during the construction of the grid. After that, this zigzag should be drawn on a wooden surface. Put the nails into the corner parts and pull the wire. It is advisable to use the mittens-boots that protect the hands from scratches. Put the wire on the board and threaten each nail with it. The remaining wire must be chopped off, and then remove the spiral. This procedure should be repeated from 15 to 40 times, depending on the length of the wire.
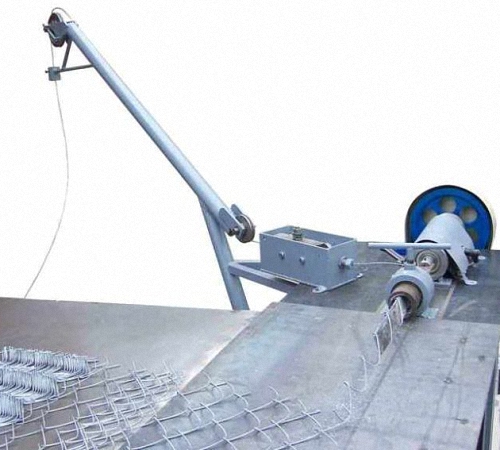
Now we will get acquainted with the design of a more complicated machine for the manufacture of a rabid grid. The options for machine tools that serve the wire using the drum involves an uneven supply of wire. Since it is located from a large roll, for the move of which a large amount of strength is required, and when this is still happening, the drum rotates inertial and the wire is supplied unevenly, intermittently.
To avoid such an error, use the device, similar to an element of knitting machines, stretching the thread in which occurs upstairs.
For the manufacture of such a feed device you will need:
- bearing,
- leash,
- Ring,
- Steel plate - as a support.
The central part is a metal axis, the length of which is about one meter. At its end, a bearing is installed, which has a leash and a ring. Several rods are welded to the axis, the diameter of which is 1.2 cm.
All wire is installed on a steel plate, which serves as a platform. The end of the wire is pulled out of the tensioner through the ring and installed a stretch device that contains a lubricant and rollers.
The construction of a stretch device requires:
- bearing clips;
- the body of the pump for the bicycle;
- roller;
- holes for the roller axis.
The stretch device has a frame in the form of a rectangular triangle. As legs, a metal corner acts, and the hypotenuse is a five -mile metal strip, seven centimeters wide. This strip has holes in which the rollers are installed. On the corner is a device that provides the lubrication of the wire during its movement. It will require a bicycle pump to make it. From the corps part of it, you need to saw off the bottom and attach it to the strip with the help of clamps. The pump cover should be well wound on the housing, as it fixes the cork from the felt on which the cuts need to be made. They are necessary for free passage of wire through a lubricant. Do not allow the touches of the wire to the edges of the tube, you need to install a solid -metal ring on it. To do this, use a bearing clip.
As a winding device is a pipe that has a spiral slot with a knife. The size of the vertical diagonal of one cell is equal to the size of the double internal size of the pipe.
To form slots in the form of a spiral in the pipe, you must first draw a spiral on paper, which is glued to the pipe, and then, using a grinder, cut the pipe in pre -marked places. With the help of a file or skins, polish the surface. It should be smooth and even.
Choose a steel corner that has shelves of 2 cm. Prepare two segments, the size of a pipe, and then form a structure.
In the process of manufacturing knives for hanging there are nuances, namely:
- Each pipe should contain three or four knives having a different shape, since the soft wire requires flat knives, and the elastic wire - twisted;
- The size of the shanks should be the same - the length is 5 cm, and the diameter is 2 cm;
- To make a straight knife, any metal is suitable, but for twisted products, choose more durable types of steel;
- Do not allow a free chatting of the knife in the inside of the pipe.
When the knives are ready, it remains to start assembling the mounting table, on which the rabitsa grid will be weaved. Before starting work, you need to install the wire on the feed device, and then stick it into the supply structure.
Start the formation of the first spiral. By adjusting the rollers in the stretch device, you need to achieve the release of a perfectly flat spiral.
When weaving a mesh on such a machine, which has a diameter with a large section, it will turn out to make about 90 meters of the grid in one day.
If the labycle grid is made of separate segments of the wire, then they are interconnected by nodules.
Tips for working with a machine for the production of a rabitsa grid
You should not often install the wire in a winding type device. Better, fill it all at once. This will facilitate work with the machine, since the initial refueling requires skills and time. To refuel the wire, you need to perform a number of actions:
- Bend the final part of the wire 180 degrees;
- hook the hook by the surface of the knife;
- Enter a knife with wire into a pipe;
- Make half the turn and press the wire to the surface of the knife with a screwdriver;
- Do not allow extension of the hook, as there is a risk of jamming the wire in a winding device.
Therefore, if the wire is over, then you need to stop the work before the end of the wire goes into the lubrication device and attach a new wire to it by creating a node.
If the wire is too hard, it needs to be burned. Although this process will make it softer, it will significantly affect its working characteristics: firstly, not all areas are equally anneal, and secondly, if a galvanized wire is used, then the entire zinc will burn and it will not be stable before corrosion.
When a grid is formed and you need to stop the work, follow the location of the knife. It should be in an upright position.
The most durable and high -quality is the mesh of the rabita galvanized, its service life is several decades. Therefore, no need to save on the choice of the right wire.
If the grid is not required in the near future, you do not need to weave all the spirals. Then put them in a separate place, so it will be possible to significantly save space.
Rabitsa mesh video:
![]()
StrPort construction portal 2011-2018. Articles about repair, construction, building materials.
Copying information from the site is possible only with permission of the editorial office Or indicating a direct link to the source. Legal justification
The labycle grid is one
The labyfield grid is one of the cheapest materials for the fence and is not mounted, set the pillars and pull it. It remains only to buy a grid of labitsa and poles. I buy here https://steel-pro.ru/setka/setka-rabitsa/. Everything is satisfied: both the price and the delivery time.
I bought arbolite here
I bought arbolite here arbol.su