The whole carpentry and improvised tool used by the masterful master in everyday life ...
|
|
Massive board is one of the most durable materials for floor ... |
The constantly expanding flooring market is at a certain stage ... |
DIY polycarbonate greenhouse
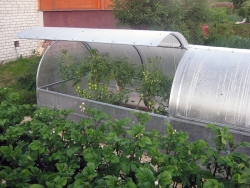
Daching and suburban life always has one significant advantage of the ability to grow foods independently, as well as decorative plants and flowers. Moreover, garden works have long ceased to be a labor service, but turned into a kind of exciting pastime with a useful result. Only now the climate is far from tropical, so you can’t grow most of the plants, you won’t quit the seeds in open ground, and you have to forget about the early yields. Unless to equip a warm place for plants on your site, for example, install polycarbonate greenhouses. This will allow not only to get greens and other early cultures, radishes, turnips and others in early spring, but also to grow seedlings of heat -loving crops for subsequent landing in open ground.
How the greenhouse differs from the greenhouse
It is not clear why, but many confuse a greenhouse and a greenhouse. Some believe that this is one and the same, while others, that the greenhouse is something small, and the greenhouse is large, above human height. In fact, everything is a little different.
Greenhouse This is a structure that is heated using natural sources of heating. For example, a construction can only warm only due to the sun or biofuel, reproduction or burning of manure. This follows from the concept of the word greenhouse, i.e. greenhouse effect, steamed. Whatever the size of the structure, if the heating system (electric, gas or other) is not brought into it, then it will correctly consider it a greenhouse.
Unlike a greenhouse, greenhouse A structure heated using an artificial heating system.
So, a greenhouse can be of any size. But taking into account the fact that the heat secreted by the manure is not enough for heating too large space, the greenhouses most often make low, much lower than human height. So you can work in them only through special hatches, leaning covers or simply removing the upper extension completely. Such greenhouses are used to obtain early greenery, growing seedlings of heat -loving crops, early varieties of various crops and shelter from spring frosts. For these purposes, polycarbonate mini are well suited. Although they are somewhat more expensive than film, they justify their value with durability, strength, ability to better maintain heat, convenience and ease of maintenance.
Types of greenhouses
By the type of location, greenhouses are divided into in -depth and everse.

In in -depth greenhouses, heat and lower fuel consumption for heating are better preserved. They are a trench that has the upper strain of logs. Sometimes bricks or concrete blocks, metal parts are used for strapping, but here you need to understand that the thermal conductivity of these materials is too large, such a greenhouse will be poorly held warm, and the elements of stone and metal will act as bridges of the cold. A in -depth greenhouse can be single -sloping or gable, and even have an arched lid. A greenhouse with a plain roof in the form of a flat frame is called russian greenhouse».

Gable greenhouses are called belgian, they are used to grow high crops.

Overground greenhouses, they are also called portable, Parisian and French, are good that they can be rearranged from place to place at any time. Manure in them is in the lower part, in the box, from above the soil. When the manure reproaches, the soil crumbles, over time the contents must be replaced. But this is more convenient to do than in the Russian greenhouse, since the bottom is always visible, in the in -depth structure the soil gradually sags, the plants are lower and lower.
But aboveground greenhouses have a significant drawback, they are much colder, they are not able to keep warm in early spring, taking into account our climate. But to use them in late spring to cover plants or growing early crops in order to protect from frosts is quite justified.
Most often, polycarbonate greenhouses from the manufacturer are an aerial structure. But, nevertheless, you can choose a model that can be used as a lid for an in -depth greenhouse. If none of the finished models suits you, you can try to make a greenhouse yourself.
DIY polycarbonate greenhouse
Polycarbonate is modern material, there is no complexity in working with it. The main task is to make a high -quality frame to which it will be possible to attach polycarbonate sheets. This material is a type of plastic, it can be monolithic, i.e. have one layer of a certain thickness, and it can be cellular, i.e. Two sheets with honeycombs between them in which air is clamped. Cellular polycarbonate is able to retain heat as well as a double glazing frame. Only unlike glass, it is not fragile, does not beat and can withstand the strokes of the hail, the thickness of the snow and other mechanical influences.

A homemade polycarbonate greenhouse may not be inferior to the factory if such simple rules were observed during its manufacture:
- Try to minimize the number of cracks. Naturally, a hinged cover should be present in the greenhouse, so it should be done so that it does not form cracks with a common structure.
- If you plan to make an arch from polycarbonate, then you can bend the sheet only across the direction of the honeycomb.
- The frame should be resistant to conditions of high humidity and pathogenic flora.
- So that water does not get into the sheets of cellular polycarbonate, during installation, the cut should be reliably insulated. The best option to insert the sheet into the P-shaped profile, but the overlapping option with subsequent gluing sheets with tape is also possible.
- Do not save on the frame. Do not take raw wood when it is drying out, the bars will lead, and with them a polycarbonate sheet can bend an arc. Too easy profile from galvanizing should not be used for a large greenhouse, under pressure from sheets, the profile can bend. For fastening it is better to take the most reliable option: for wood, nails, for the profile of self -tapping screws.
- Perform the installation of a greenhouse in late autumn or early spring. This is due not only to the fact that at this time there is a minimum of plants that can interfere, but also with the fact that the optimum temperature for working with polycarbonate is +10 - +12 C. At a higher temperature, such a problem with cooling may occur The sheet will decrease in size, the cracks will appear. At negative temperatures, it is also not worth working with polycarbonate, with warming the sheet will expand, cracks will appear in the places of fastening, additional sealing will be required.
For a finished greenhouse from polycarbonate, the price depends on its size and the material used for the frame. Most often, having made a greenhouse yourself, you can save up to 50% of the cost declared by the manufacturer. Agree, having time and desire, why not make a greenhouse yourself? Therefore, if you decide, then we will tell the technology of manufacturing a warm house for plants.
Polycarbonate greenhouse drawing
Before starting any work, even before buying materials, you should first draw a drawing of the future greenhouse. On the Internet you can find ready -made drawings with and without dimensions. Those. There are sizes there, only you need to pay for them.
To begin with, we determine how long we want the structure, then we determine with the width. The most optimal width for in -depth greenhouses is a width of 145 150 cm. With less manure, it will not be enough to heat the space, with more inconvenient to process. But you still decide. If you are not afraid of frost, you can make a width and 80 cm and 1 m.
Next, we should decide what type of greenhouse we need: buried or above -ground. And the most time -consuming one what the roof will be, how the removable elements will be located or the whole structure will be removed.
On depicting greenhouses made of polycarbonate, you can see photos farrier-butterfly With folding sash,

a greenhouse with a single -shut -off leaning roof,

arched greenhouse with opening wings,

greenhouse convertible,

greenhouse swallow,

pariper Dragonfly,

squirrel Snail.

What preference do you decide, or maybe a stormy imagination will tell you a solution even better?
Based on the species of the roof of the welder, its height will vary. Choose it depending on the convenience of operation and the height of the plants that you will grow.
Draw your dream greenhouse, apply all sizes to the drawing and calculate the number of necessary materials.
Choosing a place for a greenhouse
Before making a polycarbonate greenhouse, you should choose a good place for him on the site. Its size will depend on this.
The greenhouse should stand so that most of the time is lit by the sun. It is better if it is the sunny place on the site.
Do not have an element in the lowland, soil and rainwater can accumulate there, as well as water from melting snow. This will lead to baking and ragging plants.
On the cardinal points, the greenhouse should be oriented as follows: a long part from north to south.
If the site has a high level of groundwater, you can only make a buried greenhouse by performing a high embankment. If this is not possible or such a structure does not fit into the landscape, you will have to use aboveground greenhouses.
Preparation of a greenhouse for a greenhouse
As an example of the manufacture of a greenhouse, we will consider a deepened greenhouse with a lid in the form of an arch that is removed, so we will dwell on preparatory work on the site in more detail.

First of all, remove the turf and dig a pile of trapezoidal shape. The depth of the pit can be a maximum of 80 cm, at least 30 cm. It depends on the purpose of using a greenhouse and the severity of climatic conditions. Accordingly, the harsher the spring and the previously we are going to plant plants, the deeper the pit should be.
The walls of the pit can be strengthened with wooden boards.
At the bottom, we fall asleep the manure to mix with charming leaves, peat and other additives. Horse manure is best suited, but cow can be used. A layer of manure should be so much to pour only 20 cm of soil on top. For example, for a greenhouse with a depth of a pit 80 cm of manure, 50 60 cm should be poured.
On top of the manure we fill up the soil with a layer of 20 25 cm.
Next, it is necessary to make a crown on which the upper part of the greenhouse will be installed. It can be made from logs with a diameter of 18 20 cm, knocking them down so as to form a circuit with a width and length of the greenhouse.
Making the frame
The type of frame for a greenhouse depends on the design of the greenhouse and the complexity of the drawing. The easiest option to perform the arched cover. Consider how to do it.
We take the bars with a thickness of at least 50 mm. If there is no sufficient length of Brusiev, then we knock down somewhat together so that in the end it turns out a rail with a length equal to the planned length of the greenhouse. There are two such racks. Next, it is necessary to fix polycarbonate to them. It is the mount to such a frame that we will consider in the next section, and now a couple more options for the frame.

The frame for the greenhouse can be made of metal -plastic water pipes, bending them in such a way as to then sheathe polycarbonate in the form of an arch. But in this design it will be difficult to make high -quality opening sash.


But the frame made of galvanized profile or wood of any planned shape is the best option.
Installation of polycarbonate sheets on the frame
The standard polycarbonate sheet has dimensions: 210 cm in width and 6 m in length. We need only one sheet. We cut it into 4 parts. The first will be 90 cm, the remaining three are 170 cm.
Polycarbonate is cut with an ordinary construction knife.

Then we fasten the sheets to the karsas bars. We lay them out like this: the wide side (210 cm) should go along the bar. We fix the sheets with screws, overlap. Then we glue the cut of the upper sheet with tape.
Important! The polycarbonate sheet is placed in such a way that the sunscreen is outside the greenhouse.
Next, bend the resulting design in the form of an arch. We take a beam with a thickness of 50 mm, a length equal to the width of the greenhouse, i.e. 145 150 cm or what you planned. Net the beam to one of the bars of the frame. We bend the canvas with an arc, fix it to the second beam. We repeat the procedure on the other side.
It remains to close the space from the end sides. To do this, we use a sheet 90 cm wide. We apply it to the resulting lid, with a pencil or marker we set the required size, cut out and close the hole.
As a result, we get a lid in the form of an arch from polycarbonate for a greenhouse. We install it on top of the crown.
Further, when working with the greenhouse, the lid must be completely removed.
Of course, there are more complex designs of polycarbonate greenhouses. They will require more temporary costs, patience and materials. Swarkers with opening wings, with a gable roof, can also be performed with your own hands. Just do not forget to follow the general rules.
![]()
StrPort construction portal 2011-2018. Articles about repair, construction, building materials.
Copying information from the site is possible only with permission of the editorial office Or indicating a direct link to the source. Legal justification
And we bought a greenhouse
And we bought a “snowdrop” greenhouse and did not suffer. Very simple and convenient. And the price is very low.