In modern private construction, the rafter system of the attic roof gives ...
|
|
We decided to install a stretch PVC ceiling, but do not want to overpay? Then the best ... |
Honestly, such a decorative coating on ordinary wallpapers is not much like it ... It ... |
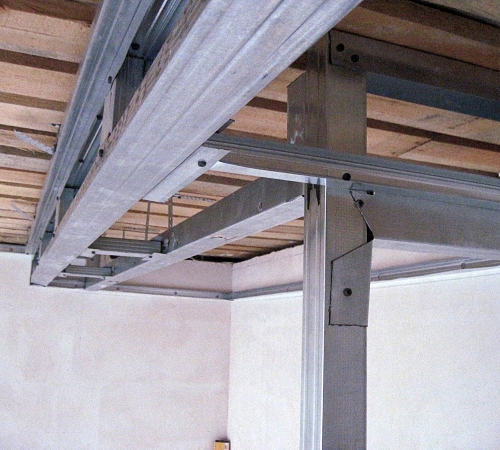
Installation of profile for drywall: step -by -step instruction
Before installing drywall, you should prepare the frame on which it will be mounted. For these purposes, a special profile is used, which differs in size, cross -section and configuration. We will talk about the features of the installation of profile for drywall and its purpose.
Table of contents:
- Profile for drywall: characteristics and general information
- The main types of metal profile for drywall
- Features of the mounting of a metal profile
- Features of installing profiles for drywall around the perimeter of the room
- Installation of profile for drywall of the guide type
- DIY Hypsum Carton Installation: Vertical sites
- Installation of horizontal fragments from a metal profile
Profile for drywall: characteristics and general information
Drywall is a material that is quite easy to use. However, in order to fix it on the surface, a special design from the profile should be built. In the process of performing these works, difficulties most often arise.
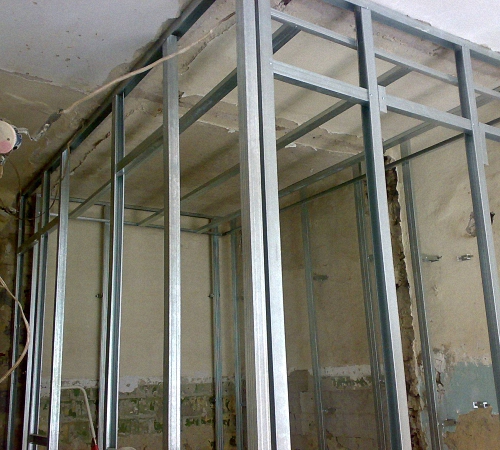
The structure of the structure made of a metal profile for attaching drywall allows this material to fully perform its functions. Since the armless fastening of drywall is a gypsum sheets that finish the room. At a time when frame structures differ in forms, sizes, have arched openings, etc.
The absence of a crate will not allow alignment of walls, ceiling decoration or installation of partitions.
There are two options for profiles used during the installation of drywall structures:
- wooden;
- Metal.
The first option is distinguished by a mass of shortcomings, among which, first of all, the low duration of operation, compared to metal. In addition, a wooden profile is more susceptible to moisture than metal.
Steel profiles are several times more expensive than wooden, this is their main drawback. Despite this, they have a lot of advantages, among which we highlight:
- high resistance to all external influences;
- accessibility of acquisition;
- simplicity and reliability in use;
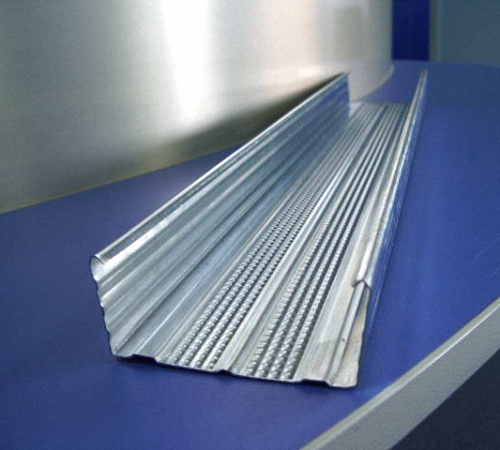
- The duration of operation, galvanized steel is used for their manufacture, 6 mm thick;
- This profile is easily restored;
- A variety of profile options that are suitable for use in certain situations.

The main types of metal profile for drywall
In accordance with the purpose, all profiles for the installation of drywall are divided into:
- basic;
- guides.
The dimensions of the profile for gypsoscarton vary in the ratio with the design features that is built from it.
The first option has a marking of PS and PP. It is intended for places with high load. It is on this type of profile that plasterboard sheets are attached. Two versions of the guide profile differ along the edges in the form of the letter P or C.
For the guide profile, there is a marking of PN. It is a horizontal bar, which is the basis for attaching vertical racks. It is this profile that forms the basis of the steel frame.
We offer to familiarize yourself with the main options for the profile for drywall made of metal:
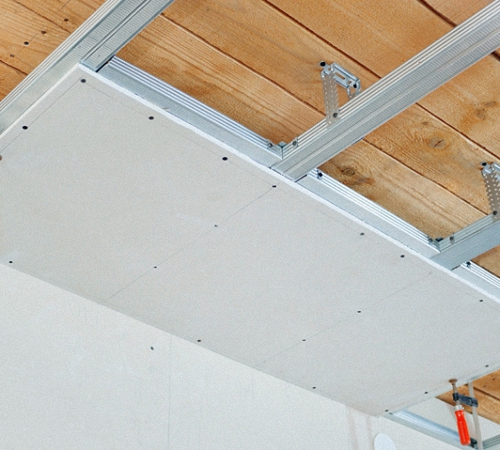
- Mon - are guiding ceiling profiles, since it is on them that the drywall used in the process of ceilings is attached;
- PP - a type of ceiling main profile, is used in the process of fixing drywall on the ceiling, it is fixed around the perimeter of the room, when installing suspended ceilings;
- Mon - wall profiles, perform the function of a vertical rack in wall structures.
Tip: PS profiles are partially used, that is, they are installed by segments, in order to save material. This does not affect the final quality of the design.
There are two more options for profiles that are used infrequently:
- Corner - help to form the angles of the drywall septum, they are installed directly on the already mounted drywall and protect it from exposure to various kinds of mechanical stimuli, when arranging the ceiling, the angular profiles are fixed around the perimeter, when wall is arranged, they are attached on the floor and ceiling;
- Arkal - are used in the process of building arches, in addition, with its help, radius and various kinds of asymmetric forms of walls or partitions are formed, to fix such a profile there are sufficiently simple screws.
Keep in mind that the maximum radius of flexion of the arched profile is 50 cm, with greater load, there is a risk of destruction of the structure.
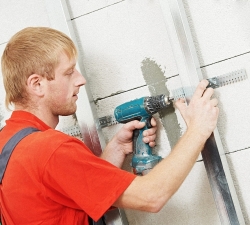
Features of the mounting of a metal profile
To fix the material, special suspensions are used, with which the interval between the wall and the profile is regulated. Thus, before the construction of the structure, it is not necessary to pre -level the walls.
If the ceiling height is more than two meters, then 5 suspensions attached to the ceiling or on the wall are required to install profiles. With their help, the evenness of the entire structure is adjusted.
Keep in mind that the basis of a metal frame structure is a guide profile. It is fixed using dowels and screws. The average distance between the holes is 200 mm. Thus, the design will be reliably attached to the wall.
Some types of profiles already have pre -drilled holes, for beginners it is better to choose just such materials.
In order to facilitate the installation procedure for the profile for drywall, we propose to familiarize yourself with useful tips for conducting this process:
1. On the wide wall of the profile, two plasterboard sheets will easily fit, but keep in mind that each of them should be located evenly on it.

Tip: calculate the installation of vertical racks so that the interval between them is six centimeters less, the values \u200b\u200bof half the drywall in width.
2. The screws are installed in close proximity to the wall, to ensure a more reliable fastening.
3. Cut the screws exclusively at right angles, otherwise, unscrew the self -tapping screw and install it again.
4. All hats of self -tapping screws are fed 0.5 mm in the profile.
5. Vertical racks have a special place for installing the communications of the engineering direction. Although in most cases, wires and pipes pass directly under drywall.
6. When decorating a private house, you should take care of the presence of additional heat and sound insulation.
7. When buying profiles and guides for hypocarten, the required amount of materials should be increased by 10%, to compensate for various sorts of sections and technical points.
Features of installing profiles for drywall around the perimeter of the room
First you should make a plane marking on which the frame will be installed. Next, prepare tools in the form:
- two plumb lines;
- fishing lines;
- ruler;
- hammer with nails;
- chalk.
To fix the plumb line on the wall, nails are used, it must be fixed on the ceiling, but hang to the floor. The second plumb line is attached in the same way. Keep in mind that the plumb line should not touch anything, since the evenness of the vertical will be violated.
A fishing line is pulled along the wall in three places: from above, below and in the center. The highest point on the wall will serve as a place of installation of a metal frame. Retreating the place from it, check the accuracy of the breakdown. In parallel in a pre -stretched fishing line, pull on another part of it at the side wall. Combine the sections of the forest located on two walls using a ruler, thus make the labels of the plane.
Repeat this procedure with all other walls and with the ceiling. Using the rule and chalk, draw the perimeter of the structure.

Installation of profile for drywall of the guide type
In order for the further design of the profiles to be even and correct, it is necessary first of all to correctly fix the guide profile, which is the basis of the frame that takes on most of the entire load.
To fix the guide profile, the presence is required:
- punch;
- electric drill;
- hammer;
- fasteners;
- scissors for metal;
- Passatiges.
Install the guide profile on the wall, according to a pre -made marking. To make it more convenient to work, it is better to start the whole process from the lower part. Retreat from the upper part of the profile 0.3 m, and drill a hole that should be several millimeters larger than the length of the dowel-gvo. Make two more holes in the central and lower part and set the dowel-gvo.
Check the evenness of the entire structure according to the set marking, if necessary, adjust the profile and forget the nails. Next, measure the distance that remains to the end of the wall and add twenty millimeters to it, since the installation of the guides is overlapped.
Using scissors for cutting metal products, cut the side sections of the profile and bend it out, cut the central part and align with pliers. Install the next part of the profile, while at the butt area, forget the additional dowel-gvo.
Put the profile on the marking and fix it with the dowel-clamps. In the same way, all subsequent guide profiles along the perimeter of the walls and ceiling are installed. For additional strengthening of the entire structure, dowels are used, installed in a step of thirty centimeters. Before this, it is recommended to once again check the structure for evenness and compliance with the marking.
DIY Hypsum Carton Installation: Vertical sites
Vertical purposes should be attached in accordance with the size and type of installation of drywall sheets. From the beginning of the wall, a distance equal to the width of the sheet made of drywall is measured, a label is made. It is here that a vertical profile will be located, which will become a joint of two sheets. The label denotes the transverse middle of the metal profile.
In the same way, mark all the vertical sections of the profile installation. The plasterboard sheet is divided into two parts in accordance with its width, each of them should not be more than fifty centimeters. Make tags on the floor surface, they will indicate the middle part of vertical profiles.
Throw the plumb line from the ceiling to the floor, and indicate the places in which the vertical profile is attached to the ceiling. Using the first mark, transfer the dimensions to the surface of the ceiling. To check the correctness of the work, throw a plumb line from the ceiling to the floor, if the tags match, then the marking does not require adjustment.

To fix vertical profiles on the ceiling, you will need:
- electric shurubrust;
- metal screws;
- fishing lines;
- pliers;
- regulations;
- pencil;
- suspension in the amount of three pieces;
- hammer;
- fasteners;
- electric drill.
On the central part of the wall, measure the interval between the ceiling and the floor. Transfer all the measurements to the surface of the profile, while subtract one centimeter. In order to avoid the occurrence of errors with a pencil, mark the size of the entire workpiece. Cut the side sections of the profile, bend its edges out, cut the central part. To level the cuts use pliers. Thus, the guide will connect to the vertical profile.
After installing the workpiece on the wall, mark it around the perimeter. Further, the wall is divided into three areas on which tags are made and the workpiece is removed.
Install the suspension according to the labels made, drill with the help of perforated holes in the suspension and fix it on the marks of the dowel-clavings. With the help of plumb line, drywall is very conveniently attached, in addition, with their help it is exhibited in the necessary direction.
Install the second suspension and return the workpiece. Attach a vertical profile to the surface of the guide using screws for metal. First, fix it of the upper part, and then the lower. Keep in mind that the profile height is less than a total height per centimeter, so you should take care of the presence of allowance of 0.5 cm from above and below.

On the surface of the vertical guides, fasten the screws on which the fishing line is fixed. The side sections of the suspensions are required to be bent, and a vertical profile is set on the fishing line. To conduct this process, more than one person will be required.
Keep in mind that the profile, in no case, should not push the fishing line or move away from it. The option of checking the evenness of the design using the rule is possible.
Tip: If even minor errors are found, one should resort to their adjustment at this stage of work. After installing vertical profiles, error cannot be fixed.
Installation of horizontal fragments from a metal profile
The horizontal parts are jumpers that increase the strength characteristics of the structure. These components are recorded directly on the design, and not on the wall. In order to save material, in the process of fastening the horizontal parts of the profile, the principle of fastening of drywall should be applied, that is, to install jumpers in areas located under drywall.
Please note that during the installation of drywall, the principle of chess order should be used, that is, first a whole sheet is laid, and then half of it. This will help prevent the appearance of long seams and strengthen the strength of the structure.
To perform this process, the presence of:
- screwdriver;
- screws with scissors for metal;
- pliers;
- crab;
- Marker.

In a place where the transverse profile intersects with a vertical structure, a special part, which is called crab, is installed. If the even cross is not formed, the following actions should be performed:
- measure the distance between the middle sections of two verticals;
- Cut the workpiece and set in place;
- Using a marker, mark the profile installation sections;
- Using scissors for metal, cut the desired section of the profile;
- Passatigs will help to align the cuts and bend the side areas at right angles;
- Install the profile and attach it using self -tapping screws;
- Check the evenness of the resulting design.
Video installation of the profile of drywall:
![]()
StrPort construction portal 2011-2018. Articles about repair, construction, building materials.
Copying information from the site is possible only with permission of the editorial office Or indicating a direct link to the source. Legal justification
it is dull written, from the fifth to
muddy written, from the fifth to the tenth
Steel profiles (hereinafter
Steel profiles (hereinafter referred to as a quote) - the duration of operation, galvanized steel is used for their manufacture, 6 mm thick; - 6 mm ???
Complete horseradish, not at all
Complete horseradish, not at all readable,
nicerta is not clear
nicerta is not clear
I myself realized what I wrote about
I myself realized what I wrote about