Frame residential buildings built using Canadian technology came to us in the 21st century. They are...
|
|
The first task that arises from the owner after buying a site for construction ... |
For the duration of construction or just for temporary residence in the country quite often ... |
How to make a workbench
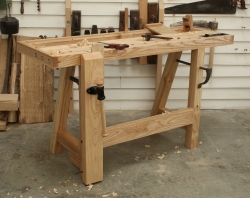
From a long time ago skillful masters sought to equip the workplace as comfortable as possible and, if expressed in modern language, ergonomically, which was considered a guarantee of not only quick and effective work, but also safety. In this regard, the premises intended for repair and manual production were filled with all kinds of tables, racks and boxes, the original material for the manufacture of which was a tree. Over time, the cheaper metal gradually replaced the tree from the construction arena and began to be used for the manufacture of machines, metal furniture and various auxiliary equipment, especially relevant in a construction workshop. Since the goods offered by stores often do not correspond to the indicated characteristics, and sometimes stands on a par with industrial equipment, in our article we will share simple tips and tell you how to make a wooden workbench with our own hands.
Content
- The main purpose and typical characteristics of the workbench
- Carpentry workshop: types of constructive performance
- Carpentry or locksmith: differences
- Dimensions and location of the workbench
- How to make a workbench in the garage: selection of materials
- How to make a workbench table? Sequencing
- How to design and make a universal workbench?
The main purpose and typical characteristics of the workbench
Regardless of its design features, the work table is necessarily characterized by massive dimensions and stability, and designed for processing structures and products with a wide variety of dimensions. When constructing a carpentry workbench, it is important to remember that the dimensions of the processed products are directly dependent on the dimensions of the workbench, while the processing of products both manually and using the power tools of the drill and electric rhuban is practiced. A typical layout of a standard carpentry layout consists of the following elements:
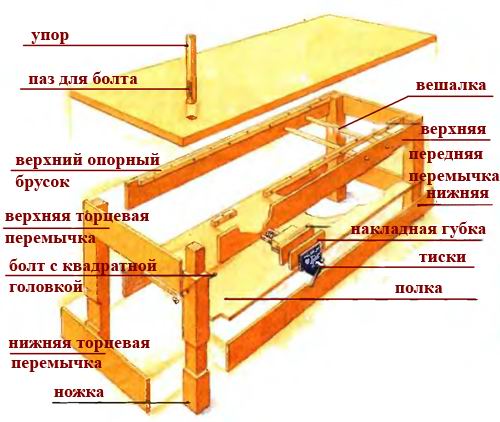
- The working surface, for the manufacture of which a massive board is used, the thickness of which is at least 60 mm. For the manufacture of the lid, experts advise to give preference to solid wood, such as oak or beech, using which it is not necessary to periodically change the working surface of the workbench, due to the high wear resistance of the material.
- A vice designed to consolidate the processed parts. They are installed on the front surface of the lid. Massive workbenching provides for the installation of several vices separately intended for attaching small and large parts. Large vice is made of wood, while, choosing a vice of small dimensions, it is better to give preference to metal structures.
- Line supports are designed to increase the stability of the overall design, which are connected by longitudinal strips. For their manufacture, it is advisable to use soft wood, linden or pine.
- In the space under the workbench, on the supports, you can install drawers designed for tools and any other working accessories.

Carpentry workshop: types of constructive performance
When developing a workbench project, it is important to take into account its design features, whether it will be installed stationary in the workshop or will be represented by a mobile structure. If you prefer a mobile structure, the optimal solution will facilitate it due to the material used, which should be less thick. A mobile workbench can also be modified through a collapsible countertop, as well as folding legs. In connection with the listed features, there are three types of workshops:

- Mobile workbench designed for minor repair work and manipulations with woodwork;
- A stationary workbench used to process massive wooden blanks and heavy boards. It is easy to manufacture, but is tied to one place;
- Disassembly or transformer workshop is convenient for its collapsible design, which facilitates the process of replacing its individual parts, and also increases the mobility of the entire structure. You can find out how to make a retractable workout in specialized manuals.

Carpentry or locksmith: differences
In addition to the classification presented above, the workbenches differ in their purpose. Distinguish between carpentry and locksmith workbenches. Since the creation of a locksmith workbench is fraught with a number of difficulties, in this guide we will tell you how to make a carpentry workshop with your own hands.
Dimensions and location of the workbench
In the process of creating a workbench, it is important to choose its location correctly. It should be in the immediate vicinity of natural light sources, if any. Local light sources will also not be superfluous. We must not forget about electric sockets, which should also be close to the workbench. All wires located in the working area are preferably enclosed in a corrugated pipe or box.

Before proceeding with the construction of a workbench, experts recommend determining its final height. To do this, lower your hands down, after which the palms are placed parallel to the floor. The distance between the floor and the palms is the highest height of the desktop, the most convenient specifically for you. Since homemade workbenches are often designed for the only workplace, the length of the table is 1.5 m, and the width is 0.8 m.


How to make a video workplace
How to make a workbench in the garage: selection of materials
The selection of the material for the manufacture of a workbench is an important stage of all work, which determines the final strength and stability of the structure being built. Before making a carpenter workout, let's talk about the rational choice of materials necessary for its manufacture. According to experts, for the construction of a workbench, the optimal material will be a strict beam that is suitable for the manufacture of a frame frame and legs.

The ideal dimensions of the strict timber:
- for legs 100x70 mm;
- for jumpers - 100x50 mm;
For countertops, it is better to choose boards with a thickness of 5 cm, or a whole canvas, such as an old wooden door or chipboard characterized by a laminated surface. It is important to know that preference is better given to solid wood, such as oak, maple and beech.

How to make a workbench table? Sequencing
The manufacture of a workbench includes several stages, the fundamental of which are:
- Assembly of the base;
- Installation of countertops;
- Installation of equipment on a workbench.

Assembly of the base
The base, as a constructive element of the workbench, is a wooden frame, the fastening of which is carried out in such a way that the design meets all the requirements of stiffness and stability. For these purposes, between the legs of the workbench, it is necessary to provide the installation of a horizontally located jumper, and in the middle, throughout the length of the structure, it is important to establish the tsar. Both jumpers and the king are fixed at a distance of 40-50 cm from the floor. Subsequently, they can be used not only to strengthen the design, but also to install shelves and boxes for improvised tools. When constructing the base, the bars are fixed by connecting the spike-paz, and in those places where this is not possible, they use self-tapping screws. It is preferable to first prepare grooves and spikes, according to the drawing, and only then glue the junction of the bars with carpentry glue.

If you build a stationary workbench, one or more parts of the frame can be attached to the wall, which will contribute to an even greater strengthening of the final design.
Manufacturing countertops and its installation
- Thinking over the stages of manufacturing a countertop, we must not forget that it should be slightly larger than the base. A massive shield of previously indicated sizes is made from previously prepared thick boards, for fasteners of which long nails are used, driven from the inside of the boards. The boards used are preliminarily drunk to each other to eliminate garbage entering the existing cracks. For the installation of the countertop, the use of materials is excluded for the manufacture of which pressed chips were used, since they do not meet the requirements for its stability. To the countertop, several transverse bars are nailed, for which it is necessary to provide grooves at the base. With the help of self -tapping screws, horizontally oriented rails are attached to these jumper, which are needed to glide drawers.

- The countertop is attached to the base on the bolts. To do this, in the upper part of the base bars, using a chisel, a recess is made, and in the countertop, holes are drilled under the bolts, the heads of which are recessed in the lid by means of drilling in the countertop of the corresponding diameter. In order to avoid injuries from the chuckles in the process of subsequent work, the countertop is polished several times and covered with olifa.

Equipment installation
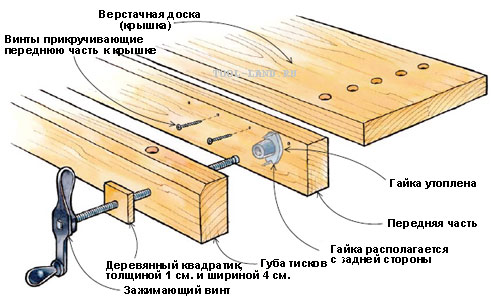
- A vice is attached to the installed countertop, the installation of which should be provided for recesses in the end of the countertop. At the site of installation, a plywood is attached to the bottom of the countertop. When installing a vice, they are first applied, they mark the place of their fasteners, and then fixed with the help of nuts and bolts. Remember that the vice should not be located from the edge, which contributes to the displacement of gravity during work.

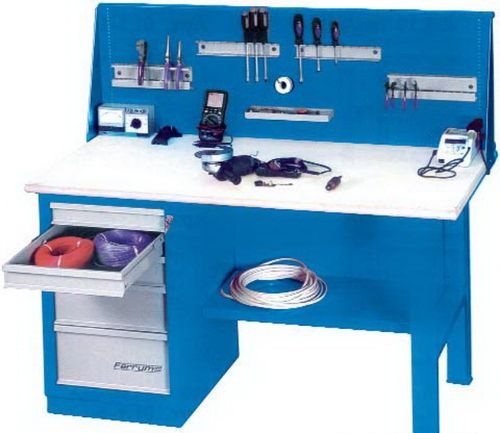
- In addition to the vice of classic equipment for workbench, there are wooden clamps, a stationary drill of high power, separate varieties of turning equipment, a milling element. In conditions of cottage, it will also be useful to install a grinder and circular. When installing equipment on a workbench, it is important to think over all the details of convenience and safety, as well as check the strength of all fasteners. If the equipment works from the electric network, it is important to correctly calculate the power of the simultaneously connected equipment, as well as correctly conduct the connection itself.
How to design and make a universal workbench?
In this article, the process of manufacturing locksmithing is not considered in detail, and it is also not explained how to make an iron workout in view of the complexity of this process, however, we consider it necessary to consider an option that provides for the combination of locksmith and carpentry workmsmen, which is especially relevant in the conditions of country houses and plots.

For this, the same workbench is made as given in the instructions, but slightly increase the area of \u200b\u200bthe working surface. Sometimes for this you may need to strengthen the base through the use of additional frame elements. When the countertop is installed, one half is covered with a sheet of thin stainless steel, which is fixed with screws. In the ideal version, not only the upper part of the countertop, but also its end elements are covered.

![]()
StrPort construction portal 2011-2018. Articles about repair, construction, building materials.
Copying information from the site is possible only with permission of the editorial office Or indicating a direct link to the source. Legal justification