Garage insulation is a kind of key to the long life of your car. Sharp ...
|
|
The center of country life can safely be called the veranda. This is a kind of continuation of the house in ... |
A good roof in country households is an important component of a comfortable ... |
DIY garage garage
The garage, unlike the protected parking lot, will protect the machine not only from the illegal actions of hooligans and attackers, but also atmospheric precipitation, for example, hail. It will also reduce the effect of ultraviolet radiation on the paintwork. In addition, he will save the owner of the car from endless and expensive visits to a car wash, since not everyone manages to independently get rid of the litter or adhesive linden juice. In the article, we consider how to make a garage with a shell with your own hands.
Content:
- The advantages and disadvantages of the garage of the shell
- Tool and consumables for the construction of a metal garage of shells
- General recommendations for the construction of a garage of shells
- Elements of the walls of the garage-penal
- Installation of a shell garage
- Quantity and price of material for the garage of shells
The advantages and disadvantages of the garage of the shell
The garage is built both according to the individual and a standard project of brick, gas, foam blocks, metal. But it is almost impossible to obtain permission to build such a capital structure due to land deficit, especially in large megacities.
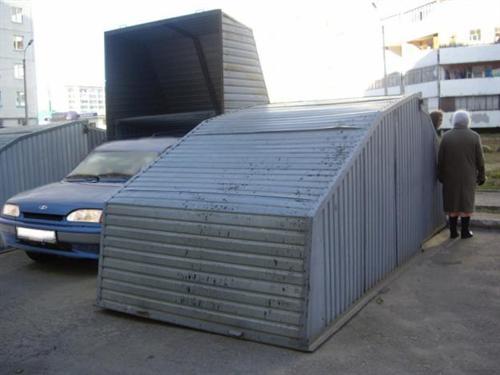
The exit is here an analogue is a garage-raki or the so-called pencil case. This design is legally likened to the tent, so it can be built both on a legalized land plot, and in any place suitable for parking.
At the same time, for the owner of the car, the construction of the shell will bring obvious advantages:
- low costs for its acquisition and installation. And the construction of the garage on its own will significantly reduce financial costs;
- its light weight allows you to carry out construction without a capital base, only in some cases a column foundation may be needed;
- the presence of a place for storing tools, garden equipment and other very necessary things, for example, an old bicycle, skis and so on;
- protection of the car from hijackers and vandals, atmospheric precipitation, exposure to sunlight;
- the possibility of storing a vehicle in the immediate vicinity of the place of residence;
- easy and quick installation/dismantling of this design allows the owner if necessary to transport it to the country or to the village.
But when erecting a metal structure, it is important to consider some nuances:
- the garage should not interfere with the passage of special equipment (ambulance, fire engine);
- do not choose a place on sewer hatches. Firstly, this blocks access to them for service, and secondly, an unpleasant odor in the shell is provided;
- it must be remembered that such a design takes more area than one parking space, which can lead to misunderstanding with other owners of cars;
- often, home -made shells have a not quite aesthetic appearance, so when building it should be given special attention to the appearance of such a garage, so as not to spoil the territory adjacent to the house with your creation.
Tool and consumables for the construction of a metal garage of shells
The scheme of the future building and the work plan will help to purchase the necessary amount of material in order to avoid downtime. If there is no tool, for example, a grinder or a welding machine, you can borrow it from friends or neighbors, significantly reducing financial costs. In addition, prudent actions will allow to purchase construction products at reduced prices during the off -season.
Tool:
- welding machine, electrodes;
- drill, drill 12;
- bulgarian, cutting and grinding disk;
- screwdriver;
- roulette, marker, corner 90.
Material:
- metal square profile 50x50 mm;
- profiled sheets C20 or higher;
- sheet rental 5 mm thick;
- bolts (nuts) 12x120 mm;
- door loops 16 welded;
- screws equipped with a press-shaped and tip-grinder;
- foam 50 mm;
- construction glue liquid nails.
General recommendations for the construction of a garage of shells
- Due to the low weight, it is installed without any foundation. The shell can be mounted on any even coating, if necessary, the surface is leveled with a rubble of a large fraction of 40x70.

- For a more convenient and quick assembly of the shell, it is recommended to carry out work first on the manufacture of individual sections. Each cut of metal parts is cleaned with a grinding disk, which greatly facilitates subsequent welding work.
- Later it remains only to mount the prepared segments directly on the spot. The work holes made in advance under the metizes will make the collection of parts much faster. Even 2 people can cope with the performance of all actions.
- Ready -made frames are necessarily treated with an anti -corrosion composition, and then all elements are painted. After the frame is assembled, points intended for welded door loops are cleaned. After installing the loops, the welding places are painted.

- If possible, then it is advisable to conduct electricity to the garage-cutting. To do this, one lamp and a pair of sockets are enough. All wiring is passed in the corrugation. These works are carried out using a copper wire in double isolation. For lighting, you can take a vein with a diameter of 0.5 mm, a 1.5 mm socket.
- The arrangement of the room ends with the installation of mezzanines for tools. If the area does not allow you to install shelves, then the board is simply fixed on the wall, and nails are nailed to it, which will serve as hooks.
- It is advisable to insulate the shell, it is more often used here material as polystyrene foam, since it can be given any form. It is recommended to mount it on special glue.
Elements of the walls of the garage-penal
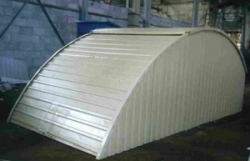
A more popular option is a garage .
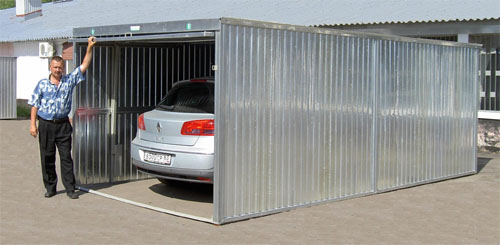
The optimal size is a design of 3x6 m and a height of 2.5 m, therefore, during construction, you should be started from these dimensions. The slope of the roof will be carried out due to the difference in the length of the vertical racks. The slope can be carried out in any convenient side. In this case, the inclination falls on the back of the garage.
To build a pencil case with your own hands, it is necessary to visually divide it into 7 sections, where one of them is a whole rear wall, the side wall consists of 2 segments (respectively multiplied by 2) and the gates, which are made of 2 cavities.

Back wall
- To perform this metal frame with dimensions of 2.2x3 m, it is necessary to prepare two segments from a square profile of 50x50 mm corresponding to these dimensions. We also need 1 cross -length 2.9 m, which will give additional strength, will serve as a place of attachment of a profiled sheet and foam. The internal parameters of the structure will be 2.2x2.9 m.
- It is necessary to weld the elements on a flat surface, observing straight angles and checking the deviations with a level. The crossbar is mounted in the middle, retreating from the upper edge of 1.1 m.
Side walls
As mentioned above, the side wall consists of two frame elements.
- To assemble the first design, you will need a metal profile of the following sizes:
- l \u003d 3.0 lower crossbar;
- l \u003d 3.01 upper crossbar;
- h \u003d 2.2 m a vertical stand that will be welded directly to the rear wall;
- h \u003d 2.3 m, a stand mounted to the adjacent section.
- After all parts have been connected, it is necessary to weld an additional spacer to enhance the structure - L \u003d 2.9 m. For this, the height of the racks is divided in half, respectively, on the one hand, the lag is mounted at a height of 1.1 m, on the other 1.15 m.
- The second frame for the side wall is also mounted from segments of square rolling with a length:
- 2.3 m vertical attached to the edge of the previous structure;
- 2.5 m extreme stand, to which the gate sash will be installed subsequently;
- 3.0 lower crossbar;
- 3.1 upper crossbar.
- After assembly of the frame, the cross -length of 2.9 m is welded. The installation points are calculated by dividing the height of the racks by 2. in this case 2.3: 2 \u003d 1.15 m and 2.5: 2 \u003d 1.25 m.
- These two sections will be attached to each other with the help of bolts for which the working holes of the required diameter are made in advance.
- In the same way, the-commissioning frames are carried out for the other side of the pencil case.
Additional fasteners
- To strengthen the entire garage frame, it is necessary to install the crossbar from below and from above. The floor will be strengthened in 3 places, the upper part of the structure is 4 points. They are pre -cut from a metal rolling with a thickness of 5 mm plate 50x100 mm.
- There should be 14 such blanks, where 2 holes on both sides are drilled in 10 of them, retreating from the edge of about 1-1.5 cm. These prepared elements are welded to the crossings in the center, so that the holes are located on both sides of the crossbar.
- The preparation of the remaining 4 plates is carried out a little differently: 1.5 cm is measured from the edge of the plate and the hole is drilled, another 1.5 cm is retreated from it and the second is performed. The crossbar is welded to the blanks from the very edge, forming the letter G, respectively, the holes should be on one side.
The frame of the double gates
- The frame of the door leaf is made of metal rolling 50x50 mm. Here, 2 vertical racks with a length of 2.6 m and 3 sections of 1.395 upper and lower crossbars, and 1 horizontal, which are welded in the center of the frame, in this case, are located at a distance of 1.3 m from the top of the racks, will be needed here.

- The second sash is performed in a similar way.
- The ears for a hinged lock can be purchased in the finished form or made independently from a plate of 5 mm. They are welded after assembling the entire garage frame.
Installation of a shell garage
Faster and easier these actions are performed by three workers, in extreme cases, you can cope with together. For convenience, the collected frames are stabilized using supports and after completion of work are removed.
It should be noted right away that the tightening of bolted joints is half -condensed. The final fixation is carried out only after the assembly of all structural elements.
Stages of installation of prepared sections:

- strengthen the frame of the rear wall with ugsinins;
- set the first side of the sidewall, check the possible deviations using the level. The holes for the bolts are made through two frames, their placement points should be placed about 20 cm from the top and the bottom of the frame. Slightly twist the methysis;
- similar actions: installation and fasteners are carried out on the other hand;
- the second prepared walls of the walls are mounted on the side frames;
- 3 lower transverse lags with a step of 2 m are installed. The massacre of the L-shaped type acts as an element connecting the front vertical racks of the sides. This crossbar is mounted in such a way that its plates are turned into the garage;
- similar actions are performed in the upper part of the metal structure. Installation of 4 spacers is carried out, and the distance between each will be 1.5 m. The last crossbar forms the contour of the garage gate;
- at this stage, all bolts are thoroughly delayed;
- installation of the gate begins with the fastening of door awnings. Moving points should be located 20-30 cm from the upper and lower frame. When installing, the gap between the vertical racks and doors should be about 2.5 cm, and the gap between the 2 doors are 1.5 cm;

- ears for a hinged lock are welded to the gate frames;
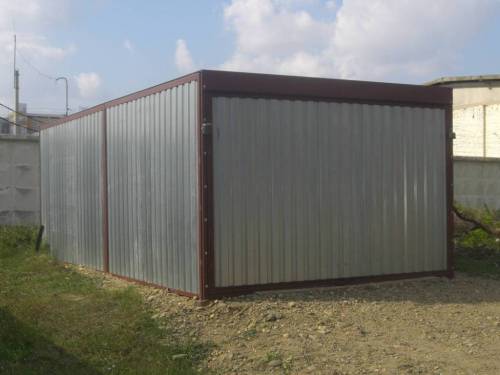
- next, the metal frame is sheathed with profiled sheets. On the walls, they are placed vertically with an overlap in one wave. Fasteners are carried out in every second deflection. At the corners of the garage, special external prescription elements are installed, which will protect the structure from rain moisture or snow;
- the roof is covered. These work begins with the bottom of the roof. The profiled sheet should protrude beyond the cornice of at least 40 mm, forming an overhang.
Quantity and price of material for the garage of shells
Below is the amount of material that is necessary for the construction of a garage-cutting with dimensions of 3x6 m and a height of 2.5 m, and the average cost of all components is also indicated:
- Profiled sheets. The total area of \u200b\u200ball surfaces of the garage is 62 m, the average cost is 170 rubles/m. So 62x170 \u003d 10 540 rubles.
- Self -tapping screws. Fasteners of the profiled sheet are carried out with self-tapping screws, about 5-6 metizes per 62 m are spent on 1 m about 350 pieces. We multiply by the average price for a piece of 2 rubles. And we get 700 rubles.
- Components to the corrugated board. The external corner can be purchased at 90 rubles/m, for this construction you need 10 m. The total amount will be 900 rubles.
- Square profile 5x5 cm. For construction, you need 110 m metal, the amount is multiplied by 50 rubles/m \u003d 5,500 rubles.
- Sheet metal. For the manufacture of 14 plates 5x50x100 mm, approximately 1.5 m of steel strip or 0.075 m is required. The average price of sheet steel is 1 063R/m, by simple calculations we get the following result of 80 rubles.
- Bolts.The crossbars are mounted using M12 meters 70 mm long, 28 such bolts will be needed. The price for 1 fasteners is 11 rubles. 28x11 \u003d 308 rubles. For a bunch of individual elements of the frame, 8 bolts M12x120 mm are needed among themselves. In this case, the cost will be 136 rubles.
- The loops are welded. For garage gates, two pairs of loops are purchased, each can cost from 45 to 70 rubles. On average, it turns out 115 rubles.
Thus, the total costs of building a mini-garage on their own do not exceed 20 thousand rubles.
The finished shell will cost about 38,000-40,000 rubles, about 3,000 rubles are added to these expenses. Total new metal structures will cost 41,000-43,000 rubles.
![]()
StrPort construction portal 2011-2018. Articles about repair, construction, building materials.
Copying information from the site is possible only with permission of the editorial office Or indicating a direct link to the source. Legal justification