The wooden floor is quite whimsical in operation and puts forward to its ...
|
|
The article discusses the design, features, scope and installation ... |
It would seem, what a trifle these door handles! But, nevertheless, without them in no way ... |
DIY logs house
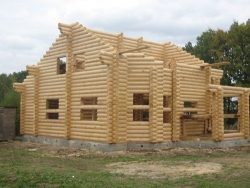
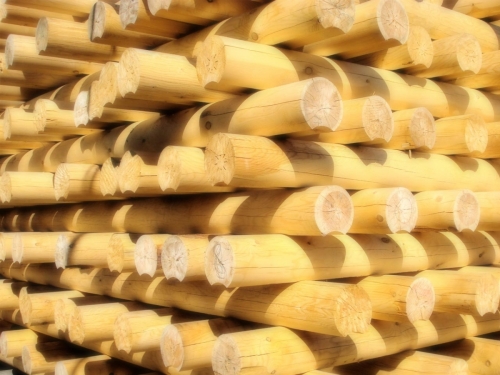
Today, in the construction of country houses, someone uses modern materials and technologies, creating a house made of polystyrene and aerated concrete, and someone is inclined to traditional methods and builds houses made of wood or Saman. But there is another way that allows you to combine technological achievements and traditions. Those who have chosen this path build houses made of a log. Such a house has a number of significant advantages over the house made of artificial materials, in addition, to build a house made of a loop of their own hands with their own hands by everyone who knows how to handle a carpentry tool and at least a little understanding the construction business.
- Preparation for the construction of the house
- Breeding a house from a looped log
- House made of logs: video
Preparation for the construction of the house
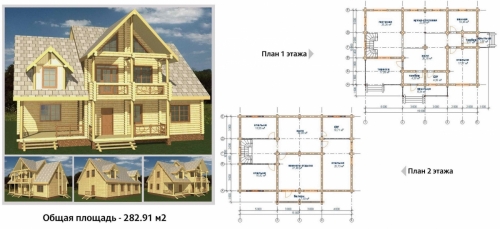
To build a house made of a looped log, you will need to get drawing and design documentation. For the project itself, it will be necessary to carry out geodetic work on the site and, taking into account the recommendations of the architect, the data obtained in detail document. Based on the data received, the architect will create a project taking into account all the characteristics of the area and personal wishes of the customer. In addition to creating a project from scratch, you can purchase ready -made projects of houses from a looped log and, if necessary, make changes to them. Typically, such house projects are offered by organizations that are engaged in the production of logs. This greatly simplifies the manufacture and construction of houses from a galinded log for a particular project.
Of course, if there is a desire and skills to work with the Archicad program, the project can be performed independently. But the logs for the house are still better to order from the manufacturer. This is many times easier than renting equipment and making allocated logs directly on the site. And the reasons for this are more than enough. The first, and, perhaps, the main reason is the level of the moisture of the log. In the production of logs, special drying undergoes, which allows them to reduce their shrinkage to 1%. For comparison, the logs of natural humidity give a shrinkage up to 10%. Secondly, on an industrial scale, it is much easier and better to carry out wood processing with antipyrens and antiseptics. Thirdly, it is difficult to perfectly choose a longitudinal assembly groove in camping conditions, but in production it is a common thing.
Unfortunately, due to various circumstances, even the factory manufacture of a gallected log does not guarantee ideal quality. Therefore, when buying logs, you should approach their choice with increased attention. To do this, you need to focus on the following indicators:
- The color of logs. It should be yellow or dark yellow.
- Lack of tarry pockets and complete or partial absence of knots.
- If there are cracks on the log, they should not exceed 1/3 of the cut.
- The logs themselves should be perfectly even in length and not twisted.
- The core of the log should be 3/4 of the cut, and the cut itself should be even and dense.
In addition, it is necessary to add several more features to the above main indicators that significantly affect the choice of wood. Firstly, when logs were cut down for logs. It is best if in the winter, then the log will have the best indicators of moisture resistance. Secondly, wood breed and its growing region. For the walls, they choose logs of conifers, and those that grow in the north are considered the best. For embedded crowns and strapping, you should choose a larch or aspen. These breeds are famous for their strength and resistance to negative influences.
The finished project of the house in addition to drawings and other documentation should contain the estimated amount of materials used and the volume of work. Based on this, you can get the cost of building a house. Typically, for building a house from a galinder logs, prices start at 300 cu. per 1 m2 and fluctuate depending on the prices for materials and the complexity of the work. The table below indicates the total number of materials for a two -story building with a total area of \u200b\u200b180 m2.
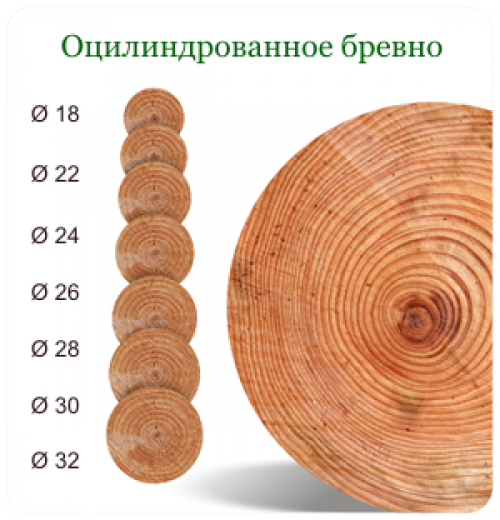
Based on these data, conclusions can be drawn about the required materials and volumes of work for your own project and the total cost of construction. In addition, I would like to note another important point. The diameter of the log used also affects the total cost of the house from the gallected log. The more it is, the more expensive it will cost to build a house.
Breeding a house from a looped log
By acquiring the design documentation and having transmitted its copy for the production of logs, you can begin to prepare the site for assembling the house. This primarily applies to cleaning the site from garbage, trees or shrubs that interfere with the construction of the house. After that, a platform for unloading and storage of allocated logs and access roads is equipped. In addition, you should equip a free site directly near the future wall of the house for the preparation and lifting of logs. All work on the construction of a house from a galinded log is best performed by a brigade, 5 6 people.
An important point in the construction of a house made of a gallery log is a favorable time of the year, and this is, oddly enough, winter. In fact, the secret is simple. In winter, the air is the dry, and wood does not gain moisture. Accordingly, the shrinkage of the house will be minimal. But this approach is fair for those regions where in winter low humidity and minus temperature. If in your region of winter is less frosty, it happens that wet snow is on, you will have to equip logs for logs where they will be protected from precipitation. The exception is the laying of the foundation. It must be made before the arrival of cold weather, otherwise the strength of concrete will be low.
Foundation
Since the house made of wood is much lighter than a stone at home, the foundation for it can be made lightweight. Most suitable the strip small -sized, the tape-sabotage and slab shallow foundations. Which of them to choose depends on the properties of the soil and natural conditions. In fact, the choice of the type of foundation is determined even at the design stage, when all geodetic work is carried out, and the architect begins to create a project.
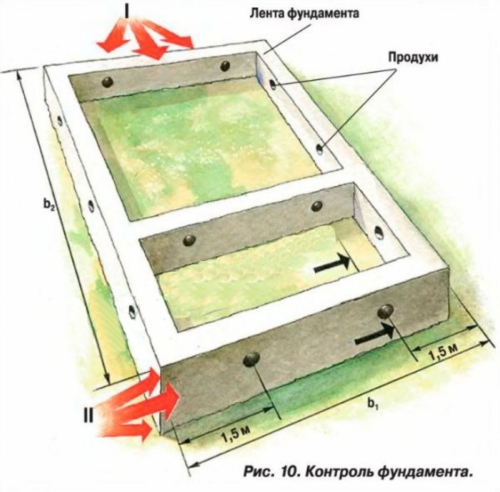
The foundation laying begins with markings. To do this, drive the pegs in the corners of the future house and pull the cord between them. To control the correctness of geometry, we use a fairly simple method. Between the opposite corners we stretch the diagonals and then measure their length. If the perimeter has straight angles, then the length of the diagonals will be the same, if not, then you will have to rearrange the pegs so as to level the skew.
In the case of arranging a slab foundation of the indicated perimeter, it will be enough and you can proceed to the excavation of the Earth. For pile-toe and ordinary strip foundation, you will have to make additional markings. To do this, in the corners of the perimeter we make the indentation to the required width, insert the pegs and pull the cord between them. We check the correctness of the angles using diagonal connections. When everything is perfectly leveled, we proceed to the excavation of the Earth. The depth depends on the occurrence of groundwater and can fluctuate from 0.5 m to 1 m. In the case of a pile-and-lent foundation, you will also have to drill wells to a depth of 1.5 m.
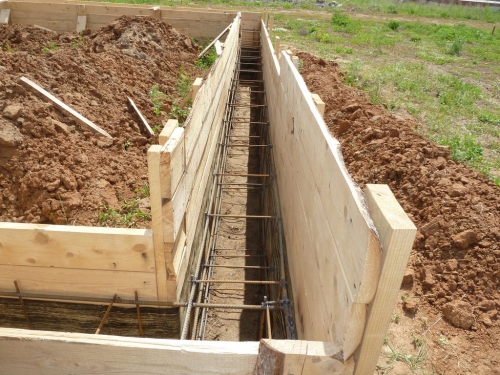
Now we equip it formwork for pouring concrete. For these purposes, you can use moisture -resistant plywood, chopped boards or special shields for rent. We knock down the boards and plywood among themselves, providing a dense fit so that there are no cracks. By installing them in place, we make spacers for the strength of the entire structure. It is also necessary to remember the lots in the foundation. To create them, it is enough to take a piece of logs, with a diameter of 15 20 cm, wrap it with pergamine or roofing material and securely fix it so that the bar does not shift during the fill. After pouring concrete, solidifying and removing the formwork of the bars, carefully remove it and get a flat round hole.
In parallel with the arrangement of formwork, we create reinforcing frame for the foundation. For these purposes, we use a special reinforcing grid or weld the reinforcement rods among themselves. We lower the finished frame into the formwork and proceed to the filling with concrete. The concrete itself can be ordered already ready, and it will be brought by a mixer, or to do it directly on the site. At the end of the fill, we leave the foundation for 30 40 days to gain strength. During this time, logs will be made.
Important! Despite the simplicity of the task, the creation of a foundation for a house made of a rounded log has a number of key points, the non -compliance of which will lead to the destruction of wooden walls. Firstly, the height of the base should be at least 50 cm. This will protect the logs from getting wet and decay during spring melting of snow and rains. Secondly, when creating the foundation, it is necessary to equip the ventilations for ventilation of the underground. Otherwise, moisture will accumulate there, to affect the walls, floors, microclimate at home and will lead to the appearance of fungi, mold and genes.
Walling
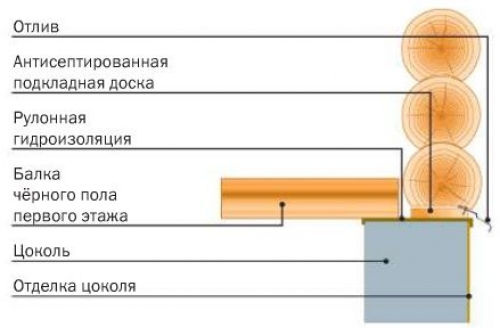
After the foundation gained strength, the logs were made and delivered to the site, you can start the construction of the walls. We start work with arrangement waterproofing of the foundation. For these purposes, we use roofing material, glassizol or other rolled material. Materials like roofing material are laid in two layers, the glassizol can be in one. Since the work is performed in the winter, it is preliminary to remove the snow and warm the surface of the foundation with a burner, on which the waterproofing is laid. The insulating layer itself should lie evenly, without distortions and protruding the edges of the foundation by 3 5 cm.
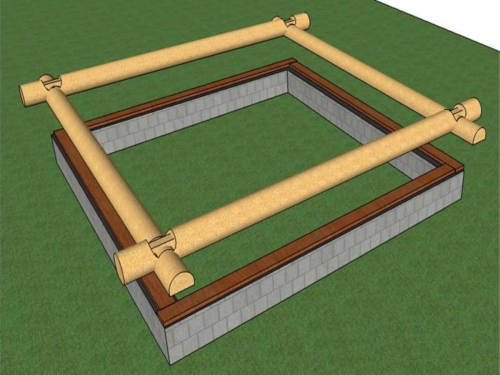
The next step will be lowering the lower binding of wooden support beams. For these purposes, beams from larch or aspen are perfect. We put the beams themselves in two rows in the middle of the foundation and temporarily fix them. After that, using the perforator, we cast through the through holes and finally fix the beams using metal pins from the reinforcement. In conclusion, we coat the beam with bitumen mastic.
Important! Before finally fixing the beams to the foundation, we check their geometry using diagonal connections. If necessary, align and after that fix it. A small discrepancy is allowed up to 5 mm. Before laying the beams, carefully impregnate them with an antiseptic. During the construction of wooden houses, the galbed log and other wooden structural elements should be carefully processed with antipyrens and antiseptics.
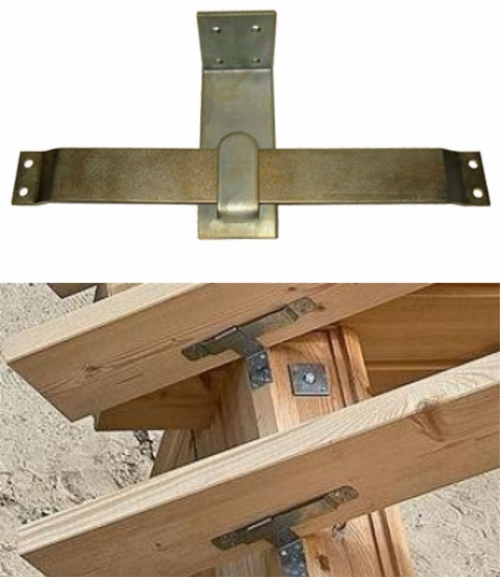
Having completed work with support beams, we proceed to laying of mortgage half -worn. Why is it half -worn? In order for the walls of the house to be stable and served for a long time, their base should tightly, without cracks, fit to a strapping of beams. Therefore, the bottom of the logs of embedded crowns is cut so that it is even, unlike logs for walls, the bottom of which has a longitudinal groove in the form of a crescent. On top of the strapping we install storm castings. Laying is as follows. First, we lay the logs on parallel walls. Then we put logs on the free walls that will overlap previously laid. At the same time, in the corners and places of conjugation in the upper logs we make a groove for a bundle of logs. For the strength of the design of the junction of the logs, the logs are connected with metal brackets, which then we sink into the logs. The embedded crowns themselves are fixed to the strapping with the help of the bastards.
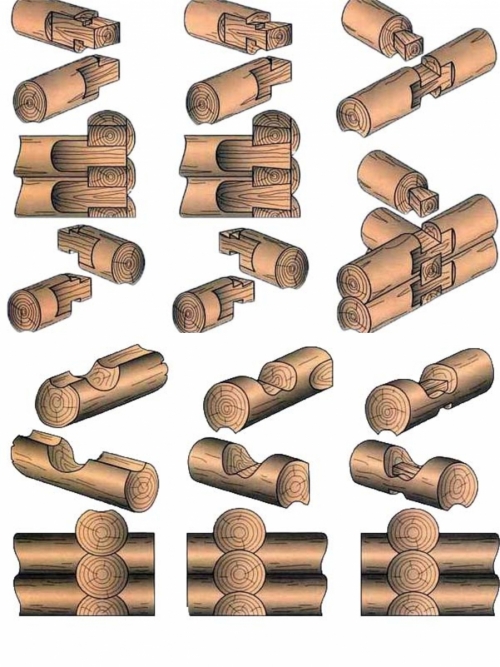
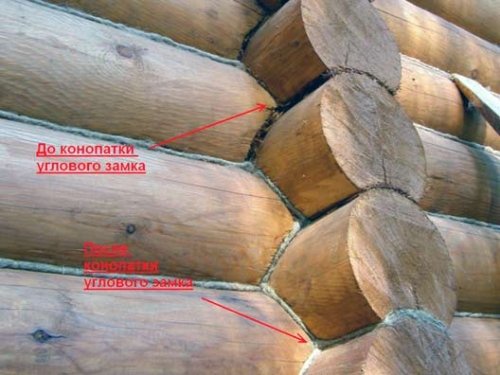
Important! The corner joints of the logs can be made in several ways: in a cup (Russian or Canadian) and in a paw. The ligament in the paw implies the creation of corners without a trace, the corner connections are strong, but they look somewhat not aesthetically aesthetically pleasing. The cup, on the contrary, looks beautiful, but at the same time, gaps may appear after shrinkage. For those who prefer a cup, you can recommend the use of a Canadian cup. It is made in the form of a cut cone, and after shrinkage of wood, retains the reliability of the connection without cracks.
Further construction of walls is as follows. Keeping the laying sequence, as for a embedded crown, logs are laid on each other. Before laying each next log to the longitudinal framework, tape heater from jute, hemp or pack is fixed. The assembly is carried out according to drawings, and thanks to the industrial manufacture and breaking of the house from the gallected logs, work is performed quickly enough.
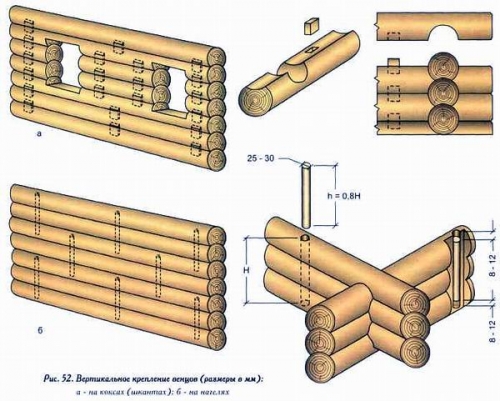
Each new laid the log is strengthened by the wax with a wooden stakeconnecting two or three logs together. To fix the log, after laying and checking the correct laying, it is temporarily fixed with nails on the sides. This is done so that during the drilling of the hole under the nagel, the log does not shift to the side. After that, a punch with a long drill with a diameter of 5 mm is less than the wound used, and the hole is poured through two to three logs. The dumbings themselves are made with a diameter of 20 mm. Now it remains to drive the nagel inward, thereby tied the logs together. The first baches are driven near the corners of the house, following in steps 1 1.5m. On each fourth log, the nagella is shifted relatively driven earlier. The result is chess placement, which increases strength. During the laying of logs, we constantly control their horizontal and vertical walls, otherwise you can fill up the entire structure. Having fixed the log with nagels, we take out the nails driven to fix the logs.
Creation of inter -story floors and gender
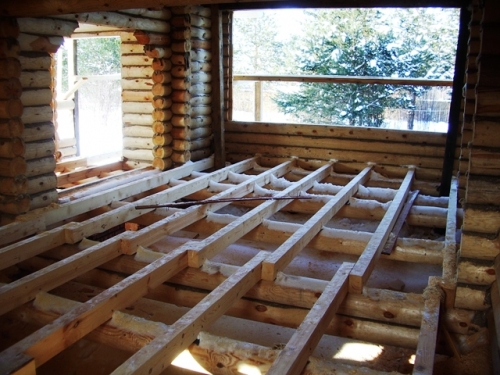
When we build houses made of a loop, we must take care of the flooring in time. In such houses, floors are wooden floor on the lags, and its creation will require a certain skill. To do this, at the beginning of the bookmark of the first crowns, you will have to cut into them and lay the support beams. To do this, it is necessary to outline the installation sites of the beams according to the project. Then, using a chainsaw, carefully cut a rectangular groove inside the log. The depth is taken so that the beam lay firmly on the foundation. Then soak the beam with antipyrens and antiseptics, lay it in place. Next, you can make a black flooring of boards and continue the construction of the walls.
Important! For the reliability and strength of the wooden floor, retaining columns of brick, logs or concrete are created for the supporting floors of the floor.
If the house is two -story and more, inter -story floors are created by the way described above. That is, the beams of the inter -story ceiling neatly cut into the logs of the crown. But unlike the beams of the first floor, the inter -story insert occurs in such a way that 90% grooves are in the upper log, and 10% in the lower. After all the work on the construction of the house and after its shrinkage, you can finally equip the floors.
Roof
The design of the roof is well -known. It consists of a rafter structure, a thermal insulation layer and roofing material. But there are several significant differences that distinguish the roof of the house from the galled log from the roofs of ordinary houses. Firstly, this is a ridge run. It is part of the inner wall, so when designing this should be taken into account. But this is for large houses. In small ridge ranks, it is made in the usual way. Secondly, the rafters are attached in a special way, and the log of the last crown acts as Mauerlat. To install the rafter leg in the Mauerlat, a cutout is made, at an angle that corresponds to the angle of the roof tilt. The rafter leg itself is fixed using metal elements, which during the shrinkage of the house will slip, while maintaining the angle of inclination and the strength of the connection to the walls.
The assembly of the roof is quite simple. The first two rafter legs are rising up and connected at the beginning of the ridge at the required angle, after which the cutout is made in the Mauerlat and the rafter leg is placed there. The same operation is done for the second pair, but already at the end of the skate. Pulling the cord between them and leaving the horizontal, both farms can be finally fixed. The remaining rafters are installed under a stretched lace with a step of 600 mm. On top of the rafters, the crate and waterproofing layer are equipped. In conclusion, the counter is packed and the roofing is laid.
Hemp
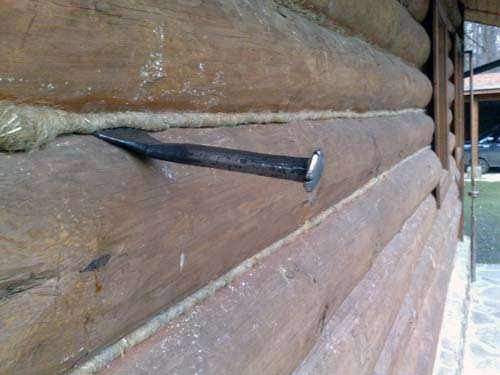
The second stage of the construction of the wall hemp is completed. It is performed by a special tool that pushes thermal insulation material into the joints between the crowns. There are two options for hemp. The first is the addition of thermal insulation to the joint. The second hemp of protruding thermal insulation, laid during the laying of crowns. How the hemp will be made depends on what width the insulation was used. Having finished with a hemp and joints, the house is left for 1 year to shrink the logs. Only after that can you begin the final work and additional hemp walls.
Important! For insulation and sealing of cracks of a house from a gallendled log, it is forbidden to use mineral and glass wool, as well as mounting foam.
Installation of windows and doors
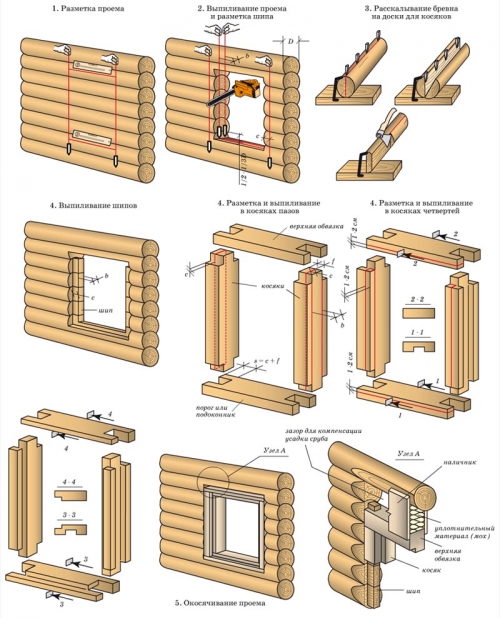
After the house stood for a year and under its own weight the logs sat down a little, you can proceed to the installation of windows and doors. To do this, a comb is made in the vertical part of the openings. Then inserted casing for windows or doors And fixed there. This is necessary to compensate for the shrinkage during the operation of the house. The joints between the box and the wall are filled with a double layer of insulation. The windows and doors themselves are installed in the casing. On the window opening, a photo of a shopping log photo shows a way to arrange such a opening.
You can build a house made of a log with your own hands in a fairly short time. But you can complete the finish finishing work and call into it a year later. Such a long period may seem unacceptable to many. But those who waited for this hour can be proud of ecologically clean and healthy for a healthy life without hesitation.



I hadn't thought about it before, but
I used to not think about it before, but now I have a desire to rebuild the house, I don’t want a big one, that is, I want it, but the fact is that I want a mini house 6 to 6, two -storey, from a rounded log.