The choice of finishing materials for the repair of a small room is not so simple ...
|
|
The installation of the door frame is accompanied by the installation of the door on the loops. The... |
Warm floor in the kitchen is a modern level of comfort, turning the usual ... |
DIY toilet dismantling the toilet
Someday you will definitely face the problem of dismantling the toilet. After all, like all communications in the house, plumbing should always remain working. But for such things, time is ruthless. Therefore, even cosmetic repair in the apartment requires replacing all the elements of the bathroom and the restroom. Before installing a new toilet, you need to dismantle an old plumbing device. This lesson is not the most pleasant, but, nevertheless, quite simple, not long and quite fulfilled with your own hand.
Table of contents:
The dismantling of the toilet
The dismantling of the toilet and the installation of a temporary plumbing device is not such a difficult task as you noticed. After reading the theory presented in our article, the video about the dismantling of the toilet will answer the remaining questions.
Preparatory work
Dismantling and replacing the toilet, which has served its term, is necessary to ensure comfortable conditions for residents of a city apartment or country house. Before work, it is recommended to stock up on all the necessary tools. Keys of different sizes and crowbar may be needed in the process. Also, it is not bad at hand at hand. To get rid of water residues, a lot of rags should be saved.
All operations associated with the dismantling of the toilet with your own hands must be performed in rubber gloves to protect the skin of the hands from microtrauma and bacteria. Before starting the work, it is advisable to thoroughly wash the toilet and treat it with some disinfectant, for example, chlorine solution, because it is still a nursery of harmful microorganisms. You can rinse the toilet with running water with an antiseptic dissolved in it - ordinary whiteness, which is quite suitable for these purposes.
After that, the space in the working area should be freed from all the subjects present, everything must be removed, up to the rugs. It is customary to start the dismantling of plumbing with a disconnection in the supply pipeline of cold water. The water that remained in the tank must be drained, and it is also worth ensuring the complete inactivity of the sewage system with water should not be used themselves, but also should be warned neighbors from above to abstain from water procedures for some time. After making sure that the supply channel is reliably blocked, you can start removing the toilet.
The liberation of the foundation of the toilet
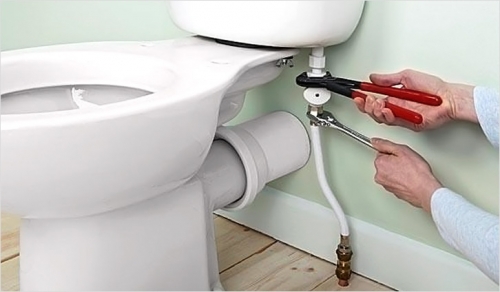
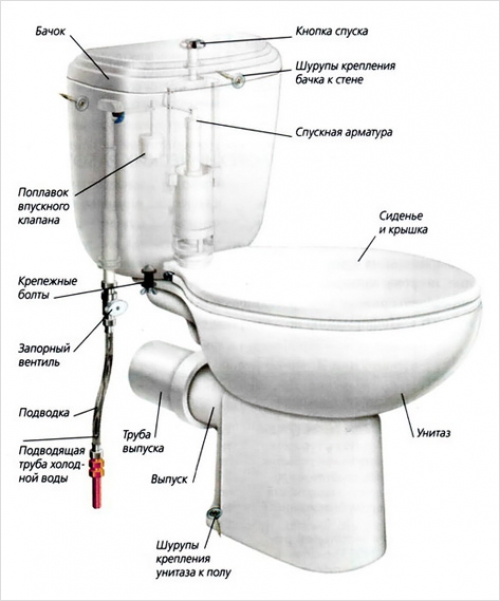
You should start with the disconnection of a flexible hose, which gives water from the pipe. The next step is the dismantling of the tank, because it will be harder to physically remove the toilet along with the tank. Lower the last water, unscrew the nuts of the tank mount, which are located on the back of the structure, and open the lid. If the tank hangs on the wall on the hinges, then you can remove it without opening.
Next, it is necessary to release the base. If a tile is beautifully laid around your toilet, then it will have to be knocked out. The toilet is attached to the floor in two or four places of the lower part of the bowl. There is either a warehouse connection of the toilet on the stilettos, which is mounted on the floor, or a bowl, which is screwed with dowels with hexagonal hats. But in any case, the mount must be unscrewed with a wrench of a certain size.
When mounting on hairpins, you need to slightly raise the base and with a light swaying the seal in the pipe of the withdrawal sewage. If the trim of the pipe bell was made using a cement mortar, it is recommended to put this solution with a chisel before removing the base.
It is better to use a thin chisel, chopping cement with maximum caution with light blows, it is customary to direct the tip of the chisel across the coating, in the opposite case, the pipe bell or the release of the toilet can burst. As soon as coating cracks on one of the sides, a similar operation will need to be done from the opposite side of the release. Shards should be pulled out and try the toilet to get out of the divery pipe. If it doesn’t work out, it is recommended to repeat cement racing.
However, if you get the most difficult option, which implies the attachment of the base to the wooden board, then in this case the dismantling of the toilet will be traumatic for plumbing. It will be necessary to repulse the bottom so that the fasteners are left in the floor along with the base, then it should be taken out in parts when the work is over.
Dismantling the toilet from the sewer pipe
As a rule, old plumbing devices are thrown away, so they do not need to regret them. In order not to get hurt in the tile during operation, it is recommended to carefully observe safety measures to use protective glasses and gloves. Now the toilet is connected exclusively with the cast iron pipe of sewage, and it can be disconnected from it in several ways. These methods carry a different degree of destruction. Accordingly, the dismantling price is different if you order a service for specialists.
Before removing the toilet, it is recommended to make a special cork, which is a rag gag, which has a size of about 100 millimeters in diameter. This traffic jam must plug the hole in the detachment pipe, thereby preventing sewer gases into the apartment.
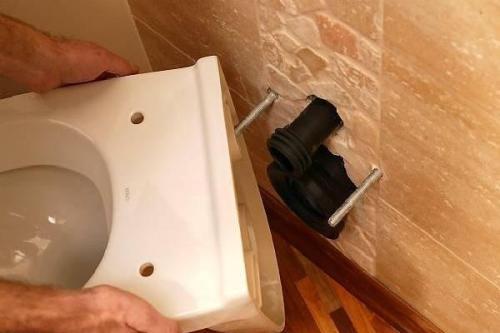
The first way is destruction. According to this technique, you should recapture the withdrawal, carry the toilet, and then just clean the bell from the residues of the solution and ceramics. You can break off the withdrawal in a situation where the toilet is no longer attached to the floor by cleaning the junction of the withdrawal and pipe as much as possible, lift it and pull it up. It remains to knock out the remnants from the pipe without damaging the sewer pipe itself. Try not to clog the sewer with fragments, it is better to clog the hole with something.
You can choose a more humane way if attempts are made to maintain integrity. To the smallest residues, it is necessary to clean the joint of the sewer pipe with the toilet from the seal, the solution and other inclusions. Raise the product, see how free it began to move in the pipe. Slowly scrolling and swinging the discharge, you need to pull it out of the pipe, cleaning the passage from the solution in parallel. If you managed to get the toilet, then it is necessary to clean the pipe for the future installation.
Dismantling the Soviet toilet
And it also happens that when the line reached the bathroom, the owners there meets a gloomy product that was mounted on a conscience decades ago since the erection of the house. Then the dismantling and installation of the toilet will become quite troublesome, but if you do it yourself, you will probably understand its design, and in the future the repair will no longer deliver you any problems.
The most difficult option is rightfully dismantling the Soviet toilet, because the design is very unique, and the device was attached in such a way that it is almost impossible to tear it out. Therefore, you will not be able to keep it intact. Inspect the floor near the toilet, evaluating the mounting method.
The next problem is that it occurs in the case of dismantling the Soviet toilet, especially if your plans have re -use of the toilet, for example, in the country, this is how to disconnect the discharge from the sewer. During the construction and installation of communications in Soviet times, first -class tightness was made, with rare exceptions. The joints were covered with a solution so deeply that today it will not work to knock it out carefully, without damaging the sewage pipe or a challenge.
Installation of temporary toilet
During the repair in the bathroom, you can put a temporary toilet with your own hands. At the same time, it is not at all necessary to resort to the help of specialists or strangers. In addition, you will need a minimum supply of tools. A temporary toilet is best installed without washing tank. An extra will also connect a temporary toilet to the water supply. In this case, washing into the system is recommended to be carried out by pouring water previously recruited into a bucket.
For the stability of the plumbing device, it is customary to equip a shield or place a piece of chipboard under it, with dimensions of 500 by 500, fixing through the fasteners of the toilet with screws with washers. It is better to buy screws with a hexagonal head of the required length. If there is a need so that they do not protrude from the bottom from the shield, long self -tapping screws can be cut by a grinder.
It is convenient to attach a temporary toilet to the sewage system with corrugation. Such a design allows you to quickly remove plumbing to another place, literally in a minute, and also quickly put the toilet back. In order for the toilet surface to get as low as possible during the repair, wrap it outside with cellophane and fix it with tape, which should only be glued to cellophane, because it will be difficult to remove its remains from the case. It is advisable to cover the entire assembled design with a piece of chipboard or plywood in order to protect against garbage, solution, dust or accidentally caught tool.
Fastening a new toilet
For the installation of a new toilet, including the Ideal Standard toilet toilet, in addition to the toilet itself, you need to have 3 more important details at hand: a corrugated pipe of approximately 15 centimeters in diameter, eccentric and fasteners. With the fasteners, everything is clear, the corrugated pipe is used instead of the old that goes to the collector, and the eccentric is used to connect the corrugation to the toilet.

There are three main methods for fastening the plumbing device to the floor:
- Fastening with dowels.
- Fastening the wooden board to taffet, which is drowned in the seizure of the floor. Taffeta should be made with well -leafed wood, for example oak. The toilet after installing taffeta is customary to be attached with conventional screws.
- Fastening the toilet with epoxy glue. It is necessary to apply a layer of resin on the supporting surface, the thickness of which should be close to 5 millimeters, and then press the toilet to the floor.
Fixing the toilet on the dowel
Before installing the toilet, it is strongly recommended to deal with the mount. If the placement of the bolts of the old mount coincides with the new one, then you can install a new toilet in the same place. There should not be too large holes for dowels, which in turn should not fail, but without obligation they should not be less than the right size, it is unnecessary to score the dowel by force. If the fasteners crack or damage in another way, then this will reduce the stability of the toilet.
When moving the toilet, it is necessary to find the most suitable placement in the room, and it is also worth remembering that the corrugated pipe should join the sewage bell without obstacles. With the help of corrugation, if necessary, you can independently determine the connection angle and the required distance from the pipe to the walls.
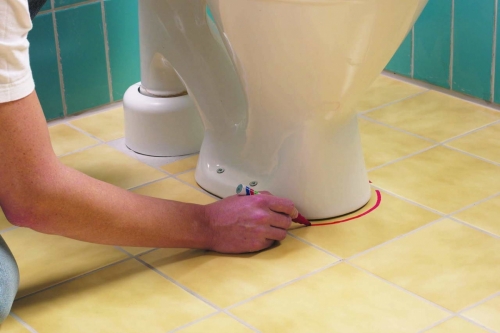
Having found the best place for installation, you need to outline the outline of the landing plate of the plumbing device with a felt -tip pen or pencil, it should also be noted for dowels fasteners. Having pushed the toilet, you should drill a diamond drill, the openings for fastening, which are marked earlier.
The most difficult work is the drilling of tiles. It is necessary to drill with shock drilling with a drill, but the upper layer is recommended to drill without a blow, and then you can also make strikes. The main thing is to drill almost without pressure on the drill, it will make the functions of the blow herself. The perforator is considered not suitable equipment for such work, but after you pass the tile, you can also use a perforator.
Taffet's toilet
Before starting work, it is worth preparing holes for the toilet. If the output holes of the toilet are suitable for typical holes, but when this is not so, it is recommended to use special nozzles that are included with a plumbing device.
Inner fastening of the toilet
The fastening of the toilet is internal and external. However, along with this, the internal mount is considered more common. It is necessary to put the toilet and mark the markings. On the tile, it should be noted from the inside of the mounting place, after which it is necessary to note the place of drilling for fastening, which are fixed to the floor with the help of bolts.
The next step is to drill a hole for mounting a plumbing device. The principles of drilling are similar to the one that were described above. So that the drill does not go to the sides during the drilling, it is necessary to make chips in previously marked places, for this you will need a hammer and a core.
Insert the dowels into the prepared holes, set the toilet in this way that the fasteners coincide with the dowels. Do not forget to put the gasket before fixing. If it is absent, it is necessary to squeeze the silicone from the inside of the circuit circled on the floor throughout the perimeter. Silicon, however, will not be superfluous, and when there is a laying.
When installing, the resulting silicone will fill uneven and the gap between the floor and the toilet, and also block access to the toilet of dust and water. And this, in turn, means that microbes and mold will not multiply there. And the rust of the toilet fasteners is also prevented, which you can unscrew with ease after many years.
Then you need to insert the screws with the washers into the holes in the landing five of the plumbing device, and accordingly twist them tightly in the dowels, but you should not squeeze them too much in order to avoid damage to the toilet. It is recommended to tighten the mounts alternately diagonally so that the toilet does not skew.
Next, the release of the plumbing device with the neck of the sewage system should be connected. Immediately before installing a corrugated sleeve, it is necessary to lubricate it from the side of the sewage system with silicone. It is not necessary to lubricate the toilet from the toilet, but this will not harm.
Installation of a tank
After the work done, you can start installing a tank. Be sure to insert a sealing washer between the toilet and the tank, and the taceck itself is attached to 2 stainless bolt. From the side of the tank for bolts, it is also worth putting sealing gaskets.
Installation of all parts of most modern toilet models, water eyeliner and tank accession are performed almost without the use of tools. The only thing that is needed is a divorce key that is designed to tighten the fasteners and attach the water hose. Do not use such tools as pliers and a hammer.
Water eyeliner
Water is brought to the toilet with a flexible hose. It is customary to squeeze the nuts with a hand and only when it doesn’t work, squeeze for half a turn with a wrench. In the compounds of a flexible hose, silicone or rubber washers are used as a seal. No need to use sealing winding in any case, because its use can provoke a leak.
It is very important not to allow excessive tension of the hose, it should always be with a margin. After the water has been connected to the toilet, you need to lower it a little to clean the system from the remains of silicone and garbage, which will cause harm to the drain mechanism.
Water can be brought using a flexible hose from metal -plastic or a copper tube. These are the most reliable materials that are able to increase the life of such an eyeliner at times. After installing the toilet, it is recommended not to use it for at least four hours so that the silicone finally froze.
But it is better not to use the toilet at least six hours to fix the silicone as best as possible, but in general you need to look in circumstances. And finally, the advice when sealing the corrugation with the sewer pipe do not spare the silicone, it is customary to apply it in such a way that it does not fall into the pipe.
Now you have found out how to dismantle the old plumbing device and install a new one. More, dismantling and installing the toilet requires unquestioning performance of hygiene and safety requirements, so be sure to put on protective glasses and gloves! And work extremely neatly if you want to use the old toilet subsequently in your country house or install it in your former place after repairing the bathroom. During work, it is advisable to establish a temporary toilet.

