One of the advantages of wooden houses is their slight weight relative to brick ...
|
|
The lock installed on the gate allows you to protect the residents of the house from a sudden ... |
When it comes to natural environmentally friendly building materials, one of ... |
Squinting walls with their own hands
When carrying out repair or construction work at their final stage, they have to put the walls of the walls. The leveling of the walls with putty is necessary if you want to get even and beautiful walls for painting or pasting with wallpaper. All work is carried out in several stages, each of which can be performed even by a beginner. Of course, without practical experience in aligning the walls with putty, you can not do without flaws. But adhering to the recommendations described below, you can minimize errors.
- Types of putty
- Tools and additional materials
- Recommendations for alignment of walls with putty
- Squinting walls with their own hands
- Setting walls with putty: video tutorial
Types of putty
When going to align the walls with putty, you should pre -determine the type of putty. The type of materials for the finishing, the initial quality of the wall surface, as well as the intended purpose of the room, affect the choice of one or another putty. Based on these parameters, and you should choose putty.
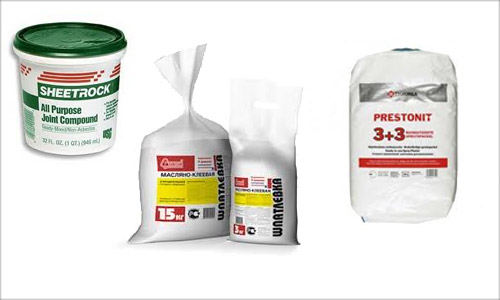
Today on the market you can find many putty from various manufacturers. But all putty can be divided into ready and dry. The fundamental difference between them is the need to prepare dry putty in place. Otherwise, they are similar. But it should be noted that for ready -made putty, higher quality is characteristic, since they are prepared strictly according to technology directly at enterprises.
When choosing a putty, it is necessary to pay special attention to its type. There is a starting (leveling), finish and universal putty. Each of them is intended for a certain type of work to equalize the walls.
- So starting putty Correctly use to eliminate deep irregularities. This type of putty can be applied with a thick layer of 10 mm to 30 mm, while not afraid of cracking of the surface.
- Unlike starting putty finishapplied with a thin layer of up to 10 mm and have smaller grain.
- Universal putty They have the strength of the starting putty, but fine -grained and can be used for finishing leveling.

Having decided on the type of putty, we choose its appearance. It can be gypsum, polymer, cement or lime putty. Each of the listed putty is used according to the final finish coating and the intended purpose of the room. Consider each of them in more detail:
- Gypsum putty. It is used for any finish finishing materials. Practically does not sit down. It can be applied with a layer of more than 2 mm. But the main drawback is a ban on use in rooms with high humidity and sharp temperature changes. Therefore, it is not used for external work and for decoration in the bathroom, bathroom and kitchen.
- Polymer putty. Applied to any finish finishing materials. Not seated. It can be applied with a thin layer. It does not depend on temperature differences. The disadvantages of these putty are a very high price and a high risk of buying defective putty.
- Cement putty. These putty are suitable for any finish finishing materials. Most often, this type of putty is used for rooms with high humidity. Unfortunately, the main disadvantages are surface cracking, low elasticity, a long period of hardening and a large shrinkage. As a result, repeated putty is required.
- Lime putty. These putty in their composition have both sifted unheated lime and cement or various polymers, therefore they have all the advantages and disadvantages of cement putty. They are most often used for decoration of facades and walls, plastered with lime plaster. This type of putty is recommended for the finish with lime paints.
Important! Lime and cement putty are the only ones that are suitable for painting with lime paint. This is due to the fact that they have an alkaline reaction, are able to ensure the breathing of the walls, especially if they are used to decorate aerated concrete vapor permeable walls. Gypsum putty on the contrary have an acidic reaction and can be used for decoration of concrete walls, drywall, etc.

It should be noted that when leveling the walls with putty, the cost of all work, by and large, depends on the volume of the putty used and its price. To save estimates at this point, you need to carefully read the brand of bought putty and find out its consumption by 1 m2. Of course, you have to pay for quality, but if the budget is too small, you will have to look for a compromise in the issue of price/quality.
Regarding the volume of the consumed putty, then on average about 15 kg of putty leaves on a wall with an area of \u200b\u200b9 10 m2. The thickness of the layer is from 2 to 5 mm. At the same time, after the first layer dries, an additional putty of individual sections will be required, and this is a couple more kilograms of putty. Application of the second layer of putty for final leveling is especially important when preparing walls for painting.
Tools and additional materials

To carry out all the work on leveling the walls with putty, a certain tool and additional materials will be required. Everything you need can be bought freely at any construction store. From the tool you will need:
- spatula 15 20 cm;
- spatula 45 60 cm;
- corner spatula;
- rule;
- capacity for kneading putty;
- drill and nozzle of a mixer;
- a special grater with mounting paper mounts and the paper of fine and medium grain. You can also add petals to protect against dust.
Of the additional materials, a primer and rollers are required to apply it. Also, a plastic film on the floor will not be superfluous to protect it from accidentally fallen putty.
Recommendations for alignment of walls with putty
Walls to align the walls begin with the preparation of the surface of the walls. There are no special secrets here. If you have to putty the walls of the brick of the newly built house, then this is best done after their plastering. For concrete walls, plastering is not so important.
Cleaning the walls of the old coating
In the house where the walls had any finish coating, it will be necessary to first remove it. An example of the preparation of such walls is the following photos showing the cleaning of walls from the old water -based and gypsum putty.

The wall cleaning process itself is quite simple. As in the case of the removal of old wallpaper, the surface of the wall painted with an old gypsum putty is moistened with a small amount of water, and then slopped with a spatula. But unlike the removal of wallpaper, it is best to moisten with water.

After a couple of minutes, as soon as putty absorbs water, it can be cleaned.

In cases where the walls were painted with acrylic paint or alkyd paint, everything is somewhat more complicated. First, you will have to remove the paint itself using a special wash. Of course, this is not the most pleasant way to clean, especially in closed rooms. Therefore, you can simply knock off the paint from the wall with a hammer.
Priming the base before puttying

Having cleared the wall, you can proceed to the second stage of preparing the coating with its primer. This is a mandatory stage and it is not worth neglecting. Primer deep penetration will not only increase the surface adhesion, but also penetrate deep into the wall, filling the cracks and partially eliminating minor damage. The primer is applied quite simply. At first, it is poured into a special container into which a brush or roller is thrust and then rolled down the wall. To increase the effect of adhesion, the primer can be applied to two layers. After applying the primer, we leave the walls to dry for 6 10 hours. Then you can start aligning the walls with putty.

But first, it is necessary to learn a few simple recommendations that will allow you to play the walls qualitatively and without any problems.
- It is best to put the walls of walls at one time. This is dictated by necessity rather than any rules. The thing is that the putty dries quickly enough, and after 20,30 minutes it will already be impossible to apply high -quality to the wall. Therefore, several small trial kneads should be made to determine at what speed you develop them.
- If you had to take a long break, then before proceeding to further putty, you should abundantly moisten the edge of the putty and then continue putty.
- If it is necessary to align the walls with several layers of putty, for the first layer you can use universal or starting putty. And the last layer is already applied with the finish putty.
Squinting walls with their own hands
Having completed the preparation of walls, you can proceed directly to the leveling of the walls with putty. All work will be held according to a certain scheme. The algorithm of actions is as follows.
1. Before starting to knead putty, it is necessary check the evenness of the walls. To do this, we take the rule and apply it to the wall at different angles. Vertically, horizontally and diagonals. Applying the rule in this way, you can notice all the irregularities of the wall. Where there is a gap between the rule and the wall, there you will have to fill it with putty.
Important! After checking the walls for the presence of irregularities and noting these places for yourself, it is necessary to take into account the following. If most of the protrusions are located vertically, then put the putty from the bottom up. And if horizontally, then from right to left or vice versa.
2. Having checked the walls for irregularities, we proceed to the putty knead. As already noted, the first two or three kneels must be made by trial, gradually increasing the amount of putty. For the convenience of typing dry putty from the bag, you can use a special plaster bucket.

On average, for a more or less uniform production of the solution, a newcomer will need 4 5 piercups of putty. The amount of water for one batch must be looked at the package. For various manufacturers, it can be different.

We knead the solution using a drill and a mixer nozzle. We bring the solution to the consistency of thick sour cream. So that the putty can easily remove from the spatula and at the same time does not slip or not drain from it. When kneading putty, it is necessary to achieve a monotonous solution, without lumps. If there are one, we try to break them and knead them.

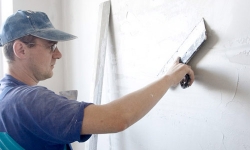
3. Using a narrow spatula, put their putty on a wide. We try to evenly distribute the putty along the edge of the spatula. Then we apply the spatula to the wall at an angle of 50 60 degrees and stretch the putty along its surface. You can keep the spatula in various ways. An example of how to do this is shown in the photo.

The main thing is that the spatula is securely fixed in the hand, and when putting putty, a sufficient amount of effort is applied to smear their putty on the surface. We begin to putty from the corner of the room. To create even and neat slopes and corners, we use a special corner spatula.
4. Having developed the first spatula, we repeat the entire procedurewith a set of putty and applying it to the wall. But we do this on a new section of the wall, next to the already applied layer of putty. At the same time, we partially advance on it, as if continuing the previous layer. Remember the irregularities of the wall and apply putty accordingly.
5. Having processed the area of \u200b\u200bthe wall with an area of \u200b\u200babout half a meter, we take the rule and apply it at an angle to the wall. Then, with a slight effort, we run along, removing the excess putty.
6. We repeat the entire algorithm of putty until we develop the entire knead. Then we repeat it.
After the walls were swollen, we leave them to dry for two days. After drying, it will be possible to more carefully evaluate all the shortcomings and flaws at the first putty. Again we apply the rule to the wall and find irregularities, if any. Next, you can go in two ways.
The first Fill the recesses with a new layer of putty. Second Scheat the protrusions with a grater, and then, if necessary, apply the finish layer of putty. Consider the second option, since it will allow the most qualitatively to align the walls with the finish putty.

- We take a grater with pieces of sandpaper fixed to it.
- With neat circular motions, we clean the excess putty in those places where influxes or hillocks formed.
- At the end, we fix the sandpaper with zero grain and go again through the cleaned places.
- At the end, check the surface of the wall and, if necessary, apply the finish layer of putty. Before applying the finish layer, the wall must be moistened with water or a primer to soften the previous layer and increase adhesion. The finish layer should be applied with special care, so that there are as few flaws as possible.
Setting walls with putty: video tutorial
Work on the leveling of walls with putty is one of the simplest and lightest in construction. Of course, without experience it will be difficult to make perfectly even walls the first time, but a little practice will quickly give a positive result. If you do not be friends with the tool or do not want to get dirty, then you can find good masters for quite reasonable money. Moreover, the price is not high in the region of 125 130 rubles per m2 for aligning walls with putty. Which in comparison with, for example, plaster is quite cheap.
![]()
StrPort construction portal 2011-2018. Articles about repair, construction, building materials.
Copying information from the site is possible only with permission of the editorial office Or indicating a direct link to the source. Legal justification