Laminated coating is not demanding. In order to carry out high -quality ...
|
|
Available cost, excellent performance, variety of models and ... |
The use of a warm floor system for heating the premises has already stopped ... |
DIY drawings on wallpaper. Features of applying a pattern on liquid wallpaper

If you plan to create an original design of the room and arrange it in accordance with your taste preferences, but you are afraid that you cannot realize this idea due to a lack of free time, give preference to wallpaper painting, which will be the perfect option for decorating the room for connoisseurs of original interiors, whose whose The day is scheduled for a minute. It is enough to show a little fantasy and not be afraid of experiments and you don’t have to walk on specialized stores for long in search of exclusive wallpapers, as you can easily apply your favorite coating, even if you do not have the gift of a talented artist. Of course, for applying complex drawings you will need experience, in connection with which, it is only possible professionals, but there are a number of techniques by which you can apply drawings, even if you have the artist’s talent. What is the essence of these methods in this article.
Content
- We decorate the wallpaper with drawings: recommendations of specialists
- The main methods of applying the picture to the wallpaper: Brief description
- Drawings on wallpaper using stencils: how to make a stencil yourself?
- DIY Liquid drawing
- Advantages and disadvantages of patterns on liquid wallpaper
- How to create a pattern on liquid wallpaper
We decorate the wallpaper with drawings: recommendations of specialists
If you are decorating wallpaper with your own hands, try to choose wallpaper specially designed for staining, for example, vinyl or non -woven. This advice is especially relevant if you apply a drawing on the wallpaper in the children's room. However, remember that for a single application of the dye, the use of conventional materials (paper) is allowed, but in this case you may encounter certain difficulties;

Try to apply the drawings already on painted wallpaper, however, before proceeding to apply the image, wait for the complete drying of the subject layer;
The key to successful work will be the correct use of obviously prepared equipment and tools for applying the drawing to the wallpaper roller made of natural materials, a sponge, a spray gun and stencils. As a paint for applying a picture on wallpaper, experts recommend using water -based compounds on acrylic or latex basis, in the structure of which there are no heavy solvents;

Before starting work, it is necessary to prepare the working room to cover the floor with newspapers with polyethylene or cardboard. If you plan to apply a drawing to wallpaper designed for painting, cover the wall with a fresh layer of paint, and, having waited for its drying, proceed to applying the picture. If the wallpaper on which you will draw is not designed for painting, they must be primed;
If you first picked up paint and brushes and think about what to draw on the wallpaper, follow the advice of our specialists, who do not recommend newcomers to use more than four shades in the process. The ideal option for amateurs will be compositions consisting of three colors;
In the subject of the picture, try to reflect the nature of the room. For example, in order to maintain a childhood spirit in the child’s room, decorate the walls in the room with your favorite animated characters of the baby or animals. The cold restraint of the living room, decorated in modern urban styles, will emphasize the abstract composition of geometric themes. Calm and relaxation of the bedroom will complement delicate floral drawings.

The main methods of applying the picture to the wallpaper: Brief description
Before proceeding with decorating wallpaper, determine the main task that you set for you. If you do not go into details, there are two such tasks:
- The first simple decoration of the wallpaper, which is based on a chaotic application of divorces or contrasting spots on a pre -prepared base;
- The second application of a complex drawing, the basis of which is the drawings of the correct shape (geometric patterns, plants or animals), alternating in a given order.
To realize the first task, implying simple decoration of wallpaper, you can use a spray gun or, if there is a dexterity, a sponge and an ordinary painting brush;
To apply complex compositions, it is advisable to use the stamping method, implemented using a textured roller. The use of a rubber roller with a squeezed stamp is one of the simplest ways to apply wallpaper drawings. The technology for applying the drawing in this way is simple and resembles staining the wall, however, experts recommend preliminary training on ordinary paper or a piece of unnecessary wallpaper.

In addition, when applying a pattern by stamping, adhere to the following recommendations:
- So that in the process of rolling adjacent areas, significant displacements do not occur, apply a slightly noticeable markup on the trimmed plane;
- To minimize the formation of divorces on the finished plane, before making a finish, after applying the paint to the roller, first roll the instrument on the draft;
- When rolling the roller on the wallpaper, make sure that there is a small pressure.
Important! Another simple and no less interesting way to apply a picture to wallpaper is a method involving the use of stamps. As the latter, traffic jams, foam sponge, natural materials and even the hands of the artist can be used. In specialized stores, you can purchase ready -made stamping samples.

- If you correctly determined the size of the image and made several training drawings, you should not have problems in the process of work. The key to a hundred percent result is the distribution of paint with a uniform dense layer: the dry shape will not be able to leave a high -quality imprint, and excess paint will flow along the wall.
- You can apply a picture to the wall with the help of a home projector, while the composition can be of any complexity. To implement this, it is enough to print your favorite image on a sheet of paper, bring it to the projector and draw a reflection obtained on the wall. In the future, the image is decorated with a brush, airbrush or roller.
- If you do not have the skills of an artist, this is not a reason to refuse to apply drawings to wallpaper. A faithful assistant in this matter can be stencils that can not only be purchased in finished form in specialized stores, but also do it yourself.
Drawings on wallpaper using stencils: how to make a stencil yourself?
What does that require?
- Pre -found on the network or an ornament or drawing you independently developed;
- Cardboard sheet;
- Scissors;
- Stationery knife;
- Scotch.
Important!If necessary, in a pre -selected drawing using photoshop, add jumpers, so that the structure will become one. After the implementation of this stage by fragments, print the selected image, combine the parts and stick the resulting pattern on a dense cardboard.

- The next stage is cut. Carefully cut out the voids that will subsequently be painted. To produce this manipulation as neatly as possible, use a stationery knife or scissors;
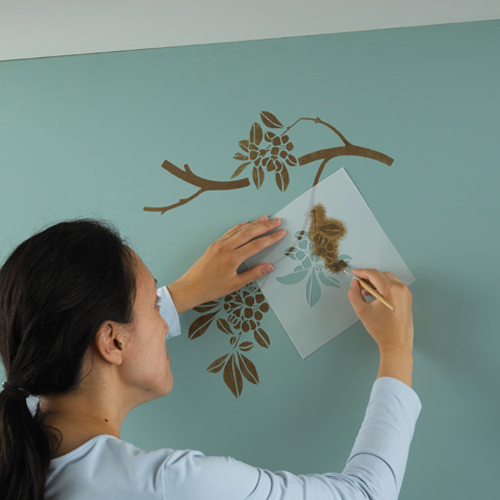
- After the stencil is ready, place it on the wallpaper and fix it with tape so that later you can easily remove it;
- By fixing the stencil on the wall, you can start filling it with paint. To do this, experts recommend using a special sponge to avoid falling into cardboard;
- Wait for a slight drying of the paint and only after that remove the stencil, painting the sections of the jumpers with a small brush.

What do we usually draw on paper wallpaper with our own hands?
Consider the most popular ideas of stencil creativity.
- Despite their simplicity and uncomplicated forms, images of stars, butterflies and flowers remain the most popular ideas, which successfully fit into some parts of the room. Despite its simplicity, and, at first glance, the same type of forms, fitting into various interiors, these drawings become the highlight of each individual room and look differently.
- It is also necessary to separately consider the tree as an element of wall painting. The spectacular addition of any interior will be images of the flowering Japanese sakura, fabulous or traditional fruit trees, as well as spectacular tree tree trees will advantageously complement and revive any interior. If you are engaged in the design of the nursery, experts recommend that you give preference to drawings of the stellar sky on the ceiling applied using luminous colors and fabulous houses decorating the walls.

Important!So that during the operation of the room the drawing does not swim, it must be covered with varnish. The application of varnish should be portioned, and smears of the brush are short and restrained. After applying the varnish to half the picture, you need to wait for a partial drying of the picture and only then proceed to apply the rest of the varnish, since otherwise it will flow down under the influence of gravity. Only after the final drying of the varnish can the work can be considered complete.
DIY Liquid drawing
The demand for liquid wallpaper is not in doubt, and one of the reasons for their popularity is the possibility of creating unique artistic compositions on their surface. The operational characteristics of liquid wallpaper combine the positive qualities of plaster, varnishes and ordinary wallpapers.
Given the aesthetic characteristics of liquid wallpaper, it can be argued that this material belongs to the same category as decorative plaster. The basis of liquid wallpaper is the symbiosis of cellulose and silk fiber, generously complemented by a mixture of granules, dyes and other decorative components.
A distinctive feature of liquid wallpaper is the possibility of applying them not only on horizontal and vertical planes, but also on the surface with complex configuration due to high adhesion of the material to brick, cement, wooden, metal and clay surfaces. Liquid wallpaper can be easily combined with other materials, as well as create applications of various levels of complexity on their surface.
Despite the fact that in the designer’s arsenal there is a huge selection of means for creating an abstract ornament, drawing or pattern, including the use of photowers or mosaic plaster, recently they are increasingly preferred with liquid wallpaper, drawings on which have both advantages and ones limitations. Consider them in more detail.

Advantages and disadvantages of patterns on liquid wallpaper
- Unlike photo wallpaper, burning out with prolonged contact with ultraviolet radiation, the drawings on liquid wallpaper are resistant to sunlight, which will be especially important when decorating rooms, the windows of which are oriented to the southern side;
- Liquid wallpaper quickly dry out regardless of humidity and the presence of drafts in the room;
- The pattern on liquid wallpaper does not lose its brightness during operation, even covered with a layer of dust. Given this, it is important to note that liquid wallpaper cannot be washed, but they can be vacuumed by this type of cleaning does not have a negative effect on the condition and brightness of the picture;
- Cold air and drafts do not have a negative effect on the surface of liquid wallpaper, they dry equally quickly under any temperature conditions;
- Pleasant tactile sensations in contact with liquid wallpaper, another advantage of this material is warm and soft, not leaving, in contrast to mosaic plaster, scratching sensations;
- In case of damage, liquid wallpaper is easy to restore. By retouching liquid wallpaper, you cannot determine the former place of damage by eye, since the flaw will be completely invisible. This advantage will be able to appreciate the owners of apartments where there are children and pets. Given this, liquid wallpaper is a common material for wall decoration in children's rooms.

How to create a pattern on liquid wallpaper
Working with liquid wallpaper, as we apply the drawing correctly, the order of work, presented below, will help to understand this issue.
Preparation for work: Specialists' Councils
- First of all, the working surface must be treated with antiseptic mixtures and a waterproofing agent, which will prevent the mass spread of the splash fungus dispute;
- To increase the adhesive characteristics of the surface, putty and primer of the walls are performed;
- Having completed preparatory measures, it is important to make sure that the working surface is perfectly smooth, white and characterized by the absence of even minimal flaws, since otherwise the image on liquid wallpaper will not work. This is due to the fact that by applying decorative material to the surface uneven in height, you will apply the layers of decorative coating uneven in thickness and thereby violate the appearance of the surface. The white color of the working surface is needed so that the planned shade of liquid wallpaper and the pattern is uniform;
- The final stage of preparatory measures is the preparation of a mixture for liquid wallpaper. At the same time, experts recommend being guided by the instructions presented on the packaging of the material. At the same time, it is important to determine in advance to the color scheme used in order to mix the right amount of liquid wallpaper of the required shade. Consider what materials and tools will be needed for applying liquid wallpaper.

Materials and tools necessary for work
- The plastic cell is one of the main tools for applying liquid wallpaper, contributing to the correct restriction of the contours of the picture;
- A small spatula The necessary tool for the distribution of the mixture in small areas;
- Hopper tool with which you can spray wallpaper on the entire wall;
- Stencils working elements that form the basis of the future drawing;
- Your hands, to a certain extent, are also a working tool, since, in view of the environmental safety of liquid wallpaper, it is recommended to apply them in certain cases not with a spatula, but with your hands.

The process of creating a pattern on liquid wallpaper
If a stencil is used to apply the image:
- Fix stencils on the wall using tape and distribute liquid wallpaper in the resulting slots. After applying the entire working mass, reject the stencil from the wall and, if you fill out the ornament from the liquid wallpaper of the surface with a large area, the procedure described above must be repeated until the whole form is completely formed.
Important! Stencils made of cardboard are quickly soaked, and they have to be cut several times, therefore, having weighed all the pros and cons, think about the purchase of ready -made reusable stencils or paste home -made stencils with tape to increase their wear resistance. Ready reusable stencils are made on the basis of a polymer film, so that they become resistant to water. Excess liquid wallpaper that fell on a stencil are easily removed with a spatula.

If the image is applied according to the sketch:
- Apply a sketch of the future image on the wall with a simple pencil, clearly drawing the contours and small details, as well as noting the color of each part of the picture;
- Next, it is necessary to apply a decorative coating to the drawing, first of all, filling out parts of the picture, not related to each other. Within their circuits, the working composition is applied and distributed using the cell. If the mixture protrudes outside the boundaries of the drawing, it is also collected with the help of a cell, placing the tool at an angle to the wall. As a result of this stage, all selected areas should be evenly filled with a working mass of liquid wallpaper;
- Similarly, it is necessary to apply liquid wallpapers to other areas of drawing that are not related to each other;
- Wait for the work of the working composition, accelerating this process using a hairdryer;
- After you see the drying of the working mass that fills the areas remote from each other, proceed to fill with liquid wallpaper of adjacent elements;
- Details that are not different in large sizes are filled with liquid wallpaper with a spatula. They are filled last, and after drying, the masses are wiped with a cell, which is most convenient to produce when the rest of the details are already dry.

Liquid wallpaper drawing on the ceiling
The drawing with liquid wallpaper on the ceiling is applied using the same technology as on the walls.
Important! When applying a decorative coating to the ceiling, carry out all the work in protective construction glasses, since otherwise grains of the construction mixture can fall into the eyes, which is fraught with damage to the cornea.

The ceiling algorithm with liquid wallpaper:
- Clean the ceiling from old finishing materials: dilapidated plaster, whitewashing or paint;
- Monitor the working surface and, if necessary, eliminate large cracks and irregularities with the help of putty or a small amount of liquid wallpaper;
- Perform the primer primer with a special working mixture of deep penetration. Note that the primer Ceresit CT17 is not suitable for these purposes, since after some time if it is used, liquid wallpaper will be covered with ugly yellow spots;
- If fragments of reinforcement or communications that need to be hidden are present on the ceiling, use PF enamel, oil or latex paint;
- If the ceiling is already covered with a layer of oil or latex paint, it is not necessary to clean it, just primed the surface.
- The ceiling design with liquid wallpaper is carried out similarly to applying the material to the wall.
We draw on the wallpaper video
![]()
StrPort construction portal 2011-2018. Articles about repair, construction, building materials.
Copying information from the site is possible only with permission of the editorial office Or indicating a direct link to the source. Legal justification
It is better to use murals
It is better to use the photo wallpaper 3D https://uwalls.ru/fotooboi-3d/, they are more stylish than liquid