The roof without damage is considered the key to protect your house from bad weather. But how would you ...
|
|
Often, the owners of the residential building only after the end of its construction want to ... |
Modern architecture and design capabilities allow you to equip at home and ... |
DIY toilet repair
No matter how paradoxical it sounds, the repair in the smallest room of the apartment of the bathroom can cost more than the decoration of a huge room. To a large extent, this is due to a fairly high price for high-quality plumbing. Yes, and the work of masters-treads will cost a lot. Significantly reduce expenses can be repaired the toilet with your own hands. Of course, in this case, the long -term process will be delayed even more, but the final amount in the estimate will greatly decrease.
Content:
Preparatory work
Where to begin? First of all, it is necessary to remove old plumbing and finishing materials. To do this, we need some tool:
- Several screwdrivers of different sizes and sections;
- Screwdriver;
- Gas key No. 3 or No. 2;
- Punch;
You can start work. First, we dismantle and take out the old plumbing washbasin, bath, toilet. If a washing machine is installed in the bathroom, we start with it.
Important! When planning to live in an apartment during the repair, take into account the fact that you can do without a bath and washbasin somehow, but without a toilet in any way. Try to dismantle it last. After replacing the pipes, it can be put back, but not attached.
Dismantling of the washbasin
Whatever design you have a washbasin, the principle of it is dismantled the same: the same:

- Crush cold and hot water;
- Open the valves of the mixer and let the water drain;
- With the help of a divorce or gas key, disconnect flexible hoses;
Important! Disconnecting flexible hoses, remember that water can remain in them. Take care of where it will drain.
- Unscrew the fasteners of the mixer and remove it;
- Under the siphon, substitute a water collection container and unscrew the siphon glass. Drain the water and install the glass in place;
- To disconnect from the sewage system, unscrew the nut under the bottom of the sink, while holding a glass of siphon;
- Unscrew the nut at the top of the siphon and disconnect the drain pipe;
- Remove the wedge -shaped washer and nuts on both sides of the pipe and remove it;
- If the connection of the siphon with the sewer is cemented, arrange yourself with a chisel and a hammer. Passing the chisel at right angles to the pipe, whip and remove the solution;
- Remove the siphon from the sewage hole and close it with a special lid. If there is no lid or a non -standard hole is plugged with a rag so as not to block the flow of water.
Now we remove the sink. We simply take out Moydodyr out of the room, and unscrew the sink on the bolts, holding so as not to fall.
Dismantling of the bath
Given the size of this subject of plumbing, you will have to tinker a little longer than with a washbasin:

- Turn off and drain the water;
- We unscrew the nut of the siphon and remove the drain lattice;
Important! If the bathtub is very old and the nut boils to break the drain grill. The easiest way to do this is from the inside of the bath with a hammer and a small chisel. We beat off the funnel segment and bend the remaining part so that it passes through the bathtub drain.
- Disconnect the overflow;
- We take out the diverted pipe from the sewage pipe;
- Now it remains to disconnect the grounding strip and you can make a bath.
The dismantling of the toilet
If you do not plan to use this subject of plumbing during the repair, you can remove it completely. If there is a need for it, postpone the dismantling until the pipe replacement.

So, let's get down. As in previous cases, we block the water and drain the remains from the tank:
- Unscrew the supply hose on the water supply;
- Remove the tank from the toilet, having previously unscrewed the nut under the shelf. If you had a suspended tank, just disconnect the pipe from the toilet and remove the tank from the mounts;
- Remove the toilet fasteners: unscrew the dowels or lead nuts from the studs;
- We take out a rubber bell from the sewer pipe, having previously set up a container for drains under the connector. If the toilet is installed on a cement mortar, we take the hammer and chisel again;
- Close the sewer hole with a lid or rag;
We drain the water from the toilet and is ready.
Cleaning walls and floor
Of course, before making repairs in the toilet, you must decide on the type of coating for walls and floor. The combined bathroom is recommended to be finished with ceramic tiles, and a separate toilet can be glued with washing wallpaper or sheathed with plastic. The lining looks great in this room.
Before laying ceramic tiles, the walls and floor must be cleaned of old finishing materials. It all depends on what they were covered.
If it is a ceramic tile, knock it down. This is the easiest way to do this as shown in the video.
If the walls were pasted over with wallpaper, remove them and check the strength of the walls. In places where the plaster has slightly departed, you need to recapture it completely. If the layer of plaster is strong enough and even, it can be left.
Important! Quite often in old houses, plaster on the walls is overlap. In this case, it is better to remove it. Otherwise, aligning the walls, you will significantly reduce the already small area of \u200b\u200bthe toilet.
The whitewash needs to be washed off. If the layer is thick, use the spatula. Wet the surface with warm water with a rag or from a spray, and then remove the entire layer of whitewashing.
The wall painted with oil paint must be cleaned especially carefully. The remains of paint can significantly reduce adhesion. This can be done using a special tool or manually. These videos will help you master both methods.
DIY toilet repair video of the wall preparation process.
We clean the walls of the paint manually.
In recent years, chemicals that corrode paint have appeared on sale. Although the reviews about them are contradictory - from enthusiastic ones, to sharply negative ones, you can try.
Installation work and finishing
Waterproofing
If the toilet is combined with the bathroom, good waterproofing is necessary. And in a separate toilet, where, as a rule, the central risers of the water supply and sewage, it will not hurt.

There are several types of waterproofing materials. The most popular of them are coating and gluttoen. The former are produced in the form of mastic and applied to the surface with a brush or roller, and the latter are a self -adhesive film. Using the latter requires thoroughly preparing walls. So, the surface difference should not be more than 2 mm. Crystal waterproofing can be applied to unprepared walls. The main thing is that they are clean.
In a combined bathroom, it is recommended to isolate the entire surface of the walls and floor. Sometimes, in order to save, only areas around the bath, shower and washbasin are protected. This approach makes sense only in fairly large rooms. In small bathrooms, saving the material is so insignificant that you should not fence the garden - it is easier to isolate the entire surface.
In a separate room of the toilet, only waterproofing of the floor can be dispensed with:
- Squire the surface;
- Grind it;
- If there is a crack between the wall and the floor, it must be covered with a cement mortar or tile glue;
- The corners and joints between the plates (if any) are glued with a specially sealing tape;

The waterproofing material, regardless of the type, must be applied not only to the floor, but also to the lower part of the wall about 20 cm.
Replacing pipes
Most often, in the process of repairing the toilet, the replacement of water and sewer pipes is also carried out. In most apartments, central risers pass through this room. If the pipes in your house are old, try to agree with your neighbors from above and below and replace them. If you can’t replace the entire riser, change the segment of the pipe passing through your apartment. In this case, the junction of the connection must be in the apartment where the old pipes remained.
Of course, the internal wiring of the water supply and sewage should also be replaced. Pipe pipe pipes that have appeared in the construction market can be hidden in the walls.

To do this, it is enough to make a strobe in the wall, lay the pipes and close the stroke with a solution. It should be noted that if the riser passes through the toilet, it does not work to hide the rest of the pipes into the walls in the walls anyway. It is much easier to close all the pipes with a box.
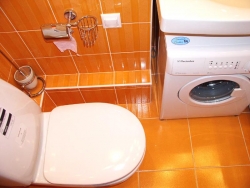
We hide the pipes
Agree, even modern pipes crossing the room from floor to ceiling will not add aesthetics to it. So, they must be hidden. This can be done using a gypsum plastic box or plastic with a window for access to pipes.
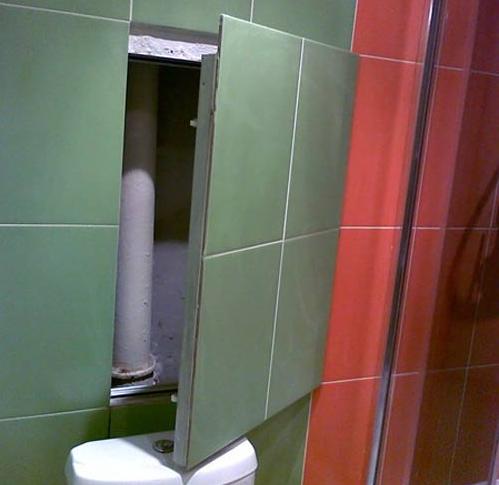
To ensure free access to pipes as a screen, rails are sometimes used. This method will not only hide the pipes, but also arrange several shelves for household trifles.

By introducing into any search engine request bathroom toilet repair photo you will easily find dozens of options for such designs.
Alignment of the walls
In order to make the perfect repair of the toilet with their own hands (a photo of the ideal, everyone can choose for themselves on the Internet or numerous thematic magazines) must carefully align all surfaces. Let's start with the walls. First of all, using a level, plumb line and corner, we measure the curvature of the walls. If it is insignificant, and as a finishing material you chose the tile, it is enough to arm yourself with a spatula and tile glue. In this case, the alignment process is very similar to the putty process.
If the walls are very crooked, you will have to plaster. It should be said that the process of this laboriousness and for a beginner can be quite complicated. The following video will help to understand all the subtleties of this process.
Thus we align all the walls.
Setting the floor
A layer of waterproofing on the floor must be covered with a concrete screed. At the same time, it is better to add polypropylene fiber to the solution. This will help to avoid shrinkage cracks. In addition, the floors in our apartments are rarely even. So with the help of a screed, we solve two problems immediately hide the waterproofing and align the floor.
Important! If you decide to arrange a warm floor in your toilet, lay it before filling the screed.
It is easiest to fill the screed on the beacons. In a small room, it is enough to install only two guide strips along the walls. The distance between the beacons should be 1-1.3m. Special plastering beacons are sold in stores, but if you want to save, you can use a wooden beam or a metal profile for drywall for these purposes. The cost of repairing the toilet can be slightly reduced not only by performing all the work with your own hand, but also by trying to send as few residues of building materials to the landfill. Here, the main thing is not to overdo it sometimes excessive savings leads to very deplorable results.
So, let's start:
- We set the guides in level and fasten them to small slides of the solution;
- Be sure to check the location of the lighthouses relative to each other in a long level;
- When the solution has dried, we proceed to the fill. We start from the far corner of the room and move towards the door;
- Pour several buckets of the solution at the far wall and stretch it with the rule as shown in the video to align the walls;
- If you get deep pits, add the solution to them and again pass by the rule;

After the entire surface of the floor is covered with screed, let it dry. Usually this process takes several days. Do not try to speed up it due to the high temperature in the room, this will lead to a significant decrease in the working qualities of concrete. On especially hot days, it is necessary to cover the concrete with plastic film and moisturize once a day.
Important! The period of complete drying of the concrete screed is about a month. That is how much you need to wait if you put an electric warm floor under the screed.
Laying tiles
When all communications are replaced, the box is installed, and the floor and walls are leveled, you can start laying the tiles. Fortunately, the variety of colors, sizes and textures of this material will satisfy even the most demanding consumer, and the idea of \u200b\u200brepairing the toilet can be spied on everything in the same magazines.
First of all, lay the tile on the walls.
Experts recommend laying a cut row closer to the floor, so it is less noticeable. We will start laying from the first whole row, which means that it is necessary to determine how height it will be:
- Measure the height of the wall and divide it into the height of the tile. Thus, you will receive the number of whole rows. Then calculate the height of the trimmed tiles.
Important! When calculating the height of the cut tiles, be sure to consider the gap between the rows. Usually it is 2-3mm.
- Measure from the floor a distance equal to the height of the cut row and attach an even wooden bar or a metal profile in level;
- In the corners of the wall, using a plumb line, we fasten vertical strips, they will serve as a vertical level;
- Prepare the solution. To do this, pour water into the prepared container and pour the adhesive composition in small portions. Stir with a construction mixer (special nozzle for a drill).
The necessary proportion, as a rule, is indicated on the package. But the final decision must be made based on the consistency of the solution: it must stay on the wall and not drain, and at the same time be quite elastic and smear.
The technology of laying tiles on the walls and floor is perfectly shown in the next video. In addition, from it you will learn how to correctly cut the tiles and grind the seams. In the video, experienced craftsmen do not use vertical levels, but for those who have taken up the laying of tiles for the first time it is better to play it safe.
REPAIR TOIAL REPAIR VIDEO TITSELOD Instructions
Ceiling
The ceiling in the bathroom can be almost any plastic, stretch or drywall. The latter is less preferable, but if you really want to, make it from moisture -resistant GCL. In this case, it must be borne in mind that such sheets of drywall are heavier than ceiling, which means that the supporting structure should be enhanced for them.
Installation of plumbing
You can start installing plumbing already a day after grinding seams on the tile. A variety of models of toilets, washbasins and showers does not allow you to give general recommendations for their installation. As a rule, there is an instruction in the delivery kit that will help you cope with the last stage of repair.
That's all. Now you know exactly how to make a toilet repair yourself: where to start, what to pay special attention to, how to save as much as possible. As you can see, the repair process in this small room takes a lot of time and effort. It is only pleasing that it is done quite rarely. Of course, if all the work is done correctly, and the materials are selected with taste.
After a new beautiful apartment has been bought, you will need repairs. Repair in a new building is inexpensive, quickly and efficiently. Great masters will always help you.
![]()
StrPort construction portal 2011-2018. Articles about repair, construction, building materials.
Copying information from the site is possible only with permission of the editorial office Or indicating a direct link to the source. Legal justification