An integral stage of any construction and finishing work is a check and ...
|
|
One of the main places of heat loss in the house is the roof. This conclusion can be drawn ... |
An additional way of increasing living space is the arrangement of the attic ... |
How to properly set the lighthouses for plaster walls. Lighthouses for wall plaster
To date, it becomes fashionable to make repairs in the house on its own. There are many programs in the body, video of lessons and literature. So we thoroughly consider one of the stages of repair work. The repair process always begins with the walls and then the task arises before us: how to achieve an ideal surface? The best way will help us with this - aligning by lighthouses. This work can be done without special knowledge. Previously, training is underway for finishing work.
Table of contents:
- Installation of lighthouses for plaster walls with your own hands
- Preparing the surface of the walls for plaster with your own hands
- DIY wall plaster on lighthouses
- DIY plaster grout
- Plaster requirements
Installation of lighthouses for plaster walls with your own hands
How to put the lighthouses for plaster walls? This work requires responsibility. It depends on it how the ideal surface will be. As beacons, use a special profile that has holes. Their length according to the standard is 301 cm, depth is 3.7 and 11 mm. Its screws are screwed to the wall up to the hat - this provides the right angle. The plumb line is attached to the screw, which is located at the top, the rest are adjusted so that the hat is at the level of the thread. All screws need to be leveled to one level. Between the walls and planes of the screws, a right angle is removed to the level of hats. Lighthouses from gypsum are also used. They allow you to do all the work faster and reduce the amount of plaster (you do not have to pull them out and close up the mount).
How to make gypsum beacons:
- dowel - screws are entrusted to the place of plaster;
- Shurups should be set to the desired height using the level;
- A galvanized profile or a straight bar made of wood is superimposed on screws;
- The gypsum mixture is applied under the profile, holding it with a hand;
- Excess gypsum removes and remove the profile.
The finished strip will serve as a beacon. They must be done throughout the wall.
In addition to those lighthouses that are already described, there are still plastic ones. The material from which they are made by high strength plastic and are attached in such a way as metal. But they are less popular because fragile and can crack.
So, let's mark the beacons. For example, the length of the wall is 4.6 and the height of the ceiling 2.76 m, and in it the door 91 by 206.
To begin with, lighthouses are placed on the edges on both sides. From indentation of 31 cm, a vertical line is drawn.
The distance from the lighthouse to the lighthouse is from 131 - 161 cm if the work is carried out by a two -meter rule. First, the right line is drawn, retreat 1.7 m and then the left. 2.4 m remains until the next line, this distance is divided into half and then after 116 cm is another line. Next, we start again with the lines at the edges.
The indentation from the floor should be 16 cm according to the layout of the lines (the ceiling of 276 cm - 244 cm beaches, is divided into 2 \u003d 16) and drill a hole at the marked points. Flotting dowels with self -configurations in them. Between the two corners, the cord is pulled horizontally. Up 246 cm is done and the same is done. If everything is correct, then 2 parallel lines should be released. In places of intersection of lines, marks are placed and holes are drilled in them for screwing dowels without self -supporting. As a result, 2 rows with holes should be obtained. Self -tapping screws can be removed in the corners, and dowels will still be needed.
Preparing the surface of the walls for plaster with your own hands
In order to finish walls according to the old plaster, to identify detachment and defective places, do a tapping with a hammer of the entire surface. In places of recesses or humps, the old coating should be removed. But the result will be better when completely removing the old plaster to the very base. Deep cavities with a solution are leveled to the level of the surface, and the protrusions are stuck. Inspection of the surface by eye can be erroneous, so it is better to make it a level or thread. For the second method, do the following:
- On the one hand and the other at the top, screw the screws at the edges and lower the veil from the bottom to the floor;
- Between the plumb lines the thread stretches;
- The thread is horizontally stretched, it is carried out from top to bottom and uneven areas of more than 1 cm are immediately noted.
Next, the surface of the walls is cleaned with a broom or vacuum cleaner and treating with a primer mixture.
The primer will not miss excess moisture and will not allow the appearance of the fungus. Sometimes a special mesh is used for plaster. This application is necessary when the middle layer of plaster is more than 10 cm over the entire surface of the wall. The construction grid is fixed with dowels or solution (if a grid made of polyethylene or fiberglass).

DIY wall plaster on lighthouses
The leveling of the walls with plaster is a very long -standing method of decoration, which is widely used in our time. The layer of applied plaster can be preparatory for further finishing or used as the main wall coating. The proportions of the components of the solution depend on their quality, the characteristics of the building. It is much easier to use ready -made mixtures, but since there are a lot of plasters, it will not pull a small amount. For reliable fixing the solution before plaster in a brick, stone or concrete wall, you need to beat up 10 cm with an ax. The number of notches - up to a thousand per 1 sq.m. The wooden wall is upholstered with a net in the shape of a grid or a metal mesh is attached.
Then the application of the plaster mass begins, which must be thrown between the lighthouses. The size of the area of \u200b\u200bone stage of the blocking depends on how quickly the solution dries. Red brick has the ability to absorb moisture faster, so the screens are made by smaller areas, and the brick from silicate is less absorbing and makes it possible to throw a larger territory. Keep in mind that the viscosity of the solution affects the quality of work. If the mixture is too wet - it will float, dry is heavily smoothed out.
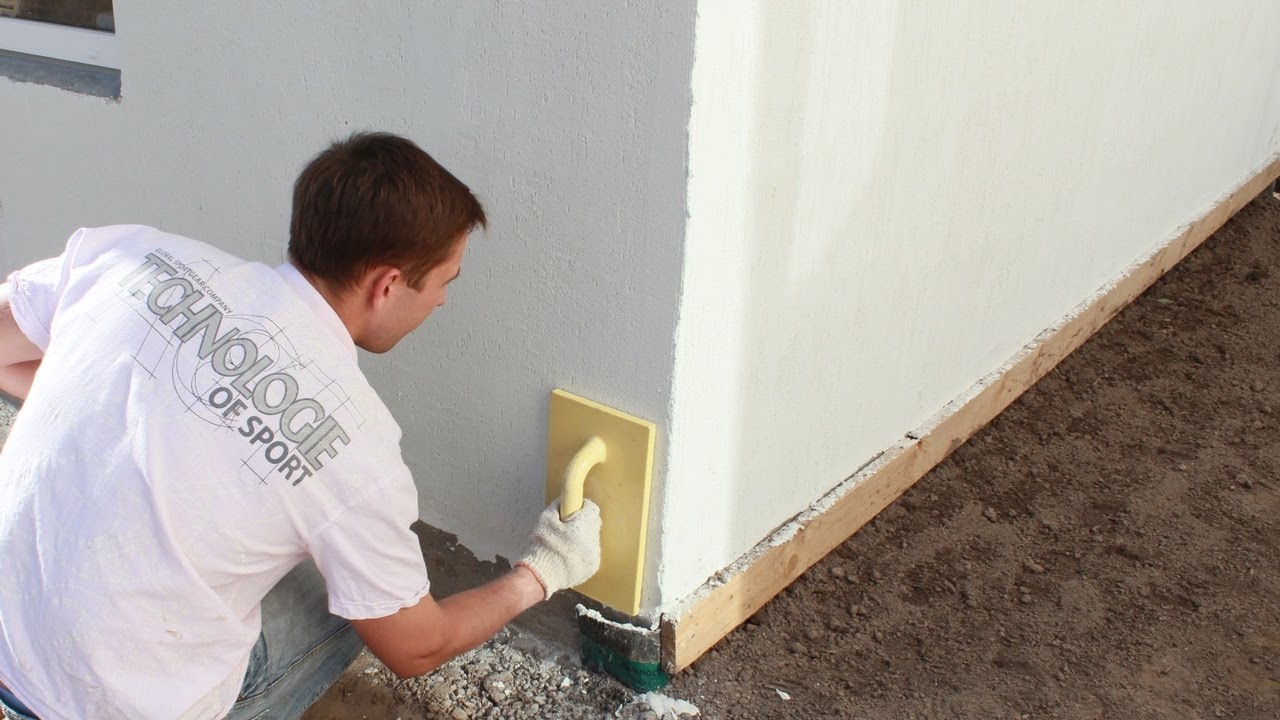
The next work will be smoothing the solution by the rule. This pressing device is based on lighthouses in the neighborhood and move up and down, while you can’t press too much - the plaster will be a curve. Uninterrupted places are laid with an excess solution. Also, you can not crush when grouting the edges - you can remove the necessary millimeters of flat plaster. And only after applying and grouting the entire surface can the beacons be removed. The remaining empty place is wiped with a spatula to the level of the plane.
DIY plaster grout
The final stage in the process of wall plaster is a grout. To do this work will help the described below:
1. The wiping procedure is done before the solution dries. To do this, the area of \u200b\u200bthe wall should be impregnated with moisture.
2. The prepared mixture is applied to the Malka, smeared as thin as possible and aligned under the chicken 45 degrees.
3. Swimming stops when the solution is no longer going on a little one.
4. The actions are repeated and the new square must be smoothed out the overlap of the previous one.
Plaster requirements
A number of requirements that are put up for finishing work are divided into three parts: the finish is simple, improved and high quality. A simple finish has tolerances in a vertical deviation of not more than 3.9 mm per 1 m and up to 16 mm over the entire height of the room. If the ceilings are 2.6 - 6.9 up to 3 pieces of irregularities for every 4 sq.m. Depth, like height - up to 5 mm. Also horizontal deviations are 3 mm per 1 m.
For quality plaster, more stringent requirements are better. Vertical - up to 1.9 mm per 1 m and up to 10 mm in height. If there are irregularities - up to 1 pc. 2 square meters. m. and depth of less than 3 mm. Also horizontally - up to 1.9 mm per meter.
For high -quality decoration, the requirements are reinforced. Vertical - less than 1 mm per 1 m, and up to 5 mm throughout the room. The permissible number of bumps is 2 to 4 square meters. m., depth of less than 2 mm.
Horizontal per 1 m - up to 1 mm.
Plaster application technique:
1. The lower layer is thrown by Kelma.
2. Next, this layer is covered with a primer with a spatula.
3. The finish coating is applied to a wet primer. If the layer is dry, it should be moistened with a brush.
4. After drying, everything is wiped in a circle with a grater made of plastic.
5. Having finished grouting the walls, the finishing stage can be considered completed.
Consider different solutions for plaster.
Clay solution is aligned with stone surfaces, as well as self -fed, brick and wood. The walls should be dry. Clay must be soaked before use. Dry, before adding water, is cleaned. After bringing to a homogeneous mass, mixing for a day give her to brew. Next, the resulting mass should be kneaded, adding water, if not enough, bring to the consistency of sour cream and pass through a sieve so that there are no solid particles. Sand is added according to the fat content of clay. The mixture is stored for a long time. If it dries, it is diluted with water and again becomes suitable. You can still add lime, gypsum or cement to clay plaster, which enhances strength. Gypsum allows you to quickly grasp, and lime has plasticity. For external work, both cement and lime are added.

Gypsovo - lime solution is covered with wood, stone or fibrolytic wall, where humidity is normal. Since the prepared solution must be developed for 11-16 minutes due to rapid solidification due to the properties of gypsum, it is better to harvest small portions. In addition, the mixture cannot be diluted with water when solidified - it reduces strength. For harvesting the mixture, gypsum is poured into a bucket with water and mixed to a sour cream state.
You can add a solution of lime, it will add elasticity. Laundice solution is plastered with dry rooms. But, having selected this mixture for decoration, it should be borne in mind that when aligning wooden surfaces, it is absorbed for a long time and this will take much more time. The most suitable wall for him is brick. She quickly absorbs moisture. In order to determine whether the plaster has dried up - pay attention to the color. When applying, it was gray, and when drying it should acquire white. The strength of this finish, of course, is lower than that of the rest. Apply lime plaster should be in large portions, since it has poor grasping. With prolonged storage - the plasticity decreases for more than 3 days and then the astringent additives must be added.
The manufacturing procedure for this solution:
- Strain the lime fluid and pour into the container;
- The necessary proportions add a little sand and interfere with a mixer. The sand must also be sifted preliminarily;
- See you the finished mixture.
Cement -cement solution - universal in its characteristics. They are finished with facades, basement and internal work. Humidity is no more than normal prevents the properties of the mixture, so the bathroom can also be finished with the kitchen. It is easily fixed on the wall and has good plasticity, but grasps up to 2 hours.
Table of cement-license and cement proportions
| Type of cement powder type of solution (sand proportions: lime: cement) |
| 150 | 100 | 75 | 50 | 25 | 10 | |
| M4 |
3:0,3:1
3:0:1 |
4,6:0,4:1
4,6:0:1 |
5,6:0,5:1
5,6:0:1 |
8,:1:1
- |
-
- |
-
- |
| M3 |
,2,6:0,2:1
2,6:0:1 |
3,6;0,3:1
3:0:1 |
4:0,4:1
4:0:1 |
6:0,7:1
6:0:1 |
10:1:1
9:1:1 |
-
- |
| M2 |
-
- |
-
- |
2,6:0,2:1
2,6:0,3:1 |
4:0,4:1
4:0:1 |
7:0,9:1
- |
7:0,9:1
9:1:1 |
Cement finishing plaster is well grasped on surfaces that have an increased norm of humidity, basement and facades. If you add special substances, water resistance and strength increase. Plastic at such a mixture at a low level.
Table of cement-sand mixtures
| Type of cement powder type of solution (sand: cement) |
| 100 | 75 | 50 | 25 | |
| M6 | 4,6:1 | 6:1 | - | - |
| M5 | 4:1 | 5:1 | - | - |
| M4 | 3:1 | 4:1 | 6:1 | - |
| M3 | 2,6:1 | 3:1 | 4,6:1 | - |
Production order:
- The layout of sand and cement is carried out in dry form;
- Sift through a sieve;
- diluted with water;
- For the effect of plasticity, you can add a detergent in an amount of 35 - 45 ml per 5 l of water.
In the decoration of the walls, in fact, there is nothing supernatural. With each movement of the hand, the necessary skill is also acquired and the work goes faster, the main thing is to learn more information about the conduct of such works, and sometimes spy with experienced craftsmen, and then be sure that you will succeed.
![]()
StrPort construction portal 2011-2018. Articles about repair, construction, building materials.
Copying information from the site is possible only with permission of the editorial office Or indicating a direct link to the source. Legal justification
And my wife and I bought a house,
And my wife and I bought a house, applied for machine plaster in http://26-shtukatur.ru/.
I always knew that it was faster and cheaper, but I did not think that so. In general, the brigade coped in 3 days, we ordered plaster on the lighthouses, for the subsequent pasting of wallpaper. All the slopes, walls and in some places the ceiling were plastered. It was nice that they even removed it.