In most frequent houses, an attic or another room under the roof is supposed to be ...
|
|
The frame design has a negative property to remove heat accumulated inside ... |
In order to maintain heat in the house and protect the room from ... |
How to raise the roof of the house. DIY attitude above the roof
An additional way to increase living space is the arrangement of the attic. However, this process does not always occur quickly. With a low location of the roof, there is a need to adjust it. Learn about the technology of raising the roof of the house and get valuable advice from specialists.
Table of contents:
- Technology and methods of lifting the roof with our own hands: make an attic under the roof
- How to raise the roof of the house - general recommendations
- Do -it -yourself attic on the roof of the house
- Methods of insulation of attic on the roof
Technology and methods of lifting the roof with our own hands: make an attic under the roof
Before the trial of the roof, evaluate its general condition and draw up a preliminary plan of action. First of all, any roof, needs additional strengthening. For these purposes, we recommend using a metal channel.
Use reinforcing rods for the manufacture of screw stretch marks. The guide rails additionally increase the strength of the structure, and prevent the shift of the roof during lifting.

To fix the channel on the beam, stock up on screws, the length of which is 100 mm and the diameter is 10 mm. The central channel is fixed on the beam, and the ears of metal are welded on them. With the help of the channel, the roof is strengthened and firmly retained when lifting.
The next stage is the installation of lifting legs. With their help, a slight rise is ensured and the shift of the roof is prevented. The total mass of supporting legs sometimes exceeds one and a half tons. For a standard roof, at least four legs will be required, the weight of each of which is more than three hundred kilograms. To connect the legs, a horizontal channel is used to each other, the interval between the channel is 25 cm.
Subject to the installation technology of these strengthening structures, the roof is acquired by the necessary power, which will provide it with integrity during the rise. However, before the installation of the channel, the total mass of the roof and wind load on its surface is calculated in a particular climatic region. Channel legs are installed exclusively on the load -bearing walls, in order to avoid the destruction of the structures of the house, under the weight of these elements.

In the process of lifting the roof with your own hands, you need tools in the form:
- a jack with additional hydraulics;
- metal reinforcement;
- reinforced concrete pillars;
- several steel stripes;
- nail and hammer;
- CHELLERS;
- pipes of certain parameters.
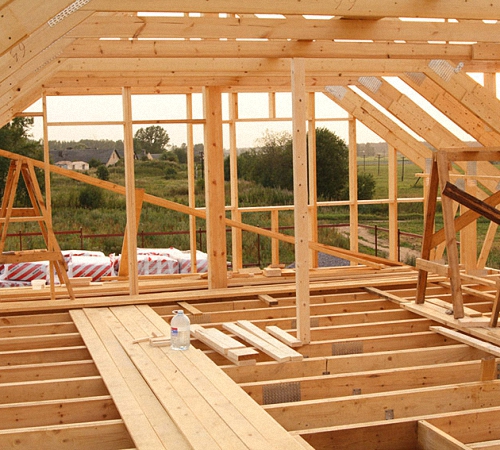
After the preparatory work is completed, proceed to raising the roof. For these purposes, stock up on the hydraulic version of the jack, which withstands the weight of more than ten tons. The option of using two jacks is possible, providing better design resistance and maximum common weight distribution. By raising the roof, use special substrates that improve the safety of work. For their manufacture, use a channel or a steel pipe with a square section. The interval between the crossbars is about twenty -five centimeters. Each support is equipped with at least twelve such details.
The roof lift is performed evenly from each point. A maximum of five centimeters of the roof rises in one pass. Gradually raising each corner, reach a height of twenty -five centimeters. Crosses are installed on supporting components only after reaching this height. After lifting the roof by 180 cm, masonry of brick for the outer walls begins. It will take at least three days to raise the roof to such a height. Masonry is performed with the mandatory use of a reinforcing belt. After lifting the roof, the jack rises. To create a full -fledged attic, you will need to raise the roof by at least 280 cm. This work is performed in two weeks. All free space after lifting the roof is immediately filled with walls made of brick.
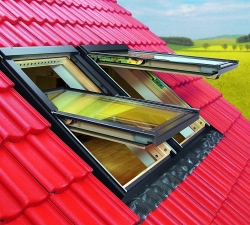
After lifting the roof and the installation of walls, window openings are formed, the undercarbon space is insulated and waterproofed. Most often, insulation is performed using mineral wool. This material has excellent thermal insulation characteristics. Waterproofing covers the insulation from both the external and from the inside. To achieve a high heat and waterproofing effect, use special membrane films. The attic is equipped with the type of multilayer pie, including vapor barrier material, waterproofing, thermal insulation, roofing materials and interior decoration. In order to avoid the appearance of mold and fungus, a high -quality ventilation system is equipped. The raised roof is equipped with vertical window constructions.
How to raise the roof of the house - general recommendations
We offer to get acquainted with the option of raising the roof to increase the height of the ceilings in a small house. In the process, the availability of:
- at least three oil jacks with high loading capacity;
- several wooden bars, steel channels and pipes;
- hard floor gaskets that evenly distribute the load;
- gaskets installed under the beams when raising the roof;
- Material for raising walls: brick, stone.

At the initial stage, jacks are installed under the ceiling beams. Previously, remove the furniture from the room or cover it with plastic film, since this process is quite dusty.
Start working with the corners, install the jack in the ratio with the location of the power beams. Install the channel to the desired height. Between the beam and the channel, install the lining that prevents the destruction of the ceiling structure. Gradually lift the beam. Make sure that the channel is located strictly in the center of the jack. Repeat the same actions with each jack. When raising each device by 5 cm, begin the next step in the rise. Try to avoid roofing during operation. Next, weaken and rearrange the jacks to the next beams. Lay the gaskets between the beams and the ceiling. To raise the first and last beam, use an enlarged shoulder, since these elements are most often in the wall. In order to avoid damage to the floor, install ultra -duty distribution gaskets between the roof and walls.
Roof at home photo:

The following is the process of fixing the roof at the desired height. To do this, bring support under it. From brick and concrete solution. Special difficulties arise with window openings that need additional strengthening. Try to work as quickly as possible, since temporary supports are a fairly shaky design that is not resistant to strong winds.
Next, proceed to the installation of internal masonry with mandatory reinforcement. Then perform the exterior decoration of the walls in relation to the walls. Provide additional heat and waterproofing of the roof.
Do -it -yourself attic on the roof of the house
The main function of the roof is to protect the whole house from atmospheric precipitation, so this design should be strong, reliable and compact. The process of building an attic on the roof is quite complex, but quite real. Thus, living space increases one and a half times.
Before starting the reconstruction, create a project of attic on the roof. Decide on the type of roof, most often, the attic roof is gable, with a triangular frame structure. As a base for each farm, a beam on the ceiling based on the wall is used. For the reconstruction of the roof to the dwelling, the constructive-power scheme of the supporting elements changes.
We offer to familiarize yourself with the options for remaking the attic to the attic. The first of them - to strengthen the rafters and ceilings, use overlays and previously connected racks. For fixing puffs, struts and reinforced rafters are used.
With a fairly frequent arrangement of farms in the attic space, then the load from beams to the roof is transmitted more evenly. After the reconstruction of the constructive-power characteristics of the attic, the load on the ceiling increases, since the mass is added from furniture and people located on the attic floor. Therefore, we recommend that you stop at the installation of additional I -beams with wooden partitions.
Keep in mind that remodeling of fours at the ceiling is a consistent and gradual process. With non -compliance with the technology of its conduct, there is a risk of deformation and damage to the roof. After remaking the farms, decide on the installation site of window openings and about its insulation.
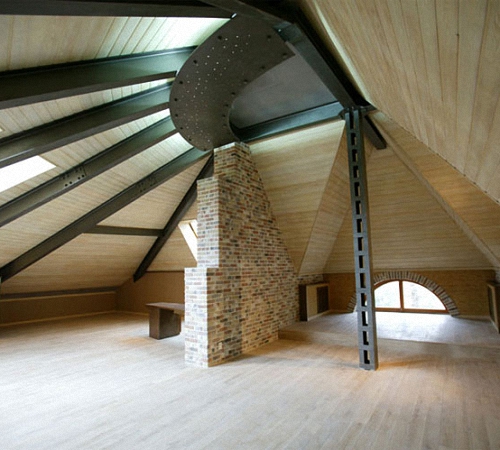
The second option for creating an attic attic - a sharp -impedial roof is distinguished by the presence of central racks with two spacers. To strengthen the structure, rafters and ceiling beams with double crossing are used.
Next, the tightening is fixed on the rafters and racks, and the inclined beams redistribute the overall load. This is followed by the process of removing the lower parts of supports and racks and freeing space for the attic. After the preparatory work is completed, insulation and exterior decoration of the attic are performed.
The roof of the roof of the house with gentle slopes implies an increase in the ceiling space due to the lower room. This process is quite complex and long. To carry out it, you should disassemble the ceiling and fix the beams with a new final floor on the lower part. When choosing the diameter of the transverse beams, be guided by individual calculations and features of the room.
In any case, the undercover space needs high -quality thermal insulation and protection against external environmental factors. The comfortable height of the ceiling in the attic should be at least 220 cm. The heat and sound insulation is performed using mineral wool insulation, laid between rafters and beams. For the manufacture of frame partitions in the attic, a lightweight steel frame is used, on which drywall and subsequent finish are fixed.

Methods of insulation of attic on the roof
High -quality thermal insulation of the roof reduces the cost of heating the attic and improves the comfort of staying in it. Several methods of thermal insulation of the attic are distinguished. The most popular of them are fiberglass and mineral wool insulation.
The first option is characterized by an affordable cost, among additional advantages we note:
- lack of toxic substances;
- good thermal insulation indicators;
- moisture resistance;
- Long life.
In addition, glass wool has certain disadvantages. One of them is the need to work in special clothing and protecting the insulation with additional films. Since the material contains a large amount of fine dust, which affects the mucous membranes of the eyes, work with this requires the use of additional protective equipment in the form of respirators and special clothing. In addition, glass wool is inconvenient when warming inclined surfaces, since after time it is deformed and does not provide the necessary tightness.

The second option is mineral stone basalt wool, has a higher cost, which is completely covered with operational characteristics. Mineral wool is available in various variations: roll or slab. The material goes well on any surface, connecting tightly to them. Among other advantages, we note:
- resistance to temperature fluctuations;
- Unrebimited rodents;
- ensuring high -quality thermal insulation;
- ease of installation;
- a variety of forms and options;
- Excellent performance characteristics, the service life exceeds twenty years, subject to installation technology.
However, mineral wool requires additional waterproofing, since this material is unstable to moisture and is destroyed under its influence.
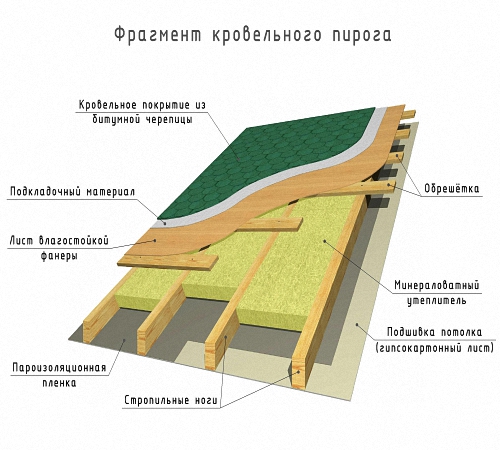
Initially, structures are insulated around the perimeter of the attic. At the next stage, waterproofing of the room is performed, and vapor barrier with a ventilation gap is organized.

A layer of insulation is laid on the roof, floors and partitions. In the presence of a pediment, it is also subject to insulation. Roofing slopes have a certain slope, which means the insulation should completely repeat their shape, hermetically connecting with the structure.
Therefore, for insulation of these structures, we recommend using the plate options for mineral wool material. Additional fixation of the insulation provides a crate. The insulation should fit tightly against the wall. Otherwise, the quality of thermal insulation is reduced.
Three materials options are used to warm the floor in the attic:
- in the presence of reinforced concrete floors - we recommend using polystyrene foam, which, in addition to excellent thermal insulation, protects the lower floor from noise;
- in the presence of wooden floors on reinforced concrete floors, use basalt wool, with equipped corner gaps;
- In the presence of wooden floors, use any type of insulation, with an additional waterproofing layer.
A flat flat surface - a great place for using roll insulation, special adhesive tape is used to connect the material.
Raise the roof of the video:
![]()
StrPort construction portal 2011-2018. Articles about repair, construction, building materials.
Copying information from the site is possible only with permission of the editorial office Or indicating a direct link to the source. Legal justification