In order to protect your plot or house from extraneous invasion, it is protected ...
|
|
The sliding gates become popular and gradually replace standard swing, in ... |
Many people like to take a steam bath in a Russian bath, whip themselves with oak or birch ... |
DIY WITHING WITHING POLEPLAST
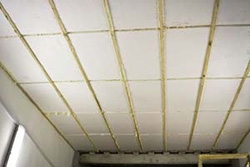
To build a truly heat-efficient house, you need to take care of insulation not only walls, but also the roof. The best way to insulate it is the creation of a multi -layer pie consisting of thermal insulation material, a steam -permeable film and waterproofing. This method implies the use of mineral wool, but there is another modern material that will make the process of warming the ceiling much less time -consuming is a foam. It has lightweight and low thermal conductivity, which is so popular when warming residential buildings.
Content:
Foam properties as insulation
The process of warming the ceiling with foam will depend on the type of roof. If the roof of the residential attic is required to insulate, then thermal insulation is laid on the slopes between the rafters. When the attic is non -residential, it is best to insulate its floor. In the apartment, the only option is to warm the ceiling from the inside with foam or any other thermal insulation material.
Its main advantages have already been listed, now we will dwell in more detail on other features of the material.
Advantages
- The foam has low hygroscopicity, which means that when warming the ceiling there is no need for steam and waterproofing.
Important! If a wooden structure is insulated with polystyrene, then a layer of vapor barrier material is desirable. Or all joints between the tiles should be especially carefully filled with sealant or foam.
- Unlike mineral wool, it does not shrink over time, which eliminates the occurrence of cold bridges. Throughout the entire period of operation, it retains its thermal insulation characteristics.
- The thickness of the foam for insulation of the ceiling is 5-6 cm, which is much smaller than mineral wool. This is especially important for city apartments, where the height of the ceilings is so small.
Specifications
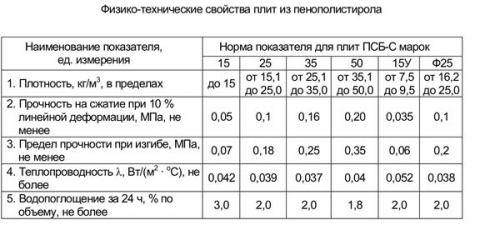
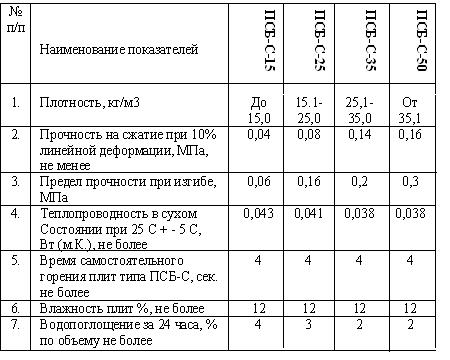
- Low thermal conductivity, which is 0.037 0.041 W/MK;
- the structure of the foam remains unchanged at a wide range of temperatures;
- it has high resistance to the influence of biological and chemicals;
- low hygroscopicity, placed in water, it is able to absorb only 0.5-1.5% of the volume;
- not subject to the formation of fungi, mold and decay;
- good soundproofing properties due to low dynamic stiffness;
- it is easy to install, has a low weight and is easily cut.
Flaws
Short life. The shelf life declared by manufacturers is only 10-20 years, provided that the technology of insulation of the premises is observed. In case of violation, the term becomes less.
Foam is dangerous in a house with poor ventilation.This is due to the fact that the foam is not a vapor permeable material, which means that condensate will begin to accumulate indoors. In this regard, humidity increases, which leads to the formation of mold and fungus, and the effectiveness of the insulation decreases. All this is especially dangerous for people suffering from allergies or asthma. The output will be the installation of supply and exhaust ventilation.
When burning, it emits toxic substances.In contact with fire, it does not burn, but melts, secreting black smoke with gas dangerous for health, which can cause respiratory tract paralysis.
When choosing a foam, you need to pay attention so that it has quality certificates. It should be bought in trusted firms and large construction stores. Unfortunately, there is a large amount of material made in a artisanal way on the market, not distinguished by high quality.
Calculation of the material
Any repair and construction work begins with the calculation of the material. To determine the area of \u200b\u200bthe ceiling, it is necessary to multiply its length by the width. For insulation, foam of different thicknesses is used: 2.3.5 and 10 cm, but for the ceiling it is best to take sheets with a thickness of at least 5 cm with a density of PSBS-15 to PSBS-35.
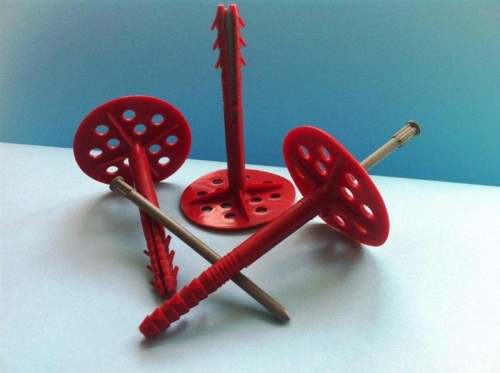
For fixing the foam, dowels with a wide hat and special glue are sold, but its cost is quite high. You can use the usual cement -based glue.
Types of adhesive mixtures and their consistency
Regardless of the adhesive manufacturer, it is necessary to take into account several important points:
- the packaging should be written that it is intended for polystyrene foam;
- depending on the manufacturer, the mixtures are divided into two types: for gluing plates and for gluing plates and devices of a protective layer. The first species is cheaper, but suitable only for the installation of plates and filling the gaps between the insulation, the second is more expensive, but it can be attached to the reinforcing mesh and use it as a leveling layer.
Tip: It is not recommended to combine the compositions of different manufacturers.
Its consumption directly depends on the smoothness of the surface to which the foam is attached. On average, it is 5 kg/m2 for gluing and will still go to glue the reinforcement and the leveling layer. Each manufacturer points on a pack of proportions for mixing, but it is important to know some nuances:
- it often happens that the mixture must be diluted thicker than the manufacturer recommends. According to the consistency, it should be so thick that when applied to the spatula, it retains the shape and does not spread;
- but for fastening the grid it is better to dilute a little slurry, then it will be easily deepened;
- for the final leveling layer, the glue should be even more liquid, which resembles liquid sour cream by density.
DIY WITHING WITHING POLEPLAST
Frame insulation
Before mounting the crate under the sheets of foam, the surface should be prepared. To do this, all the old painting or whitewashing is thoroughly removed, the ceiling is washed from dirt and dust. Then, if necessary, it is aligned with putty and primer. It is advisable to treat the surface with an antiseptic composition.
Important! All electrical work is carried out before the installation of foam.
During insulation, it is necessary to observe the temperature regime, which should be within +5C to +30C. This will provide reliable and high -quality fastening of foam to the surface.
The choice of the frame will depend on the financial capabilities, as well as the degree of moisture in the room in which the insulation is performed. For it, wooden beams or metal profiles are used.
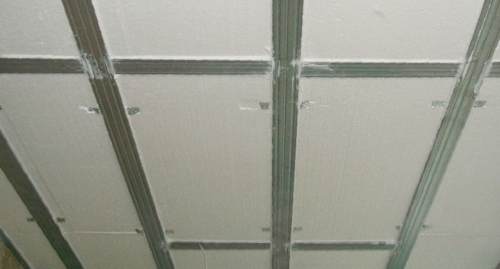
All parts of the foam are cut strictly by the size of the cells, since the material, over time, does not change its forms.
First, transverse profiles are mounted with a distance of 50 cm from each other on dowels. In this case, be sure to use the level. Then transverse profiles with a similar step are installed. They are attached between themselves with screws for metal.
Foam can be fixed in two ways: using screws or on glue. But regardless of the selected method, absolutely all the gaps between the sheets are delighted. This will ensure tightness, and as a result, will protect from heat loss.

If the crate is mounted from wooden beams, then a vapor -permeable film is placed between the foam and the finish coating, which protects the frame from condensate.
The final stage is the installation of drywall. Metal profiles are installed for it, to which it is attached using metal screws.
Below is a video insulation of the ceiling with foam
Adhesive method
When the financial capabilities and little time for repair are limited, the optimal option for insulation of the ceiling will be to install polystyrene sheets on glue without the construction of the crate. Buying a conventional adhesive mixture for ceramic tiles or putty, instead of special glue, will reduce the process even more. They will no less effectively cope with the gluing of foam to the surface of the ceiling. But still, with this method of fastening, it is recommended to use a dowel with a fungal hat.
It happens that the ceiling is whitewashed with a lime solution that cannot be removed. In this case, its entire surface is carefully coated with adhesive solution and is left until completely dry. Only after that can you start gluing the insulation.
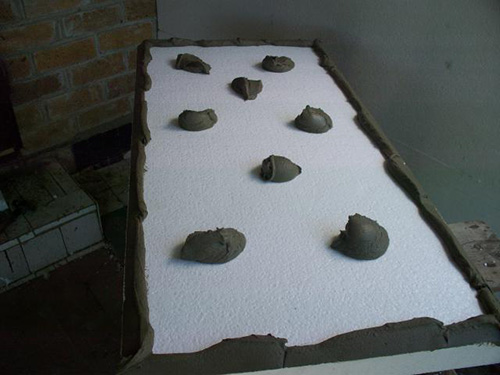
First, a solution is applied to the ceiling and on a foam sheet (it can be applied pointily or toothed spatula over the entire surface) and the insulation is tightly pressed to the surface.
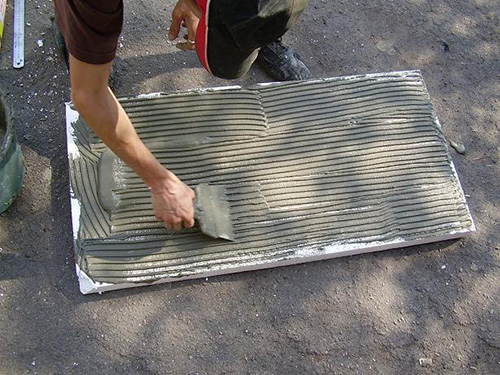
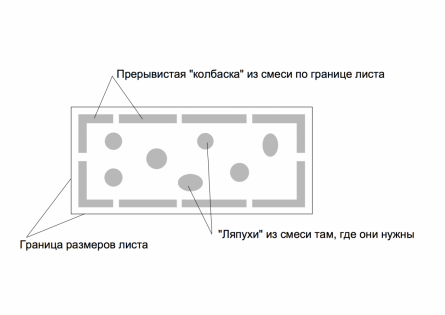
For better fixation, it must be tightly pressed for a couple of minutes. And so, step by step, the entire area of \u200b\u200bthe ceiling is glued. After glue, the foam is additionally strengthened with dowels-gearboxes.
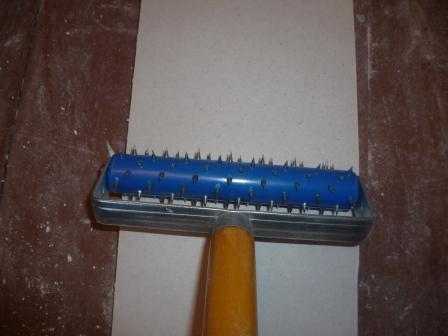
Tip: If euproured polystyrene foam is used instead of foam, then its surface must be made more rough. In order not to waste time and not make furrows with a clerical knife, you should use a needle roller for drywall or a hard iron brush.
The dowel-grib consists of a wide hat and a sleeve into which a nail is clogged. For insulation, it is better to use dowels with a plastic nail, since it will not form additional cold bridges.
To install it, a hole is pre -drilled, a little longer than the dowel itself. It is simple to determine its length, for this the thickness of the foam, the thickness of the finish coating, vapor barrier and deepening in the wall by 5 cm. Thus, with a thickness of the insulation of 5 cm, it turns out: 5 cm+1cm+5cm \u003d 11cm, which means that the hole should be 13 cm.
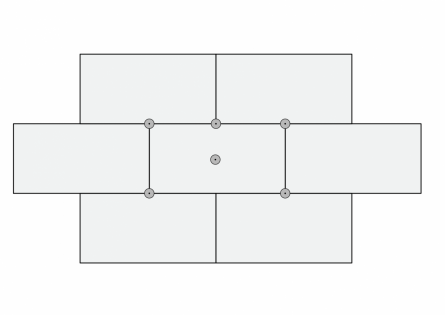
Dowcs are located in the places of connection of sheets and 1 in the center. The sheet accounts for 5-6 fasteners. This will provide a denser and even fit of insulation to the ceiling.
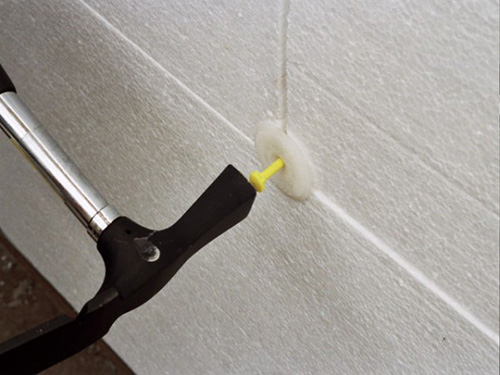
When driving dowels into the ceiling, its hat should be flush with the edge of the insulation. After they are all installed, nails are clogged in them. As a result, the dowel hat deepens into the foam of 1-2 mm, which is considered the norm. If the nail is not completely clogged, and an insignificant part remains on the surface (up to 1 cm), it is simply cut by nippers.
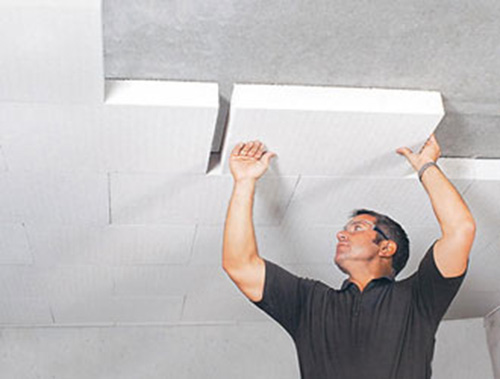
Important! Sheets should be mounted in a checkerboard pattern.
At the final stage of this stage, all the protruding joints of the sheets of insulation are adjusted to the foam grater.
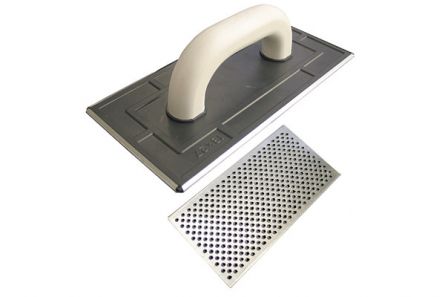
Before applying the finish, it is necessary to make a reinforcing layer. To do this, a special solution is used, which is applied to the foam in an even layer. The first layer is placed a reinforcing mesh of fiberglass, it is shed in it and is left until completely dry. Next, a second layer of solution is applied, and also left on drying.
Due to its low price, lightweight and ease of use, polystyrene is very popular as a heater. But, despite all its advantages, it is not the best option to insulate them from the inside.

