A cozy and attractive balcony is a wonderful addition to any housing, in ...
|
|
One of the advantages of wooden houses is their slight weight relative to brick ... |
Previously, wooden floor coverings were pretty good quality that there are to this ... |
Repair of ceilings from drywall
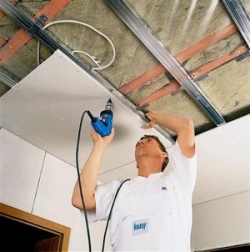
Like any ceiling coating, the ceiling of drywall is required over time. There may be several reasons, from simple obsolescence and the desire to change the interior, before it comes into disrepair. The drywall itself is quite fragile, which means it can sag, cracks, dents or breaks can form on it. In addition, after flooding with neighbors, he will also require serious repair work or complete replacement. The article will talk about how to repair the ceiling of their drywall.
Content:
- Possible defects in the ceiling made of drywall
- The gypsum plastic ceiling bend, how to fix it?
- How to fix cracks on the ceiling made of drywall
- How to repair a hole in the ceiling made of drywall
- The plasterboard ceiling is outdated and requires replacement
- Repair of water flooded with drywall in the apartment
- How to remove stains and stains from a drywall ceiling
Possible defects in the ceiling made of drywall
The suspended ceiling system from GKL has a number of advantages that make it popular. But due to the low strength of the gypsum base, defects that require correction are often formed on it. These include:
- the deflection of drywall sheets, which can occur due to problems with its frame, poor-quality fastening of sheets or because of the movement of the building itself;
- getting wet of GKLThe cause of which is flooding from above. Depending on how much the material is wet, the type of repair work will be selected. If the wetting is slight, it is quite possible to restore without dismantling all sheets, with severe damage, the ceiling coating will have to be replaced with a new one;
- cracks on the ceiling made of drywall.Appear due to poorly carried out putty work, poor-quality compositions or due to the movement of the building due to shrinkage or seasonal letting in soil;

- legs at the joints of the sheets.Also appear when deformation of the base, to which the crate is attached;
- mechanical damage. Frequent if there are children at home. It is enough to throw an object with a heavy or with a sharp edge to leave a dent on its surface.
Before starting the work, a thorough inspection of the entire ceiling for breakdowns and their possible reasons is carried out. This will not only correctly develop an algorithm for repair, but also prepare all the necessary materials and tools in advance. With minor damage, it will not be difficult to cope on their own, in other cases it makes sense to call specialists who will provide guarantees for their work. Below are the most common methods for repairing a drywall ceiling, which are repeatedly tested in practice by experienced craftsmen.
The gypsum plastic ceiling bend, how to fix it?
If this is caused not by the movement of the entire building, then there may be two reasons:
- installation errors, poor fixation of sheets;
- the deformation of the sheets of drywall, the reason could be the high humidity of the room without proper ventilation, or in the room for a long time there was a negative temperature.
With small surfaces of the surface, which do not cause fears for the entire structure, resort to putty. To do this, the starting putty, enough with a thick layer, all bumps are aligned. And after drying, apply a layer of finish putty

Another way to repair the deflection of GKL without dismantling is as follows:
- it will be necessary to buy not ordinary short screws designed for drywall, but long 90 mm. It is by them that the sheets will be pulled directly to the ceiling, and not to the frame;
- the place of the greatest deflection is marked with a simple pencil - this will facilitate the work. And with a step of 20, screws begin to tighten. They cannot be strongly deepened, otherwise they will simply enter the GCL and leave a hole. Therefore, they are screwed at once until the moment when the hat clings tightly to the sheet without pressure. After that you can start pulling. To do this, each self -tapping screw is slightly twisted one after another, and they, in turn, neatly pull the deflection site to the ceiling. This is a rather painstaking and complex work, where any careless or too fast movement can lead to a hole from a screw or to breakdown of a sheet;

- the drywall tightened in this way will still not have a perfectly flat surface and will require further putty.
But still, more often you have to carry out more large -scale events.
Stages of work
- If the installation of the ceiling was not carried out on their own, in any case, you will have to reject the crumpled stove and check how the crate is made. The rules for its installation differ from those used for walls. So, the step between the guide rails should not exceed 40 cm. And the design itself is performed in the form of squares of 40x40cm.

- Wall sheets with a thickness of 12.5 mm are not suitable for the ceiling, their maximum thickness should not exceed 9 mm to alleviate weight. In addition, it is better to choose a moisture -resistant GCL with a green front side. It is optimal not only in a humid visit, but also with possible temperature differences. So, ordinary drywall absorbs a lot of moisture, which at a negative temperature freezes and can cause deformation of the sheets. Which will become a possible cause of flexion of the ceiling.
Tip: If the reason is precisely a poor -quality crate, then this is a warranty case and the company should fix it for free.
- Thanks to the plasticity of the GCL, the crowned sheet can be fixed. To do this, it is dismantled and neatly lowered on a flat horizontal surface. Having soaked abundantly from the spray gun and leaving it for several days, it is likely that it is leaving, and after complete drying, it is again suitable for installation. But before that, the rheck profiles must be led to the ceiling to strengthen the crate.
How to fix cracks on the ceiling made of drywall
The reasons because of which cracks appeared on the ceiling coating from GKL:
- the finishing work was done too early in the new building, preventing the house with a complete shrinkage. Or the wrong foundation of a private house was made, which is why it is moved by a natural torment of the soil, and therefore the walls and ceiling are deformed;
- incorrect putty technology and no reinforcing tape was used for sheets;

- with strong temperature changes or humidity during installation work.
Tip: you can not carry out work with drywall in an unheated room in the cold season. It is this, most often, that becomes the cause of problems with drywall ceiling in further operation. It is also recommended to work with it at the end of the black decoration of the room, after concreting the floor and putting the walls.
Removing crack at the joints of two -level structures made of drywall
- You need to start with a reinforcing tape, if it is self -adhesive, then it is immediately applied to the inner joint of levels. Putting in half, it is applied to a slightly larger length than a crack has, and tightly glued.
- With a simple ribbon, you should first apply a thin layer of putty, and put a piece of Serpi cut off in size and press it with a spatula from the middle to the edges. A flat strip without joints and seams should be obtained. Everyone leaves until dry for a day.
- Then a second layer of universal putty is applied. Here you need to ensure that the edges of the cursed mixture go to zero with the rest of the ceiling. There should be no groove. If this could not be achieved, since it took too thick the repair layer, then the finish the ceiling passes through the finish putty, including the patch, thereby creating a single even canvas.
- When embarrassing the crack on the outer coal, you will have to replace or correct the corner profile. Most often, it looks in the form of an aluminum perforated angle. First, it is unscrewed, cleaned of the old coating and put in place, screwing with self-tapping screws with a step of 10-15 cm. The profile is very thin, so it cannot be tightened, otherwise its edge will go in waves. It puts it down on top and processed with a skin.
Tips for shaking cracks on the plane:
- for the necessary penetration of the putty mixture into the GCL, the crack is slightly deepened and expanded. The edges are exactly cut with a sharp clerical knife;
- as a repair composition, putty for seams or universal;
- each dried layer (even black) must be thoroughly treated with a grater with a fine metal net;
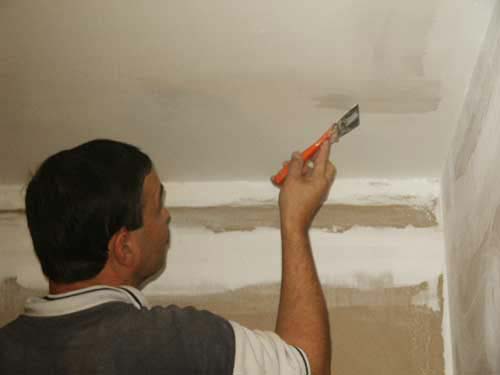
Repair of ceilings from drywall photo

- a very wide crack is recommended to be additionally strengthened with reinforced glass chloride. It is attached to a thick layer of glue directly along the edges of the opening. When this layer dries, the crack is filled with putty and left to dry.
- After drying, they are ground and cooked under painting. As a rule, such a repair remains invisible.
Ceiling repair with drywall video
How to repair a hole in the ceiling made of drywall
- If necessary, fill a small in area and a non -heating dent, just smear this place with a primer (PVA glue diluted with water) and putty with a piece of Serpi. After a day, apply another layer of putty and, after drying, roll.
- To repair the through hole, you will need a stationery knife, a ruler, pieces of profile (wooden rails or bars of the desired thickness are suitable), a primer and putty.

Stages of work
- Without dismantling the entire sheet of GKL, the through hole is circled right on the ceiling. This must be done with small allowances and in the form of an even square or rectangle. In one of the corners with a knife, you need to cut through and through. Next, applying a ruler or any other hard stencil, for example, a profile, a circled figure is cut to the entire depth of drywall. We carefully get the resulting piece.
- Then you can go in two ways. In the first case, the frame is made for a cut piece, guides of the desired size are screwed to the ceiling. Or small pieces are cut out of thin plywood, their number corresponds to the number of sides of the figure, therefore, 4 blanks are required for a rectangle. Halfly, starting under the gypsum -plane ceiling, they are screwed directly to the gypsum on the screws. For their second protruding half, the repair patch will be recorded.

- After installation, the joints are recommended to deepen a little, so that in the future they are easier to putty (like mowed edges of drywall plates).
- Further, all work is performed as usual: putty in several layers with a sickle and further grinding.
The plasterboard ceiling is outdated and requires replacement
It is possible that when defects appear, the ceiling was not repaired. They accumulated, and over time, all ceiling coating cracked or deformed. If there is no desire or advisability to carry out partial repairs, then it is worth replacing the entire ceiling.
Stages of work
- The surface is cleaned of paint and putty in those places where there should be self -tapping screws. If it is not possible to find them in this way, then the way out will simply break the sheets. This is done carefully so as not to damage the communications hidden behind him.
Tip: with this method of dismantling, a lot of plaster dust is formed, which will quickly fill the entire room. Therefore, it is better to do this in the warm season, with open windows and in personal protective equipment. Also, the room is completely cleaned of furniture and interior items.
- Check the condition of the crate. If these are wooden rails, then it is advisable to treat them with antiseptic impregnations, in the case of a metal profile, no additional measures are required.

- The frame is not touched for the ceiling, only new sheets of 9 mm GCL are screwed on it. Work should start from the corner of the room. It is more convenient to do this together, while one screws up, the second supports. Therefore, you need to stock up on goats or two steps.
- Cut drywall in size easily with an ordinary stationery knife, but gypsum very quickly stupid blades, so they must be reserve and periodically change. Otherwise, it will make the cut with torn.
- Having mounted the entire structure, they begin primer, reinforcement and putty.
Repair of water flooded with drywall in the apartment
Perhaps this is the most serious damage that a plasterboard ceiling can receive. Gypsum porous material and easily absorbs water. Because of what it gets wet and destroys.

- At strong degree It is no longer subject to damage to the repair, but only to complete replacement. But before attaching new sheets, the old ones are cleaned, and the ceiling is dried for several days with ventilation of the room.
Tip: Some masters advise you to try to restore it. For this, during the detection of flooding, electricity immediately disconnect. In the ceiling, through the openings are made. If the deflection of the sheet is detected from the highest accumulation of water, the struts are placed. It should be noted that it should be with a wide sole so as not to pierce the material. From the two distant edges of the room, the rooms are cut out and placed in one of them a construction hair dryer or a heat gun is directed. This will help to dry the underground space faster.
- Slightly getting wet will not cause much trouble. As a rule, spotlights are mounted in ceilings from GKL. In the case of flooding from above, lighting devices are removed, thereby forming for ventilation form. After a few days, they can be set back, and the resulting spots (if any) are putty and painted over.

- The average degree of wettingalso not a sentence for the plasterboard structure of the ceiling. As in the previous case, all spotlights and hanging chandeliers are removed. Additionally, holes are made through with an awl, screwdriver or knife. This is enough for it to dry. In the future, these small holes can not even be puttled, but simply disguise with acrylic silicone, which will not be difficult to choose for color. Or just repaint the ceiling completely. Places with a damaged paper layer are amplified by a special mesh sickle
How to remove stains and stains from a drywall ceiling
Sometimes yellow spots after flooding are able to appear even through a layer of putty and water -based paint. In these cases, it is recommended to do the following:
- stir the place of the stain, removing the soiled layer of paint and putty up to the drywall base;
- then fumble with a grater or fine -grained sandpaper;
- primed the entire surface of the ceiling;
- if the protective coating of the gypsum mixture is damaged during the cleaning, it can be restored using a fiberglass or a reinforcing mesh (depending on the size of the site, but the canvas should be one). It is attached to the thin layer of putty, and after drying it puts down with one layer with the whole ceiling;
- after a day, after completely drying, the finish composition is applied and the surface is made with grinding. A layer of paint is applied on top or pasted with wallpaper (the second option is preferable).
When the stain is one or very few of them, then only these spoiled areas can be repaired, without affecting all the ceiling coating with putty.
- Initially, the spot is also cleaned of the finish and wiped with a skin to drywall.
- The starting putty is filled with these recesses with a small allowance on the sides, which should have smoothed edges.
- After drying, grind. On top you can stick wallpaper, but if the ceiling is painted, then you also need to apply a layer of finish putty.
Tip: Even with a complete coincidence of the color of the paint, it is not recommended to paint only the repair areas. Fresh color will stand out strongly against the general background.
After such processing, no spots will appear on a freshly painted ceiling.
At first glance, it may seem that the repair of the ceiling made of drywall is a very troublesome and laborious business. But in any case, this will require less effort than its complete replacement. In addition, it will save the family budget well. So, on average, the installation of a single -level flow by a professional brigade without putty will cost from 500 rubles/m2.
![]()
StrPort construction portal 2011-2018. Articles about repair, construction, building materials.
Copying information from the site is possible only with permission of the editorial office Or indicating a direct link to the source. Legal justification