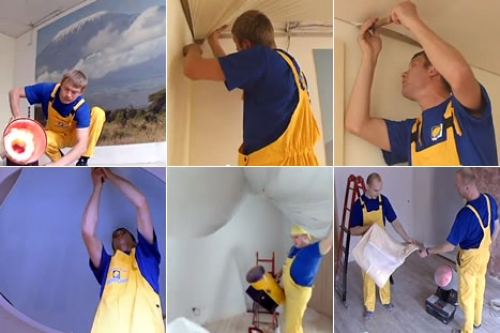
To install plastic windows, specialists are needed. It is worth the means, but ...
|
|
Low -rise houses with a residential attic are more common. First of all ... |
The size of the cellar depends on the size of the foundation and the height of the base. Often the height of the ceilings ... |
Installation of stretch ceilings PVC
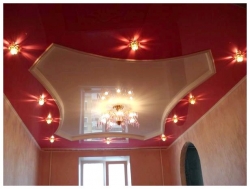
We decided to install a stretch PVC ceiling, but do not want to overpay? Then the best option would be to install it yourself. Is it possible? Quite. The main thing is to have a desire, all the necessary tools and materials, as well as patience and extra couple of hands. In order to convince you of the installation of suspended ceilings there is nothing arch -wording, this article was written. Consider the entire process in order.
Content
- Tools
- Determination of the area of \u200b\u200bthe canvas and the size of the linear meters of the baguette
- Setting the level of stretch ceiling and baguette
- Fastening for a chandelier
- Pipes and other communications
- Installation of PVC canvas
Tools
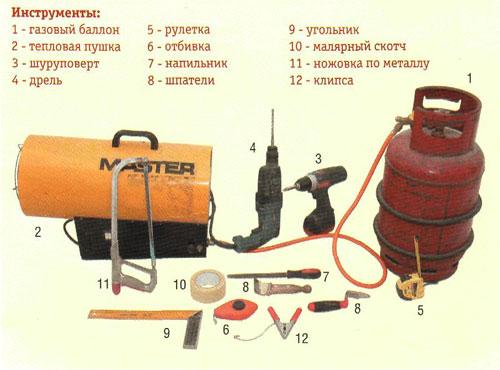
We will need to install the stretch fabric:
- screwdrivers are flat and cross -shaped, as well as with a curved working surface;
- plaxing hugs are ordinary and with elongated lips;
- ordinary roulette or laser;
- water level;
- meter level;
- durable cord or special marching cord with paint;
- punch and screwdriver;
- hacksaw on wood or metal (depending on the material of the frame);
- hammer, island and reinforced adhesive tape;
- gas or electric heat gun (depending on the capabilities of your wiring);
- special clamps for hanging the canvas during installation.
This is a minimum set of the required tool for installing PVC stretch ceilings. If we say, the installation of the ceiling is planned in the bathroom with installed tiles, then instead of a perforator it is more advisable to use a drill with special ceramics, etc.
Determination of the area of \u200b\u200bthe canvas and the size of the linear meters of the baguette
Since the installation of a stretch ceiling will be carried out independently, we will have to determine the size of the canvas ourselves. To do this, take an electronic roulette or a regular 5 meter and measure the exact distance between the angles of the walls. When working with an electronic roulette, you do not need an assistant, when using the usual, invite someone to the rescue. The most important thing is not to be mistaken in size.
So, roulette in the hand, a sheet of paper and a pencil. For accuracy and simplicity, draw a square or rectangle of your room. Be sure to mark the doors. All measurements begin to be made on the left side of the entrance. For convenience, you can indicate the corners with letters, accepted by Latin, but there are no strict requirements, you can Cyrillic. Starting from the first corner on the left side of the doors, measure the length of the walls at the top of the ceiling. Not at the bottom or in the middle of the room, sometimes the difference, it would seem, can reach an even corner to several centimeters.
We measure the distance between the corners over all four walls and measure the diagonal of the ceiling. The diagonal is measured from the original corner at the opposite angle. All the necessary sizes for the pattern are ready.
Several points. If you plan to use graduate baguits, then ordering the canvas, take with a margin. When buying PVC films with harpoon, the dimensions should be accurate, otherwise it will be very difficult to pull it when installing.
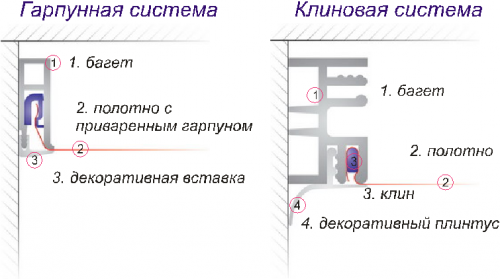
If in the first version with a graduate, the canvas can be adjusted in size, the excess is cut, then this is impossible with harpoon. That is why the graduate and wedge method of installing stretch ceilings remains in demand. In addition, it is cheaper. But he has a minus to dismantle the film and it will be very difficult to install it again. When choosing the installation method, consider this.
How many lineup meters do you need? You already have dimensions, it is enough to determine the perimeter, adding the amount of the parties.
Setting the level of stretch ceiling and baguette
It is necessary to start by determining the lowest angle in the room. We retreat the desired distance from the ceiling and make a mark on the wall. How much you decide to decide, the minimum distance should be such that it is convenient for you to work as a drill or perforator at the ceiling.
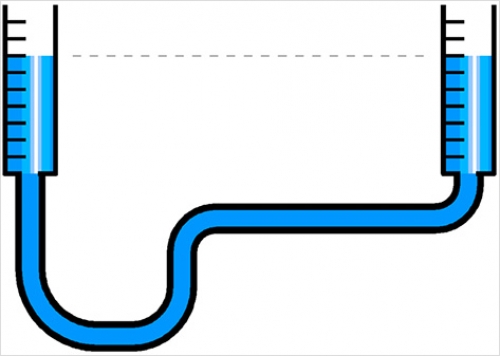
At this mark, we mark the level in the remaining corners of the room. It is simple, apply the second end of the hydraulicar to the opposite angles, and where the water level coincides with the reference angle, put the mark on the wall.
Next, take a strong thread or a marching cord with paint. The ends of the cord are applied exactly with marks on the wall. We pull it, there should not be sags. Next, we simply pull it off the wall and release, using the paint, a clear marker appears on our wall for attaching the baguette.
We begin to attach the baguette to the wall from the corners. In the middle, using a hacksaw on metal, we make an incision on the back of the baguette. The front side is always a little longer than the rear side. When we make an incision, we try not to hook the front side with a hacksaw, so that when bending, it would not crack. We slowly bend. The whole corner is ready. You can do the angle and the method of washed down the corners and fitting. This is long and time -consuming. But decide in what way to distinguish the corners to you.
We drill holes in the baguette with an interval of 10 cm, at the bend in the corners with a distance of 8 cm. The plastic, as well as aluminum, is excellently drilled with a conventional metal drill. We apply the baguette along the line marked on the wall and using a drill or perforator, make holes in the wall. We score dowels and screw the screws. When tightening screws, try not to overdo it, you may burst the plastic. This does not threaten aluminum baguettes.
After installing the baguette around the entire perimeter of the ceiling, it is necessary to process its joints. Using a knife, cut the sharp edges in plastic baguits. In aluminum baguettes, you can smooth out with a file. Using ordinary adhesive tape, you can connect the front sides of the baguits. This is necessary so that during the stretch of the canvas it is not damaged.
Fastening for a chandelier
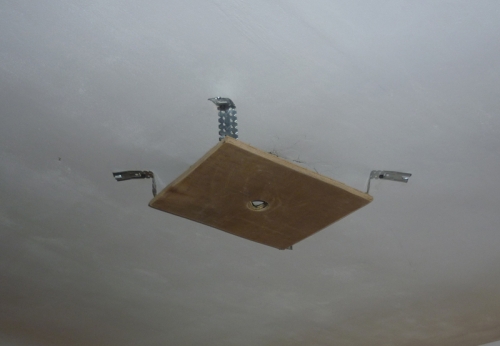
Consider the easiest option for arranging lamps - fastening the chandelier. We take a wooden bar or metal profile for drywall, who has something at hand. Using the same marginal cord, mark two diagonals. At the intersection, we will have a ceiling center. If there is a wiring there well, no, we bring the wires.
We drill holes for dowels with a perforator. In a wooden bar we drill holes for screws, select the diameter at your discretion. The main thing is that it would be reliable and tough. We fasten the bar to the ceiling. The surface of the bar should be on the same level with the baguette.
The metal profile is attached to the anchor. The procedure is similar, we denote the center, drill holes for the dowel, fasten two anchors to the ceiling. The surface of the profile should also coincide with the level of the baguette. We cut the protruding edges of the anchor with a grinder and grind. There should be no sharp corners and burrs. Otherwise, we risk being left without PVC film.
The mount for the chandelier is ready. With spotlights is slightly more complicated, but if desired, you can install them. The mount for the basement can be made of pieces of a metal profile or in any other way, for example on anchors. But remember that the lamps should be no more than 50 watts.
Pipes and other communications
The surface of the ceiling is not always free from communications. It can be heating pipes, hood or so on. We need to make the canvas wrapping these communications, such as a pipe. To do this, take pieces of any plastic, up to 3 -4 mm thick and cut out the insert under the diameter of the pipe. The form is not particularly important, but the main thing is that the hole for the pipe is not close to the pipe, i.e. A little more than the pipe itself. And from the side of the input of the canvas for the pipe, we cut the plastic. We remove all the sharp corners and burrs on the plastic.
Run the heat gun and warm the canvas. We unfold it, and cling the angles of the film to special clamps. Looking a little forward: the installation of PVC film always begins from the corners in the direction of the middle of the wall.
We warm up the side where the pipe is located. Using a pencil with a stretched canvas, we mark the center of the pipe on the film. We remove the angle where we made a mark and retreat from the mark one centimeter. The indent is made to stretch the canvas, i.e. At the end of the installation, our first mark will go aside about a centimeter. We also retreat from the harpoon 1 cm.
We take the prepared plastic amplifier and, using high -quality superglide, glue it according to the marking made. The glue is applied evenly over the entire surface of the plastic with a thin layer. Inside the circle of the amplifier, the mode of the canvas is several parts. So that we would get at least 4 triangles. You can more. We wrap the film on the amplifier and also glue it.
Between the harpoon and plastic on the canvas we also glue the insert. If there is part of the PVC canvas, you can. We check that everything would be securely glued. Cut the canvas and harpoon according to the mark with a knife. We start the film and amplifier for the pipe by the circuit is ready.
On the same principle, any obstruction of the canvas is done. We need an amplifier that, using glue, will not allow the canvas to break. When marking, take into account that when heated, the canvas expands, which means it is necessary to make indentes into a centimeter.
Installation of PVC canvas
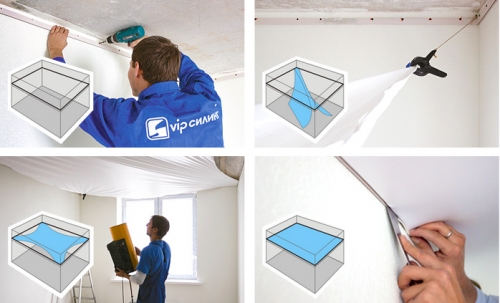
Installation of stretch PVC ceilings with your own hands should always begin with warming up the canvas. You can not bring the heat gun close to the canvas, you can damage it. Evenly warm the entire surface of the film up to 60 C.
Using a pre -prepared spatula, we begin the installation of the canvas. The fastening of PVC film always begins with the corners, as shown in the picture. Grouply grab the harpoon with a spatula, and not for the film and insert the baguette into the grooves. If the heading baguette, then the canvas is inserted into the baguette and installed a wedge or graduate, depending on the system.
After the corners, we begin to start the canvas from the middle of the walls. After all four sides of the canvases are instituted in the baguette in the middle, we begin to start from the middle of the remaining non -fixed edges of the canvas. And according to this principle, we start around the entire perimeter of the ceiling.
If the bumps are not terrible where there are no irregularities, warm up with a heat gun and the surface is leaving. With a harpoon mounting system, the installation of the canvas is finished, and with a head -up, it will be necessary to cut out extra pieces of the canvas.
It remains to install a chandelier and put a camouflage tape or plug around the perimeter of the baguette. The remaining types of decor, such as skirting boards, you already choose at your discretion. Before cutting the canvas for installing a chandelier, do not forget about the amplifier, cut a circle of plastic and glue at the installation site.
In fact, there is nothing complicated in installing stretch ceilings PVC, the main thing is not to rush and act in order. Master the installation of single -level ceilings and over time you can start more complex types of two -level. What does the installation of stretch PVC ceilings look represented in the video below.


