Many designs, styles and directions in the interior dictate their rules. Moderate ...
|
|
In snow winters, no construction can do without such protective structures as ... |
The construction of the house according to German technology is characterized primarily by using ... |
Home repair - with your own hands
What do you think about to make repairs? The fact that it is already scary to enter the apartment, the wallpaper has faded and lag behind the walls, at least at least plant potatoes on the ceiling, and the floors will soon begin to fall underfoot? Hardly. Good hosts will never have this, because they will take care of the repair much earlier. Most often, starting repairs, people want update. In addition, a luxuriously renovated apartment, like an expensive costume, clearly shows that the owners of the case are in perfect order. And what can emphasize the status of a successful person better than a beautiful stretch ceiling? In this article, we will talk about installing a stretch ceiling with our own hands.
Content
- The choice of stretch ceiling
- Preparatory stage in the installation of a stretch ceiling
- Installation of a stretch ceiling
The choice of stretch ceiling
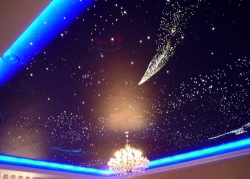
Stretch ceiling with a photo print for the bedroom
Before we deal with the installation itself, you should choose the material for the stretch ceiling. The dispute has been sparing for a long time, which is better for him - a polyvinyl chloride film or polyester fabric. Let's go briefly on their most important qualities.
So, any stretch ceilings have the following properties:
- excellent aesthetic appearance
- not too complicated installation
- durability - from 10 years of warranty
- water resistance
- fire safety
- the environmental friendliness of the material - yes, this parameter refers to artificial fabric from polyester, and to the PVC film equally
- simplicity of operation - you can clean the stretch ceiling with an ordinary damp cloth
- functionality, because the stretch ceiling allows you to mask any heat and sound insulation layer
Thanks to the above qualities, stretch ceilings have become so popular. No wonder only very rich people could afford such a ceiling at one time. Thank God, now we can make such ceilings in our house, and not only in living rooms, but also in the kitchen or in the bathroom.
And now let's talk about those characteristics that distinguish two types of ceilings.
Tissue stretch ceiling
Let's start with the fabric as more expensive. What makes the tissue stretch ceiling so attractive?
- First of all, its width. Polyester panels can reach a width of 5 meters, that is, the ceiling in almost any room does not require fusion of paintings.
- And, of course, the ability to install a fabric ceiling without the use of heating devices.
That's basically it. But the cost of such a ceiling already refers to disadvantages - it is really high. Different designer tricks, for example, photo printing, increase the price of tissue stretch ceilings.
PVC stretch ceiling
We go to PVC ceilings, how will they please us?
- Here, the most significant property will be elasticity. When heated, the PVC film is stretched by more than 10%, and, cooling, returns to the original (well) size, which allows you to create a tightly stretched ceiling with a perfectly flat surface. In addition, it is the elasticity that comes to the rescue in the event of flooding by neighbors from above, when our PVC ceiling sags under the weight of water, but remains intact.
Elasticity PVC ceiling - about 100 kilograms per square meter
- Another quality of PVC film, which simply makes the eyes scatter is the richest variety of colors and textures that does not increase the price on a stretch ceiling. It makes no sense to list all the colors - there are more than 200 of them. And by the texture of PVC, ceilings are divided into three categories:
- matte - slightly rough, without shine (the same as fabric)
- satin - smooth, with a slight reflective effect
- varnish or glossy, the mirror effect of which allows you to visually increase the room and choose a fabulous design of lighting
- And finally, the price. Compared to fabric ceilings, this is also an important advantage.
But the minus of the ceiling from PVC film for some reason many consider the need to fet the film strips to obtain a panel of the desired width. This is all the more strange that the spike of the paintings is very reliable (if it seems to someone that the film is easier to break by the seam) is almost invisible, and it is not always required - after all, PVC canvases with a width of 3 and a half meters are already released now.
In general, we figured out the difference in the material, made a choice, you can proceed to the practical side of the issue.
Preparatory stage in the installation of a stretch ceiling
Considering that we still make repairs, then the walls should be at least completely put in order the walls to install the stretch ceiling. That is, try to install the ceiling after pasting wallpaper. After all, for this process, it is necessary that the room be clean. The basic ceiling also needs to be cleaned - remove from it crumbling whitewashing or wallpaper, as well as any dirt and dust. The fact is that the spots from dirty hands from the stretch panel will be very difficult to remove, but we need a clean ceiling.
To properly determine the size of the canvas of our ceiling, it is necessary to make thorough measurements. Experts believe that the discrepancy should not be more than 5 mm, otherwise the ceiling tension will be uneven, which will greatly reduce beauty and durability. You need to measure on the walls at the place where we will fix the baguette. In principle, this level is determined by the height of spotlights. We measure the entire perimeter (all sides, not only two) and diagonals. We reflect all the measurements on paper - draw a diagram. In the same scheme, we denote all the openings (windows and doors), pipes and other communications. In full scheme, it is much more convenient to choose places of adhesion of the film strips, if necessary.
We apply the lines on the walls along which we will attach the baguette. To do this, it is most convenient to use the level to put the tags in the corners and through a construction cord or just a strong thread to beat off a flat line. The perimeter is ready. Now let's take a baguette - in it it is necessary to drill holes for self -tapping screws in advance, and the profile itself is fired for angular joints. When attaching the baguette on a brick, concrete or drywall wall, the distance between the dowels should be at least 8 cm, if we are going to fix it on a tile or metal, then this period can be increased to 12 cm. We make the first hole in the baguette no further than 2 cm from the corner. Now we only need to fasten the baguette to the wall, not forgetting to check the correctness of its position.
The preparation process is almost completed, it remains only to mark the points of attachment of the lamps, install racks for them and conduct wiring. By the way, the markings of the lamps need to be done not only on the ceiling, but also on the floor, otherwise it will be difficult for us to find racks after tensioning the ceiling. We reflect the location of the lamps using a plumb line or laser. And we will try to do this with an indelible marker so as not to trample in subsequent work.
All is ready? It's time to install the ceiling!
Installation of a stretch ceiling
Our stretch ceiling was bought, and the packaging with it has already warmed in the warmth of the apartment. Just in case, I will immediately warn you - it is not recommended to leave the canvas for too long, it may form creases that will be completely straightened only after a while.
Do not forget - it should be clean in the room, so it is worth it just in case again to vacuuming, it is much easier than to remove dirty spots from a brand ceiling.
If you decide to purchase a ceiling from PVC film, then before opening the packaging and unfolding the panel in the room you need to tightly close the windows and doors, and the room itself is heat the degrees to 40 heat gun. We open the packaging carefully so as not to damage the canvas, especially if we use something sharp.
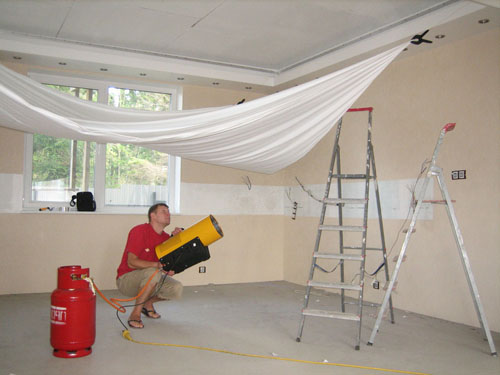
Uniform heating of PVC film with a heat gun
Turning the film, we and evenly warm it up to 60 degrees, then it will become more elastic and easily stretch along the baguette.
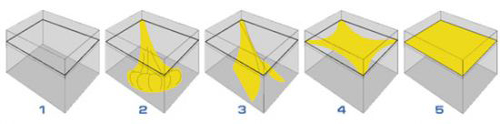
Stretch ceiling attachment procedure
We begin to fix the film from the selected corner (the packaging should indicate which angle of the film we fix in the first place), fixing it 15-20 centimeters on each side of the corner. Then we go to the opposite angle, and in the same way we fix the rest of the corners. After that, stretch the film and fix its edges around the entire perimeter of the room. During stretching, we continue to warm up the film to facilitate the tension and straightening of folds and creases. And the last - when the film is already stretched onto the baguette frame, we warm it for another quarter of an hour, after which the room can be opened and ventilated. Everything - a stretch ceiling from PVC film is almost ready!

Schematic image of a harpoon mount of a stretch ceiling made of PVC film
Now you need to lay a decorative plug to close the gap between the wall and the stretched ceiling. And also make holes for lamps. This is done like this:
- a scheme for the location of the lamps is transferred to the ceiling canvas (remember our marks on the floor?), Points put the points with a regular marker
- the overhead rings of the lamps are lubricated with cyanacrylate (glue) and as soon as possible and more accurately glued to the canvas in the marked places
- after the glue dries and grabs, we carefully cut out the film inside the ring with a sharp knife
- adjusting the height of the lamp, screw the bulbs
A small remark about the bulbs - in the case of a stretch ceiling, do not use lamps with an incandescent power of more than 60 watts to avoid the possible melting of the film.
If you still decided to install a fabric stretch ceiling, then wearing is useless, because polyester is not so elastic. And to start fixing the canvas should be from the middle of the wall, and the corners remain in the end. But the stretching procedure itself remains the same.
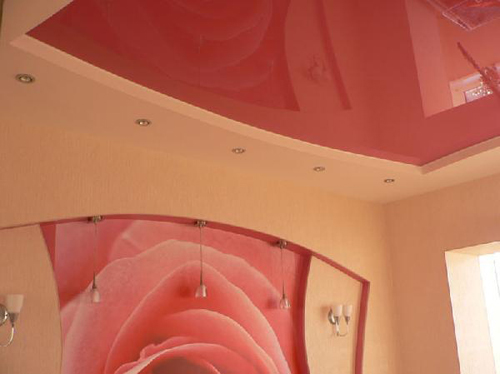
Two -level ceiling - with glossy stretch PVC ceiling in the middle and borders made of drywall around the perimeter
Uh, now that's all! The ceiling is stretched evenly, without distortions, the profile is closed with a beautiful ornament of the insert, the lamps are fixed. We turn on the light and enjoy the new original design of the whole room.
![]()
StrPort construction portal 2011-2018. Articles about repair, construction, building materials.
Copying information from the site is possible only with permission of the editorial office Or indicating a direct link to the source. Legal justification