Wooden door handles for premises for various purposes are sufficiently expensive ...
|
|
For the construction of a house of low number of storeys, more and more people are used ... |
Insulation of the front door contributes not only to minimizing heat loss, but also ... |
Installation of foam ceiling panels
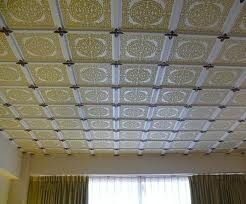
The domestic market is saturated with a variety of materials for finishing the ceiling, offering the consumer many options. It can be plastic, wooden, metal panels or suspended and tension systems, in any case, each coating, one way or another, performs its decorative function. However, there is a material that combines environmental friendliness, ease of installation, low cost and durability. We will talk about foam ceiling panels, which have recently regained their former popularity.
Content:
- Production of foam ceiling panels
- Advantages and disadvantages of foam ceiling panels
- How to choose foam ceiling panels
- Calculation of the required number of panels on the ceiling
- Choosing glue
- Methods of location of foam ceiling panels with photo
- Installation of foam ceiling panels
Foam products are widely used in construction due to their high technical and operational properties. Elements for the decoration and decoration of the premises are available from it. It can be ceiling panels, skirting boards, and sockets that serve as addition or are used independently.

Production of foam ceiling panels
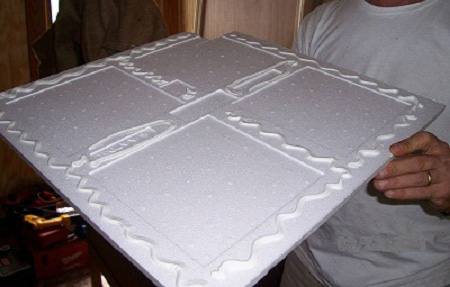
It should be noted right away that foam ceiling panels are most often produced by a square shape with dimensions of 30x30 or 50x50 cm, less often a rectangular -shaped plate is offered on the construction market. According to the manufacturing technology, they can be divided into 3 types.
Pressed
- Stamps are used here, in which prepared foam plates are laid. The form is passed through the press, forming on the front side a print of a relief pattern. With this method of manufacture, the granularity of the material remains. Product production is possible only white.
- After installing the plates, you can give any shade, covering them with water-dispersed paint, diluted with the right tint of the tint. The panels made by this method can be laminated in any color palette.
- This technology allows you to produce a product with exact geometric parameters, therefore, the ceiling surface is almost perfect. Due to the porous structure and thickness (up to 8 mm), the slabs have decent heat and soundproofing properties.
Extruded
- With this method, the main raw material is subjected to temperature treatment. The foam melts and then a strip is made from the resulting mass, which later, through a vacuum-termic molding, turns into tiles.

- In the process of melting the material, a dye can be added, which allows you to produce such products in any color scheme.
- Small porosity makes this ceiling panel more durable. However, it should be clarified that with this production, the equipment should be configured as accurately as possible. Otherwise, the products may turn out with deviations in size. Which will undoubtedly create difficulties in installation.
- These products at the output have a glossy surface. They are produced in a wide variety of embossed ornaments, with clear embossed patterns, with complex, sometimes voluminous decor. It is very easy to care for such panels.
- After gluing extrusion plates, the seam between the elements is quite noticeable. In addition, such products cannot be additionally painted, since their surface is not capable of absorbing a coloring substance.
Injection
- This manufacturing method involves the processing of steam of the main raw materials laid down in the press-form. As a result, a cast plate of white color with a thickness of 9-14 mm, which has higher quality, comes out.

- The valuable properties of the ceiling panels made in this method are water -repellent and noise -respected properties, which allows them to mount them in wet rooms (bath, kitchen) and rooms with thin walls.
- This type of tile has the correct geometric shapes, a deeper and more clear texture. During installation, the material forms a single canvas without visible seams.
Advantages and disadvantages of foam ceiling panels
- Despite different manufacturing technologies, the weight of the tiles does not exceed 200 g/m, which significantly facilitates the transportation, storage and installation of products.
- Foam plates in the production process are treated with antipyren components that reduce the combustibility of the material. Thanks to this, the flame is held, no more than 4 seconds. In addition, when burning, the polystyrene secures 8 times less heat than a tree.
- Products made by extrusion are characterized by resistance to alkaline, alcohol and saline solutions, building mixtures based on gypsum, lime, cement. Which allows them to perform their installation on the surface of any materials.
- However, contact with organic solvents should not be allowed, such as: gasoline, turpentine, kerosene, acetone. Oil -based paint and varnish products can lead to deformation and melting of foam panels.
- It is impossible not to note the safety of the material in an environmental plan, where the toxicity indicator does not exceed 0.027 mg/m, which is fully consistent with existing norms.
- Foam panels are not susceptible to decay and formation of mold, withstands a wide range of temperatures. The coefficient of thermal insulation exceeds the indicator of wooden products, not to mention such materials as brick or reinforced concrete.
- You can mount such products in almost all rooms of any purpose, but only with a reliable ventilation system.
- A significant advantage of foam ceiling panels is their low price and a large assortment.

- The only drawback of this facing material is its unsuitability for expensive interiors or premises decorated in an ultramodern style. Although today manufacturers are trying to expand the assortment of products manufactured as much as possible, where each consumer will be able to purchase panels to taste.
How to choose foam ceiling panels
- First of all, when buying, you should study the geometric shape of the product. The corners should strictly equal 90, the edges of the plates are even, without jamming and rounding. Such conditions of choice will allow you to perform installation, where the joints of the edges will be invisible.
- The density and thickness of the ceiling panel should be the same over the entire surface. Crowing the edges is unacceptable. If a stamped product is purchased, then take it around the corner and shake it slightly, if it is not broken, it means that the production technology has not been broken.
- The relief on the stove should be the same, and the ornament (drawing) is clear, without blur.
- Of course, in products made by extrusion, the appearance is most attractive. However, during operation, their gloss can become very intrusive, such a product is quite capable of distracting attention from the main elements of the situation.
- The owners of the kitchen of small areas should be careful with the choice of this material, especially if the room has poor ventilation and also does not have an extract. In this case, the warm air emanating from the stove will stagnate under the ceiling, which will lead to the penetration of fat into the porous surface of the ceiling panel. After a while, the product will turn yellow and lose shape.
Calculation of the required number of panels on the ceiling
The calculation of the material can be made in two ways.
The first way
- On paper, the surface of the room is drawn for pasting with panels. The scale is necessarily preserved here. Since foam ceiling panels are usually mounted from the middle of the ceiling, to begin with a diagonal. Next, it is necessary to place the material from the central part to the edges of the room with maximum thoroughness.
- If, when located near the wall, the gap of less than half of the stove remains, then one thing will cover two such areas. If the gap is more than 25 cm, then you should know that a whole tile will go into the consumption;
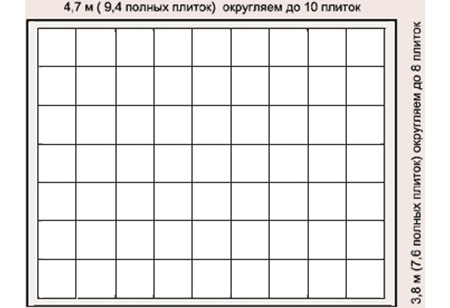
The second method
- The calculation can also be performed by a mathematical way, where the length and width of the room are divided by the size of the plates. For example, there is a room with a width of 4.5 m and a 3.8 m width, the purchased product has dimensions of 50x50 cm. So 4.5: 0.5 \u003d 9 tiles, 3.8: 0.5 \u003d 7.6 plates. The results obtained are multiplied and as a result we get the final amount of material of 68 whole pieces.
- It does not matter what method the calculation was made, the material should be purchased by 10-15% more. This is necessary in case of erroneous cutting or deformation of the product, because you don’t really want to run to the store, having quit repairs. In addition, if some time has passed after the acquisition, it may well be that this collection will already be absent.
Choosing glue
Before fastening ceiling panels from foam, it is important to choose the right glue.
- These work can be performed using the well -known polyvinyl acetate glue Bustilat or, for example, PVA. They do not have a repulsive smell, but, unfortunately, they dry for a long time. If for some reason the choice fell on such adhesive compounds, then, in order not to stand 10 minutes under the ceiling, carefully supporting the tile, it is recommended to use the English pins, stuck them neatly under the angle of the product.
- Universal adhesives such as titanium, master or eco-naset can also be used. The polymer, which is part of the presented options, endows with pretty good adhesive properties, but the grasp itself has been going on for quite some time.

- Against their background, the moment is favorably different, which fully meets its name glues instantly. Of course, it is a little more expensive and it is necessary to additionally purchase a construction gun for it, but it is worth it.
- A thick consistency of liquid nails is perfect for these purposes, especially if the surface is imperfect. The composition should be read here, there should be no solvent among the components.
- The adhesive mixture can be prepared independently. To do this, you need a polymer putty (preferably on an acrylic basis), which is diluted with water, until it turns out thick as sour cream. A little PVA is added at the collection stage. It is recommended to knead a similar solution in small portions so that it does not have time to harden in the process of work.
- It is worth saying that the stamped product is glued easier than the tiles made by extrusion.
Methods of location of foam ceiling panels with photo
The sticker of foam plates can occur from the corner, the method is relevant for rooms with perfect parameters, which in itself is a rarity. If these work is carried out in a typical apartment, it is likely that the longitudinal seams of the tiles will be shifted and will be clearly visible from the front door.
- Accommodation can be diagonal. This option is preferable, because this location allows you to visually increase the room. In addition, all flaws, cut off the wedge -shaped parts of the plates will go to the walls.

- If someone seems to be too boring and ordinary to someone, then you can stick multi-colored slabs. A couple of combined shades are selected for the combination, or, conversely, a game is held in contrasts. Selected products are laid in the form of a serpentine or chessboard.

- To create an individual project, the panels are painted with acrylic or water -based paint diluted with a tint. You can paint the entire surface of the ceiling or only selected elements in the required order.

- Sometimes the panels are glued to a frame made of wood or metal, this method is more suitable for curved surfaces. The design allows you to hide communication or perform a ceiling of complex shape.

Installation of foam ceiling panels
- Designers advise in any case to start laying facing material from the chandelier, thereby receiving a clearly built pattern in the central part of the ceiling. To do this, you need to draw a straight line from any corner, passing through the point at which the main lighting device is located. Usually this is a chandelier and, as a rule, it is not in the center of the room.

- The second line should be drawn perpendicular to the first. Thus, you get a surface divided into 4 segments.
- But before this, standard organizational work on the preparation of the ceiling is carried out, including cleansing from the previous coating or exfoliating putty. Remember, if thin tiles were selected, then dark spots will be visible through them. Therefore, it is better to plaster the surface at least 1 time to give a homogeneous white color.
- A primer is mandatory, which suppresses the growth of mold and fungus, removes construction dust from the surface, which significantly improves adhesion.

- Next, the ceiling marking is performed, where perpendicular diagonals are carried out, serving as guides to masonry panels. Having carefully checked the accuracy of the angles and the evenness of the lines can be proceeded to the sticker.
Here you need a minimum set of tools:
- mounting, stationery or ordinary sharply sharpened knife;
- pencil, roulette;
- soft fabric;
- tiles and glue itself.
Stages of work
- It does not matter how the stoves will be laid: in parallel to the walls, that is, from the corner or from the central part of the ceiling diagonally, remember, the first 2-3 panels determine the appearance of the entire surface. Therefore, increased attention should be paid to the correct location of foam products according to the markings.
- Pay attention to the arrows or cramped inscriptions depicted on the back of the plates. They indicate the direction in which the styling should be carried out. If there are no one, then immediately by opening the packaging, you need to put them yourself, for example, with a simple pencil, but, in no case should you use a marker. There are 2 reasons for this, firstly, in the daylight, the panel will significantly differ in shades from white to deep gray. This is especially sinned by smooth products. Secondly, plates are often found, where one of the parties can differ on a fraction of a millimeter, it seems to be a little, but when laying 10 elements, it runs up to 0.5 cm. It is undoubtedly that it will not be necessary to talk about perfectly even seams. Therefore, if you glue foam panels strictly in one direction, the difference will be invisible either in work or in the final result.
- As a rule, the glue is applied pointwise around the perimeter of the panels, for more reliable fixation by the adhesive composition, the diagonals of the product can also be noted. After you need to wait a few minutes and only then glue the stove.
- The material itself is quite thin, so pressing should not be done with fingers, but with your palm. Excess glue is neatly removed by the fabric immediately after installing the stove. Next, the location of the plate is checked, it should be strictly parallel to the marked line. If necessary, adjusting the placement of the ceiling panel.

- Subsequent panels are also mounted in the same way. When laying products from the angle of gluing is carried out in rows. If the option was selected where the installation begins with the central part of the ceiling, then it is recommended to glue 2 pieces alternately in each segment, that is, in a circle relative to the chandelier. In this case, it will be possible to avoid noticeable displacements of the seams.
- When working, it is important to monitor the absence of a difference in the height of the product, which is possible due to an excess or insufficiently thick layer of glue.
- When all entire plates are recorded, the distance to the wall is measured and the required part is cut off using the knife. Each panel should be measured separately, since the room often does not differ in the correct dimensions. If a gap no more than 15 mm remains between the wall and the whole panel, then it is not necessary to close it, here it will hide.

- If, at the end of the installation of ceiling panels made of foam with your own hands, gaps between the plates were found, you should not be upset, here you can knead a little finish putty and gently close the gap with your finger. An excess mixture from the product is removed using a wet sponge.
Such plates do not require special care. Here, it is enough from time to time laminated products to wipe with a damp cloth and soap solution. Other tiles can be vacuumed using a soft nozzle. Alcohol will help to get rid of the fat spot, and small pollutions are easily removed with an eraser.
![]()
StrPort construction portal 2011-2018. Articles about repair, construction, building materials.
Copying information from the site is possible only with permission of the editorial office Or indicating a direct link to the source. Legal justification