Roof insulation is an important stage in the construction of your own home. These works need ...
|
|
The service life of the foundation of the house is from 50 to 100 years, and in principle we compare with ... |
Today there are a large number of different building materials for the roof ... |
Installation of cassette ceilings

Times are going on, and every year there are more and more options for decoration of ceilings. Now they can not only whiten, paint and paste it with wallpaper, but also finish with panels, equip stretch and suspended ceilings. The choice is so great and diverse that it is difficult to dwell on something specific that it would satisfy all the needs of a modern person. Cassette ceilings Universal option, which is suitable not only for public places, cinemas, restaurants, cafes, hotels, discos and night clubs, hospitals and other institutions, but also for the ennolation of residential premises of living rooms, kitchens, bathroom, hall, etc. In this article We will talk about what cassette ceilings are, what they are and how to install them.
- Advantages and disadvantages of cassette ceilings
- Elements of the suspension system
- Types of cassettes from different materials
- Installation of open -type cassette ceilings
- Features of the installation of closed -type cassette ceilings
- Installation of cassette ceilings: video - Instruction
Advantages and disadvantages of cassette ceilings
Cassette ceilings are a type of suspended ceilings and are a suspended structure of profiles and decorative cassettes or panels, the front side of which can have different design, color and texture. In order not to fail, let's figure out what such ceilings have advantages and what disadvantages.
Advantages of cassette ceilings:
- It does not require pre -preparation of the surface, its alignment. Fastening profiles can be installed on any strong base concrete or wooden. The cassette ceiling will hide all surface deficiencies.

- Behind the cassette ceiling, you can hide communications: electric wiring, ventilation ducts, gas pipes, cables and wires for various purposes, for example, the Internet.
- Unhindered access to communications. Unlike other suspended structures, such as drywall ceilings, access to these communications is possible at any time without additional dismantling or repair operations. It is enough to remove one or more cassettes/panels and you can freely repair or re -relerate networks.
- Cassettes or panels easily change to new ones, if they were damaged due to mechanical exposure or wet due to the flood from above.

- Another equipment can be installed in the place of cassettes: lighting (raster lamps), heating (infrared heaters, air conditioning) and ventilation. The sizes of cells and cassettes are unified, some models of such equipment are produced specially for them. Moreover, the same lamps or air ducts are just connected to the wires and put in the cell cell.
- Moisture -resistant cassettes/panels made of aluminum or glass are not afraid of moisture, mold and fungi. They can be installed in the bathroom, shower, pool and other rooms with high humidity.
- The exceptional ease of installation, which any owner can easily cope with.
- An acceptable price, especially taking into account the durability of the cassette ceiling and the possibility of replacing its elements.
- A huge selection of color solutions, as well as matte, glossy, velvet, mirror textures.
- The ability to perform the frame is both visible (open system) and invisible (hidden system). Cassettes for these systems are different and differ structurally, like profiles.
- Fire safety.
As you can see, there are so many advantages that it seems that it is better to find anything better. But do not be fascinated so much, this design also has disadvantages.
Disadvantages of cassette ceilings:
- The suspended structure lowers the ceiling level of 15 25 cm. The minimum height is 15 cm. For rooms with low ceilings, this is quite critical, so it makes sense to find something else and abandon the suspended ceiling at all.
- In the open system of the cassette ceiling, profiles are visible. Many may not like it.
- Even in the option with a closed frame system, the grid that the edges of the cassettes forms is still noticeable. This gives the premises some differentness.
- The cost of profiles for cassette ceilings is greater than for hanging structures made of drywall, as they are more aesthetic, their front side is decorated.
Perhaps everything, there are very few shortcomings. From all of the above, we can conclude that the installation of cassette ceilings is possible only in rooms with high ceilings and if the owners are arranged by the very type of this ceiling, its differentness. In rooms with high humidity, only cassettes made of metal or glass can be used, as they are non -threat.
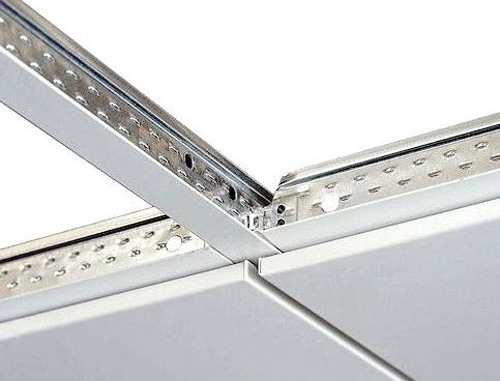
Elements of the suspension system
Cassette ceilings are sold in sets or parts. The representative of the company calculates the number of elements based on the area of \u200b\u200bthe room. It is better to always take with a margin, but small. For example, mirror panels can be taken more, as they can break, but durable aluminum, damage them during installation.
In total, the installation of a cassette ceiling will need the following elements:

- The carrier profile T15 or T24 (15 mm and 24 mm is the width of the lower shelf) 3600 mm or 3700 mm long. Most often made of aluminum. The lower shelf is made to the panels in color.
- Intermediate guides/profiles T15 or T24 with a length of 600 mm or 1200 mm. Equipped with special latches, which help easily assemble the frame, inserting them into the holes or fasteners of the supporting profile.
- A fastener profile or corner 3 m long. The height of the product is 24 mm, the width of the lower shelf is 19 mm.
- Suspension on the springs for additional fastening of the main guides to the ceiling. Suspension-is also used.
- Cassettes or panels that are inserted into the cell cells.
All elements of the suspension system must be purchased from one manufacturer, otherwise different elements may simply not approach each other.
Types of cassettes from different materials
An indisputable advantage of cassette ceilings is that the cassettes themselves or panels themselves can be made of different materials, different textures and colors. This allows you to realize a lot of intricate or simply elegant design solutions. And also allows you to install cassette ceilings in premises for various purposes.
Metal cassette ceilingsthey are made of aluminum or galvanized steel. They can be matte or glossy, smooth or perforated, coated with a mirror metallized layer or polymer spraying. The most common colors of such ceilings: white matte and glossy, silver and matte metallic, chrome, light beige and gold. In addition to these colors, the panels can be red, raspberry, blue, black, light gray and even have a tree texture. If you have not found a shade you like here, do not despair, the manufacturer offers powder staining of his products in any color selected according to the international coloring table RAL.
The edge of the panels of metal ceilings is performed in several ways:
- Board Absolutely even edges.
- Tegular The edges of the plate are made with a step, the panel is obtained at the level of the lower edge of the fasteners.
- Also aluminum slabs are made with bent under 90 edges for fastening into hidden systems.

Mirror ceiling Cassette can be made, both from silicate glass, and from plexiglass (acrylic glass) or even metal stylized for glass. The surface of the plates is both purely mirror and slightly matte with shades of gold, silver, chromium, etc. The suspended structure is also made in color, i.e. Gold, chrome or black. Mirror slabs are installed inside the ceiling frame, this allows them to be securely fixed.

Glass cassette ceilings From silicate or acrylic glass, they allow you to create a truly unforgettable ceiling design. Behind panels/stoves of matte glass, which are now very popular, you can install lighting devices. Scattered light creates an atmosphere of comfort and heat. A variety of patterns can be applied to the surface of the glass, including sandblasting. Lamps will highlight them on top and highlight them against the general background.
Gypsum cassette ceilings The oldest proven option. A mass of color solutions and textures. They are used not only for decorative purposes, but also for sound and thermal insulation of ceilings. Such panels cannot be used in rooms with high humidity.
Cassette ceilings from mineral or fiberglass Used for thermal insulation of the premises and reduction of shock noise. Mineral fiber panels are a heater in a hard stove, and fiberglass slabs are somewhat reminiscent of glass wallpaper.
Wooden cassette ceilings An extremely rare exclusive phenomenon. The panels are made of wood of expensive oak species, tika, ash, Merbau, bamboo and others. Quite often, the panels are decorated with carvings, such work is not cheap, in fact, like the ceilings themselves. The frame of wooden ceilings is hidden or hidden by decorative overlays.
The price depends on cassette ceilings on the material of the panels. Even the cost of ceilings from one material can differ significantly. For example, the cheapest aluminum ceilings cost 6 cu for m2, and the most expensive 38 cu for m2. Glass ceilings will cost and more expensive than 80 cu for m2.
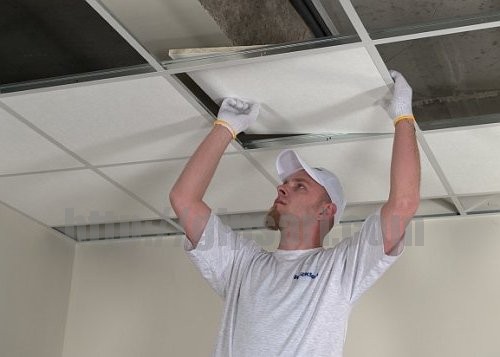
Installation of open -type cassette ceilings
Cassette ceilings are so easy to install that all work can be done independently without any special skills or knowledge. The installation itself takes no more than 2 days. In addition to the set of the suspended cassette ceiling, you will need a drill, a perforator (for concrete walls), dowels and screws, a level (preferably laser), a construction thread or twine, a grinder, metal scissors and straight arms.
Drawing of a cassette ceiling
Before proceeding with the installation of a cassette ceiling and even before ordering components, it is better to draw up a drawing of the future frame. To do this, on a sheet of paper, draw a premises plan with accurate dimensions and apply a frame of the frame on it indicating the exact size. This will help calculate the number of system elements and correctly distribute them on the surface of the ceiling.

It will certainly turn out that the number of cassettes/panels will be uneven, which means that you will have to mount cut slabs. Such plates should be located near the walls that are not immediately visible. For example, above the front door. On the opposite sides of the room, the size of these plates should be the same. The distance between the main guides should be 600 mm or 1200 mm, and between the intermediate 600 mm. As a result, cells of 600x600 mm should be obtained.
How to calculate the exact size of an incomplete slab: Divide the width of the room by the size of the panel. For example, the room with a width of 3400 mm is divided into the width of the panel of 600 mm, we get 3400/600 \u003d 5.6666. We multiply the whole number of panels by their width 5x600 \u003d 3000 mm. We take this value from the total width of the room: 3400-3000 \u003d 400 mm. Divide it in half, we get 400/2 \u003d 200 mm.
Now you can purchase materials and start installation.
Installation of a wall profile
It will not be difficult to install cassette ceilings with your own hands. We start working with marking. First of all, we apply a zero mark on the walls, for this you will need a level. The laser level here will be in handy, but if it is not, you can do with a water level. The main thing is that the marks on the walls form a plane.
The zero level should be at least 150 mm below the main ceiling. If communications are hidden over the cassette ceiling, then the indentation must be calculated so that everything is fitting, and at the same time there is free access to communications.

On the perimeter of the room on the walls, we draw a line, along it we will attach a wall corner profile. Then we attach the profile to the wall and fix it using dowels or screws. If the walls are made of durable concrete, then first we set the holes, lay the profile, put the holes in the wall, insert the dowels and only after that we put the profile again and screw it with self -tapping screws. The fastening step for a wall profile is 400 500 mm.
Suspension fastening
Do not fasten the suspensions by eye, since if you install them with an error of 30 50 mm, they will not hold the profile sufficiently tightly. It is better to outline places first. How to fix suspensions:
- To do this, on a wall profile or above it, we make marks where guide profiles will be located.
Important! The maximum distance between suspensions is 1200 mm, from the extreme suspension to a wall of 600 mm. They should be located at the intersection of the main and intermediate guides.
- Then we pull the construction cord or thread between the marks. We fix them to self -tapping screws.
- According to the drawn plan, we retreat the required distance from the wall and make a mark strictly above the cord.

- When accurate places for suspensions will be marked with dots, you can start drilling holes. We use a drill or punch.
- On spring suspensions, we usually reduce too much fasteners with the help of nippers and with pliers we make a smaller loop.
- We fix on the ceiling with metal anchors with a hat 13 mm.
Do not forget to install additional suspensions in places where there will be lighting devices, fan or other equipment.
Installation of the main guides
We cut the main guides to the required length, if necessary. For example, for a room of 3400 mm, the extra 200 mm profile must be cut so that the intermediate profile is firmly fixed into its groove.
We install the main profiles in this way: we support them on wall profiles, level them strictly along the stretched cord, then we put it on the corner profile with a snapping mechanism, firmly fixing it.

The suspension hooks are put up for the holes in the main profile, adjust the height using a quick -and -sound clip. If you compress this clip, then the lower suspension pin can be moved up and down, if released, it fixes the suspension in a certain position. Be sure to check the location of the profiles using the level.
Installation of intermediate guides

We begin the installation of intermediate guides from the middle of the room. In a step of 600 mm, set the profile between the main guides. At the ends of the intermediate profiles there are special elements that must be snapped in the main profile. Between themselves, such profiles are joined according to a similar principle.
Be sure to check that the angle between the profiles is strictly 90. You can use the transporter.

When the middle of the room is ready, we move to the profiles closest to the wall. Cut them to the required size. The edge on which the latch remained is inserted into the main profile, and the second end is simply laid on a wall profile.
Installation of cassettes or panels
It remains the simplest to install decorative plates. First, we check the corners between the guides 90 again. Then we just insert the plates into the cells: we put them into the hole by the edge, turn them into a horizontal position and lower it on the profiles. The edges of the plates should not be visible, otherwise the frame is incorrectly mounted.
Finally, install cut slabs. We cut them under the size evenly, trying not to make chips. To do this, you can use a hand -cutting tool. The wall -mounted edge should be as flat as everyone else.
So the cassette ceiling is ready, you can enjoy its beautiful view. In the future, the surface of the ceiling can be washed with a soft rag with soapy water, if the panels are made of metal, glass, plastic. If the material is afraid of the water gypsum, wood, mineral fiber, then it is better to use a panicle to remove dust.
Features of the installation of closed -type cassette ceilings

The installation of cassette ceilings with a closed system is slightly different from the previous description. Firstly, slightly different profiles with a fastener on the lower shelf of the profile are used. The edges of the panels are inserted into it.
Carrying profiles are installed parallel to the long wall of the room with a step equal to the size of the panels. The dimensions of the panels of the ceilings with a closed system may not be unified. For example, often the width of the panel is 300 mm. The main profiles should be fixed with a step of 300 mm on suspensions. For each profile it is necessary so many suspensions that the distance from the extreme to the wall is 600 mm, and between the neighboring 1200 mm.

The frame will be parallel to located profiles. Plates are attached to them, the edges of which are bent at 90. The edges of the plates are inserted into the hole in the profile and snap there. Plates can be moved along the profile. In more detail and clearly, the instructions for the installation of a cassette ceiling with a closed system can be viewed in the video example below.
Installation of cassette ceilings: video - Instruction
![]()
StrPort construction portal 2011-2018. Articles about repair, construction, building materials.
Copying information from the site is possible only with permission of the editorial office Or indicating a direct link to the source. Legal justification