Frambles and marble floors have always been considered a sign of obvious luxury and refined ...
|
|
One of the most important stages in the repair is the work to equalize the floor ... |
We warm the bath with our own hands. Tips from the master for the installation of thermal insulation
As you know, every year energy is becoming more expensive. What to do to the owner ... |
How to make a frame for the ceiling
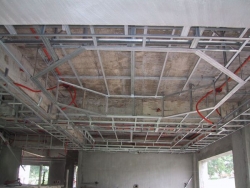
Everyone wants to live in a house or apartment with a beautiful and unique interior. To create one, in addition to wall decoration, you will have to work on the ceiling. After all, it is it that we notice and consider first of all at the entrance to the room. Today, suspended and suspended ceilings are especially popular, allowing original ideas and ideas to realize. But behind their external beauty and simplicity, a frame for the ceiling is hidden, less attractive and much more complex.
Creating a stretch or suspended ceiling work consisting of several stages. This is the creation of the project. The second stage is the arrangement of the frame. The third stage is the laying of communications and the lining of the frame. In conclusion, there is a finish, if necessary. In this article, we will examine in detail the creation of the project and how to make a frame for the ceiling.
Calculation of the ceiling frame
Like any other construction work, the arrangement of a suspended or stretch ceiling begins with the project, namely with the calculations of the number of materials. This is most convenient to do in a specialized program, such as Archicad. In creating the project, the most important is the drawing of the ceiling frame indicating the necessary structural elements, installation sites, as well as their number.

Having planned to equip a stretch or suspended ceiling in yourself, you must be prepared for the fact that for each of them you will have to make your own frame that is different from the other. Moreover, the structural elements for the suspended and stretch ceiling are different. Of course, for the beauty of stretch and suspended ceilings, you can combine. In this case, a frame for a two -level ceiling is created, combining structural elements of both types of ceilings. Therefore, when planning the creation of such ceilings, you should focus on the number of ceiling levels. The appearance, the number of materials and the complexity of the work will depend on this.
Important! The creation of a suspended or stretch ceiling involves a decrease in the total height of the room. Therefore, it is worthwhile to approach the issue of creating a multi -level ceiling.
Before proceeding with calculations, it is necessary to figure out what the frames of stretch and suspended ceilings are. The frame for a stretch ceiling consists of an aluminum baguette profile, which is attached to the walls around the perimeter of the room at a certain height from the ceiling. The frame for the suspended ceiling is much more complicated and is a design of metal profiles of PP and PPN (their analogue is the CD and UD profile), connected by self -tapping screws and one/two -level connections. The whole structure is attached to the ceiling for suspensions.

To calculate the required amount of profile for a stretch ceiling, just measure the perimeter of the room. But in the case of a frame for a suspended ceiling, you will have to work hard and do the following:
- we measure the perimeter of the room. The result will be the length of the guide profile of the PPN 28/27. There may be a situation when it seems that the opposite walls are different in size different in size, one relative to the other. In this case, for the convenience of calculations and purchase of materials, we take more importance;
- now we calculate the amount of the main supporting frame profile PP 60/27. The length of one profile is taken equal to the width of the room. So more convenient and reliable. The profile itself is attached with a step of 600 mm. Such a step is convenient in that drywall sheets are produced in sizes of 600 and 1200 mm. If we make a frame for the ceiling made of plastic, then the profile PP 60/27 is placed along the length of the room with a step of 500 mm. The calculation of the number of profile planks is carried out as follows: divide the width or length one step and we get the number of planks. For example (4000/600)+2 \u003d 8.66. We round to the whole in the direction and get 8 planks and mark on the location of the installation of the supporting profile. In this formula, +2 are two strips that are installed at the beginning and at the end of the room;
Important! For the reliability of fixing the GKL sheets, the first and last strips of the supporting profile is placed at a distance of 100 mm from the wall. The remaining six are evenly distributed with the selected step.
- next, we carry out the calculation of the P-shaped suspensions. They are attached to the overlap, take a step at 600 mm. For each bar of the supporting profile, several pieces of such suspensions are required, their calculation is carried out as follows: (4000/600)*8 \u003d 48 pcs. As in the case of load -bearing strips, we place the first and last suspensions at a distance of 300 mm from the walls, the rest with a step of 600 mm. We mark the places of their installation in the drawing with crosses;
- the stiffness of the entire structure is achieved by installing jumpers between supporting profiles. To do this, use the PP 60/27 profile, which we place in a step of 600 mm. The number of rows of jumpers is calculated similarly to the number of load -bearing planks. The difference is that for calculation we take the length of the room instead of the width;
- the connection of the supporting profile and jumpers is performed using special connectors of crabs. The calculation of the number of crabs is performed quite simply. To do this, multiply the number of rows of the supporting profile and the number of rows of jumpers;

The calculations discussed above are performed for a single -level suspended ceiling. Typically, a two -level suspended ceiling involves the creation of a protrusion, niche or arranging a stretch ceiling inside the suspended structure. To do this, along the perimeter of the room, with an indentation from the walls, a metal frame for the ceiling is created. The same profiles are used as for the usual single -level ceiling. The difference is only in the height of the second level and its design. To make a calculation for a two -level ceiling, it is necessary to supplement the above scheme for creating the frame as follows:
- the number of pP profile jumpers for the second level will be (8+8)*2 \u003d 32 pcs. In addition to one jumper of increased length in each corner. The size of the second level bearing jumper is selected from vision, what will be the second level;
- to consolidate 36 jumpers, 36 suspensions are required;
- to make the design reliable, for the second level you will have to make vertical racks from the PP profile, to which GKL sheets will be attached in addition. The number of racks is equal to the number of second levels of second levels 36. Their height depends on the height of the second level you have chosen;
Important! If the height of the second level is more than 120 mm, it is necessary to use adjustable suspensions on traction. If you plan to make a stretch ceiling inside a two -level structure, then we calculate the length for its profile along the inner perimeter of the two -level ceiling.
- all points of installation of suspensions, vertical and supporting profiles are marked in the drawing. In addition to the project of the suspension or stretch ceiling, it is necessary to specify the installation sites of lighting devices and wiring the wiring to them.
Creating a ceiling frame
The installation of the frame from the profile for the ceiling from GKL, plastic panels or stretch ceiling begins with preparing the surface of the ceiling. Even, despite the fact that the entire surface of the ceiling will be hidden by a new ceiling, you should take care of the overlap and eliminate large irregularities and close up cracks. In addition, you will also have to align the surface of the walls, especially in those places where the baguette and guide profile will be attached. After the completion of these works, you can proceed directly to the installation of the frame.
Ceiling marking

We start marking from the ceiling height mark. To do this, you can use a roulette or a metal ruler. By applying it at 3 4 points to the wall, we measure the necessary height from the ceiling without taking into account the thickness of the drywall sheet, a plastic panel or skirting board for a stretch ceiling. Having made notes, we take the painting thread, connect the planned points and, pulling it out, let go. As a result, you get a direct line along which we will further attach the guides of the suspended ceiling or fasteners for a stretch ceiling. To simplify the task and not to mess with the painting thread, you can use the laser level.
Important! For a stretch ceiling, there will be enough mark on the walls under the ceiling around the perimeter of the room. And for the frame for the ceiling made of drywall or plastic, you will have to mark the strips of the carrier frame and the suspension fastening points, as indicated in the drawing. This can be done similarly to the method described above.
Installation of the frame for the ceiling
We begin to create a frame for a drywall ceiling with the installation and fixing of the guide profile of the PPN 28/27, which is attached to the walls under the ceiling using dowels and self -tapping screws 6x60. To do this, in the profile itself, plunge the holes with a pitch of 300 mm. In this case, we make the first and last hole 100 mm from the edge. Then we apply the profile to the wall so that the planned line is under the lower edge of the profile.
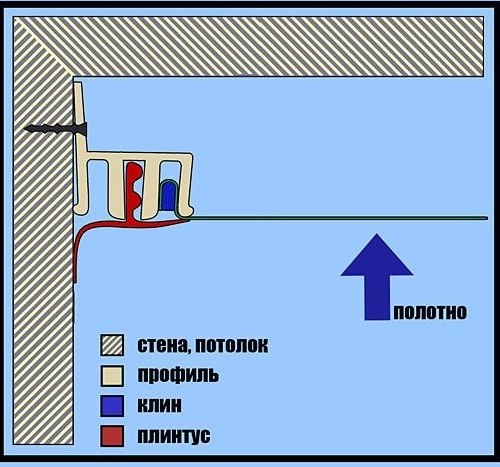
Through the holes in the profile, we make notes for fasteners. You can sprinkle holes directly through the profile attached to the wall, but this requires one or two partners, firmly pressing the profile to the wall. Having made holes, set the profile in place and fix it. For a focus of the ceiling made of plastic, we perform the same actions described above. Since the frame of the stretch ceiling consists only of baguette profiles, after fixing them to the wall, you can proceed to the tension of the canvas.
The following suspensions are next in line. At the suspension mounting point, apply it to the floor. We make sure that the base of the suspension is located strictly perpendicular relative to the line for the strip of the supporting profile. Then we plan a place under the holes for fasteners and then plug it, or immediately put the holes. It remains only to repeat this procedure for all suspensions, fix them in place and bend the suspensions down. In this case, it is necessary to ensure that the gap between the antennae is 60 mm.

Important! By mounting a metal frame for the ceiling, you need to be prepared for the fact that you will have to screw many different screws. Therefore, you should purchase a screwdriver in advance.

Having finished with suspensions, we go to the strips of the supporting profile. Everything is simple here. It is necessary to start flat, the basis down the profile of PP 60/27 inside the suspensions and fix it on both sides on each suspension. To do this, we use screws for metal LN 8 or LN 11. As a result, a frame for a ceiling made of plastic was obtained. But for the drywall ceiling you will have to install additional elements. To do this, we take the entire bar of the profile PP 60/27 and cut into pieces in size equal to the distance between the installed strips of the supporting frame. The number of such jumpers is indicated in the drawing. Now we take a roulette or ruler and mark with a marker on the strips of the carrier -bearing frame of the installation of crabs. Then we install them in place, pressing from above until completely snap. Now we install jumpers that are attached to the crabs in place. Having snapped them, we check the distances between the jumpers according to the drawing, if necessary, adjust and fix with screws on the metal.

The above option for installing the frame is provided for a single -level suspended ceiling. To create a second level, it is necessary to supplement the already created design. If this was not done at the beginning of the installation of a two -level frame, then first of all we mount the guide profile for the second level. Then, to the already installed jumpers of the first level, we fix the vertical racks from the PP 60/27 profile. To do this, in the very profile of the racks, we cut part of the profile from above and below to make a P-shaped opening. Now we put the P-shaped rack in place and fasten with screws on metal. It remains to install the planks of the second level of the second level and fix them.
Having created a frame for a suspended and stretch ceiling, you can start laying wiring for lighting devices. The completion of all affairs will be the lining of GKL sheets, plastic panels or tension of the canvas. It is worth noting that all work on creating the frame is quite capable of performing on their own. The main thing is to be able to handle the tool and understand the essence of the work performed.
![]()
StrPort construction portal 2011-2018. Articles about repair, construction, building materials.
Copying information from the site is possible only with permission of the editorial office Or indicating a direct link to the source. Legal justification