The sewage clogging occurs even with the most accurate use. This is a big...
|
|
Loops of accessories, which several years ago was unremarkable ... |
The roof is the most important part of the house, on the quality of which the comfort of living depends ... |
How to make a two -level gypsum cardboard ceiling
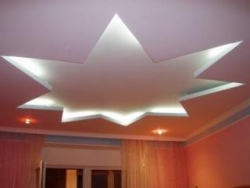
Not always just a perfectly even surface of the ceiling fits into the concept of the room. Therefore, designer thought has no restrictions on the creation of bizarre patterns, curls and smooth waves above the head. In this case, the base acquires a number of storeys, and with it the volume and a unique look. The design of any configuration also allow the design of any configuration. But this technology is complex and inaccessible to an ordinary home master. While drywall allows you to take into account all the wishes of households. The article will talk about how to make a two -level gypsum cardboard ceiling with your own hands.
Content:
- The validity of a two -level gypsum cardboard ceiling
- How to make a two -level gypsum cardboard ceiling
The validity of a two -level gypsum cardboard ceiling
The most common option is a two -level ceiling. Its creation is the least costly, both in terms of material and in the amount of time, which will have to be spent on its construction. In addition, the number of levels equal to two is the most acceptable solution for most apartments in multi -storey residential buildings. The height of the ceilings in their rooms is already small in order to lower it even lower and weight due to the creation of additional volumetric elements. And the loss in height will be significant at least 10 centimeters.
Two -level gypsum plasterboard ceilings photo

And even in the case of such a restriction in the number of storeys, in practice you have to go to small tricks: use the surface of an existing ceiling as the first level. In private houses, the height of the ceilings is usually much higher, so their happy owners are less limited in actions.
How to make a two -level gypsum cardboard ceiling
Preparatory stage
- At the preparation stage, you should decide on the project. Plasterboard sheets (GVL) are attached to the profile, which can be bent at different angles, not limited to exclusively straight lines. Therefore, the sketch of the ceiling structure can be really the most daring.
- The easiest way to perform the edging around the ceiling from simple straight lines or select only the lighting area in the center of the surface. This is convenient even from the position of counting the required amount of material. Yes, and those who had no experience with GVL before, is much easier to start with the creation of simple figures. But regardless of complexity without the simplest pattern of the future ceiling, you should not move on. If there is an opportunity or independent experience in modeling on a computer, then it is much better to call for help high technologies. Then your idea can be seen in conditions close to reality, complicate it or, conversely, abandon any detail.
- When purchasing plasterboard sheets for the ceiling, be sure to take into account its location. If you can buy an ordinary GVL in the hall or bedroom, then for the kitchen it is worth choosing a moisture -resistant version of the material. As for the frame, you can build it from wooden bars. There will be no problems with the material of various lengths and thicknesses, but it is much more convenient and faster to work with a metal profile. After the sketch is compiled, and the material, along with the due margin, was calculated and purchased, it was time to look up.
- Since the upper tier will be considered an existing base, it must be carefully examined for the existing flaws. The point illumination, which is used in most cases, will clearly distinguish all the irregularities and errors. Therefore, it is worth armor with a spatula and align the future tier No. 1.

Two -level drywall ceiling with backlight
- Armed with a sketch, you need to outline where exits under the lamps will be located on the ceiling. Then it will become clear how and where to lay the wiring. At this stage, it is better to invite a specialist if there is at least the slightest doubt of your own forces. It is not only about security considerations that are not working or through one burning lamps are able to ruin the whole impression of the design, no matter how wonderful it eventually turned out.
- In addition to the location of lighting points, there are also communications such as air conditioning or hood, if we are talking about the ceiling in the kitchen. About their location and a possible combination with the design of the ceiling, too, should not be forgotten.

The design of the two -level ceilings made of drywall
- There are two ways to assemble a two -level gypsum cardboard. It is easy for some masters to work directly on the ceiling. That is, as expected, to install all the guides on the base, and then sheathed the GVL frame. And it is easier for someone to do the opposite: to completely collect a complex basis on the floor, fastening the guides with each other and folding the desired figure from them. And only then reunite the second tier with the first.
- It is not possible to give an unambiguous assessment of the correctness of any option of these two. These are personal preferences of the master and the nuances of each individual design. A bulky second tier exceeding the base in the area seems to be advisable to collect immediately on the ceiling, because then it will need to somehow raise and hold it until the fasteners are produced. This is inconvenient, it will require a large number of assistants, and there is also a significant risk of bending the entire frame.
- And small figure structures, perhaps, is much more convenient to cook, being in a stable position on the floor, and not on a stepladder.
Two -level gypsum -plane ceiling frame
- As the first stage to the ceiling, you need to transfer the marking of the future structure in full scale.
- The guide profile is fixed on the planned lines. It has a marking of PNP, has a size of 2728, and 3 meters long. It is used exclusively to create a frame of suspended ceilings or wall cladding. Such a profile is attached at the height of the estimated level of the ceiling, and in its wall there are already holes for metizes that facilitate this process. In places where it is required to create a bend of the profile wall and form a smooth wave. The steeper the radius of the conceived figure, the less the step of the cut. If it is planned to make a fairly voluminous semicircle on the ceiling, it is better to make it from several small segments, bending each separately work so much more conveniently than bending a three -meter profile at once. To perform cuts, you can use scissors for metal or a small light grinder (you will have to hold it with one hand).

- Now you need to fix straight suspensions. They are sold with the labeling of PP 6027. They are mounted with an interval of 60 cm. It is recommended to use anchor dowels as hardware for fastening, they are more tightly included in the base and provide good retention of any heavy structure.
- To add the structures of stiffeners, you need to cut the right number of blanks suitable in length. For straight sections, the step of their attachment of 60 cm will be quite sufficient, on curved complex segments of the structure it is reduced to 20-30 centimeters. When installing transverse guides, which then will also serve for closing the GVL, do not forget about the presence of spotlights. Places of fastening the profile and the output points of lighting devices should not intersect.
- The outlines mounted on the ceiling should be repeated from the same profile and fix it on the suspensions. You can collect this part of the structure on the floor, and then simply put it in place.

- The longitudinal and transverse structural elements in the intersection are additionally fastened with special crabs. Their paws are bent along the edges of the profile and fixed with small screws for metal. So it turns out a reliable connection that can withstand significant loads.
Hypsum plasterboard sheathing
This stage is not of great complexity, but it will require the accuracy of measurements and some preparation, especially if the design is not straight, but with curved elements. With simple forms, everything is simple.
- From the drywall sheet, a chamfer applied in the factory is cut off, as a rule, slightly thinner than the main part of the material.
- Pieces of the desired size are marked and cut on the sheet to close the structure and proceed directly to the cladding. The elements are attached to the profile with self -tapping screws, trying to completely drown their hats in the material.

- In order to remove the lamps out, the holes of the desired diameter are selected in the GVL. This can be done using a drill and a special nozzle of the crown, you can use an electrician and cut the necessary figure along the drawn contour; For the lack of power tools, you can always use a hand hacksaw. There are special hacksaws for drywall sheets. They differ in their design, the tip of the canvas is pointed, and it itself is quite dense and rigid.
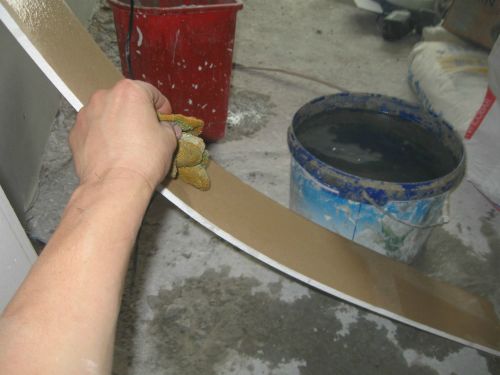
If you need to bend the drywall strip, then you can choose one of two ways for this.
The first involves the use of fluid. It is used when it is necessary to make a small wave.
- The required strip is cut off in size, laid on a flat surface, one of the sides is moistened with water and left for a while (about an hour). Despite the apparent simplicity, there are several nuances.
- Before moisturizing the material, along the side that is supposed to be wetted, pass with a needle roller. The grooves created with its help will contribute to the better penetration of water. No need to try to soak the sheet in one call. There is a risk of damaging the paper layer, without reaching the plaster filling. To moisturize, you can use a roller or spray gun. The procedure is repeated several times. After the allotted time, the element from the GVL softens, and bend it in the right direction will not be difficult. First, the sheet is fixed at one of the edges, then it is carefully bent further and at the same time fix it. The recommended fastening step is 10 or 15 cm so that the bend will fit tightly and does not disappear. After installation, you should ventilate the room well, and give excess moisture to evaporate.
The second method is more often used to create arched doorways. But for bends along a large radius, it is better to use it.
- So, on a measured piece of GVL, you need to perform a series of notches. They are located 3-5 cm in steps. It depends on the planned curvature of the structure. It is more convenient to place a sheet of material on a horizontal plane or lean against a wall with a small slope. A construction knife with a sharp blade must be applied by parallel cuts along the ruler (or using the construction level). The second paper layer that remains entirely is strong enough to prevent drywall to break to the end.
- Then the sheet should be broken over the sections of the cut and fixed on the profile. If the element is long, then it must be cut gradually, as it is fastened. As an option, a long curved line can be divided into several segments, and installation in stages.
- This method of bending of drywall involves quite frequent use of metizes. They need to screw them every 5 cm (respectively, the step of the cuts). This will ensure the most dense fit of the sheet to the main structure.

The tricks of the cutting of drywall
- In order to quickly and smoothly cut off the desired piece of drywall sheet, a simple construction knife is enough.
- Sheets of large sizes (more than a meter wide) are more convenient to cut when they are leaned against a wall with a small slope. The canvases up to 0.6 meters are better to cut widthly, putting on a flat surface of the floor or table.
- All incisions are carried out on the front side of the material.
- If you need to sheathe with plasterboard sheets, a large area of \u200b\u200bthe ceiling, then it is better to purchase a 3.6 m plate in size. For small work, it is better to buy material in terms of 2.5 m. This will turn out much more convenient and more economical. The waste will remain minimal.
- Careful planning when opening will also help minimize the costs of drywall. The rule, where it is advised to measure seven times, and only then cut, in this case it works 100%.
Putty
- At the junctions, plasterboard sheets are putty with the use of Serpi (reinforcing mesh). As a rule, it is enough to go through the spatula only these places and the point of entering the screws. The entire surface is extremely rare, for example, before applying liquid wallpaper as a finish coating.
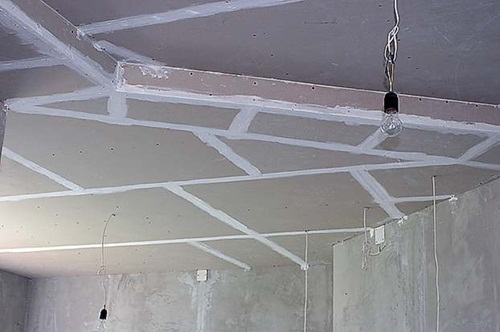
- After all the joints and hollows from self -tapping screws were equalized with the general level of material, the hopped places are treated with a fine -grained skin. Now the entire surface is treated with a layer of primer, and it is considered completely prepared for final pasting with any type of wallpaper or for painting.
Two -level gypsum plasters video
On this installation of a two -level gypsum plastic ceiling is over.
![]()
StrPort construction portal 2011-2018. Articles about repair, construction, building materials.
Copying information from the site is possible only with permission of the editorial office Or indicating a direct link to the source. Legal justification
fS
fS