Today, the ceiling such as whitewashing is almost no one uses. They came to her ...
|
|
The device of the floor screed is one of the important stages in the repair. Concrete is ... |
In the process of erecting any building, first of all, the foundation should be laid. On the basis ... |
Water warm floor - DIY installation

A warm cozy house, a loving family, healthy children - doesn’t this one of us dream of that? This dream is not only our generation or our country. And if love and health are the concepts of eternal and not always amenable to our efforts, then to arrange a warm house for us quite on the shoulder. Just think, people probably dreamed about this in the caves. After all, it is the space surrounded by a cold stone that most of all I want to warm. And so the ancient inventors tried: the hearth, fireplace, stove - dwellings began to slowly warm up. Pipes appeared - not only water came to the houses, but also the ability to make a more advanced heating system. And as an apotheosis of scientific thought: today we know the device of warm floors, and we can even make a warm floor with our own hands.
Release:
- A little about the advantages of warm floors
- General ideas about the system of water warm floors
- Preliminary preparation for installation
- Warm water floor - installation technology
- Installation of a water warm floor with a concrete screed
- Nasty way of installation of water warm floors
A little about the advantages of warm floors
Let's first talk about why it is the warm floor that is considered the best way to heat the housing and what is no longer satisfied with the usual heating system using radiators.

Comparative characteristics of the radiator system of heating and warm floors
With radiators, everything is quite simple - with a heat source located on the wall, in our room a rather noticeable and not very pleasant, honestly, temperature difference is formed in our room. Why? As we taught at school, warm air seeks to rise up, while the cold falls down. The lateral arrangement of heating devices leads to the fact that the warmest place in the room is only near the heat source, then the warm air goes up almost in a straight line, and the cooled one drops to our legs. So it turns out that there is nothing to breathe upstairs, and the legs are freezing, and even a constant air cycle around the room creates nasty drafts and carries dust, no matter how much it remove it. And all this leads to numerous health problems.
But in the case of placing a heating system, and even with a uniform arrangement of heating elements over the entire area of \u200b\u200bthe floor, warm air is very successfully distributed in our living space. The legs are shrouded in the most comfortable warmth - degrees 25-30, who likes, already at the level of the head, the air becomes cooler (remember the recommendations of doctors?) - 20-25 degrees, and the temperature of the underground air no longer worries us - we still do not sleep on the ceiling. In addition, such an even constant flow of heat from the floor relieves us of sharp and strong air movements, the so-called convection flows, that is, cleaning, finally, brings long-awaited fruits to relieve us of ubiquitous dust. And all this combined at times reduces the likelihood of colds and allergic diseases.
So it turns out that the connection of a warm floor brings not only heat to our house, but also health.
General ideas about the system of water warm floors
Well, we begin to warm our house using the best technologies of our time. Moreover, it really is mainly about its own private house, because not every apartment has the opportunity to install an alternative heating system - only in those apartment buildings where this is provided for by the project. In addition, heating of a private house with hot water is simply more profitable than the same electric warm floors. But let's look in more detail what a water warm floor is.
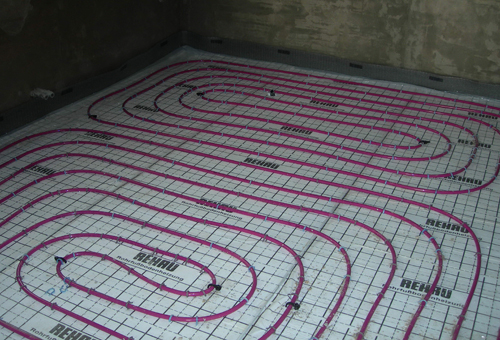
Laying pipes of water warm floor
So, the warm floor of the water is the device of the system. The correct set of warm floor includes:
- a substrate under a warm floor insulating from heat leaks and moisture down
- fasting system for fixing pipes (there may be a reinforcing mesh)
- heating elements, in our case, these are pipes with hot water
- the material that evenly distributes heat on the floor surface, in this capacity, the concrete screed often acts
- finish flooring
- temperature control system
If you choose high -quality materials and responsibly approach the installation, then our water warm floor will serve for a long time and without interruptions. The simplest example - a pipe from modern materials is guaranteed to last at least 50 years. The whole system will work flawlessly as much as its every element is reliable - the rule of the weak link.
Preliminary preparation for installation
What you need to know for a successful installation of all elements of the system? In addition to general provisions, there are also the same little things, without which our whole work can turn into a zilch. Here are a few rules guaranteeing the perfect functioning of the system:
- to make a project of a hydraulic heating system of the whole house is better with the help of specialists who will definitely calculate the necessary heat supply and pipe laying scheme
- lay pipes for a water warm floor on a flat surface so that the distribution of hot water occurs according to the scheme, without stagnation
- for full thermal insulation, the substrate should be from 3 to 15 cm thick (directly depending on the temperature of the coolant) and a density of at least 35 kg/cubic meter. m
- with a large area of \u200b\u200bthe heated room, it should be divided into several sites, in size not more than 40 square meters. m, then the temperature load on the concrete screed will not be so large, and you can not be afraid of cracking
- between the sites and around the perimeter of the entire room, it is necessary to lay a damper tape that compensates the temperature fluctuations of the concrete screed
- pipes for a warm water floor should be selected quite flexible and durable, metal -plastic or polypropylene seamless pipes with a diameter of 20 mm are best suited for this purpose
- excessive joining should be avoided when laying pipes in order to exclude the possibility of leaks under the floor (the safest option with two joints is at the entrance and output of the collector)
- the length of one whole pipe should not exceed 90 meters, then circulating water will always be the desired temperature
- we make sure that there are no creases when bending pipes
- a warm floor should be filled only after checking the hydraulic system for tightness (crimping)
- pour the concrete screed when maintaining normal working pressure in the pipes system
- all technical devices (collector, pump, boiler, thermostat) should be purchased from reliable companies that give good guarantees - it is better to pay the full price right away than to spend additional money on the repair of the warm floor again and again
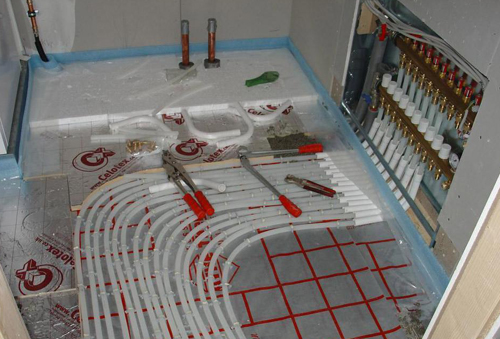
A pumping-mixing node with a collector unit of a water-free waterproof system
Following these simple rules, we can count on the fulfillment of our dreams. Although if the one who wants to independently equip the warm floor in the house is not a lot of experience in repairing, it is better to invite specialists, then confidence in the reliability of the system will be guaranteed.
Warm water floor - installation technology
It's time to move on to specifics. And here we need to figure out what type of installation is more suitable for us. At the moment, two methods of installing a water floor are known:
- concrete (with mandatory concrete screed)
- stale (depending on the material on which installation is made - polystyrene or wood)
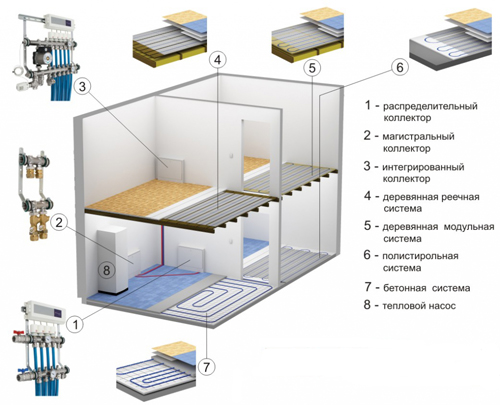
Various types of installation of water warm floors
The concrete method of installation is best suited for the first floor of our house. Polystyrene can be done on any tier, but the wooden is most optimal for the second and higher floors of the house. However, more detailed information is needed for a better understanding.
Installation of a water warm floor with a concrete screed
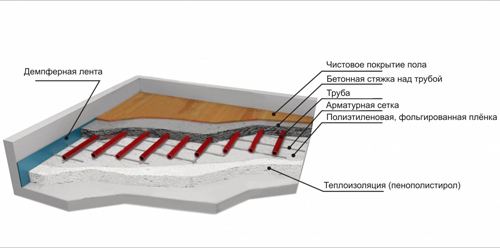
Water warm floor with concrete screed
The stages of installation with a concrete screed are as follows:
- we install a collector cabinet on the wall and mount a pump-mixing node with a collector block in it
- we glue the damping tape
- we lay waterproofing (polyethylene film)
- we lay the thermal insulation with a reflective helling (you can first lay polystyrene or polystyrene, then foil)
- we install a reinforcing mesh (if we had previously laid polystyrene mats with bosses or grooves for pipes, then this stage can be skipped)
- we connect the pipe to the collector’s output and lay it according to the room according to the scheme specified in the project, connect the second end of the pipe to the return
- we make a connection of the heat regulator of the warm floor and servo drives to change the temperature through the communicator
- we carry out crimping (give in pipes increased pressure to test tightness)
- leaving the working pressure in the pipes, pour the concrete screed (concrete mixture based on cement M300 with plasticizer and polypropylene fiber or special mixtures for screed of warm floors) with a layer thickness of 5-7 cm
- after complete hardening of concrete (28 days), we lay the finish flooring
That's all. But this is the most difficult installation of warm floors. By the way, boilers for a warm floor, although they are part of the heating system, are installed separately with the help of specialists.
Nasty way of installation of water warm floors
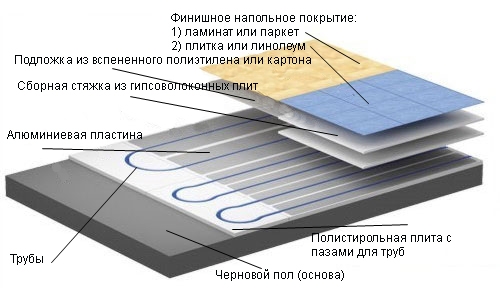
Layers of laying water warm floor with a flooring
The most important difference between this method is the lack of a concrete screed. Stages of styling will be as follows:
- installation of a collector cabinet and waterproofing
- the heat -insulation laying:
- or polystyrene mats with pipes for pipes
- either mineral wool or other similar material, laid under a wooden base (modules from chipboard or lag)
- laying aluminum plates
- connection and laying of pipes according to the scheme
- subway to the finish floor:
- for parquet or laminate - cardboard or foamed polyethylene
- for tiles or linoleum - gypsuminated or cement -stoves as a prefabricated screed
- flooring
As you can see, the deceased method takes much less time, and the layer of the pie with pipes is much thinner than the concrete screed, and lighter, therefore it is recommended for inter -story floors.
This is how the water or hydraulic warm floors are installed. Not so scary, isn't it? But still I repeat: if you do not have a lot of experience in affairs of this kind, it is better to invite a professional specialist. Or at least use the consultation of a living professional who sees your specific case and will be able to adapt our tips for you. Good for you to repair and warm house!
![]()
StrPort construction portal 2011-2018. Articles about repair, construction, building materials.
Copying information from the site is possible only with permission of the editorial office Or indicating a direct link to the source. Legal justification