Installing plastic windows allows you to get rid of many problems associated with ...
|
|
For each owner of the house, it is important to equip all rooms with special comfort ... |
A car for many people is more than just a means of transportation. It... |
Seaming of seams in concrete floors
The device of the floor screed is one of the important stages in the repair. Concrete is a durable and reliable material, but, nevertheless, vulnerable to dynamic loads, temperature changes, aggressive chemical exposure and water. So that the screed does not destroy and serve reliably and for a long time, it is recommended to pay special attention to the head and seal of the seams in concrete floors.
Content:
- The need to cut seams in concrete
- Classification of deformation seams
- General rules of suture cutting
- Ways to seal the seams
- Sealing seams with sealing mastic
The need to cut seams in concrete
Any floor consists of a coating and a base, which, most often, is equipped with a concrete screed. Concrete in its structure is a very fragile material that is not capable of plastic deformations. After the application to screed the load, which exceeds its strength characteristics, the material is not able to deform without destruction, as, for example, in the case of plastic or other plastic material, and will crack like glass.
Also, cracking is observed under the influence of internal stresses in the concrete floor, which is caused by temperature changes and shrinkage deformations during hardening of the screed. To limit the crackers of the floor and control the appearance of cracks in the concrete screed, it is recommended to cut deformation seams.
Classification of deformation seams
In the concrete flooring, the most responsible event is the correct construction of deformation seams in the floor. There are three types of deformation seams in the concrete floor: insulating, shrinkage and structural.
Insulating seams
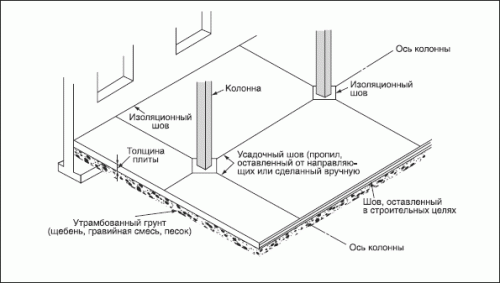
The structures of the house during its operation are subjected to various deformations. There are a lot of reasons that cause these deformations. These are the effects of environmental factors, soil movements, temperature effects. To avoid the transfer of such deformations from the foundation and walls to the concrete floor in places where the screed is in contact with other structures with columns, walls, foundations for equipment, it is necessary to arrange insulation seams to the thickness of the screed.
A suture of isolation type will allow the floor to work regardless of other structural elements of the building. Concrete in the process of hardening gives shrinkage, decreasing in volume, and if the screed has a rigid clutch with a fixed object, and there will be no insulating seams, then it will crack with a high degree of probability.
Isolation seams are arranged around the foundations and columns, as well as along the walls in order to exclude the transfer of deformations from the structures of the house to the floor screed. The seams of this type are created by laying along the structures of the building of the insulating material before pouring concrete. The insulation material should perceive plastic deformations without destruction, that is, to be compressed. It is important that such isolation material does not appear on the surface of the screed.
Usually the thickness of the seam reaches 10 millimeters. Isolation seams can be in the shape of a circle or square. The square seam must be deployed 45 degrees around the column to form a straight seam opposite the corner of the column. If, through the seam, which is not intended for places with a large load, the equipment will move, it is recommended to thicken the screed by 25%.
When pouring concrete around the columns, the formwork is installed along the seam line. After clean the formwork and put in its place the insulating material of the desired thickness. The remaining between the column and the seam is poured with a concrete solution and smoothed. You can also cut the seams in the concrete floor around the columns in hardened concrete with rhombuses, cutting out to the entire depth of the screed and filling it with insulating material.
Shrinkage seams
The concrete screed unevenly dries from top to bottom. The upper part of the floor dries stronger and sits more than the lower one. The screed tries to wrap himself, after which the edges become above the center. As a result, internal stresses arise in concrete, which lead to the formation of cracks. To avoid chaotic cracking, shrinkage seams are cut in the screed.
Suffer seams allow you to create straight slabs plane in the screed. As you strive to wrap and dry concrete, the seams will open slightly, and the cracks will form not chaotic, but in a given place. Law seams can be made by inserting the converting rails, while the concrete still remains plastic, or by cutting the seams after the end of concrete processing.
Deformation shrinkage seams must be made along the axes of the columns and then joined with the corners of the joints walking around the perimeter of the columns. The distance to the seam from the column should not exceed the thickness of the screed by 24-36 times. In the aisles, shrinkage seams should be located at a distance, which is equal to the width of the screed. Paths that have a width of more than 300-360 centimeters should have a longitudinal seam in the center.
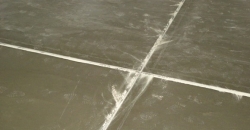
Paul maps formed by shrinkage seams should be square if possible, avoiding L-shaped and elongated cards, as well as branches, as shown in the photo of the seams in the concrete floor. The length of the card should not be more than a width more than one and a half times. The smaller the floor map, the smaller the likelihood of a chaotic cracking of a concrete screed, but it is also important not to overdo it.
Saw seams need to be created at the outer corners, since otherwise cracks can go from the corners. The screed section with too sharp angles cracked with a high degree of probability. Avoid such angles if possible. If this is not possible, make sure that the base is well compacted, and cut the seams in places where the formation of cracks is most likely. Sometimes, in order to close the cracks at external and sharp corners, the screed is additionally strengthened with steel reinforcement.
Structural seams
It rarely happens that the entire procedure for filling the concrete floor is carried out without breaks, the duration of which is no more than 1 day. This is possible only in rooms with a small area and provided that the concrete mixture is transmitted uninterruptedly. Typically, the fill is carried out with significant technological breaks. The laid concrete during this time manages to gain some strength. In places of contact of screeds with different laying periods, it is useful to cut structural seams.
They arrange structural seams in those places where you finished the daytime work on laying concrete. They are performed if possible at a distance of about 1.5 meters from other seams in the concrete floor, which are located parallel to them. The shape of the edges of the screed for structural seams is usually made according to the principle of a spike into a groove.
If the structural seam is where insulating and shrinkage seams are not desirable, then you can use the sleepers that are laid across the seam. Reiki should be placed at the right angles to the seam in the middle of the depth of the concrete screed.
General rules of suture cutting
In order to get a strong concrete screed, wear -resistant, resistant to various mechanical loads and negative influences, it is recommended to use high -class materials, and cut out deformation seams in time and professionally. There are general rules for cutting seams in the concrete floor, which it will be useful for you to familiarize yourself with:
- Cutting time. The seams must be cut immediately after laying concrete, or after it gains the desired strength, so as not to be damaged by the blade, but to the possibility of arbitrary cracks. In wet cutting, such conditions occur approximately 4-12 hours after the finish processing of concrete. Although it is also possible to cut the seams in a day under certain conditions. On dry concrete, slicing should be done as quickly as possible, until the edges of the seams began to crumble.
- Trial seam. The worker should do a trial seam a couple of hours after the start of hardening of the concrete solution. If the aggregate particles when cutting a test seam are falled out of concrete, then it is too early to start cutting. And it's time when the blade cuts the grain of the aggregate with concrete.
- Tools and equipment. The location of each seam is customary to outline on a stretched rope with chalk. As a guideline for the cutting procedure, a ruler is used, for example, a board with a width of at least 4 centimeters. The seams in freshly laid concrete can be made by a special cutter, and in dry concrete floor the seams are drank. When cutting the seams, you should always have spare equipment at hand, if the main breaks down.
- Cutting technology. In hot weather or in the danger of cracking, it is sometimes recommended to cut every third seam before intermediate cutting. Usually the seams are cut in the sequence in which concrete was laid. The seams should be cut to a depth of 1/4 - 1/3 of the thickness of the concrete screed. The seams that are made on freshly used concrete with special carriers can have a slightly lower depth. Typically, the interval of cuts is selected within the result of multiplying the thickness of the screed by 24-36. On a 10-centimeter screed, the seams are cut at a distance of 240 360 centimeters from each other. For concrete with significant shrinkage, it is preferable to make the interval of cuts closer to the indicator of 240 centimeters. Exclude a T-shaped intersection of chopped seams, which provokes the formation of cracks passing through such a crossed seam.
Ways to seal the seams
Sealing of the seams allows you to protect the seams from the penetration of aggressive media and water, as well as from clogging. Sealing the cracks on the concrete floors allows you to strengthen the screed and protect it from mechanical strokes at the joints, prevents gaps, punctures, as well as abrasion. This is especially important if you plan to put ceramic tiles on the concrete floor, since cracks appear in the coating with leaky seams, which leads to the rapid destruction of the tile coating.
Different materials are used to seal deformation seams:
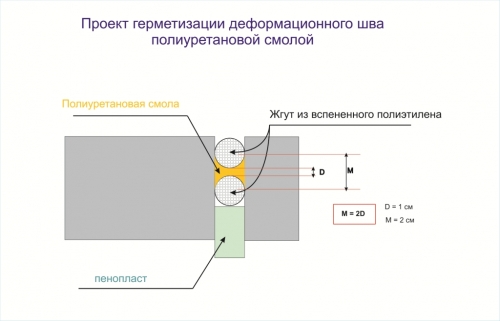
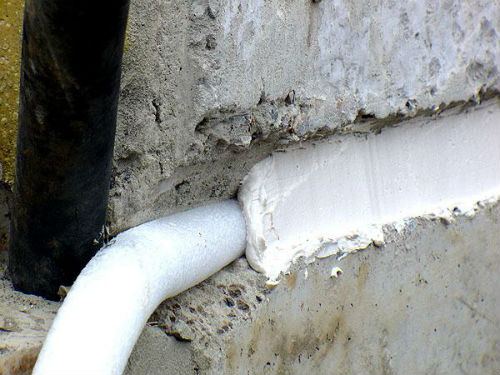
- Servital tourniquet. An effective method of sealing deformation seams in the concrete floor is to lay a sealing tourniquet made of foamed polyester. This material is quite practical in use and retains high elasticity even at low temperatures.
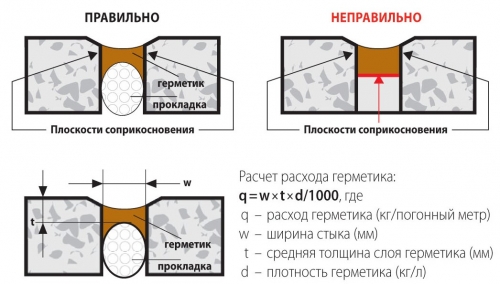
- A sealant for the joints of the concrete floor. A very popular option is the use of all kinds of sealing mastics. After curing, the material becomes elastic and completely isolates the seams from the water. The surface where the cracks were treated with sealant will also not be a source of dust.
- Hydroshponki. Another method for using PVC, rubber or polyethylene -based sealing material. As such a material, profiled tapes called hydraulic spons made of polymer materials are used, which, when pouring concrete solution, are laid inside the deformation seam.
- Profiles for deformation seams. The last way to install deformation seams in the concrete floor is to use a profile for deformation seams, which consists of frost -resistant rubber and aluminum or steel guides. Sealing rubber does not pass dirt and moisture inside the seam. The installation of such profiles allows you to reduce the actions of the load on the screed and prevent cracking of the concrete floor. Such profiles are built -in and overhead.
Sealing seams with sealing mastic
In construction practice, different types of sealants are used. They differ in the number of components are one- and two-component, as well as chemical nature. The most common are polyurethane, acrylic and latex materials. Polyurethane sealants have the best indicators for strength, relative lengthening, resistance and durability.
Let's look at the procedure for sealing deformation seams in the concrete floor using two -component sealant:
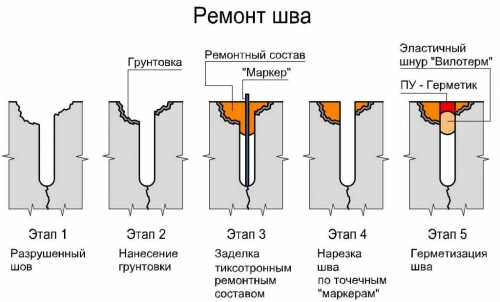
- Preparation of tools and materials. Before proceeding with sealing, it is necessary to prepare: hermetic mastic, a brush for applying a primer, a triangular narrow spatula for leveling the sealant layer, a primer of deep penetration, which strengthens the substrate, a frame gun for squeezing into the gap of sealant.
- Preparation of the base. The base should be dry, strong, without signs of fungal damage, cleansed of dust, any bulk materials, oils, mud, rust, fat, old paint or other substances, not fixed particles, which can affect the clutch. Therefore, before sealing the deformation seam, it must be cleaned of garbage and dust by purging the compressed air, by means of mechanical cleaning with sandstorming or brush, and then treated with a primer. Using the compressor, you should make sure that it does not leave an oil film in the seam. The narrow seam is better slightly expanded before applying sealant. To strengthen the bases, you need to pre -treat with concentrated primer.
- Kneading sealant. If you use a two-component composition, mix the paster with a hardener until a homogeneous mass is obtained for 3-5 minutes. It is impossible to violate the dosage of the components, which is indicated in the instructions, because the decrease in the number of hardeners provokes the undercullification of the sealant, and its increase is fraught with the production of hard sealant. To increase fluidity, you can dilute the composition with a solvent (gasoline, white spiteration) in an amount of 80 grams per 1 kilogram of composition.
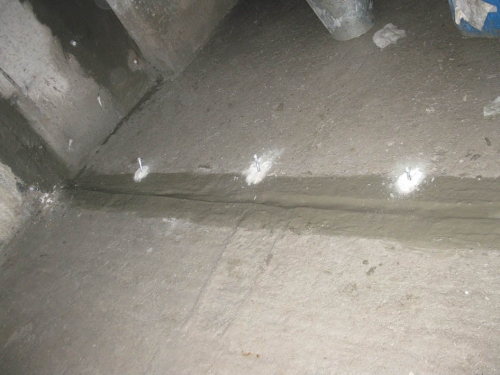
- Application of sealant. Apply a sealant with a pistol along the entire length of the seam with a uniform layer, then flatten the sealant strip with a spatula on a concrete floor, as shown in the video about the seams in the concrete floor. To obtain an even and beautiful seam, you can moisten the spatula before smoothing in a soap solution. Remove the excess sealant. The viability of such a sealant is close to 40 minutes at a temperature of 20 degrees above zero. When the composition loses its viability, which manifests itself in the ability to smear on the surface, it is recommended to apply a layer of cement or sand, which has a thickness of 1-2 millimeters on a stacked crack. Time for a set of strength with sealant 5 - 7 days. When conducting work indoors and after its completion, it is necessary to carefully ventilate the room.
In addition, the special elasticity of such a sealant allows you to use it for repair sealing the concrete floor of cracks and holes in the floors and concrete slabs, as well as for repairing cracks on road canvases. The composition withstands temperature fluctuations from 50 degrees below zero to plus 60 degrees Celsius, which allows it to be used with success for concrete work outside the premises.

