Since ancient times, and still piece parquet due to the aesthetic qualities for ...
|
|
The prototype of modern piece material for lining of buildings of any purpose was ... |
To build a truly heat-efficient house, you need to take care of insulation not ... |
We lay the warm floor. DIY Film floor for laminate

House heating is one of the most important issues that should be treated very seriously. Indeed, in the future, thanks to high -quality heating, comfort will depend on the cold pores of the year. Having insulated the walls, ceilings and installing the heating system, it should be treated with floor insulation. At the moment, one of the most effective and economical methods is film insulation for laminate. Due to its design, this type of insulation does not require preparatory work for installation, which is an important part of the work in laying cable heating. Everything here is much simpler and more reliable, since instead of a cable a special thermal soldier is used.
Table of contents
- Methods for installing an electric warm floor
- Types and advantages of the film floor under the laminate
- Necessary materials for installing a warm film floor
- Preparation of the basis for the installation of a warm film floor for laminate
- Laying insulation
- Definition and preparation of a place for a thermostat
- Warm floor laying
- Insulation of the cut sections of the film
- Organization of wiring and its testing
- The laying of the finish coating
- Useful tips and warnings when installing a film floor
Methods for installing an electric warm floor
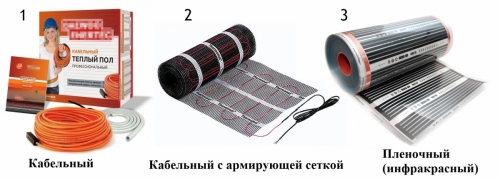
Often they use three types of installation of warm electric floors:
- Laying directly under the floor covering (film floor);
- Installation in a layer of screed, and after laying the flooring;
- Installation of a warm floor on the upper part of the screed under the tile.
Laying under the flooring is a good method when there is no need to replace the screed. Its design allows you to lay up under linoleum or laminate without additional work. Installation in a layer of screed is often used for heating in the kitchen, loggia and in the bathroom, installing a cable warm floor. A layer of waterproofing insulation is established under the system, and a small layer of screed on top. If this is a two -storey building and on the ground floor the floor insulation are performed, then the need for screed and the heat -insulating layer is not required. Tiles and layer of tile glue are excellent defenders of heating elements, but you should pay attention to the instructions before performing the work in order to make sure that such styling is the possibility.

Types and advantages of the film floor under the laminate
If a few years ago, few were familiar about the infrared film warm floor, today it has gained very popularity.
This heating system works on the basis of infrared radiation, which is safe even for such sensitive materials as laminate and other wood coatings.
At the moment, there are two types of warm film sex:
- The bimetalic thin polyurethane film, inside which a two -layer patented compound is laid. The upper layer is a copper alloy with additives, and the lower layer of aluminum alloy with the presence of additives.
- A carbon resistive element, which includes two working layers of a lavsan film, the thermal elements of which are connected by a parallel and sequential method.
This type of film is perfectly used not only in sexual work, but also of the walls. Its elasticity and dimensions (0.585 m0.545 m) only contribute to simplification for convenient and quick installation.
Pluses of film warm infrared floor
- Quick and simple installation on average does not take more than 2 hours
- The thickness of the film 3 mm will not significantly affect the height of the room in any way
- High -level reliability
- Not compulsory work on pouring the screed, since the film warm floor without problems is settled under linoleum, carpet and laminate
- Does not affect the humidity of the heated room
- Promotes the anti -allergic effect
- Electricity savings up to 20% compared to other heating systems
- If necessary, the move, is easily dismantled, which will save money and time, as well as get a warm floor at a new place of residence
- Ionizes the air
Necessary materials for installing a warm film floor
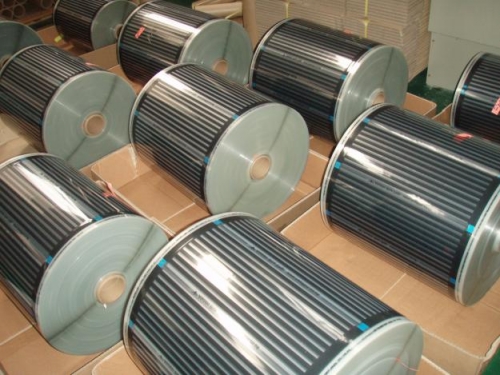
In the standard set of materials for laying a warm film floor there is a thermal gunner, which is twisted into a roll, a set of insulation and electrical wiring for contact clamps and the clamps themselves. You should also get a temperature controller with a temperature sensor.
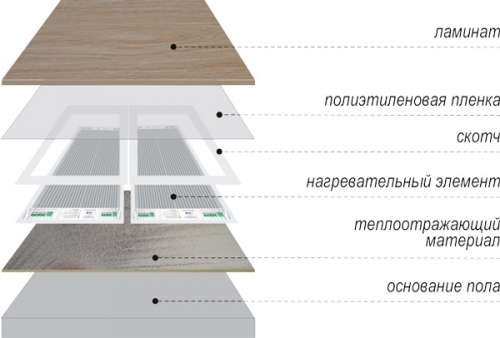
To improve the thermal properties and durability of the design, for the installation of the system you need to purchase additional materials:
- The film is polyethylene
- Two or one -sided tape
- Heat -refracting material
Preparation of the basis for the installation of a warm film floor for laminate
When installing a warm film floor, there is no need to dismantle the old coating. This is done only if the old coating in the future cannot fulfill its physical purpose. If the coating is in good condition, then it should be cleaned of possible types of dirt and dust. The permissibility of the height difference corresponds to the height of the film itself, and this is 3 mm. It is strongly recommended that you use to check the surface at irregularities with a level. Having discovered the irregularities of the surface, it is advisable to align them, and then dry them with a vacuum cleaner. Only after all these work performed can we proceed to the very installation of infrared warm floor.
The area that will be forced by furniture or appliances is not insulated, as this is unjustified. But if it is planned to be frequent changes in furniture or furniture updates, then the whole room is treated so much. Do not forget about the power of the warm floor, which directly depends on the area of \u200b\u200bthe heated room. The larger the room, the less power consumption. In any case, during the choice of the film sex, the consultant will calculate the right amount and the necessary power for optimal efficiency.
Laying insulation
The initial stage is the laying of waterproofing designed to protect the warm floor system from moisture.
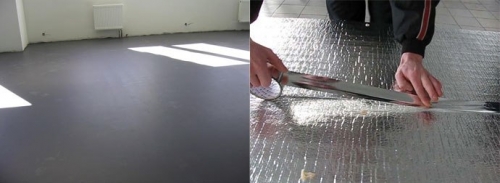
The next stage is the installation of a thermal insulation layer, the purpose of which is to prevent thermal losses from radiation, which is directed down, as a result of which the energy consumption is significantly reduced and the effectiveness of the entire system as a whole is increased.
For such purposes, almost any insulation material can be used. It must be carefully straightened and mounted with the metallized side up, while gluing the joints with tape.
For laminate, according to experts, foamed material with a thickness of at least 3 mm is best suited as thermal insulation.
It can be either reflecting and not reflecting, for example, cork. One and the other is effective, the main thing is that its thickness is in the marginal norms. Usually the reflective coating is made from Lavsan. It is worth noting that the folk coating is not high quality for infrared warm floor under the laminate, so it is extremely not recommended to use it in the installation of thermal soldiers.
To reduce thermal losses, the joints of the substrate should be sealed with tape with metal spraying.
Definition and preparation of a place for a thermostat
The thermostat performs the control functions of the temperature. The main tasks of the thermostat are based on the following:
- setting the basic level of temperature;
- programming frequency of heating;
- automation of the time for turning on and off the system warm floor.
Before starting installation work on the installation of infrared warm floor, it is necessary to determine the location of the thermostat (20 cm from the floor level is optimal), since the entire process of fastening the thermal sheets and the placement of wires depends on this.
After that, they make a diagram of the installation of a warm film floor.
Warm floor laying
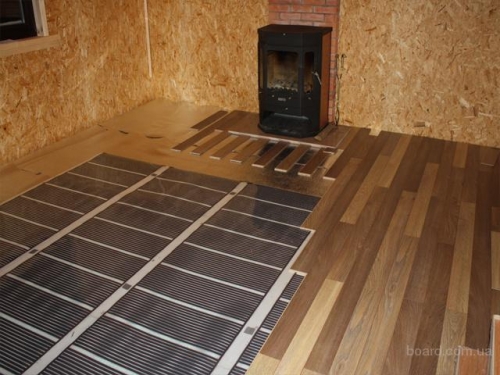
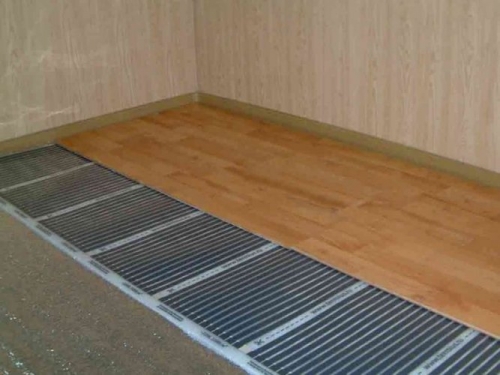
Installation of thermal soldiers is carried out directly for thermal insulation according to the intended scheme.
The connection diagram of a film warm floor:
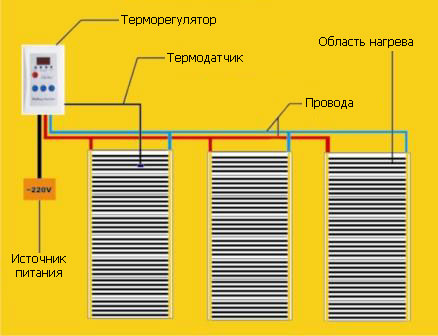
In the insulation of the entire floor of the room, there is no need, the warm film floor is mounted on the useful areas of the room.
Polyester film is laid:
- by 50% of the entire area of \u200b\u200bthe floor with a capacity of 90-150 W/m2 if an additional heating system is needed, when the main thermal source is present and only a comfortable warm floor is provided;
- at 70-80% with a capacity of 150 W/m2- in the case of the creation of the main heating, when other heat sources in the room are not provided.
The thermal soldier should not be installed closer than 20 cm from the wall, and in places of placement of furniture to prevent overheating, and later damage to the underlying system. It is also forbidden to place the film closer than 1 meter from strong heating devices, for example, fireplaces.
For the correct and most efficient placement of the thermal, it can be cut with scissors according to the intended marks (in bright places that are located between the dark sections). It is worth remembering that the maximum strip length should not exceed 8 meters.
Important: any imposition of individual parts of the film on each other is prohibited.
The film can be one- or double-sided. In the first version, the system is laid down the reinforced side, in the second version you can both.
To reduce the length of the wires, the film should be mounted towards the wall, where the temperature controller will be located in the future.
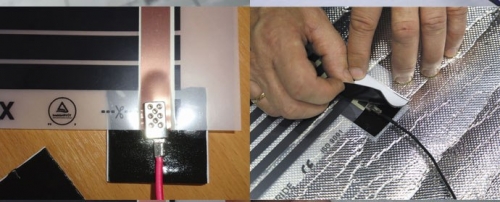
The film is laid down by the copper sides of the contacts down, then clips are connected to the edge of the copper strip, to which the wires are connected later.
Insulation of the cut sections of the film
In places of cut, the film floor has open areas of copper and to avoid further possible damage, these places should be insulated. For these purposes, bitumen isolation is most often used. We cut off a rectangular insulating film in size slightly larger than the processed surface, and glue copper areas on both sides. In the film, holes are made to accommodate the isolated area by pressing it and further sealing with tape. In those places where the wires will be attached, until it is necessary to proceed with the insulation, since the clamps of metal should initially be connected. They are attached as follows: one side of the clamp must be gently placed between the copper strip and film, then tightly click it with pliers.
Organization of wiring and its testing
Connecting wires
The wires of the film warm floor should go from the center to the plinth area, to the wall, which will prevent the risk of pressure on them. The wiring should be carried out directly under the thermal puff, for this, holes are made in it, through which the wires are stuck, which are further fastened with tape. It is worth not to forget that the wires should in no case advocate thermal insulation. Their connection to the clamps is carried out in parallel: the left sides are attached only to the left, and the right to the right, respectively. At the ends of the wire, insulation is removed with a sharp tool, then twisted and pushed through the clip holes, after which it is fastened with pliers. After that, the mounting location is isolated and attached with tape to the film. For convenience, so that there are no confusion from the initially you can use two colors of the wiring.
Connection of the thermostat
Initially, to the heating film, namely to its lower side, approximately in the center of the second section, a well -insulated temperature sensor is connected. It is a small thermometer with a head in the form of a polymer element that is soldered to the wire.
For the sensor itself and its wiring, holes should be cut to the thermostat. If the wire should be bent, a smooth turn should be made in the film in order to further exclude cable breakdown.
After all the installation of the sensor and the connected wires are completed, you can proceed to the direct installation of the thermostat. It is advisable to connect this device stationary, however, it is also allowed to install it using a socket.
As can be seen from practice, the main amount of wiring is best placed under the baseboard.
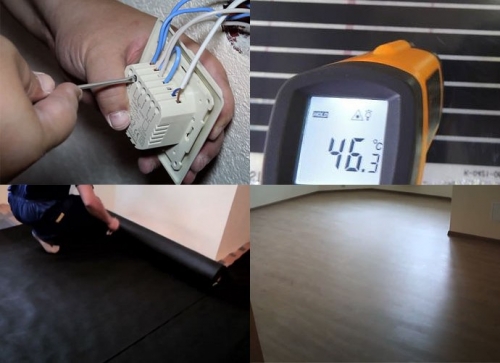
The principle of connecting the thermoregulator of the film warm floor is the same as that of the other types of electric floor: on the one hand, a thermostat is attached to the two contacts, wires from a warm floor are attached to the opposite side, and wiring of electric power is inserted in the center. The grounding wires do not join contact, but are connected by a terminal.
System testing
Before starting work on mounting the laminate, it is necessary to test the warm floor system. A high -quality thermal soldier is evidenced by the absence of sparking and overheating of individual sections.
If any defects are not noticed, then the next stage is the cover of the heating floor with an additional thick layer of polyethylene film (at least 80 microns), which serves as a protection from the ingress of liquid on the warming system, and due to reducing the wear of thermal male during its operation. It is spread over the lanes of the heating film.
The laying of the finish coating
When laying the laminate, you should be extremely careful in order to avoid damage to the thermal puff.
When choosing a laminate, it is important to pay attention to its labeling and the ability to use as a styling on warm floors.
The laminate installation process is quite simple. Initially, the side edges of the panels are joined, then each new strip is connected to the previous one. Castles are easy to connect if this process is at a small angle. If small gaps are present between the laminate plates, they can be eliminated using light strikes with a hammer on the side. After the installation of the laminate, a baseboard is attached to all the area of \u200b\u200bthe room, in which holes are made in places of output of cables.
Immediately you cannot connect a warm floor to electricity, it is necessary that it warms up to room temperature and only include in the mains.
It is worth noting that it is recommended to leave a small gap between the wall and the laminate when installing a warm floor, which will provide ventilation and the ability to move flooring at temperature deformations.
Useful tips and warnings when installing a film floor
- It is worth not forgetting that the installation work on the installation of a film warm floor follows at a plus temperature and at moderate humidity, not more than 60%.
- Before connecting the film floor to the network, it is necessary to carefully check the insulation of the contacts and in the places of the cutting of the canvas.
- The thermal soldier in a folded form cannot be connected to the network.
- If you have pierced through the place of the thermal, covered with graphite spraying, the place of breakdown should be insulated on both sides.
- It is forbidden to lay a warm floor on a wet surface.
- If you accidentally flooded the film warm floor, then you should immediately turn it off from electricity, and then dry it in a natural way.
- Do not forget to draw a scheme of your film floor, as practice shows, this may be needed in the future.
- Do not go along the already finished warm floor in shoes.
- Do not mow the warm floor temperature sensor, it should be subject to easy replacement and control.

