Despite the popularity of suspended ceilings or multi -level, complex structures, ...
|
|
In order to align the draft floor, adjustable ... |
A holistic perception of the apartment is impossible without the front door. How the theater begins with ... |
Laying a massive board: step -by -step instructions
The choice of the finish coating for the room is the final step in the repair. The design of the interior without a quality sex will not be complete. But it should be remembered that the finish coating does not play the main role in the constructive part of the floor, but acts only on the aesthetic link. Important elements of the floor structure are hidden from the eyes.
Content
- Massive Paul Board
- Types of a massive board
- Laying techniques for a massive floorboard
- Laying of a massive floorboard video video
- Installation on concrete ceilings and screeds
- Plywood as a base for the floor
- Lags on the screed for the floor of the array
- Laying on an existing wooden floor
- Installation of the finished floor
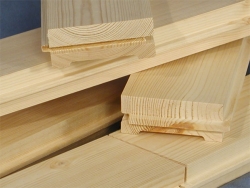
Massive Paul Board
The tree is one of the first building materials that a person began to use. Nevertheless, he leaves his positions indestructible today. Yes, the accuracy and quality of processing has increased, the use of new LCMs made it possible to continue the life of the products several times, without loss of appearance.
Traditional floors from a wooden board gained a new life, thanks to the use of the crest-PAZ technique, which allowed to accelerate and improve the styling of the board.
For the manufacture of floor boards, valuable wood species are used: oak, ash, walnut, mirbau, tick, Kemas, Dussia, Lapacho, Wenge.

Also, breeds of fruit trees are used for the manufacture of the floorboard: cherry, cherries, apple, pear. But the wood of these species is sensitive to moisture differences and can play over time. In rooms with a coating of light breeds, a constant temperature regime and relative humidity at a level of at least 50-60%must be observed.
Types of a massive board
A massive board may differ in color, structure of fibers. Depending on the type of cutting, the wood distinguishes several types of boards:
- Radial for the manufacture of the board uses the wood of radial or semi -radial sawing. With a radial cut, the trunk is cut as close to the core as possible, such wood is uniform in color and texture, the distance between the annual rings is minimal. They are practically not exposed to deformation, are highly wear -resistant, and has minimal coefficients of Lesson and expansion. Only 10-15% of the radial cut boards come out of one tree trunk, so its price is higher than other boards. High requirements for the quality of wood are presented to the boards, cracks, knots, chips are not allowed.
- The selective is made from the board of the tangential saw. It may have minor differences in coloring, the presence of live knots with a diameter of up to 5mm is allowed. Zapolon, knots on the edges of the boards, chips and cracks are not allowed.
- Natural is made of boards of any saw. Close closest to the natural unprocessed type of board. Live knots with a diameter of up to 5mm are allowed, also not living knots with a diameter of up to 3 mm, which do not fall out, drops in color, the presence of cracks around the bitch are allowed, the sap is allowed for no more than 1/3 of the length of the board. Wrestling knots are not allowed.
- Rustic has minimal requirements for the quality and appearance of wood. It is made of wood of any type of sawing, color difference, live light knots with a diameter of up to 30 mm, not living knots with a diameter of up to 10 mm are allowed, the cracks of the wood of wood up to 20 mm, and knots on the side faces are allowed. Mechanical damage to wood and vices are not allowed, which will not be putty with putty and grinding.
Methods of sawing wood

The price of a massive floor board will depend on the type of chosen board and may differ several times. The higher the class and quality of wood, the more expensive the board will be.
Laying techniques for a massive floorboard
The length of the floor boards ranges from 50cm to 6m, the width of the boards from 70mm to 200 mm. The preferred board width should be 140mm10mm.
For low-length boards (50cm-100sm), as in laying the parquet, you can use different techniques. The most preferable to lay the board along the falling light is perpendicular to the window.
For long or narrow rooms, this rule can not be observed, otherwise you will have many additional operations to cut the planks of the required length.
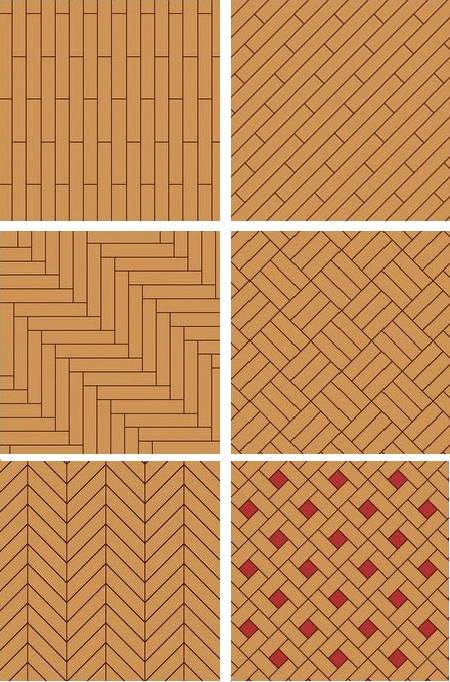
Massive board laying techniques:
- The straight deck of the plank boards are laid in the longitudinal direction, along the wall of the room.
- The diagonal deck is laid at an angle of 45 to the walls of the room;
- A chaotic deck, as well as a straight deck, is laid along the wall of the room, but boards of different lengths are used.
- Vintage styling is carried out with boards of different width and length, creating a unique design.
- block one of the classic ways of laying parquet and boards;
- Christmas tree 90 is a very popular parquet laying technique, used to lay a massive board in large rooms. It in a special way distributes the load transferred to the floor, the appearance of cracks with such styling is extremely small.
Laying of a massive floorboard
Paul from a massive floorboard, like other types of flooring requires special preparation before laying. The choice of the material from which the floor is made must be approached responsibly. The moisture content of a massive floorboard should be 6-10%, a maximum of 12%. After buying the floor, it must be placed in the room where the acclimatization will be installed, the stay in the room is at least three days.
Depending on the base, it is necessary to select the installation technology. They are somewhat different in preparatory work.
Installation on concrete ceilings and screeds
Before starting installation, it is necessary to make sure that the screed has completely dried up. To do this, take 1-1.5 m2 of plastic film and glue it with tape to the concrete base. Leave the film for a day. After a day, remove the film if the square under a film of the same color as the rest of the concrete, then the screed has completely dried up, if it is darker, in which case it is still necessary to wait with the installation of the coating, since there is excess moisture in the screed. The concrete base should be thoroughly prepared, even with a maximum drop of height 1-2mm per 1m.
Waterproofing is applied to the concrete basis, it can be both roller materials and various soil mastics. The choice of this or that material must be carried out from the price-quality equation. In different regions, the same materials are different, and analogues are cheaper. The choice is yours.
When using roller materials, they are laid with an overlap, which is recommended by the manufacturer. Joints are glued with tape or special self -adhesive aluminum tapes.
The concrete screed is ready for further installation. The base of the floor with plywood or lags is laid on it.
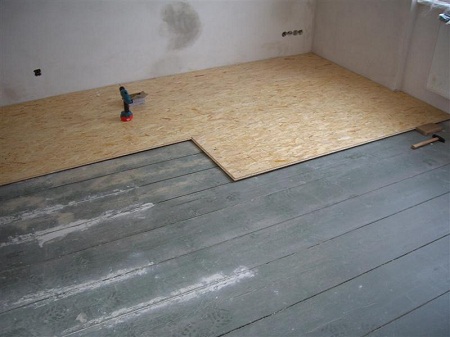
Plywood as a base for the floor
A waterproof plywood is used as the base of the floor. The thickness of the plywood from 18mm. Standard sheets are cut in stripes of 400-600mm. Plywood stripes are laid diagonally to the main coating. The plywood is attached to the screed with dowels and screws, or on glue. The number of fasteners with screws is from 15pcs. 1 m2. When gluing plywood, it is necessary to choose special waterproof mastics compatible with adhesive compounds.
Lags on the screed for the floor of the array
As a lag, bars with a minimum section of 50x50mm or more are used. Broaches used as a lag should be chamber drying with a residual humidity of not more than 12%. The lags are attached to the concrete base with dowels with a step of no more than 50cm. The screw of the screw must be drowned below the level of the lag by 3-5mm. Remove the irregularities of the bar with a shirt. The distance between neighboring lags should not exceed 300-400mm. Lags are mounted perpendicular to the main coating.

To reduce heat loss between the lags, you can install insulation. A waterproofing film is mounted on top of the lag. The basis is ready for laying the finished floor.
Laying on an existing wooden floor
Old floors from a wood array can also serve as a draft floor. The main thing is that he can withstand and transfer the load on the inter -story floor. If you are not sure of this, you should dismantle the old floor. The base of the draft floor can be cleaned and treated with antibactericidal compounds. After that, lay the moisture -proof barrier. The laying of the new sex is performed perpendicular to the flooring of the draft floor.

Installation of the finished floor
Preparation of the base was carried out, the board was acclimatized. You can start styling. The first floor board is laid with a spike to the wall with giving from it by 7-10 mm. It is necessary to fix the sex board using 3x35-45mm screws. The first board from the wall must also be fixed along the edge through the front side. These screws will hide the installed skirting board.

The board must be mounted with self-tapping screws every 25-30cm. In order to avoid chips and cracks, the board must be pre -drilled.
When installing a floorboard with a width of more than 150mm, it is necessary to carry out additional fastening through the front side. In this case, the screws are shed into wood by 8-12mm, and the resulting holes are covered with wooden chopic by nagus.
After the laying of laying to emphasize the flat surface, the board must be sanded. Then the board is covered with tinting compositions and varnish.
Sometimes, in order not to use LKM, the board is covered with mineral oil and rubbed with wax. This is considered a premium processing of a tree.
![]()
StrPort construction portal 2011-2018. Articles about repair, construction, building materials.
Copying information from the site is possible only with permission of the editorial office Or indicating a direct link to the source. Legal justification