Before building a home, you need to ask yourself the question of what material it will be ...
|
|
In order to align the surfaces of the ceilings and hide the laid on it ... |
Create a new interior of your apartment, give exceptional comfort and comfort today ... |
DIY Parquet cycles. How to cycle parquet with your own hands. What you need to know to cycle parquet with your own hands
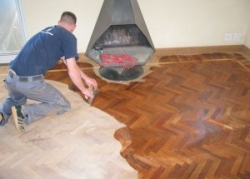
Parquet is the most expensive and noble flooring. But even the highest quality wood and varnish wear out over time. In most cases, it can be restored. Such work, although laborious, will still cost cheaper than to lay the floor again. The article will talk about how to quit the floor with your own hands and correctly cover with new varnish.
Content:
- Restoration of parquet or replacement for a new one?
- Do -it -yourself cycling tools
- The procedure for preparatory work for the floor cycles with your own hands
- DIY manual cycles with your own hands
- Algorithm for performing work on a cycling floor machine with your own hands
- How to properly cover the sprayed floor with varnish
- Parquet varnishing defects and their causes and elimination
- Parquet updating options without cycles
Restoration of parquet or replacement for a new one?
The process itself, although time -consuming, does not require special skills. Everyone can cycle the floor, the main thing is to observe the technological process.
Cyclovence involves the removal of the upper, damaged layer of wood. Depending on what the thickness of the parquet bar and on the degree of wear, the stages of cyclime are from 5 to 8.

Floor defects in which the cycling is impossible:
- damage to a beetle-dog;
- allocated strips, which is especially often after flooding;
- drying areas. So, with the width of the gaps between the strips of more than 5 mm, even the putty will be only a temporary measure. After a couple of months, this section will crack again and require the next restoration;
- there are serious damage. If they are only locally on a small number of planks, then at first these areas change to new ones and only then produce all the stages of the cyclovis, including the first, the most rude;
- thickness less than 5 mm;
- there is a fungus and mold.
The advantages of the old floor cycle with your own hands:
- there is no long process of removing the old coating;
- only masters can lay a new parquet, but you can tell the old one on their own;
- the opportunity to preserve, albeit old, but valuable and noble flooring.

Do -it -yourself cycling tools
There are two main methods of the floor cycles: manual tools and special equipment. Tools are selected depending on which method is preferable.
- Manual cycle. This is a wooden tool consisting of a handle and a narrow blade. With its help, the upper layer of wood is removed, which is previously soaked in water. Of course, the process will be very slow and difficult. But then during work there will be no noise, dust. And the cycle itself is inexpensive and accessible to everyone.
- Speed \u200b\u200bup the process, but do not buy special equipment, you can use Bulgarians, equipped with speed adjustment. But working as a tool that has to be kept on weight, it is almost impossible to make an even horizontal surface. In addition, at a low speed, the Bulgarian will not cope with the thick layer of varnish and old wood, and on a high any wrong movement will lead to Zazubin, holes, etc.
- Grinder A special tool, it is large, heavy and noisily works. But at a time you can perform a large volume at a time, and do it efficiently. Such equipment is delivered, and take it for a day will not cause much damage to the budget.

- Working with a grinder, a lot of dust is formed. A household vacuum cleaner has insufficient power and when applying varnish, a decorative coating can be spoiled due to dust impurities. Therefore, it is worth taking care and rental industrial vacuum cleaner.
DIY electrical equipment for cycles with your own hands
- Ribbon parquet-grinding machine. If the question is how to quote a parquet floor without dust, then this machine is indispensable, since there is always a bag for collecting sawdust in the configuration. This expensive equipment is produced by different capacities. In the principle of operation, a drum is laid on which grinding paper is dressed.
- Parquet-grinding machine. Instead of the drum, she has disks with interchangeable abrasives. Used for finish grinding with fine -grained skins.
- Planning grinding machine. It is intended for hard -to -reach places, the people call it a boot. It is recommended to choose models equipped with a bag for collecting dust. This is a very affordable tool, there are household models worth from 2500 rubles on sale.
In addition to the equipment itself, a lot of consumables will be required: grinding ribbons, knife or scissors, gloves, masks, etc.

The procedure for preparatory work for the floor cycles with your own hands
- First of all, you need to remove all the furniture from the room. Some believe that it is easier to leave it and move it, as cycle work is performed. But in this case, it will have to be rearranged at least 4 times, and this threatens scratches on the floor. Even if you move it through the air, it is not only very laborious and exhausting, but also cannot be avoided by the formation of overlaps - areas on which the grinding level will differ.
- Cycle is a rather dusty process. Therefore, it is not necessary to first wash the floor, it is enough to vacuum or make large garbage.
- For the same reason, the room should be constantly open windows or windows in order to create the necessary air exchange.
- For high -quality grinding of the entire floor, good lighting should be provided throughout the working day.
- When working with parquet-grinding equipment, you need to take care that traffic jams will withstand the load, which is from 15 amperes.
- Repair work of the floor may also be required before the cycle. If the parquet was mounted to the floor on the nails, then their hats can damage the abrasive skin on the drum. Therefore, at first they are clogged with a recess of at least 5 mm, and the resulting pits are aligned with putty on wood. Before work, it should dry completely.
- Also, for the convenience of work, all skirting boards and thresholds are dismantled.

- The wires laid along the floor along the walls or in the cable channels of the skirting boards are of particular danger. If they cannot be turned off and removed, it is recommended to glue the wires onto a paper masking tape to the wall. It will hold them firmly, and when peeling off will not harm even freshly painted walls or wallpaper.
- An important point and noise of the work performed. You can perform cycling with grinding equipment only on weekdays during working hours. The weekend and evening time can be used only if you enlist your neighbors in advance, especially the floor living below.
DIY manual cycles with your own hands
To facilitate your job, it is important to buy a cycles correctly:
- it is better to purchase a tool in specialized stores, this guarantees the quality of steel blades and the degree of sharpening;
- it is more convenient to work in a cycle that has a wider and shorter handle;
- the optimal width of the blade is 5 cm.
Stages of work
- The floor is well moistened with water.
- When working, there will be a lot of sawdust with pieces of old varnish, so a respiratory mask is dressed on the face.
- For ease of work, the floor is visually divided into stripes.
- The cycle begins from the center and gradually move to the wall.

- The top layer is first removed along the fibers, and then across.
- Since the work is done manually, it is very important to remove even layers and completely eliminate changes in height.
- This process is long and will take several days even when working in a small room.
- Then the parquet is grinded. To do this, use a grater with sandpaper. In circular movements, the surface of the parquet is aligned to smooth out all the irregularities that remained from the cyclovis.
Paul cycles without special equipment video
Algorithm for performing work on a cycling floor machine with your own hands
- If the sockets in the apartment are not able to withstand the load of 15-16 amperes, then the equipment is connected directly to the distribution shield in the entrance.
- The floor is cleaned of garbage, the nails are deepened. If necessary, individual strips are changed.
- The machine cycle involves several stages of processing with the grain of the skin from 24 to 120 R. This depends exclusively on the quality of the floor and is selected individually. As in the case of a manual cycle, the floor is moistened with water from the sprayer.
- First, they perform gross grinding with a skin with granularity up to 40 R. This guarantees that it will completely remove, protective varnish, paint and upper layer of wood. At the same stage, the changes in height and other irregularities are aligned. If they are present.
- The work starts from the center and cycles the entire area where the equipment takes out. Then all complex places (under the battery, corners, etc.) go through an angle grinding machine. It is possible that the most complex and inaccessible areas will have to be polished manually.

- The grinding stage has come. An abrasive with a granularity of 60-80 r is put on the drum and also pass through the center throughout the area. The task of this stage is to equalize possible scratches after rough cleaning or removing the remains of the upper layer.
Tip: Passing a large area in stripes, each new entry should be performed with a small overlap on the previous one, so that there are no unwound areas left.
- On the restored floor covering, small cracks, cracks, deepening and other shortcomings will inevitably remain. Therefore, their putty will be the next step. To do this, it is better to use special mastic for wood or car putty.
- Now the smallest abrasive from 120 p and higher is dressed on the drum. He smooth the putty. As a result, you get a flat and smooth coating.
DIY cycle with your own hands video
How to properly cover the sprayed floor with varnish
Having completely finished the finish grinding of galvanized parquet, all dust is thoroughly removed and the floor is wiped.
Tip: if you remove wood dust with a household vacuum cleaner, then the filter is very quickly clogged and absorption will become ineffective. Therefore, cleaning is carried out either by an industrial vacuum cleaner, or they buy a replaced filter and a vacuumber for household.
In total, 4 main methods of applying varnish on the flooring are distinguished:
- velorov Valik. It distributes the varnish evenly, which is especially important if it is tinted. The pile is recommended to choose a short 4-5 mm. For uniform staining, the varnish is first applied along, and then across, performing cross -shaped movements. For work, you need a painting bath, into which a little varnish is poured and when you are thickened, the excess composition is squeezed. After the first layer, when it dries, it is required to grind with a fine -grained skin, since the roller lifts the wood fibers;
- masking brush. The most uniform application will turn out if you work with a wide brush. It distributes the varnish well on the surface, but also raises wood fibers. Therefore, after the first layer it is also polished, it is advisable to choose a paper with a number 400-600 units;

- metal spatula. It is used if you need to apply thick varnish. The thin and the acute surface of the spatula will be well distributed and immediately cut all the wood fibers that can rise. Therefore, the process is significantly reduced, since the need for additional grinding disappears;
- spray gun. This method is undoubtedly the best. The speed and quality of the applied layer will not be compared with manual work with a brush or roller. The varnish is to go evenly, thinly, which allows you to make 3 layers with the same consumption of the composition as a 2 -layer brush. Each subsequent layer is applied perpendicular to the previous one.
DIY parquet varnish. Stages of work
- First, a primer or tint is applied to the floor (if transparent varnish is used in the future). 24 hours are allotted for drying.
- If at this stage defects of the planks were discovered, then you can still put them in a special parquet putty. But in order to achieve an ideal coincidence with the color, the repair composition will have to be made independently. In construction stores, special liquids are sold for tinted mixtures, they are mixed with a sawdust of the dust fraction to the consistency of plasticine.

- After hardening, putty, these places are grinded and again thoroughly exhausted.
- The first plate of parquet varnish is made as thin as possible. Even a quick -drying composition needs to be given at least a day to dry.
- The surface is carefully examined if there is roughness from the raised wood fibers, the floor is polished to perfect smoothness. For the speed of work, grinding can be done with a tape grinding machine. At the end of the work, the floor is wiped from dust.
- Next, apply the second and third layer of varnish. The interval after each application is at least 24 hours.
- It will take at least a week to complete drying and polymerization of varnish, and only after this period can you walk and put furniture on it.

Tip: Often, after applying and drying the parquet varnish, there is a sensation of stickiness. To get rid of it, it is enough to wipe the floor with a soap solution.
- It is also worth adding that the number of layers of varnish also depends on the characteristics of the wood. If the parquet is made of soft breeds of pine, birch or if, then they apply 2 layers, if from solid, such as larch or oak, then 2 layers are enough.
Parquet varnishing defects and their causes and elimination
- The varnish does not dry out and continues to remain sticky. The main reasons: too low the temperature in the room, there is no ventilation, a cold floor base, a poor -quality hardener in a two -component varnish or not enough of it, when preparing the floor, the old mastic is poorly removed. In the latter case, the output is only one re -cycle. If the reason is any other of the above, then it is enough to increase the temperature in the room or ventilate it well.
- Springs are white. The reason lies in the aggregate of high humidity in the room and too cold varnish. To eliminate, you need to heat the floor (ideally turn on the warm floors or direct the heat gun to problem areas). When the floor warms up, the influx is removed with a solvent and a fresh layer of varnish is applied.
- Stratification of varnish. The cause of the lacquer can be a poorly washed tool when applying the subsequent layers of the coating, poor grinding, poor -quality diluting after grinding or incompatibility of solutions. If small areas are damaged, then they manually go, grind and varnish. But it happens that detachment appears large -scale throughout the floor, only a new cyclist will help here.
- The appearance of small bloating. The cause of the formation of the bubbles is too thick a layer of varnish, too low the temperature of the applied composition, the direct effect of sunlight during polymerization. To eliminate, the surface is ground to remove the varnish and re -eliminate, excluding all errors.

- The wrinkledness of the varnish layer. This error is most often found with too fast layers, when the previous one does not give enough time to dry. Also, there are varnishes that most often form wrinkles is a composition based on oil artificial resins. The defect is eliminated only with its large -scale location. The varnish from the entire area of \u200b\u200bthe floor is completely polished and a new one is applied.
Parquet updating options without cycles
In some cases, single parquet defects can be fixed without a cyclist. The following tools and materials will be required to work:
- varnish. It can be alkyd, epoxy, acrylic or water -based. The main thing is that it is stable and abrasion;
- putty in tone of the floor color;
- putty knife;
- ruler;
- a hammer;
- rule-trick to vote the bar;
- awl.
Stages of work
- Imitation of joints. After putty, even coating is created. Therefore, it is necessary to imitate the joint of the planks so that the floor looks harmonious. You should wait for the putty to harden, but not completely. After that, the ruler is applied and the line is drawn, continuing the joint line of the strips.
- How to close up scratches on a parquet. Here you can not do without a manual cycle. With its help, a scratch or chip is removed to the desired depth. The pod is removed from the processed area and all dust is very carefully removed. When everything dries, this place is putting to the color of the parquet. Usually at the same stage you have to make false things the method described above. When the putty finally froze, it is skinned and covered with varnish in 2-3 layers.
- Removing small scratches. If they are superficial and scratched only decorative varnish, then you can fix it with a special wax pencil.

- How to remove wide cracks between planks. They appear with time when the parquet begins to dry out. It will require a construction hair dryer. All the strips are fastened with mastic, and if they are heated, this mastic becomes supple. Heating is performed until a pungent smell is felt. Then they encircle the bar with a hook and, tapping with a hammer, move it close to the extreme. And so they do with all the strips in the row. As a result, at the very end there is one big gap. If its width is sufficient, then a wooden insert is placed in it and put on top with putty. If too narrow, then the gap is filled with putty composition. Then also grinds and covered with varnish.
![]()
StrPort construction portal 2011-2018. Articles about repair, construction, building materials.
Copying information from the site is possible only with permission of the editorial office Or indicating a direct link to the source. Legal justification