The choice as a chimney for a stove is a brick device before ...
|
|
Surely, you have repeatedly noticed that many private houses are covered with flexible tiles ... |
The choice of putty as a finishing material for the ceiling allows you to get ... |
Warm floor Tepllyux with your own hands. Instructions with examples
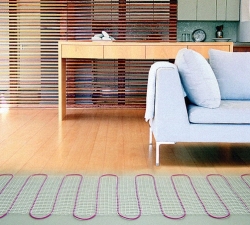
The warm floor of the Tepllyux is a voltage system that operates as an additional surface warming measure and the main heating system in the room. The heating of the room such a system carries out through the floor. There are various varieties of this system, but all sentences from Teplux warm floor reviews of consumers receive the best.
Table of contents:
- The purpose of the underfloor heating system from the Turnolux
- Varieties of underfloor heating from Tepllyux
- The component elements of the system
- Preparation for the installation of a warm floor system Teplolux
- Installation of the warm floor Teplolux
- Installation of heating sections
- Installing the heat adjustment sensor and the controller itself
- Fill the floor with a screed
- Warm gender Tepllyux, operating instructions
The purpose of the underfloor heating system from the Turnolux
The heating system of the floor from the company Tepllyux is used according to two main purposes:
- The main system of warming up the premises. It is especially convenient if it is impossible to conduct the necessary thermal communications to the house.
- Additional heat source. It is mounted in tandem with other heating systems, helps to increase the level of comfort in individual rooms or the building as a whole. Such a system is especially relevant in rooms with cold flooring and rooms on the lower floors.
During the off -season, when the central heating has already been turned off or has not yet been turned on, the warm floors heat up housing and help to comfortably survive the transition period. The system is a cable that are laid in a screed of a mixture of cement and sand.
Varieties of underfloor heating from Tepllyux
The separation of systems of warm surfaces into types passes through the thickness of heating mats, which are mounted in a screed, as well as the location of the cable in them and the number of lived in it. Among the products Teplux are especially distinguished:
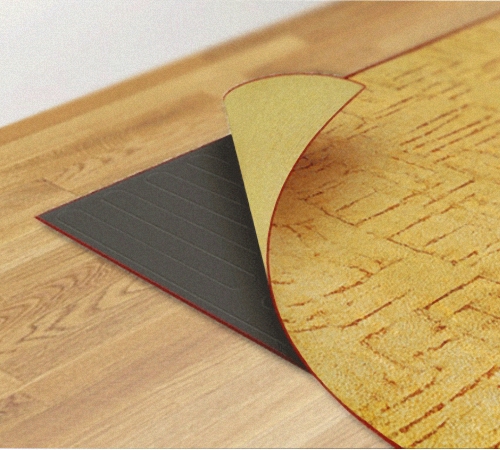
- Warm gender Tepllyux-Mini. The system is ideal for low rooms in which every extra centimeter plays a role. The thickness of the mats in the configuration is 3 mm, which allows you to reduce the size of the floor screed. The system is mounted very simply, mats are cut into pieces and fit, without additional measures along the cable length.

- Warm floor TROPIX The system is also suitable for small rooms, as it has a small thickness of 3 mm. Installation is easily carried out by mounting on a self -adhesive grid. The system is modernized and equipped with a two -core cable.
- Teplux Pro warm floor. A powerful and professional system with a two -core cable and a width of 3.5 mm. It consists of mats, heat evenly due to the ideal location of the cable in the mat.
The component elements of the system
Regardless of which the warm floor of the Turnolux mini or any other mounting set contains about the same elements in stock. The set includes:
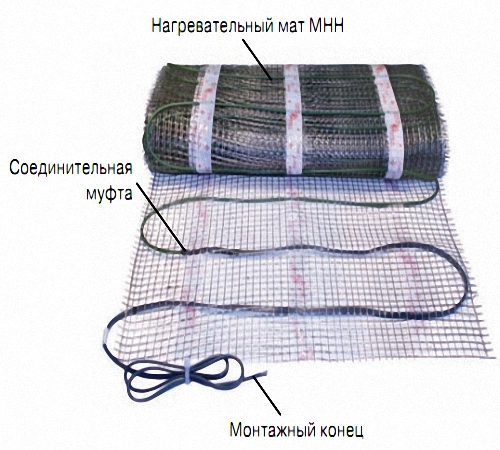
- Heating sections. This part is a wrapping of a cable of a certain length, which has specially equipped mounting ends through which the system receives power from the network. Designs of different types contain one -core or two -core cables. The advantage of mats with a two -core cable is that they are connected only at one end of the section.
- The installation tape is included in the kit, it facilitates the laying of the system. Its pieces are installed on the rough surface.
- The thermostat is necessary for the competent energy consumption of the system. The device determines the need to supply power to the section at their temperature. This device also operates according to the programs specified by the user.

- The thermostat for a warm floor is purchased separately and is not included. Additionally, isolation material from the Turnolux is purchased, a special mixture for flooring and colored decor for the thermostat. Isolation material is necessary to reduce electricity costs, reducing the speed of cooling floor. The economy indicator when using good thermal insulation reaches 30%. For this, material with an indicator of heat 0.05 W/MOS is purchased.
- When using the surface heating system as a single heating system, it is recommended to use solid polystyrene foam with a sheet thickness from 30 mm. For use as an additional heat source, foamed materials with a sheet thickness 3-10 mm are suitable. In rooms where the surface is adjacent to the soil, stiff plates of foam or mineral materials with a sheet thickness from 30 mm are placed. On which elements and in what capacity the system will be equipped, the warm floor price directly depends on the Turnolux. Since each additional element increases the final cost of work.
Preparation for the installation of a warm floor system Teplolux
Before starting the TELOLUX system, a warm floor connection, it is necessary to carry out some preparatory work on the surface. First of all, it is necessary to once again check all the parameters of the system and their compliance with the proposed site of the installation. Next, you should read and remember simple rules:
- The heating sections are located in those places where heavy furniture without legs will not stand.
- For use as an additional heat source, the specific power is 110-120 W per m2.
- For use as the only heating system, the specific power room is 130-150 W per m2. Installation area from 70% of the total horizontal space of the room.
- To provide warm rooms of different types and with different floor design, one section is not used.
- It is necessary to check that the electrical wiring laid in the room maintains the power of the surface heating system. At the same time, all devices that will eat from the same network take into account.
- Connection must be carried out through a protective shutdown device, which works with indicators from 30 mA.
- In rooms with a high humidity indicator, the system is equipped with grounding. The thermostat is not installed in them, but is taken out of the room.
Installation of the warm floor Teplolux
He tells in detail and clear about how to install the warm floor of the Teplom video at the end of the article. In general, the installation scheme looks like this:
- Carry out preparatory work in the wall where the thermostat will be installed.
- Prepare ditches for laying wiring, installation parts of the heating section and temperature sensor tubes.
- To align and clean the surface of the garbage.
- Put the thermal insulation material.
- Fix the areas with a mounting tape.
- Lay out the heating section.
- Mount the temperature sensor.
- Mount a temperature control.
- Connect all the necessary contacts, check the heating section and the temperature sensor for damage. Determine the resistance of these elements and make sure that this indicator corresponds to the passport specified.
- Perform the floor screed from cement and sand.
- Decorating the floor.
- Wait 28 days and start the operation of the system.
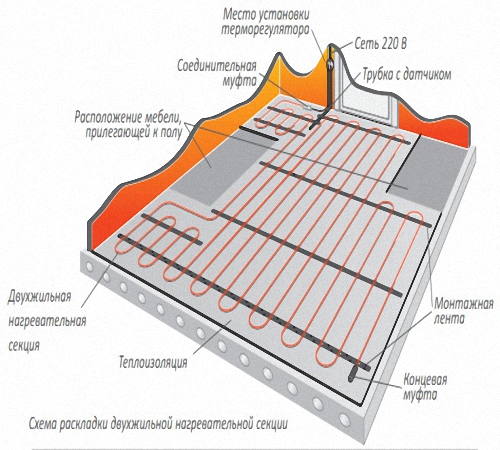
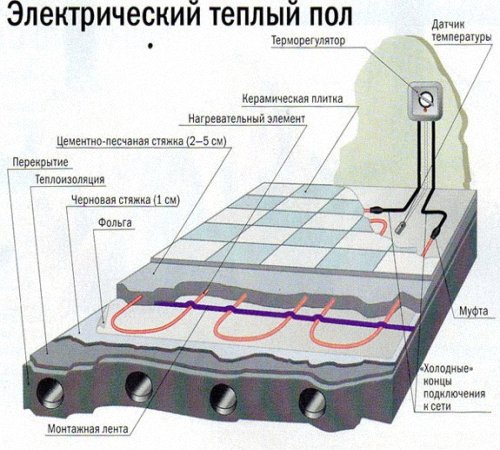
This instruction is relevant for a two -core cable system, which is mounted in a room with concrete ceilings as an additional heating system. There are some points of installation in the diagram, which need to dwell in more detail:
Installation of heating sections
- Heating sections are laid directly on the floor. If one section is not enough into the area of \u200b\u200bthe entire room, then the entire space is divided into areas, each of which corresponds to the power of the heating element laid in it. The floor for laying should have a flat surface, all cracks and potholes are eliminated. If the surface is greatly curved, then it is aligned with special mixtures. After leveling the floor, thermal insulation material is laid.
- Pieces of tape for installation are attached to a layer of thermal insulation material. They are installed in those areas in which the end of the heating section will be. For a large area, pieces of tape are additionally attached in the middle of the room with an interval of 2-3 m. The end of the heating section is carried out to the place of installation of the temperature regulator. In this place, the coupling is attached to the surface for the connection and the initial section of the heating section. From this point, laying the entire section begins.
- When laying the heating section, that the cable lies evenly and does not intersect. It is important to maintain a step of styling, which is calculated by the formula: (100*S)/l. Here s is the area of \u200b\u200bthe installation site of the section, m2; L the length of the section itself, m, this indicator is indicated in the product passport. Permissible error for installing 10 mm in plus or minus. The gap between the turns of at least 80 mm.
- The ends of the cable loops are fixed using a tape for installation. Bends are laid out smoothly, avoiding creases and tension. Along the perimeter, the distance from the cable to the vertical surface is 5 cm. The connecting and end couplings are located on the horizontal surface. The ends for installing sections of heating are removed to the heat regulator or to the box. When laying out the cable, the distance from other heat sources is at least 10 cm. When performing the installation of sections, shoes with a sole made of soft material are used, which will not damage the cable.
Installing the heat adjustment sensor and the controller itself
- The sensor is placed in a corrugated pipe made of plastic, its diameter is 14-20 mm. They have a device so that it is directly inside the pipe closer to its edge. On the other edge, the output of the sensor wire to connect it to the system. The tube is carried out from the installation point of the temperature controller to the floor. When mounting the tube, bends of more than 5 cm in radius are not allowed. The end of the tube on the floor, at which the sensor is located, is securely covered so that it is not damaged by the solution when performing the floor screed. The sensor is installed at a distance of 50-60 cm from the wall. The pipe to the floor is attached with a tape for installation.
- When the tube is securely fixed, they are convinced that the sensor easily moves in it. To check it, they get it out of the tube and then returned back. This helps easily replace the device in case of failure. The end of the tube at which the wire is released for connecting the sensor to the system is placed in a decaying box or directly near the thermostat so that its replacement occurs without dismantling the entire warm floor system.
- The heat regulator is connected in the absence of voltage in the network. The connection is carried out with the supply network, the heating section and the temperature sensor. After all the connections are executed, the voltage is supplied to the network for 1-2 minutes to make sure that the system is operational. If the LED light bulb caught fire in the heating regulator panel, then the system is serviceable. After checking, the power is turned off again. Be sure to draw up a plan for the room on which the location of the heating section, the heat regulator and the sensor is applied.
Fill the floor with a screed
- The laying of the warm floor of the Turnolux ends with the floor screed. At the beginning of the work, a heating cable is fixed with a slide of the solution, which is stretched along its entire length. The height of the resulting slide is 10-12 mm. This is necessary to exclude the possibility of violations of the integrity of the cable in further work.

- The optimal thickness for screed is 3-5 cm. For the reliability of the entire structure, it is advisable to use reinforcing nets from polymers. The finished screed is checked for the presence of cracks, which are categorically not allowed when laying a warm floor. He tells in detail about all stages of installation of the Teplux Warm House of the Video system at the end of the article.
Warm gender Tepllyux, operating instructions
After the installation of the system, the warm floor cannot be operated less than 28 days after all the work is completed. After this period, the heat regulator is included and indicate the desired temperature in it. During the first inclusion, it is recommended to indicate the maximum temperature, and after warming up the room, reduce it to the desired level.
At the first use of the system, the floors warm only after a while. This period in some cases is 8 hours, and in some cases reaches 48 hours. Such a prolonged warming period is especially characteristic of new buildings that are not yet connected to the main heating systems.
![]()
StrPort construction portal 2011-2018. Articles about repair, construction, building materials.
Copying information from the site is possible only with permission of the editorial office Or indicating a direct link to the source. Legal justification