Many of us neglect new building materials, and do it in vain! Bright ...
|
|
Panel housing construction is widespread during the construction of multi -storey ... |
The question of whether to warm your housing often becomes relevant before the cold. AT... |
DIY

Half -smoked floor screed is a method that is based on the use of a dry construction mixture based on cement with various additives that enhance the design of the screed and make it strong and strong. This method of leveling the floor is in much greater demand among the population, since it can significantly reduce the terms for the performance of tightening, and in terms of complexity it is largely inferior to the classical concrete screed.
Content
- The advantages and disadvantages of the semi -dry method of tightening the floors
- Methods of laying half -dry screed
- Preparatory work
- Preparation of the solution
- Laying a half -dry screed and its grinding
- Approximate cost of alignment of floors with the method of semi -dry screed
The advantages and disadvantages of the semi -dry method of tightening the floors
Before you rush to the store behind a dry mixture for screed, read the advantages and disadvantages of this method of aligning the floors.
Advantages:
- The cost of a dry screed is much lower than its wet analogue.
- Additional floor leveling is not required.
- During the work on pulling the floor, water is not used, which means that the possibility of its course on the lower floors is completely excluded.
- The porous structure of the semi-dry cement screed increases the sound and thermal insulation in the room.
- After the screed dries on its surface, defects and cracks are not formed, which are often so characteristic of concrete analogues.
Disadvantages of half -dry screed:
If we talk about the classic half -dry screed, which is carried out with your own hand, then this technique has no shortcomings, but if you recall the mechanized method of tightening the floors, then there is one, but a very fat minus, the high cost of work associated with the delivery of the mixture to the destination and its rise to floor with flexible pipes.
For greater clarity, see the calculation of a half -dry screed for an apartment of 50 sq.m.
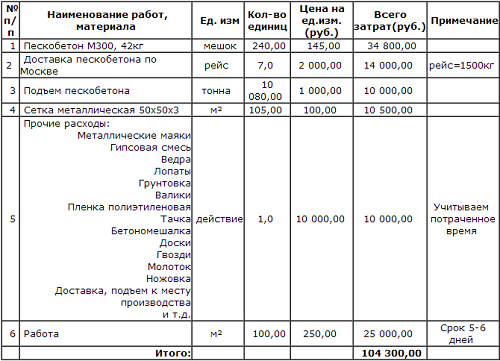
The mechanized half -dry floor screed, of course, is performed a little faster than the traditional one, but if you have chosen this method, then be prepared for decent costs.
Methods of laying half -dry screed
- A screed without a substrate. This technology of half -dry screed provides for its installation directly on the concrete base.
- A floating screed with a plane of polyethylene. Why floating? Yes, it just will not adhere to concrete and walls.
- A screed with a sound insulation substrate. This method involves laying special soundproof membranes on top of a fresh screed, which, in combination with foamed polyethylene, give an excellent result.
- A screed with a heat -insulating substrate is used in apartments located on the first floors, or in private houses. It is also advisable to mount such a screed in apartments, the temperature regime of which is disturbed due to the design features of the building. A mineral wreck is used as a heat -insulating material.
In this article, we will consider the technology of laying a floating half -dry screed with a fiber -fiber component, which allows you to tighten the floor as soon as possible, since the installation of a reinforced mesh will not require the design of the structure.
Preparatory work
Stage 1. Cleaning the base
First of all, it is necessary to remove all the garbage and dust. It is advisable to remove the latter with a powerful vacuum cleaner. If there are irregularities on the surface of the base of the floor, they need to be cleaned with a skin, and if you notice more serious defects, like a hole, cracks, cracks, then they should be sealed with a non -shaped cement mortar.
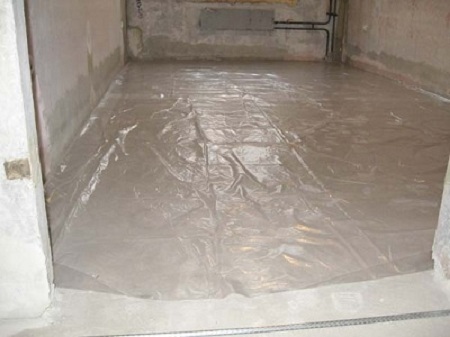
Stage 2. Laying waterproofing
As a waterproofing material, you can take an ordinary polyethylene film with a thickness of at least 200 microns, or you can use the special material of isonon, which, in addition to reliably protects the base of the floor from moisture, also has high heat and soundproofing properties.
In principle, it doesn’t matter what you choose both polyethylene, and isonon will provide your screed with the level of strength that it needs.
The film is laid directly on the cleaned surface of the floor with a solid canvas, no joints and allowances are allowed. The size of the material should slightly exceed the area of \u200b\u200bthe room so that part of the film enters the walls by about 20 cm.
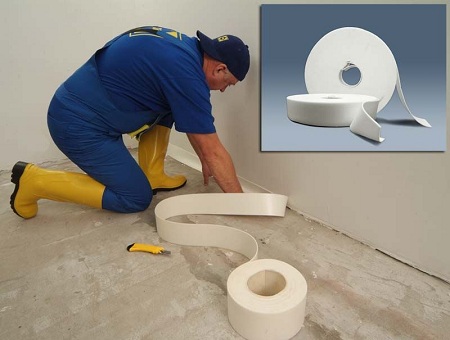
Stage 3. Wall preparation
Yes, you were not mistaken! The walls also need to be carefully prepared before laying a half -dry screed. For insulation of walls, columns and other architectural elements, a damping tape is used, which has a sticky wrong side. Such a tape is glued around the entire perimeter of the room, and its upper boundary should pass just above the future screed.
Thanks to the insulating tape, the screed will not crack during drying, it will not be terrible and the consequences of the compression-compression processes of the walls and it can even completely exclude various damage to the screed in the places of its connection to the walls.
At the end of the installation of a half -dry screed, the remnants of the tape protruding outside the surface of the floor are simply cut by a clerical knife.
Stage 4. Setting beacons
This is the most difficult stage of all, because here you have to make the most accurate calculations and measurements. Although, if you have a laser level, then you can handle this work for one or two.
So, let's get down. To begin with, install a laser level in the center of the room. Then, having chosen arbitrarily a place against any wall, tighten the self-tapping screw into the floor (the screw length should be at least 8-10 cm). Having set the rule or something else similar to it to a self-tapping screw, make a marker a mark in the place where the laser beam crosses the rule (the zarusk must be made directly on the rule).
Next, tighten the second self -cut through the opposite wall and put the rule on it again. Check that the laser beam crosses the rule in the same place where you drew a mark. If the lines do not coincide, simply adjust the self -cutting by twisting it or vice versa to twist it until your zaruba is a flush with a laser line.
Thus, it is necessary to mark the entire area of \u200b\u200bthe room, setting at least 10-15 screws: at the walls and in the center.
Now you can start setting beacons. You can make them directly from the cement mortar (if your screed is not too thick) or use special T-shaped rails that are sold in each construction store.
Let us consider in more detail both options.
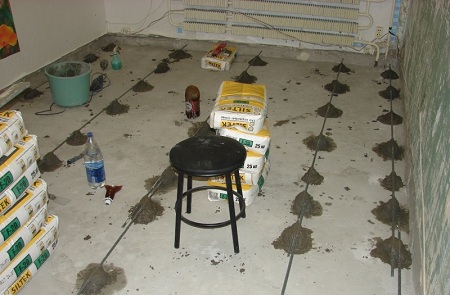
Cement mortar beacons
Take a little solution and lay it between two screws in the form of a small ridge. On top of the cement heap, put a strip of wide tape and with the help of the rule, press the mixture until it stops into the screws. The lighthouse is ready, but it is still quite unstable, so you need to give him time to dry. After the solution dries completely, you can remove the tape.
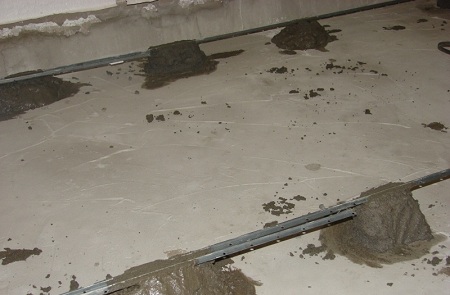
Lighthouses from T-shaped rails
If you decide to use this method, then the distance between the screws should be approximately 50-60 cm. This is necessary so that the rails do not sag under the rule.
Adding, if necessary, self -tapping screws, prepare the same cement mortar. Then put it directly on the screws in the form of small piles, and install the T-shaped rail with the smooth side down on top. Press it all the way and check the correctness of your actions. Thus, lay all the beacons on piles of cement and wait until they dry.
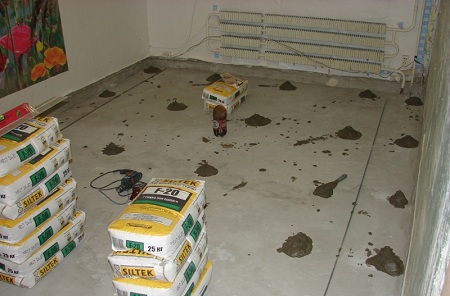
Preparation of the solution
There are already ready -made dry mixtures for the floor screed, but if you do not have the opportunity to buy them, then it is quite possible to limit yourself to a solution of your own manufacture.
For this you will need:
- Portland cement of the M-400 brand
- River sand
- Fiber -fiber
- Plasticizer
You can prepare material for a semi -dry screed both in the mixer and in any capacity of a suitable size.
First, river sand (about 120-140 l), then fibrovolin (for this amount of sand about 130 g), then cement (50 kg) and water (14-17 l) is filled. If you do not have such a large capacity at your hands, you can take the smaller one, but at the same time observe the following proportions:
- cement 1 part
- river sand 3-4 parts
- fiber-fiber 600-800 g per 1 cubic meter. m mixture
- plasticizer 1 liter per 100 kg of cement
Water must be added by eye, just do not overdo it. To check the quality of the mixture, take it a little in the hand and squeeze it into a fist. If after this moisture was released, then there is a lot of water, if the lump turned out dense and broke up after the fingers clenched, then the solution is prepared correctly.
There is, of course, there is a lot, it is easier to buy a ready -made half -tight KNAUF screed, which meets all quality standards and not to bother once again.
Laying a half -dry screed and its grinding
So, everything is ready for you to finally start laying the solution. The lighthouses are exhibited, the mixture will not wait for its time, and the combat mood. So it's time to battle!
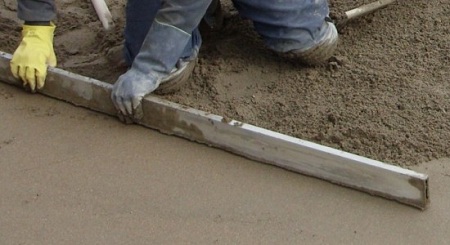
Filling the mixture of a small area between the two beacons, begin to pull it with the rule on yourself and left-right. If it is not very clear how it is, watch the video plot in which everything is intelligibly explained.
Keep in mind that the lighthouses will remain in the solution forever, so do not be afraid to close them with the mixture and remember the main value of the total thickness of the screed should be no more than 40 mm, and its minimum thickness in separate areas should be at least 30 mm.
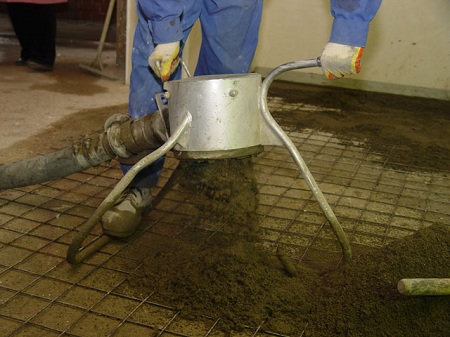
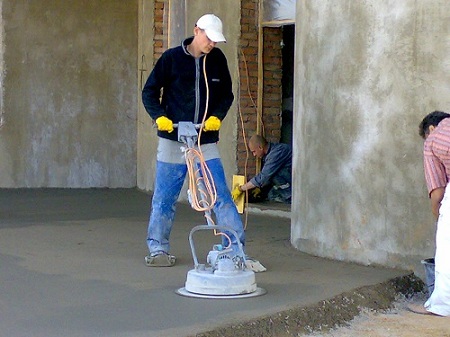
Having finished laying the mixture, it is necessary to immediately start its grout. If the room is large enough, then all the work on leveling the floor should be carried out at least together: one lays the solution and smooths it, the other produces a fresh screed. The grout should be carried out no earlier than 20 minutes and no later than 6 hours after the start of laying the screed
Grinding (grinding) is carried out using a special grouting machine equipped with aligning metal disks of different granularity. At the same time, this device compacts the mixture, making it denser and stronger.
Approximate cost of alignment of floors with the method of semi -dry screed
The price of a mechanized screed includes: the cost of materials, tools, delivery of the mixture to the destination, its rise to the floor, payment of the master, rental (if necessary) with a grinding machine.
This table shows prices for a half -dry screed, depending on its thickness and number of storeys:
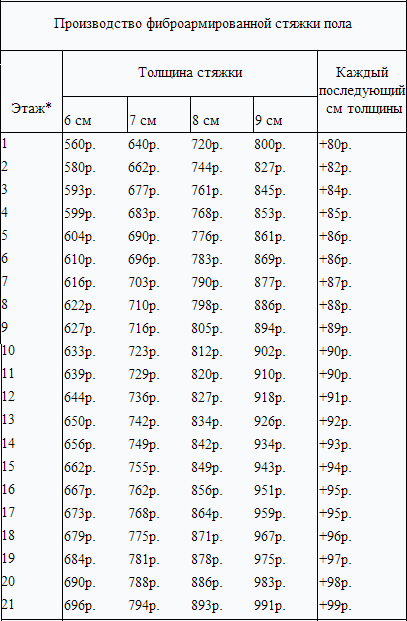
If you do all these works yourself, then the half-screed of the floor, the price is more true, will be about 5-6 times lower.
As you can see, to align the floor with your own hands is quite possible and yourself. The main thing is to know the basic requirements for one or another type of screed. You will definitely cope with half -dry!
![]()
StrPort construction portal 2011-2018. Articles about repair, construction, building materials.
Copying information from the site is possible only with permission of the editorial office Or indicating a direct link to the source. Legal justification
there is a professional screed
professional Siegage is a brigade
Murat
There is a team of screeds
There is a team of solids ProfiSionals. More than 5 years
Call 89295067707
Murat